MCP Server + Asgardeo
Asgardeo를 사용하여 클라이언트 인증 및 연결을 처리하는 샘플 MCP 서버입니다.
문서
Model Context Protocol (MCP) Server + Asgardeo
This is a sample Model Context Protocol (MCP) server that supports remote MCP clients to connect and authenticate using Asgardeo.
Asgardeo authenticates users accessing the MCP server and allows you to control tool access based on application-level and organization-level permissions defined for each user.
The MCP server is powered by Cloudflare Workers:
- Acts as OAuth Server to your MCP clients
- Acts as OAuth/OIDC Client to your Asgardeo organization
Getting Started
Before you start make sure you have the following prerequisites:
- Asgardeo account.
- Install Node.js version 18.x or higher on your system.
- A Cloudflareaccount for deployment
Configure Asgardeo
First, sign into Asgardeo console and navigate to Applications > New Application.
Then, select Traditional Web Application and complete the wizard popup by providing the following given name and the authorized redirect URL.(Ensure that the protocol remains set to OpenID Connect (OIDC).)
- Application Name : CloudflareMCPServer
- Authorized redirect URL : http://localhost:8788/callback
Note - The http://localhost:8788/callback is only used during the local testing, the callback URL from Cloudflare deployment will be added at a later stage.
Make a note of the following values from the Protocol and Info tabs of the registered application.
- client-id from the Protocol tab.
- client-secret from the Protocol tab.
- Your Asgardeo organization name
Local Development and Testing
Clone the repo directly & install dependencies using the following given instructions.
# Clone the repository
git clone https://github.com/sagara-gunathunga/cloudflare-mcp-asgardeo

# Move to the demo project directory
cd demo-mcp-server

## Install dependencies
npm install
Next, create a .dev.vars file in your project root with the following values.
# .dev.vars
ASGARDEO_CLIENT_ID=<client-id from the previous step>
ASGARDEO_CLIENT_SECRET=<client-secret from the previous step>
ASGARDEO_BASE_URL=https://api.asgardeo.io/t/<Asgardeo organization name>
ASGARDEO_SCOPE=openid profile email roles
Develop & Test
Run the server locally to make it available at http://localhost:8788
npm run dev
To authenticate with Asgardeo, you must first have a user account created. If you haven’t done so already, follow this guide to create a user in Asgardeo.
Next, start MCP Inspector locally using the following command.
npx @modelcontextprotocol/inspector
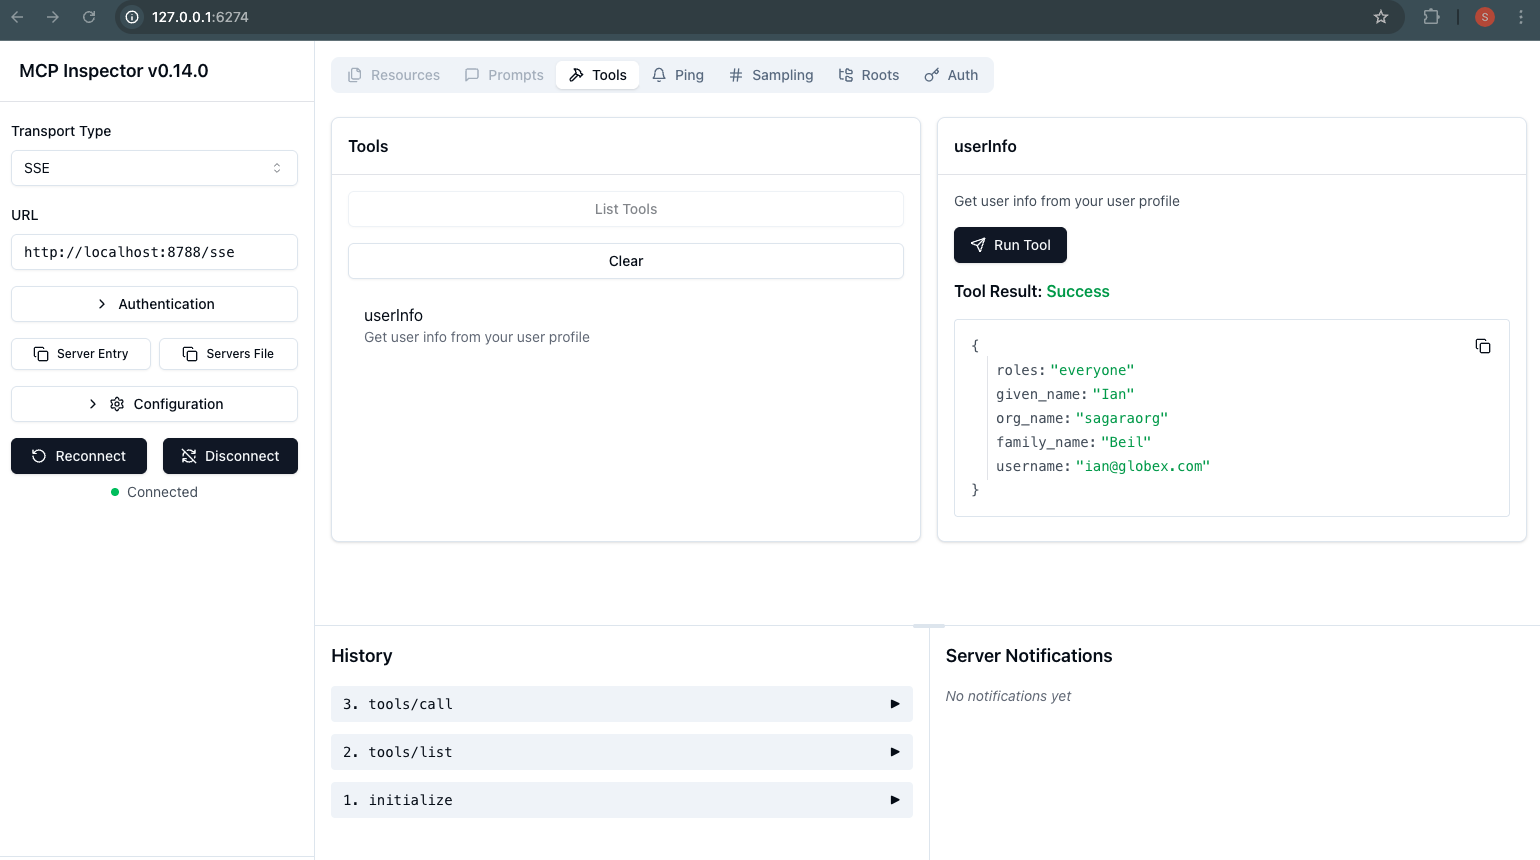
To test the local server, switch the Transport Type to SSE and enter http://localhost:8788/sse in the Inspector and hit connect. Once you follow the prompts, you’ll be able to authenticate with Asgardeo and use features such as “List Tools” in the Inspector. When you invoke the userInfo tool, you should see results similar to the example shown in the screenshot below.
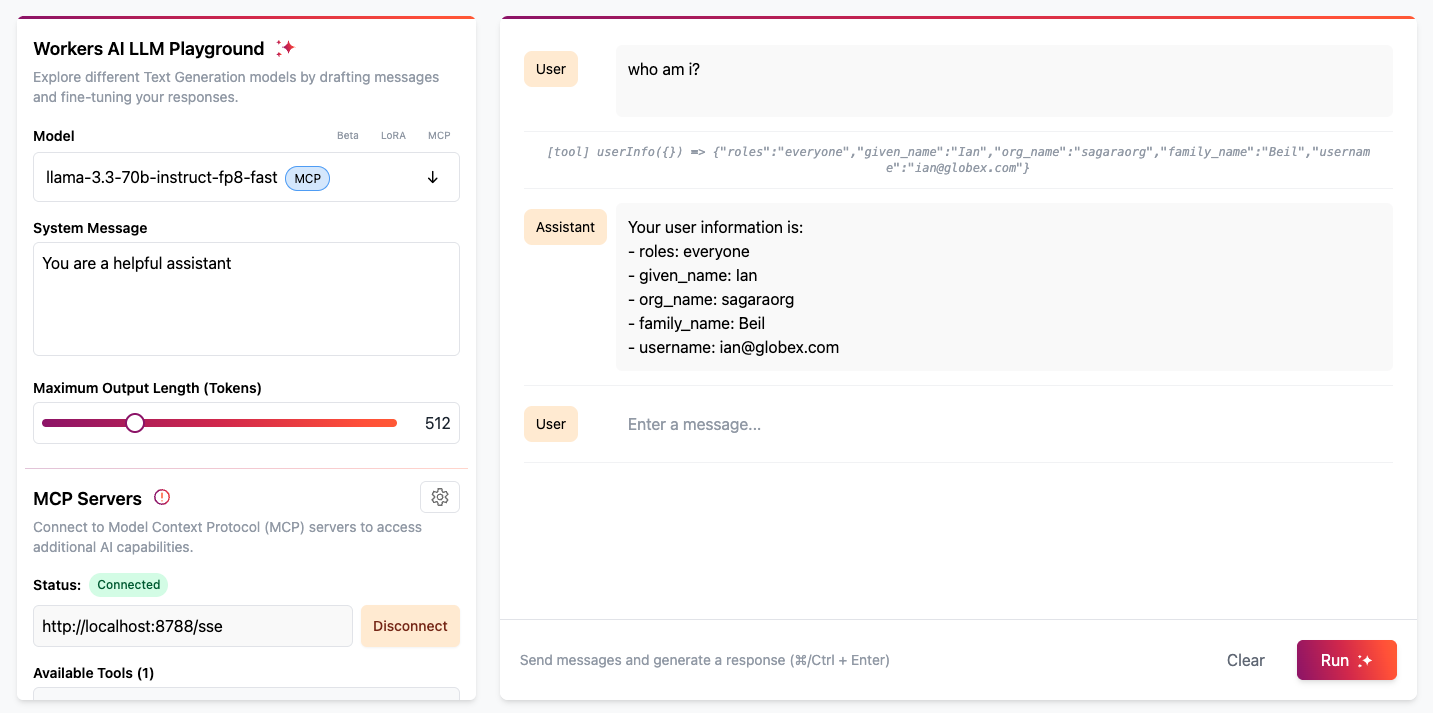
Alternatively, you can test using the Cloudflare Workers AI LLM Playground.
Simply enter http://localhost:8787/sse as the MCP server URL and click Connect. This will redirect you to the Asgardeo login page. Once you've completed the login process, you’ll be able to interact with the LLM in the Playground and use the tools defined in your MCP server.
For example, try asking the LLM: “Who am I?”
Deploying to Cloudflare
First, create a KV namespace in Cloudflare using the following command.
npx wrangler kv namespace create OAUTH_KV
Make sure to update wrangler.jsonc file with the id value received after running the above command.
"kv_namespaces": [
  {
    "binding": "OAUTH_KV",
    "id": "<your-kv-id>"
  }
],
Then, set the following secrets via Wrangler by running the following commands.
npx wrangler@latest secret put ASGARDEO_CLIENT_ID
npx wrangler@latest secret put ASGARDEO_CLIENT_SECRET
npx wrangler@latest secret put ASGARDEO_BASE_URL
npx wrangler@latest secret put ASGARDEO_SCOPE
npx wrangler@latest secret put COOKIE_ENCRYPTION_KEY # add any random string here e.g. openssl rand -hex 32
You can use the values stored in .dev.vars file with the above command.
Deploy & Test
Deploy the MCP server to make it available on your workers.dev domain.
npx wrangler@latest deploy
Make a note of the newly created Cloudflare Worker URL, which is printed as output when you run the deployment command. You can also find this URL by logging into the Cloudflare web console. The Worker URL typically follows this format:https://remote-mcp-asgardeo.<your-subdomain>.workers.dev
Next, you need to configure a callback URL using the above Worker URL. The complete callback URL should take the following format.
https://remote-mcp-asgardeo.<your-subdomain>.workers.dev/callback
To set it up:
- Log in to the Asgardeo Console.
- Navigate to the application you created.
- Go to the Protocol tab.
- Add above value into Authorized redirect URLs so that Asgardeo can recognize it as a valid redirect URL.
The connection URL of the MCP server that we deployed into Cloudflare take the following format.
https://remote-mcp-asgardeo.<your-subdomain>.workers.dev/sse
To test the remote server, switch the Transport Type to SSE and enter https://remote-mcp-asgardeo.<your-subdomain>.workers.dev/sse in the Inspector and hit connect. Once you follow the prompts, you’ll be able to authenticate with Asgardeo and use features such as “List Tools” in the Inspector. When you invoke the userInfo tool.
Alternatively, you can test using the Cloudflare Workers AI LLM Playground.
Simply enter https://remote-mcp-asgardeo.<your-subdomain>.workers.dev/sse as the MCP server URL and click Connect. This will redirect you to the Asgardeo login page. Once you've completed the login process, you’ll be able to interact with the LLM in the Playground and use the tools defined in your MCP server.
For example, try asking the LLM: “Who am I?”
Using Cursor and other MCP Clients
To connect Cursor with your MCP server, choose Type: "Command" and in the Command field, combine the command and args fields into one (e.g. npx mcp-remote https://<your-worker-name>.<your-subdomain>.workers.dev/sse).
Note that while Cursor supports HTTP+SSE servers, it doesn't support authentication, so you still need to use mcp-remote (and to use a STDIO server, not an HTTP one).
You can connect your MCP server to other MCP clients like Windsurf by opening the client's configuration file, adding the same JSON that was used for the Claude setup, and restarting the MCP client.
Access Control
This MCP server uses Asgardeo for both authentication and access control.
- All authenticated users have access to the
userInfotool. - Users with the
managerrole can access thegetDirectReporteestool. For others, this tool will not be visible.
To support this role-based access scenario, Asgardeo returns user roles for authenticated users, allowing the MCP server to evaluate permissions accordingly.
To try this out:
- Create a new role called
managerin Asgardeo. - Assign the role to a user by following this guide.
- Ensure that user roles are configured to be returned as attributes in the ID token or user info endpoint by following the relevant configuration instructions here.
Access the remote MCP server from Claude Desktop
Open Claude Desktop and navigate to Settings -> Developer -> Edit Config. This opens the configuration file that controls which MCP servers Claude can access.
Replace the content with the following configuration. Once you restart Claude Desktop, a browser window will open showing your OAuth login page. Complete the authentication flow to grant Claude access to your MCP server. After you grant access, the tools will become available for you to use.
{
  "mcpServers": {
    "math": {
      "command": "npx",
      "args": [
        "mcp-remote",
        "https://mcp-github-oauth.<your-subdomain>.workers.dev/sse"
      ]
    }
  }
}
Once the Tools (under 🔨) show up in the interface, you can ask Claude to use them.