SharedBrief
選択したAI作業からクライアント提案書、プロジェクト更新、意思決定ブリーフを作成し、アクセス制御付きの安定したリンクを公開し、OAuth認証済みのリモートMCPサーバーを通じて読者のアクティビティを確認します。
ホスト型 MCP サーバー
npx add-mcp 'https://www.sharedbrief.com/mcp'Claude Code、Codex、Cursor などにインストールできます
ドキュメント
Your AI. Your brief.
Start with a private draft, review it, then choose who can read the published link.
SharedBrief server URL
https://www.sharedbrief.com/mcp
Sign in to your SharedBrief account during connection and review the access requested. Connection instructions do not establish directory approval or verified compatibility. Platform availability and account permissions vary.
Set up yourself or let your agent help.
Follow the numbered steps below, or copy the instructions into an agent with browser or computer control. For Cursor, an agent with file access can help. You’ll still sign in and approve access yourself.
ChatGPT
Screenshots show the setup menus and fields. Click an image to open it full size. Your app may look different depending on your plan and version.
- Open ChatGPT in your browser and sign in to the account or workspace you want to use.
- Open Plugins from the sidebar and check your Personal or installed plugins for an existing SharedBrief connection. If your account uses the Apps interface, open Settings → Apps or Workspace settings → Apps instead.
- In Plugins, choose Add → Add custom MCP server. In the Apps interface, enable developer mode under Advanced settings where permitted, then choose Create. If these controls are unavailable, check the official guide below or ask your workspace admin for access.
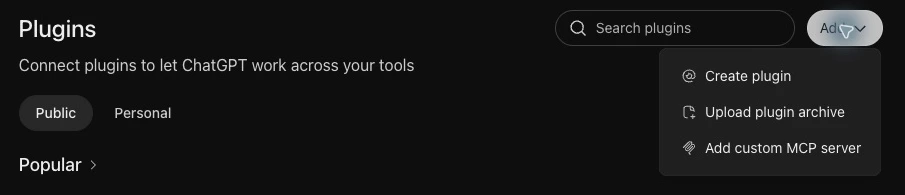 In the Plugins interface, click Add, then Add custom MCP server. Click to enlarge.
 - Enter SharedBrief in the Name field. The icon and description are optional.
- Enter https://www.sharedbrief.com/mcp as the MCP server URL and choose OAuth authentication.
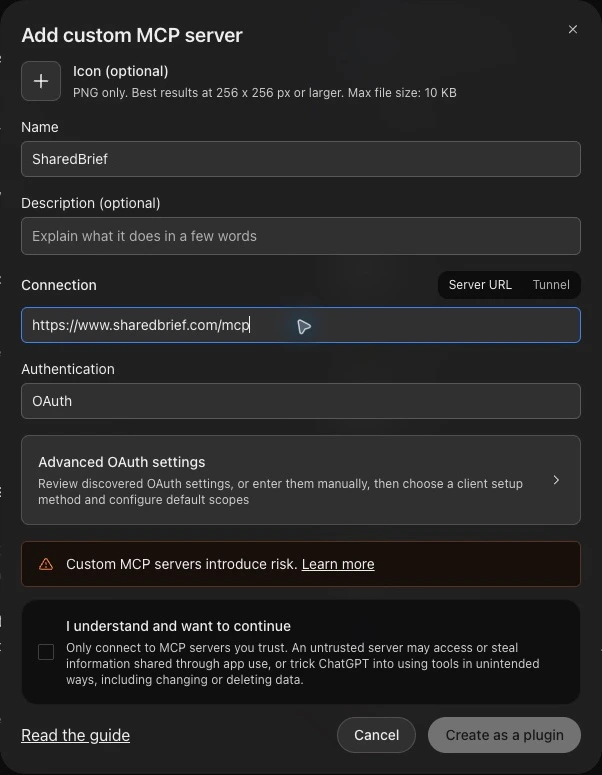 Enter SharedBrief and the server URL, and leave Authentication set to OAuth. Review the notice before choosing Create as a plugin. Click to enlarge.
 - Review the custom-server notice. If you agree, check I understand and want to continue and choose Create as a plugin. In the Apps interface, follow Scan Tools and Create. Complete SharedBrief sign-in and review and approve the requested access when prompted.
- Open a new chat and select SharedBrief from the plugins, apps or tools menu.
- Ask ChatGPT to list your SharedBrief briefs to check the connection. An empty list is fine if you have no briefs yet.
These screenshots show the ChatGPT web Plugins interface. Some accounts use the Apps interface instead. Creating and publishing briefs needs write actions; your plan and workspace controls must permit them. Settings and availability vary. See OpenAI’s developer mode guide for current settings and eligibility.
Claude
Screenshots show the setup menus and fields. Click an image to open it full size. Your app may look different depending on your plan and version.
- Open Claude and sign in to the account you want to use.
- Open Customize → Connectors and check whether SharedBrief is already connected.
- Choose + Add → Add custom connector. For Team or Enterprise accounts, an organization owner may need to add it first in Organization settings → Connectors.
 Select Connectors, click + Add, then choose Add custom connector. Click to enlarge.
 - Name the connector SharedBrief and enter https://www.sharedbrief.com/mcp as the remote MCP server URL. Choose Continue.
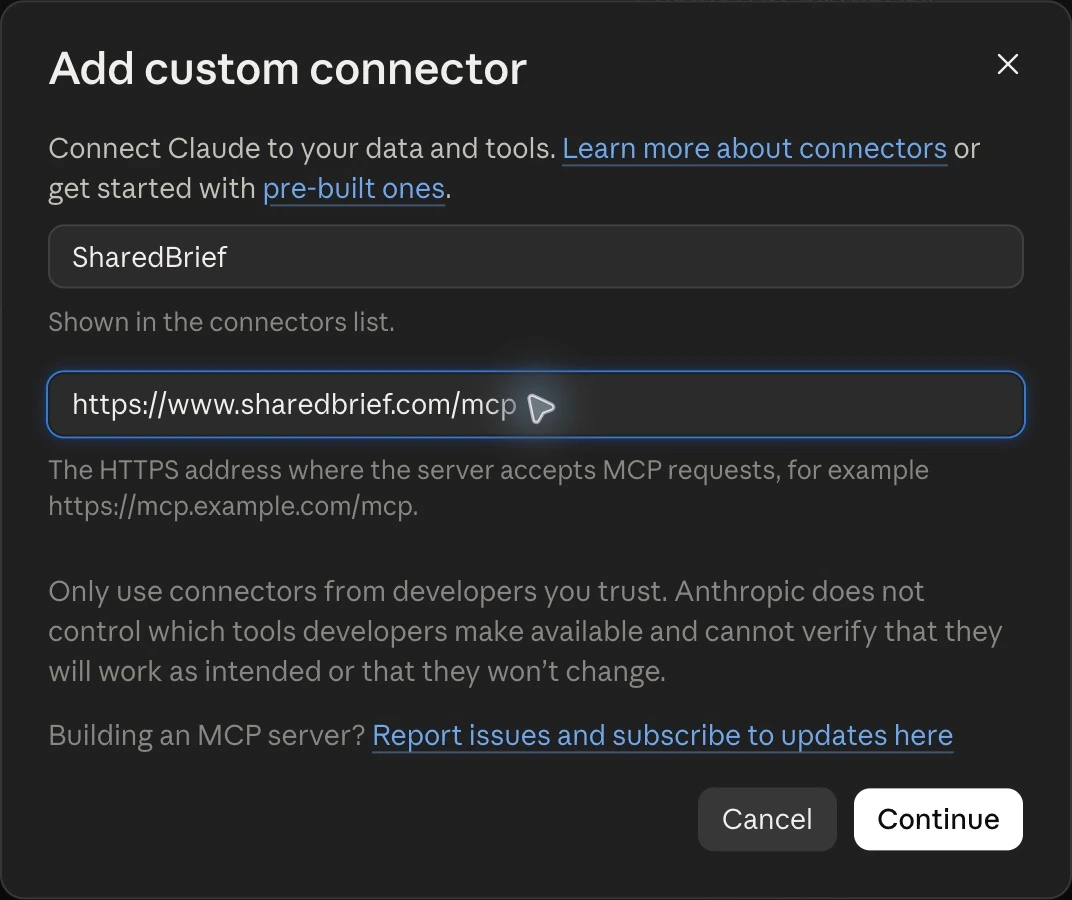 Enter SharedBrief as the name and paste the server URL, then click Continue. Click to enlarge.
 - Review the detected authentication settings. Choose Sign in now and follow the recommended OAuth setup offered by Claude.
- Finish adding the connector. Choose Connect if prompted, sign in to SharedBrief, and review and approve the requested access.
- Open a conversation and enable SharedBrief from the + menu → Connectors.
- Ask Claude to list your SharedBrief briefs to check the connection. An empty list is fine if you have no briefs yet.
Custom connector access depends on your Claude plan and organization permissions. See Claude’s custom connector guide for current settings and eligibility.
Cursor
- Open Cursor. Decide whether SharedBrief should be available in every project or just the current project.
- For every project, open ~/.cursor/mcp.json. For this project only, open.cursor/mcp.json. Create the file if it does not exist.
- Check for an existing SharedBrief entry. Otherwise, merge the configuration below into mcpServers, preserving all other servers and settings.
- Save the file and open Cursor’s MCP settings. Check that SharedBrief appears; refresh or restart Cursor if it does not.
- Choose the sign-in or Connect option for SharedBrief. Complete OAuth sign-in in your browser, review the requested access, and approve it.
- Return to Cursor and enable SharedBrief if prompted.
- Ask Cursor’s agent to list your SharedBrief briefs to check the connection. An empty list is fine if you have no briefs yet.
{
  "mcpServers": {
    "SharedBrief": {
      "url": "https://www.sharedbrief.com/mcp"
    }
  }
}
An agent with file access can help edit the configuration. These steps do not require a marketplace installation. See Cursor’s MCP documentation for current settings and eligibility.
Muse
- Open Muse and sign in to the account you want to use.
- Open Settings → Connectors and look for SharedBrief.
- If SharedBrief is listed, select it and choose the connection option.
- Follow the sign-in prompts, sign in to SharedBrief, and review and approve the requested permissions.
- Return to Muse and ask it to list your SharedBrief briefs to check the connection.
- If SharedBrief is not listed, stop here and use another AI connection from this guide. We do not have a verified manual connection path for Muse.
SharedBrief’s current Muse listing availability has not been confirmed. Muse’s official guidance says approved connectors are discoverable in Settings → Connectors. See Muse’s connector guidance for current settings and eligibility.
Sharing and reader activity
Anyone-with-the-link access is unlisted and opens without an account. Verified-reader and specific-email access require readers to sign in with a verified email. A link never overrides its access settings.
Published updates keep the same brief URL. Owners can see visits, approximate time on page, broad device type and approximate location where available. Verified readers appear by email address; anonymous visitors remain anonymous. Estimated views deduplicate repeat views from the same browser on the same day and do not represent a count of people.
Unpublishing removes access to the hosted page. People may retain content they already copied. Deleting removes the brief and its view records.
What you can create
Briefs support headings, paragraphs, lists, tables, quotes and links. Images, file imports and interactive HTML are not currently available. You can publish up to 10 briefs; each document can contain up to 100 KB of text.
Create your brief in a connected AI app, then preview and share it in your briefs. If a connection fails, check that you can sign in to SharedBrief, then reconnect from your AI platform.
SharedBrief is operated by SnuffleLabs LLC. Need help? Email support@sharedbrief.com.