Plonk
您的代理可驅動的 Mac 視窗管理程式。貼齊區域、已儲存工作區、保持喚醒、螢幕截圖與裝置端 OCR — 19 個 MCP 工具,橋接至您自己機器上的回環 API。無帳號、無雲端、無遙測。
文件
Plonk
A toolbox for your Mac, behind one menu bar icon.
Windows, workspaces, screenshots, OCR, a ruler, keep-awake, pointer tools,
shortcuts, voice and agents — native, local and modular.
To plonk is to set a thing down exactly where it belongs.







One app instead of eight menu bar icons
Plonk is a small suite of macOS tools that share one interface, one command palette and one automation surface. Use all of it, or switch off every module you do not need.
Capture and understand the screen. Take a region, window or full-screen screenshot, annotate it, pin a live crop, copy otherwise unselectable text with on-device OCR, or measure an interface in points and pixels.
Keep the Mac and your workflow moving. Hold sleep off until a timer, time of day or process exit; find the pointer, add crosshairs or click rings; inspect the front app's real shortcuts; and run anything by name from one palette.
Arrange the desk. Draw snap zones, save workspaces that remember each monitor, move windows by drag, shortcut or voice, and let app rules put new windows where they belong.
Let an agent use the same tools. Plonk ships an MCP server and CLI for layouts, workspaces, screenshots, OCR, measuring, keep-awake and the rest. The app stays the source of truth, and the whole surface remains on your Mac.
It is early. Version 0.4.x, one author. Shortcuts, zone files and workspaces are settled. The MCP tool names and the HTTP API are not, and can still change between minor versions. CHANGELOG.md says what moved.
Install
macOS 13 or newer, Apple silicon.
brew install --cask ostapondo/plonk/plonk
Grant Accessibility when it asks, then relaunch. Screen Recording is asked for separately, the first time you capture. Nothing else: no Full Disk Access, no Automation, no Keychain.
Plonk is signed but not notarized, so macOS holds a copy you download by hand. The cask takes care of that for you.
Running it alongside Rectangle or Magnet is fine, as long as their shortcuts do not collide.
Checking what you downloaded. Notarizing an app means paying Apple for a developer account, and this project does not have one, so Plonk is signed with a certificate it made itself. That means macOS cannot tell you who built the app. There is a check that answers a more useful question, and you can run it yourself: was this exact file built by GitHub from the source in this repository?
gh attestation verify Plonk-<version>.zip --repo ostapondo/Plonk
Put the number from the file name in place of <version>. The command comes
with the GitHub CLI, which is brew install gh. It
prints the commit and the workflow run that built the archive. If the file was
altered after it was built, or was not built from this repository at all, the
command fails and tells you so.
Every release also carries a small Plonk-<version>.zip.sha256 file. Put it
beside the zip and run shasum -a 256 -c Plonk-<version>.zip.sha256 to confirm
the download arrived complete and unchanged. That file is signed the same way
as the zip, so gh attestation verify works on it too. The attestation itself
is also on the release as Plonk-<version>.zip.sigstore.json, for anyone who
wants to check it offline with gh attestation verify --bundle or with
cosign instead of asking GitHub.
Installing by hand, Intel Macs, tiling managers, and removing it
Why macOS holds a downloaded copy. The certificate is self-signed rather than an Apple Developer ID, because notarizing needs a paid Apple account and this project does not have one. macOS cannot vouch for who built it, and says so. The cask skips that check by clearing the quarantine flag for you.
That is a check skipped on your behalf, so here is a stronger one to run before you open anything:
gh attestation verify $(brew --cache)/downloads/*--Plonk-*.zip \
  -R ostapondo/plonk
It prints the commit and the GitHub Actions run that built this exact archive. Apple's stamp would tell you a build passed a malware scan. This tells you the binary came from the source in this repository, with no laptop in between.
Without Homebrew. Download the latest release, unzip, drop Plonk.app into Applications, then clear the flag yourself, which is all the cask does:
xattr -dr com.apple.quarantine /Applications/Plonk.app
Or do the Gatekeeper detour once: open Plonk, dismiss the warning, then System Settings, Privacy & Security, scroll to Security, Open Anyway.
If you move or rename Plonk.app later, macOS ties the old grant to the old path and windows of newly launched apps stop being seen. Remove Plonk from Privacy & Security, Accessibility, and grant it again.
On an Intel Mac. Releases are built for Apple silicon only, so the download will not run. Building from source ought to work, see Build, but nobody has tried it and a report either way is welcome in issues.
Next to a tiling manager. yabai and Amethyst own every window on screen and will pull windows straight back out of a zone. Run one or the other.
Removing it. brew uninstall --cask plonk, or quit Plonk and drag it to the
trash. Then delete ~/Library/Application Support/Plonk/. The login item goes
with the app, and nothing was written anywhere else.
The tools
The modules share settings, shortcuts, the menu bar, the command palette and the same local API. Turning one off removes its page, menu items, shortcuts, manager and agent routes while keeping its settings for later.
| Screenshots and annotation | Capture a region, window or full screen at native resolution, then add pen strokes, arrows, shapes or highlights before saving |
| On-device OCR | ⌃⌥T copies words from a screenshot, paused video, dialog or locked PDF without uploading a pixel |
| Screen ruler | ⌃⌥R reads clearances and dragged distances in both macOS points and physical pixels |
| Live crops | Pin a changing part of the screen above everything else. It streams live and is never written to disk |
| Pulse | Keep the Mac awake by timer, schedule, open app, charging state or process lifetime. It uses real power assertions and hands sleep back when the session ends |
| Pointer tools | Find the cursor, add configurable crosshairs or click rings, and jump the pointer to the next display |
| Shortcut guide | Read every shortcut the front app actually exposes through its menus instead of relying on a stale cheat sheet |
| Zones and workspaces | Draw window places, save apps and documents as a desk, and return everything to the correct displays. Workspace details |
| Voice, CLI and agents | Run the same tools by name, from speech, the plonk command or twenty-two MCP tools. Recognition for common voice commands stays on-device |
All but the shortcut guide can be switched off, from Tools in the menu bar dropdown or the Tools page. Off means gone: out of the sidebar, out of the menu, its shortcuts released, and its tools refused to agents until it is back on. The same switches cover zones, workspaces and voice, so desk arrangement can stand down while the rest of Plonk keeps running.
If you are coming from Rectangle, Magnet, Loop or Raycast, the familiar window
shortcuts can come with you. One button imports Rectangle bindings and existing
rectangle:// scripts need one substitution. Coming from Rectangle
has the details.
Longer versions: Zones · Workspaces · Hotkeys · Everything else · Coming from Rectangle
For agents
An agent gets the same toolbox as the menu bar: capture or read the screen, measure an interface, control an awake session, inspect the desk, arrange it and save the result.
keep the Mac awake until this build finishes
read the error out of that dialog and tell me what it says
how tall is that toolbar, in points and in pixels
capture this window and highlight the warning
put the browser on the left, then save this desk as "review"
Twenty-two tools cover state, capture, OCR, measuring, keep-awake, layouts, workspaces and zones. Several agents can connect at once, each registering itself, with an optional mode that locks changes to the active one.
Setup, if you want the plonk CLI or an agent driving it (Node 18+):
claude mcp add plonk -- npx -y plonk-mcp   # Claude Code
codex mcp add plonk -- npx -y plonk-mcp    # Codex CLI
In Claude Code it can also be a plugin: same server, pinned to the release it shipped with rather than to whatever npm serves as latest.
/plugin marketplace add ostapondo/plonk
/plugin install plonk@plonk
For Claude Desktop there is nothing to type. Download plonk-<version>.mcpb
from the latest release and open it. The bundle carries the server and
its dependencies, so no config file is edited and nothing is fetched at launch.
Any MCP client works, over stdio or HTTP. One-pagers for Cursor, Zed and Cline.
The same package carries a plonk command, for the things that are neither an
agent nor a settings window:
plonk state                      # screens, zone sets, workspaces, windows
plonk launch review              # a saved workspace
plonk awake while npm run build  # awake for exactly as long as the build
plonk text | pbcopy              # OCR a region into the clipboard
plonk measure 0.5 0.5            # size of what is mid-screen, in points and pixels
For agents has every tool, the multi-agent rules, the HTTP transport and the rest of the CLI.
Privacy
No account, no cloud, no telemetry. The API binds to 127.0.0.1, refuses
anything carrying headers a browser cannot suppress, and is gated on a token
only you can read. The one outbound connection is the update check, which
carries no identifier and can be switched off.
None of that is a claim you have to take on trust. Releases are built and signed on GitHub's runners and ship with an attestation, so the binary on your Mac ties back to the commit it came from:
gh attestation verify Plonk-<version>.zip -R ostapondo/plonk
Check it yourself is every claim above with the command that tests it. SECURITY.md says where each promise stops.
Under the hood
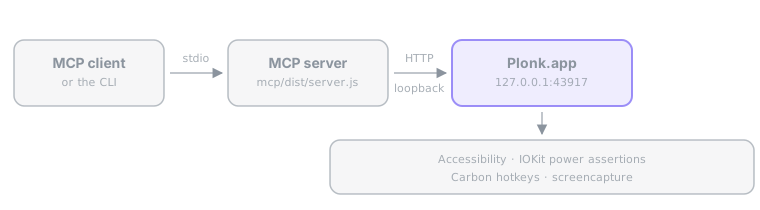
- The app is the single source of truth. The MCP server is a stateless bridge.
App/is the Swift menu bar app,mcp/the TypeScript MCP server.- Config is plain JSON at
~/Library/Application Support/Plonk/config.json.
Build
Seven commands, and they are what CI runs on every pull request. Each line is a subshell, so paste the block from the repository root.
(cd App && swift build)                    # the app compiles
./scripts/test.sh                          # the unit suite
./scripts/lint.sh                          # style rules, no dependencies
(cd mcp && npm ci && npm test)             # the MCP server
node scripts/check-zone-sets.mjs           # the layouts in zone-sets/
node scripts/check-strings.mjs             # every word the user reads
./scripts/check-security-claims.sh         # what SECURITY.md promises
None of that needs a signing certificate. Zone geometry, config decoding, HTTP routing, MCP tools, voice parsing, the CLI and every document here are reachable from that loop, and most changes need nothing more.
Producing a launchable Plonk.app does need one. Make your own once with
./scripts/make-signing-cert.sh, then run ./scripts/build.sh. macOS ties
Accessibility and Screen Recording to the code signature, and an ad-hoc one
changes every build, so a stable certificate is what stops rebuilds from
resetting permissions.
Contributing
Bug reports, zone sets, client one-pagers and code are all welcome. None of them need a signing certificate.
- The smallest useful change is one JSON file.
zone-sets/is a gallery of layouts worth copying: an ultrawide split, a rotated monitor, the one built around a recurring meeting. Draw it in the app, read the numbers out ofplonk state --json, open a pull request. That folder has its own CI job and answers in about twenty seconds. No build, no signing, no Swift. - good first issue issues are written to be picked up cold. Each says where the code is and how to tell it worked, and carries a prompt you can hand to an agent, since AGENTS.md already explains the repo to one.
- needs-hardware is where a request for a desk nobody here has gets tagged, and answering one needs neither Swift nor a certificate. Desk tools meet hardware the author cannot see, so a report from three monitors or an ultrawide is worth more than a patch. An empty list is not a filled gap: open an issue with the arrangement you have and what happened.
CONTRIBUTING.md has the rest, including how long a review takes. Questions and half-formed ideas go to Discussions. A security problem goes through SECURITY.md, not a public issue. Everyone taking part follows the Code of Conduct.
License
MIT © ostapondo