Lasso
Lasso, sunum yaparken ekranınızın üzerine çizim yapmanızı sağlayan küçük bir Mac uygulamasıdır (oklar, daireler, vurgulamalar). Yapay zekâ ajanlarının ekranınızın üzerine çizim yapıp açıklama ekleyebilmesi için yerel bir MCP sunucusu içerir. Tek seferlik 9,99 $, macOS 14+, Apple silicon ve Intel.
Dokümantasyon
Lasso
Lasso is a screen drawing and annotation app for Mac. Highlight text or draw arrows, circles and numbered steps over live apps during presentations, lessons and screen shares. Save annotated screenshots or sketch on an endless whiteboard. Talk while drawing to save a voice brief as searchable Markdown. Lasso’s local Model Context Protocol (MCP) server lets compatible AI agents capture the annotated screen, read your latest voice brief and draw over Mac windows. A one-time payment of $9.99 USD gives you lifetime access to Lasso, with no subscription. Lasso runs on macOS 14 Sonoma or later.
- Website: https://www.trylasso.online/
- Buy: https://www.trylasso.online/buy; download Lasso-1.9.2.dmg (6 MB) after checkout
- Price: $9.99 USD including tax. One-time payment for lifetime access.
- No subscription, account or activation. Anonymous daily usage counts can be turned off in Settings → General.
- Requires: macOS 14 Sonoma or later, Apple silicon and Intel
- Current version: 1.9.2, released 2026-11-11
- Signed with an Apple Developer ID and notarized by Apple
- Made by: Nika Sakandelidze
- Documentation reviewed: 2026-11-10
How it works
- Press ⌥⇧A to start drawing — over any app, on any display. (Change the shortcut in Settings.)
- Circle, highlight, point at or number what matters.
- Press esc. The drawing disappears and your screen is back to normal.
Lasso lives in the menu bar: no Dock icon and no windows to manage. It works over slides, code, browsers, video calls and full-screen apps, and there is nothing to clean up afterwards.
What people use it for
- With AI agents. Circle a detail and attach an annotated screenshot to a chat. Or connect an agent through local MCP to capture the annotated Mac screen, draw over live apps or sketch on a whiteboard.
- In meetings, online or in the room. Circle, highlight and point while you talk — on a call, in a demo, in front of a class — so no one has to hunt for your cursor. Marks are drawn on the screen itself, so they show up in Zoom, Google Meet, Microsoft Teams and screen recordings when you share your whole screen.
- With a colleague or friend. Mark the exact spot, press S, and drop the screenshot in Slack or Messages instead of describing it. Or send a link that opens in any browser.
Drawing tools
Each tool has a one-key shortcut while drawing:
- Pen (P)
- Highlighter (H)
- Arrow (A)
- Line (L)
- Rectangle (R)
- Ellipse (O)
- Text (T)
- Numbered steps (C)
- Laser pointer (F)
- Eraser (E)
Strokes drawn with the pen come out smooth, the highlighter marks text without covering it, and numbered steps count up as you click. There are eight inks (red, orange, yellow, green, blue, purple, white, black) on keys 1–8.
Blur (B): drag over anything you'd rather not show — an email, a password, a chat — to blur it on screen, in your screenshots and in what agents see.
Draw first, then screenshot
Screenshot tools work backwards: capture, open an editor, find the pen, export, paste. With Lasso you mark up your live screen and press S for the whole screen or ⇧S for an area. Each screenshot waits in a stack in the bottom-right corner with every circle, arrow and highlight: hover a card to copy or save it, click it to crop and draw on it with every Lasso tool, or drag it straight into another app.
Share a link
Hover a screenshot and click the link button, or Share Link in the editor. Anyone with the link can open it in a browser for 24 hours — no account and no app needed. The screenshot is encrypted on your Mac before it's uploaded and the key lives only in the link, so not even Lasso can see it. Stop Sharing ends a link early.
Pages and whiteboards
Swipe to start a fresh page — or a whiteboard or blackboard — without losing what you drew; swipe back and it's all still there. Whiteboards are endless: scroll with two fingers (or hold space and drag) to move around, pinch or ⌘-scroll to zoom, ⇧1 to fit everything in view and ⇧0 to go back to 100%.
Pin a drawing to leave it up while you keep working; clicks go through to the apps underneath.
AI agents (MCP)
Lasso is a screen annotation tool for AI agents. Claude Code, Claude Desktop, Cursor and other clients that support local stdio MCP can connect on the same Mac. Core tools include:
capture_screen— see the screen, with anything the user has drawn on itget_screenshot— read the screenshots the user took with Lassoget_brief— read the latest voice brief from the current app session, with its transcript and numbered screen annotationsdraw— draw over live app windows using screenshot coordinates or a visible text labelask,get_answer— ask a question over the relevant app window and receive the user’s answerresolve_mark— add a check mark by a user annotationclear_drawing— remove the agent's marksnew_board,move_board— open a whiteboard page, sketch a diagram on it, and move around or zoom to fit
Lasso asks the user before an agent's first call. The MCP connection is local; an AI client may send the screenshots it receives to its model provider under that client's privacy settings. Settings → Agents has the on/off switch and the setup to copy. This is a local stdio server, not a hosted HTTP endpoint. Its tools do not click or type into other apps.
Claude Code:
claude mcp add --scope user lasso -- /Applications/Lasso.app/Contents/MacOS/Lasso --mcp
Claude Desktop, Cursor and other clients that read an mcpServers config:
{
  "mcpServers": {
    "lasso": {
      "command": "/Applications/Lasso.app/Contents/MacOS/Lasso",
      "args": ["--mcp"]
    }
  }
}
Client setup and tool reference
Privacy
Lasso runs on your Mac and checks for updates about once a day. You can turn off anonymous daily usage counts in Settings → General. Lasso encrypts screenshots on your Mac before sharing them with a link. Drawing needs no permissions. Screenshots, blur and agent screen captures use macOS Screen Recording permission. Voice briefs use Microphone and Speech Recognition permissions and are transcribed on your Mac. Details: https://www.trylasso.online/privacy
FAQ
What is Lasso?
Lasso is a screen drawing and annotation app for Mac. Press Option–Shift–A (⌥⇧A) to draw over your apps. Circle a detail, highlight text or add numbered steps while you present, teach or share your screen. Press Escape to clear the marks.
How do I highlight part of my screen on a Mac?
Open Lasso, press Option–Shift–A (⌥⇧A), then press H to choose the highlighter. Drag across the text or area you want to mark. The highlight is translucent so people can still read what you marked. Share the entire display if you want other people on a call to see it.
How to highlight your Mac screen
How much does Lasso cost?
Lasso costs $9.99 USD including tax. It’s a one-time payment through Paddle for lifetime access to every feature. There is no subscription.
Can I save my screen annotations as a screenshot?
Yes. While drawing, press S to capture the display or Shift–S to capture a selected area. Lasso includes your marks in the screenshot. Click its preview to crop it or add more annotations, then copy, save or share it.
Capture and edit an annotated screenshot
What’s the difference between Lasso and macOS Markup?
Use the Markup toolbar in Preview to add shapes, arrows or text to a screenshot you already took. Use Lasso to draw over a live app, presentation or screen share. You can capture your Lasso marks in a screenshot when you finish explaining.
How to mark up a screenshot with the built-in Mac tools
Do I need an account or a license key?
No. After checkout, download Lasso, drag it to Applications and open it. There is no account, license key, activation or online license check. Bookmark your download page if you want to download again later.
Will it run on my Mac?
Lasso runs on Apple silicon and Intel Macs with macOS 14 Sonoma or later. The Liquid Glass toolbar requires macOS 26 or later. To record a voice brief on macOS 14 or 15, turn on Dictation.
Will people on my call see what I draw?
Share the entire display you’re drawing on in Zoom, Google Meet or Microsoft Teams. Lasso puts marks in a layer over the display, so a single-window or tab share can leave them out. Check your share preview before presenting. Viewers can see your marks without installing Lasso.
Show Lasso marks in a Mac screen share
Can I use Lasso as a screen annotation tool for AI agents?
Yes. Claude Code, Claude Desktop, Cursor and other clients that support local stdio MCP servers can connect to Lasso on the same Mac. They can capture your annotated screen and draw arrows, highlights or numbered steps over app windows. By default, Lasso asks before the first tool call. Your AI client handles the screenshots it receives under its own privacy settings.
Set up Lasso for your AI client
Can I save my screen annotations as searchable Markdown?
Yes. Record a voice brief while you draw. Lasso transcribes speech on your Mac, connects what you said to numbered marks and saves brief.md with annotated screenshots when screen capture is allowed. Lasso keeps the latest 20 brief folders locally. Agents connected through MCP can read the latest brief from the current app session.
Record a voice brief while you draw
Can I show ChatGPT what I circled on my Mac?
Yes. Circle the detail in Lasso, press S to capture the display or Shift–S to capture an area, then attach the screenshot to a ChatGPT or Claude conversation that accepts images. The chat can answer from the image. For arrows or highlights over your live Mac screen, use a client that can connect to Lasso’s local MCP server.
Share a marked-up screenshot with ChatGPT or Claude
Can I use it as a whiteboard?
Yes. Swipe to a whiteboard or blackboard page that goes on forever: scroll with two fingers to move around, pinch to zoom, ⇧1 to fit everything in view. Swipe back and your screen and drawing are still there.
Is it safe to install?
Lasso is signed with an Apple Developer ID and notarized by Apple. Download it from your Lasso purchase page.
Does it need any permissions?
Drawing needs no macOS permissions. Screenshots, blur and an agent’s live screen capture require Screen Recording. Voice briefs use Microphone and Speech Recognition permissions. Agent tools also need permission in Lasso Settings → Agents.
How Lasso uses permissions and handles data
Where do my screenshots go?
Screenshots stay on your Mac in a stack of cards. You can copy one, drag it into another app or save it to a folder. If you choose Share Link, Lasso encrypts the image on your Mac before uploading it. Anyone with the full link can open it for up to 24 hours.
Copy, save or share your screenshot
How do I uninstall it?
Quit Lasso from the menu bar, then drag it from Applications to the Trash.
Guides
How to draw on your Mac screen with Lasso
Lasso is a screen annotation app for Mac. Press Option–Shift–A (⌥⇧A) to draw over the app you are using, then press Escape to clear the drawing. Use it to explain a design, teach a lesson, present a demo or mark up a screenshot without opening an editor first.
By Nika Sakandelidze. Updated 2026-11-07.
Canonical page: https://www.trylasso.online/guides/draw-on-screen-mac
Install Lasso on your Mac
Lasso runs on macOS 14 Sonoma or later, on Apple silicon and Intel Macs. A one-time payment of $9.99 USD including tax gives you lifetime access. There is no subscription, account, license key or activation.
- Buy Lasso from this website. After checkout, download the disk image from your purchase page.
- Open the disk image, drag Lasso to Applications, then open Lasso. Its icon appears in the menu bar.
- Press ⌥⇧A to start drawing. You can change this shortcut in Settings → Shortcuts.
Circle, highlight and point at anything on screen
Choose a tool from the floating toolbar or press its key while drawing. Your marks sit over the apps on your screen. You can draw over a browser, slides, code or a document without changing the original file.
| Action | Key while drawing |
|---|---|
| Pen | P |
| Highlighter | H |
| Arrow | A |
| Rectangle | R |
| Text | T |
| Numbered steps | C |
| Blur | B |
| Laser pointer | F |
| Eraser | E |
| Undo | ⌘Z |
| Clear and finish | Escape |
Take an annotated screenshot
Screenshots and blur need macOS Screen Recording permission because they read screen pixels. Drawing alone needs no permission. A Share Link encrypts your screenshot on your Mac and lets anyone with the full link open it in a browser for 24 hours.
- Draw your arrows, circles or numbered steps on the live screen.
- Press S to capture the display, or Shift–S (⇧S) to select an area. The screenshot includes your marks and omits the toolbar.
- Use the screenshot card to copy, save or drag the image into another app. Click the card to crop it or edit its annotations.
Keep drawing on an endless whiteboard
Press W for a whiteboard or K for a blackboard while drawing. Scroll with two fingers to move around, pinch to zoom, and press Shift–1 (⇧1) to fit the drawing in view. Use the page tabs or arrow keys to return to your other pages. Pin a drawing when you want to keep the marks visible while clicking through to the apps underneath.
Related guides
- Screen highlighter app for Mac
- How to annotate screenshots on a Mac
- Annotate a Mac screen share in Zoom, Meet or Teams
- How to draw on your screen in Google Meet on Mac
- Teach an online lesson with Lasso on your Mac
- Mac Screen Annotation for AI Agents with Local MCP
- Turn Mac screen annotations into searchable Markdown with Lasso
- Best screen annotation apps for Mac, compared by use case
Buy Lasso for $9.99 USD · Privacy
Screen highlighter app for Mac
Lasso is a screen highlighter app for Mac. Draw a translucent highlight over a line of text, part of a slide or a row in a spreadsheet while the app is open. The text stays readable and your original file stays unchanged.
By Nika Sakandelidze. Updated 2026-11-09.
Canonical page: https://www.trylasso.online/guides/highlight-screen-on-mac
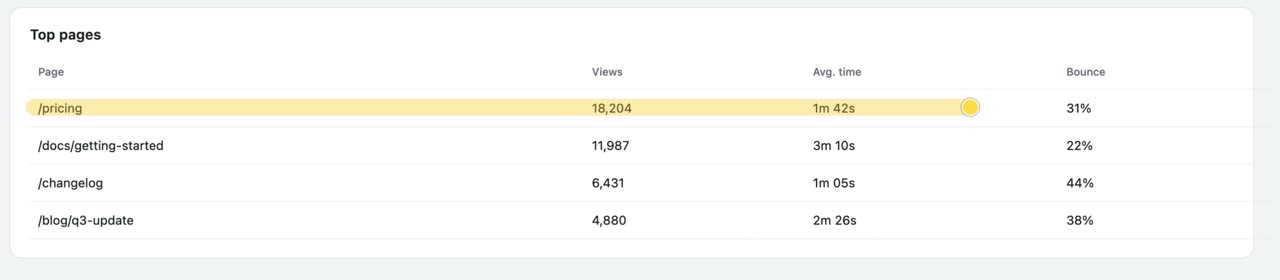
A highlight drawn over a row in Lasso’s live screen demo.
How to highlight part of your screen on a Mac
- Open the slide, web page or app you want to highlight. With Lasso running, press Option–Shift–A (⌥⇧A) to enter drawing mode.
- Press H or choose Highlighter in the toolbar. Drag over the part of the screen you want to mark. Hold Shift while dragging to draw a straight highlight.
- Press Command–Z (⌘Z) to undo the last stroke, or Escape to clear your marks and finish drawing.
Show highlights in Zoom, Google Meet or Teams
Share the entire display you plan to draw on. Lasso puts marks in a layer above the app, so sharing one window or browser tab can leave the highlight out. Check the shared-screen preview before you start presenting.
In a traffic report, highlight a row across the page name and its view count so your audience can read them together. Use the pen to circle a single number, or press F to draw a fading laser pointer stroke when you only need to point for a moment.
Save your screen highlights as a screenshot
While drawing, press S to capture the display or Shift–S (⇧S) to select an area. Lasso includes the highlights in the image, which you can copy, save or drag into a message. Drawing works without Screen Recording permission. Capturing an image requires it.
Mac requirements and price
Lasso runs on macOS 14 Sonoma or later on Apple silicon and Intel Macs. A one-time payment of $9.99 USD including tax gives you lifetime access.
Related guides
- How to draw on your Mac screen with Lasso
- How to annotate screenshots on a Mac
- Annotate a Mac screen share in Zoom, Meet or Teams
- How to draw on your screen in Google Meet on Mac
- Teach an online lesson with Lasso on your Mac
- Mac Screen Annotation for AI Agents with Local MCP
- Turn Mac screen annotations into searchable Markdown with Lasso
- Best screen annotation apps for Mac, compared by use case
Buy Lasso for $9.99 USD · Privacy
How to annotate screenshots on a Mac
With Lasso, you can draw on a live Mac app before taking a screenshot. Press Option–Shift–A to draw, then S to capture the display or Shift–S to capture an area. Click the screenshot card to crop it or add more annotations before you send it.
By Nika Sakandelidze. Updated 2026-11-09.
Canonical page: https://www.trylasso.online/guides/annotate-screenshots-mac
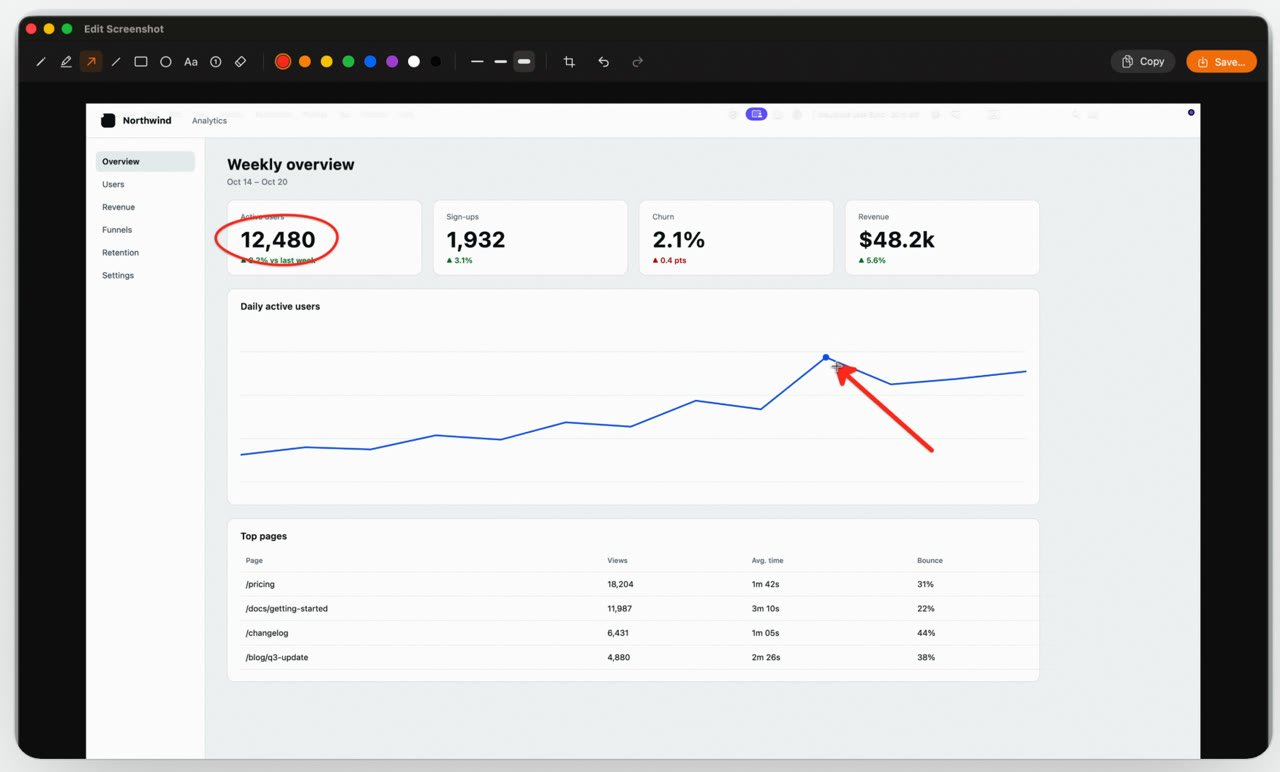
Click a capture in Lasso to crop it or add marks before you copy or save it.
Capture your live screen annotations
The capture includes your marks and leaves out the drawing toolbar. Allow Lasso in System Settings → Privacy & Security → Screen Recording if macOS asks for permission to capture the screen.
- Open the app, document or browser tab you want to show. Press Option–Shift–A (⌥⇧A) to open Lasso’s drawing overlay.
- Press A for an arrow, H for a highlight or C for numbered steps. Click once per step to number a sequence of buttons or fields.
- Press S to capture the display, or Shift–S (⇧S) and drag around the part you want to keep. Include the ends of your arrows and enough of the app to orient the reader.
Crop, label and send the screenshot
Click the screenshot card in the corner to open Lasso’s editor. Use Crop to keep the relevant part of the image, then add an arrow or a short label. Copy the result to paste into a bug report or chat, or use Save to keep a copy on your Mac.
For a link someone can open in a browser, choose Share Link. Lasso encrypts the image on your Mac before uploading it. Anyone with the full link can open it for up to 24 hours.
Example for a bug report
If a save button is hidden on a settings page, include the page heading and the panel where you expected to find the button. Draw one arrow toward the empty space, then put the steps to reproduce the issue in the ticket so they stay searchable.
When the screen contains personal information, crop it out before copying or sharing. Open the final image and check what will be visible to the recipient.
Mark up a screenshot with the tools built into macOS
Use Apple’s built-in Markup for an image you already have. Use Lasso to draw during a live demo or screen share and capture those same marks at the end.
- Press Command–Shift–4 (⌘⇧4) and select an area, or press Command–Shift–3 (⌘⇧3) to capture the screen.
- Click the floating thumbnail to open the screenshot in Markup. If you already saved the screenshot, open the file in Preview and show the Markup toolbar.
- Use Sketch, Shapes or Text to add your note, then save or share the image.
Sources
Related guides
- How to draw on your Mac screen with Lasso
- Screen highlighter app for Mac
- Annotate a Mac screen share in Zoom, Meet or Teams
- How to draw on your screen in Google Meet on Mac
- Teach an online lesson with Lasso on your Mac
- Mac Screen Annotation for AI Agents with Local MCP
- Turn Mac screen annotations into searchable Markdown with Lasso
- Best screen annotation apps for Mac, compared by use case
Buy Lasso for $9.99 USD · Privacy
Annotate a Mac screen share in Zoom, Meet or Teams
To show Lasso annotations in a video call, share your entire Mac display, then draw over it with ⌥⇧A. Lasso adds an overlay above your apps. A share of just one app window can omit that overlay, so choose the whole screen you plan to annotate.
By Nika Sakandelidze. Updated 2026-11-09.
Canonical page: https://www.trylasso.online/guides/annotate-screen-sharing
Show your annotations to everyone on the call
- Open Lasso and the app, slides or document you want to explain.
- Start sharing in Zoom, Google Meet or Microsoft Teams. Choose the entire screen or display you will draw on.
- Press ⌥⇧A, choose a tool and circle, highlight or point at what matters.
- Check the call’s shared-screen preview or ask a participant to confirm the marks are visible before continuing.
- Press Escape when you finish explaining. Lasso clears its drawing and your apps remain as they were.
Pick the right mark for your explanation
Use A for an arrow, H for a highlight, C for numbered steps and F for a fading laser pointer. A few marks help people follow a demo without having to find your cursor. For a sketch or diagram, open a whiteboard with W and use the page tabs to return to the screen underneath.
When to use the meeting app’s annotation tools
Use the built-in tools when attendees need to add marks themselves. Lasso is a presenter-side overlay. Viewers see the marks in your shared display.
| Meeting app | Built-in annotation | When to use Lasso |
|---|---|---|
| Zoom | Use Annotate in the sharing controls when meeting settings allow it. Zoom can let participants add their own marks. | Keep the same drawing tools across Zoom and other apps, or capture your own annotated screenshot. |
| Google Meet | Eligible Google Workspace editions offer presenter annotation and co-annotators in a supported browser. | Use the same pen, highlighter and numbered steps across the apps on your Mac’s shared display. |
| Microsoft Teams | Select Annotate in the sharing toolbar to open the tools powered by Microsoft Whiteboard. | Draw on your display in person or on a call without changing your annotation workflow. |
If people cannot see what you draw
Check that you are sharing the whole display rather than a browser tab or a single window. With multiple displays, share the one where you are drawing. If the call is only sharing an app window, switch its sharing source to the display and check the preview again.
Lasso draws the overlay; your meeting or recording app decides what it captures. Screen recording tools also need to capture the display containing your marks. The people watching do not need to install Lasso.
Prepare your display before sharing
Close private windows and notifications before sharing a whole display. Lasso’s B tool can blur a captured patch of your screen, but the patch is a still image: it does not follow content as it scrolls or changes. Treat it as a visual aid, and check what your call or recording is actually showing.
Press S to keep a screenshot of the explanation, or Shift–S for an area. Copy or drag it into your follow-up message. Share Link is optional and creates an encrypted link that expires after 24 hours.
Sources
- Zoom Support · Using annotation tools
- Google Meet Help · Use annotations in Google Meet
- Microsoft Support · Use annotation in a Teams screen share
Related guides
- How to draw on your Mac screen with Lasso
- Screen highlighter app for Mac
- How to annotate screenshots on a Mac
- How to draw on your screen in Google Meet on Mac
- Teach an online lesson with Lasso on your Mac
- Mac Screen Annotation for AI Agents with Local MCP
- Turn Mac screen annotations into searchable Markdown with Lasso
- Best screen annotation apps for Mac, compared by use case
Buy Lasso for $9.99 USD · Privacy
How to draw on your screen in Google Meet on Mac
If your Google Workspace edition includes annotations, use Meet’s Annotate button while presenting. To draw over the apps on your Mac, share your entire display in Google Meet and press Option–Shift–A (⌥⇧A) to open Lasso’s drawing overlay.
By Nika Sakandelidze. Updated 2026-11-09.
Canonical page: https://www.trylasso.online/guides/annotate-google-meet-mac
Use Google Meet’s built-in Annotate button
Google lists supported Workspace editions and requires Chrome 124 or later for built-in annotations on a computer. Start presenting and select Annotate when it appears. Use the pen, shapes or disappearing ink. If you need someone else to draw, appoint them as a co-annotator from the participants list.
Draw on your shared Mac screen with Lasso
- Open Lasso and the apps you want to show. Close private windows and mute notifications on the display you plan to share.
- In Meet, select Present now, choose Entire screen, then select the display where you’ll draw. If macOS asks, grant screen sharing access to your browser.
- Press ⌥⇧A to enter drawing mode. Press P to circle a detail, H to highlight text, or C to number a sequence of controls.
- Ask someone on the call to confirm that they see your marks. Press Escape to clear the drawing when you’re done.
Why can’t people see my annotations in Google Meet?
If you’re using Lasso, check Meet’s share source first. A Chrome tab or a single app window can omit Lasso’s overlay. Stop presenting, share the entire display you are drawing on, and check again. If nobody can see the display itself, check your browser’s screen sharing permission under System Settings → Privacy & Security.
If Meet’s built-in Annotate button is missing, check Google’s requirements for your Workspace edition, browser and presenter role. The Lasso overlay is controlled by the person sharing the Mac. Attendees can watch without installing it.
Keep a marked-up screenshot for the follow-up
During a design review, number the changes as you discuss them. Press Shift–S (⇧S) in drawing mode and select the relevant part of the screen. Copy the screenshot from Lasso into the follow-up message so attendees have the same numbered steps. Capturing a screenshot requires Screen Recording permission for Lasso.
Sources
Related guides
- How to draw on your Mac screen with Lasso
- Screen highlighter app for Mac
- How to annotate screenshots on a Mac
- Annotate a Mac screen share in Zoom, Meet or Teams
- Teach an online lesson with Lasso on your Mac
- Mac Screen Annotation for AI Agents with Local MCP
- Turn Mac screen annotations into searchable Markdown with Lasso
- Best screen annotation apps for Mac, compared by use case
Buy Lasso for $9.99 USD · Privacy
Teach an online lesson with Lasso on your Mac
Share your entire Mac display in Zoom, Google Meet or Teams, then press Option–Shift–A to draw over the lesson. Try it with one fraction problem. Highlight the instruction, work it out on a whiteboard, then save the part students should keep.
By Nika Sakandelidze. Updated 2026-11-10.
Canonical page: https://www.trylasso.online/guides/online-teaching-with-lasso
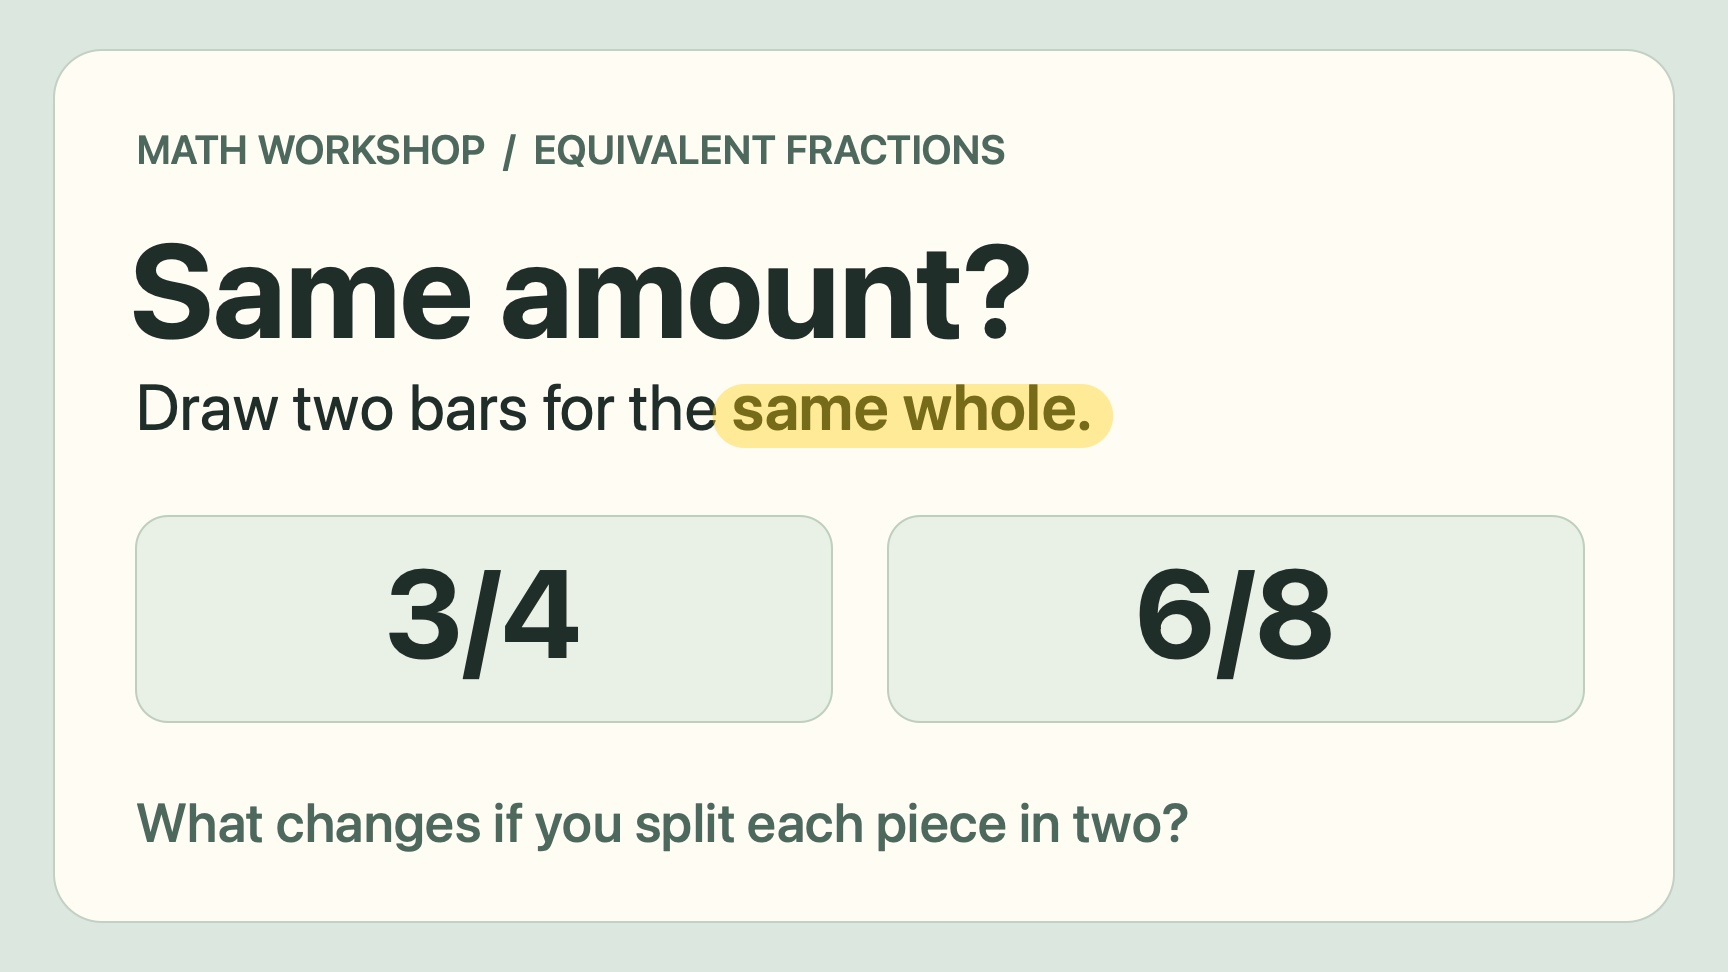
The first mark goes on “same whole.” Give students a chance to explain why it matters before you draw the answer.
Rehearse the screen share before class
Put your lesson on the display you plan to share and mute notifications. If you have a second display, keep your notes and gradebook there.
- In Zoom, open Share and pick your display from Screens. In Google Meet, choose Present now and Your entire screen. In Teams, open Share and choose your screen. Grant your meeting app or browser screen sharing access if macOS asks.
- With Lasso running, press Option–Shift–A (⌥⇧A). Press H, choose yellow, and drag over one word. Look at the share from a second device or ask someone on the call to check it. Students can see the marks through the call without installing Lasso.
- If you can see the highlight and they can’t, check your share source. A browser tab or app window can leave the overlay out. Switch to the entire display where you drew the mark.
Highlight the condition before the answer
Start with the slide above. Ask whether 3/4 and 6/8 could describe the same amount, then highlight “same whole.” Three quarters of a small pizza and six eighths of a large one can be different amounts. Those two words change how students have to read the question.
Try asking, “What has to stay the same before we compare what’s shaded?” Give students a moment to answer in chat. The same move works on a PDF or a reading passage. Highlight the relevant sentence and ask which words support their answer.
Draw two equal bars and split each fourth
Press W while drawing to open a whiteboard. Use R to draw two equal-length rectangles. Line up the ends before you divide either bar. If one outline is longer, redraw it first. The comparison depends on both bars representing the same whole.
Use L to divide the top bar into four pieces and H to shade three. Before filling the second bar, ask what will happen if each fourth gets split in two. Draw eight pieces and shade six, then use A to point to where the shading ends. Ask students to say what changed and what stayed the same.
If you’ve panned or zoomed while drawing, press Shift–1 (⇧1) to fit the board before taking a screenshot. Use the page tabs to go back to your marked slide.
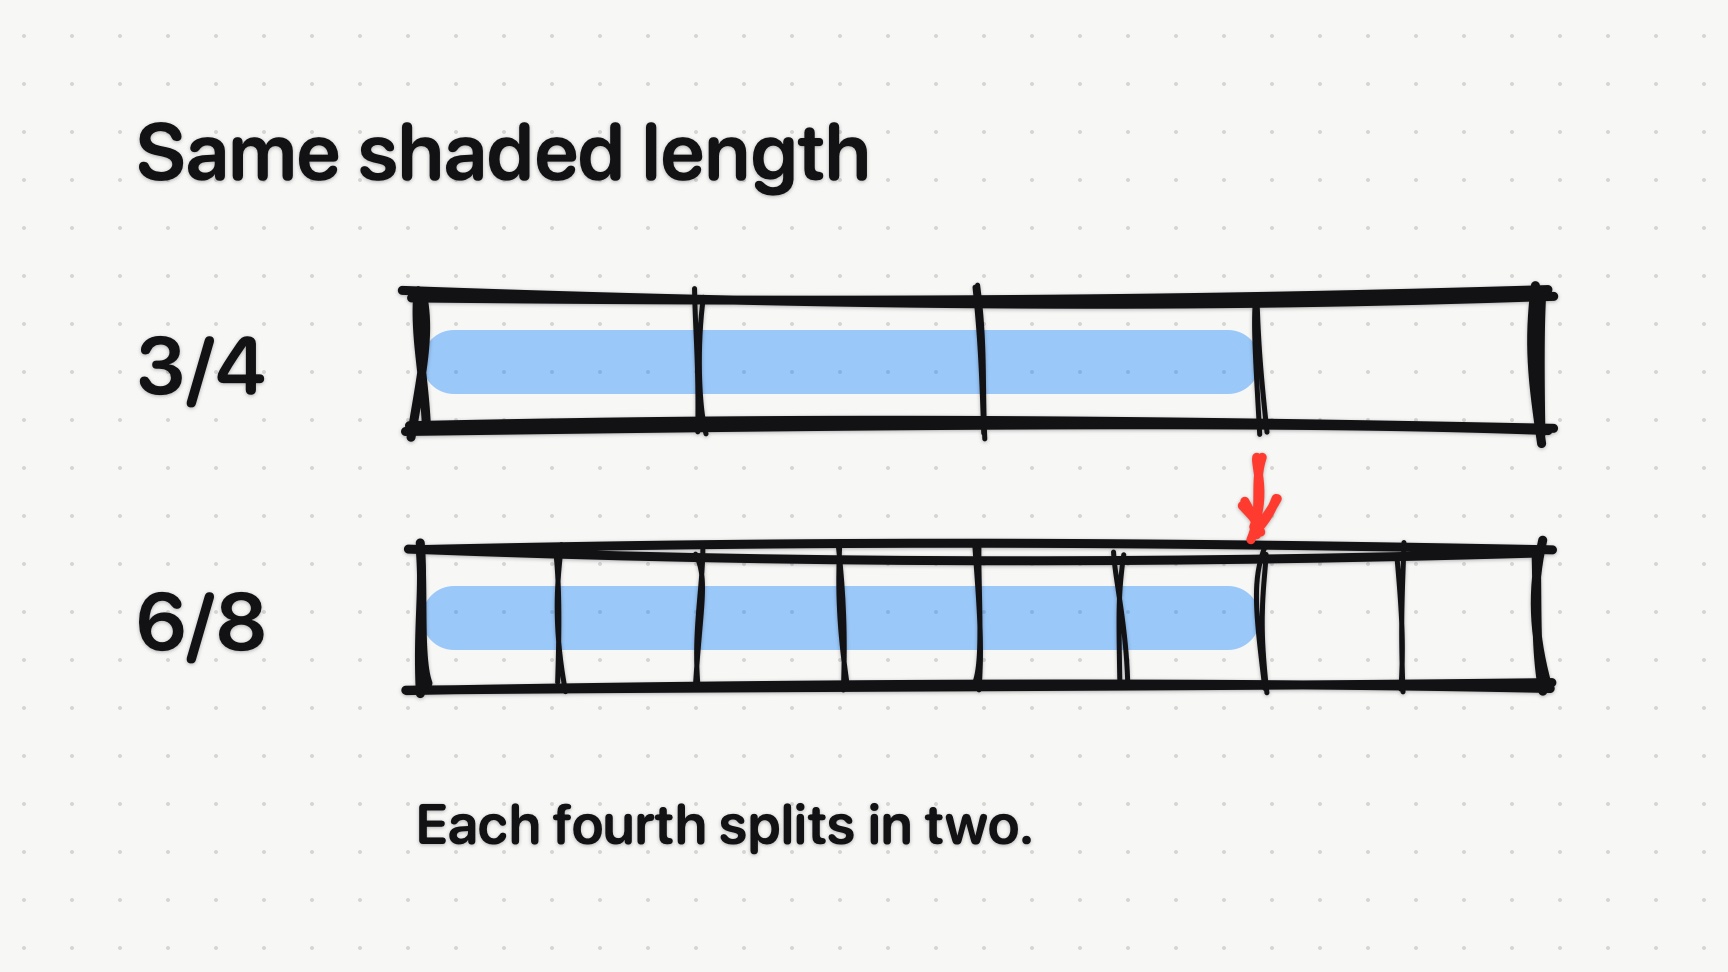
The arrow points to the end of the shading on both bars. Read that out loud so students can follow without relying on color.
Save the board and give students one more problem
Before you press Escape, press Shift–S (⇧S) and drag around the bars and their labels. Lasso 1.9.1 copies the image as you take it, so you can paste it into your course site after the preview disappears. Add a plain-text note that says what the picture shows. Splitting each fourth in two gives you twice as many pieces without changing the shaded amount.
For an exit ticket, try 2/3 = ?/6. Press C to number the two instructions on the slide below. Ask for a sketch or a sentence explaining how students found the missing number. Look for two shaded thirds becoming four shaded sixths.
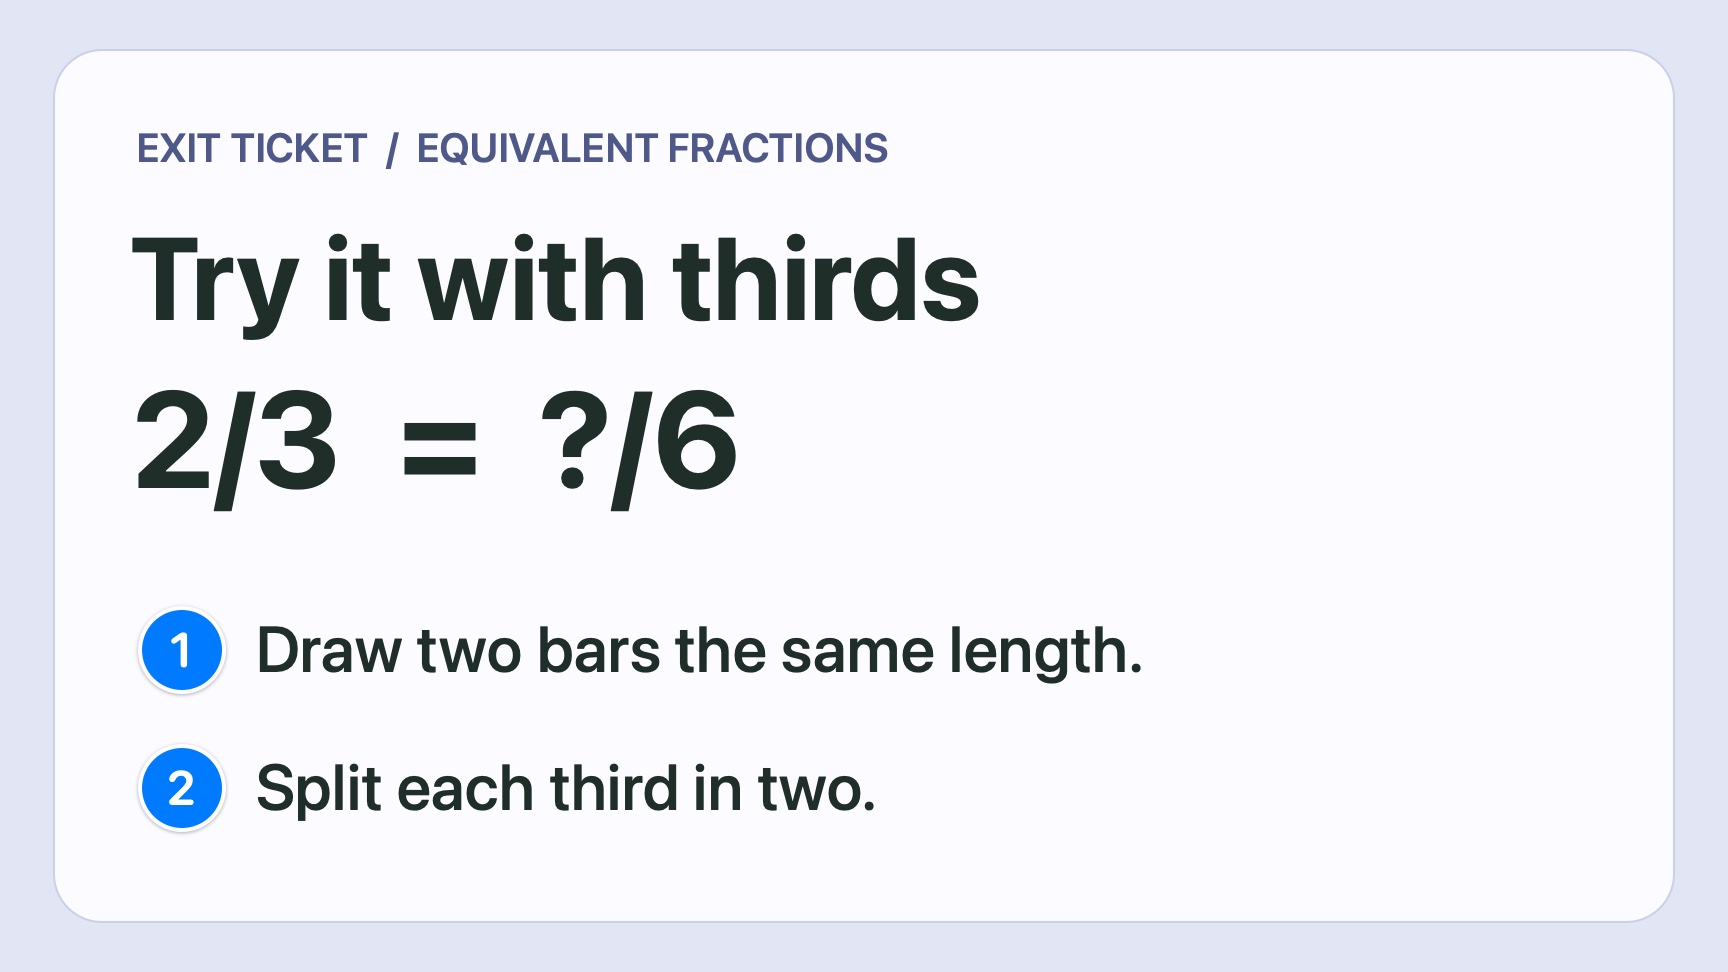
Two numbered marks give students a place to start. Leave the numerator blank for them to work out.
Keep a mark visible while you demonstrate
In a spreadsheet demo, put a numbered mark beside the cell students need to edit. Click the pushpin on Lasso’s toolbar so you can type into the spreadsheet while the number stays visible. Clear the mark before you scroll to another row.
Give one next step in office hours
Box the sentence you’re talking about with R and use T to leave a short note, such as “Name the source here.” Ask the student to tell you what they’ll change. If you save the marked draft, check the crop for private information and share it in the student’s private course thread.
What you need to draw, capture, or record
Lasso runs on Apple silicon and Intel Macs with macOS 14 Sonoma or later. Drawing works without Screen Recording permission. Give Lasso that permission when you want to capture an image. For a video of the lesson, have your meeting app or recorder capture the display you drew on and play back a short test clip.
The three figures use Lasso 1.9.1’s native drawing code on practice materials made for this walkthrough.
Sources
- Zoom Support · Share your screen or desktop
- Google Meet Help · Present during a video meeting
- Microsoft Support · Present content in Teams meetings
Related guides
- How to draw on your Mac screen with Lasso
- Screen highlighter app for Mac
- How to annotate screenshots on a Mac
- Annotate a Mac screen share in Zoom, Meet or Teams
- How to draw on your screen in Google Meet on Mac
- Mac Screen Annotation for AI Agents with Local MCP
- Turn Mac screen annotations into searchable Markdown with Lasso
- Best screen annotation apps for Mac, compared by use case
Buy Lasso for $9.99 USD · Privacy
Mac Screen Annotation for AI Agents with Local MCP
Connect an AI client to Lasso’s local Model Context Protocol (MCP) server to capture your annotated Mac screen and draw over live app windows. To ask ChatGPT or Claude about what you circled, you can also attach a Lasso screenshot directly in chat.
By Nika Sakandelidze. Updated 2026-11-09.
Canonical page: https://www.trylasso.online/guides/mcp-screen-annotation
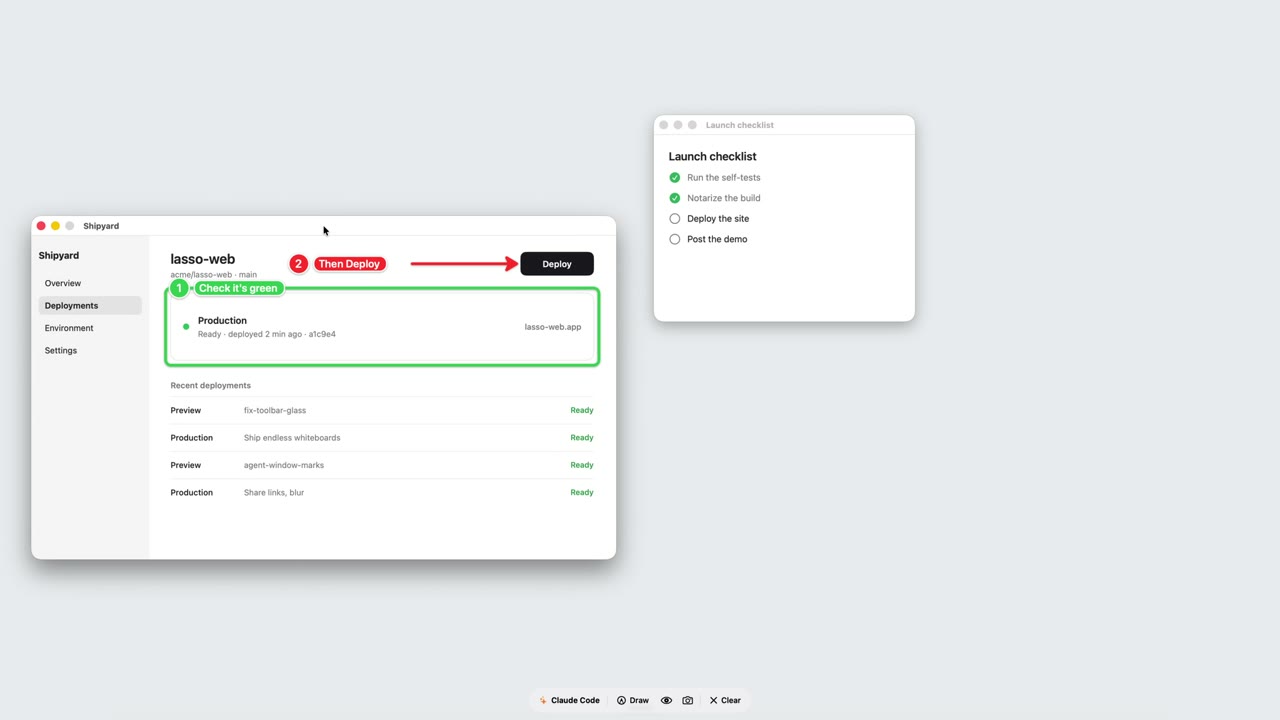
In this sample deployment window, Claude Code uses Lasso to mark two steps: check that Production is green, then click Deploy.
When to use Lasso with an agent
Use Lasso when you want to show an agent the exact part of a design, browser or document you mean. The agent can draw arrows or numbered steps on your Mac, and you follow the marks and make the clicks yourself.
Lasso’s MCP server runs inside the Mac app. The client launches a bridge on the same Mac and communicates over standard input and output (stdio).
Which AI clients can use Lasso?
| Client | How to use Lasso | What the client receives |
|---|---|---|
| Claude Code | Register Lasso from Terminal with claude mcp add. | Live screen captures and drawing tools after you grant access. |
| Claude Desktop on Mac | Add Lasso to the desktop app’s local MCP configuration. | Live screen captures and drawing tools after you grant access. |
| Cursor on Mac | Add Lasso as a stdio server in the local editor’s mcp.json. | Live screen captures and drawing tools after you grant access. |
| Codex CLI on Mac | Register Lasso from Terminal with codex mcp add. | Live screen captures and drawing tools after you grant access. |
| ChatGPT or Claude in a browser | Attach a Lasso screenshot in a conversation that accepts images. | The still image you attach. |
Connect Claude Code
Install Lasso in /Applications on a Mac running macOS 14 Sonoma or later. Register the app’s MCP bridge in Terminal, then open a Claude Code session and use /mcp to check that lasso is connected.
claude mcp add --scope user lasso -- /Applications/Lasso.app/Contents/MacOS/Lasso --mcp
Connect OpenAI Codex on your Mac
Register Lasso from Terminal with the Codex CLI. Open a local Codex session on the same Mac and use /mcp to check that the Lasso tools are available.
codex mcp add lasso -- /Applications/Lasso.app/Contents/MacOS/Lasso --mcp
Connect Claude Desktop, Cursor or another MCP client
In Claude Desktop on Mac, add the lasso entry under mcpServers in ~/Library/Application Support/Claude/claude_desktop_config.json. In Cursor, add it under mcpServers in ~/.cursor/mcp.json and set the entry’s type to stdio. Keep any existing server entries and restart your client after saving.
This setup assumes Lasso is in /Applications. Lasso Settings → Agents shows the executable path and configuration for the copy you are running.
{
  "mcpServers": {
    "lasso": {
      "command": "/Applications/Lasso.app/Contents/MacOS/Lasso",
      "args": [
        "--mcp"
      ]
    }
  }
}
Allow the connection and screen access
The MCP bridge runs on your Mac. A live capture includes one whole display and its visible marks, and your AI client may send what it receives to its model provider. For a smaller area, capture and review a crop before attaching it. Use Settings → Agents to turn off agent access in Lasso.
- Ask your client to use Lasso to inspect a sample window. If you have yet to set agent access, Lasso asks you to Allow or Don’t Allow the first tool call.
- To let an agent capture the display, enable Lasso in System Settings → Privacy & Security → Screen Recording. On recent macOS versions the panel is called Screen & System Audio Recording. Drawing with coordinates works without screen access.
MCP tool reference
Use MCP tools/list in the connected client to inspect the argument schemas for your installed version.
| Tool | What it does |
|---|---|
| capture_screen | Returns the annotated display image and its dimensions, plus numbered marks and snippets of visible text around them. |
| get_screenshot | Returns recent screenshots you took with Lasso, including edits, and a full-size PNG path when available. |
| get_brief | Reads the latest voice brief from the current session, with transcript, numbered marks and screenshots when available. |
| draw | Adds arrows, highlights and other marks using image coordinates or visible text labels via on_text. Marks follow the target window by default. |
| new_board | Opens an endless whiteboard or blackboard page for a diagram. |
| move_board | Pans or zooms the board, or fits the full sketch in view. |
| ask | Shows a question over the relevant app window. You can choose a numbered answer, type or respond by talking and drawing. |
| get_answer | Continues waiting for a reply to an open question. |
| resolve_mark | Adds a check mark and optional note by one of your annotations. |
| clear_drawing | Removes the agent’s marks while leaving your own marks in place. |
How to get Claude to show you where to click on your Mac
- Put the settings window you’re asking about beside Claude. Press Option–Shift–A (⌥⇧A) to start drawing in Lasso, then circle the settings section you’re looking at.
- Use Pin in Lasso’s toolbar to keep the circle visible while you type. Ask Claude to capture the display and draw one arrow to the control you want.
- Check where the arrow landed. Lasso anchors it to the target window by default. Pin the marks if needed, then click the control yourself.
Use Lasso to look at what I circled. If the Notifications switch is visible, draw one arrow pointing to it. If you can’t see it, ask me to scroll or open another section.
Share an annotated screenshot with ChatGPT or Claude
Attaching a Lasso screenshot gives the chat a still image to answer from. To get an arrow drawn over a live Mac window, connect an AI client through Lasso’s local MCP server.
- Press Option–Shift–A and circle the part of your screen you want to ask about.
- Press Shift–S to capture just that area. Open the screenshot card to check the image and crop out unrelated details if needed.
- Drag the screenshot into ChatGPT or Claude, or save the PNG and attach it in the chat. Ask a specific question about the circled detail.
What does the error inside the red circle mean? Use the visible error text to explain what failed and suggest one thing I can try next.
Turn an annotated screenshot into a searchable bug report
- Circle the problem and number the relevant controls. Capture the marked area with Shift–S.
- Ask a connected agent to read the capture with get_screenshot, or attach it to a chat that accepts images.
- Paste the resulting text into your issue tracker and attach the screenshot. Keep the screen name, control label and error message as text so teammates can find the report by searching for them.
Use my latest Lasso screenshot to draft a bug report. Include a short title with the app and control name, numbered reproduction steps, expected behavior and observed behavior. Copy any visible error text. Ask me for details the screenshot leaves unclear.
Sketch a diagram with an agent
Ask the agent, “Use Lasso to sketch this flow on a whiteboard, then fit it in view.” The agent can use new_board, draw and move_board. It can inspect each tool’s current argument schema through MCP tools/list.
If the client cannot connect
If lasso is missing from your client’s MCP list, check the executable path and the --mcp argument. Run the client on the Mac where Lasso is installed and reconnect or restart it. If the tools are listed but fail, open Lasso and check Settings → Agents. For a capture failure, check Screen Recording permission for Lasso and retry the capture.
Sources
- Claude Code Docs · Connect to tools via MCP
- Model Context Protocol · Connect Claude Desktop to a local server
- Cursor Docs · Configure a stdio server
- OpenAI Docs · Configure MCP for Codex CLI
- OpenAI Docs · Attach images in ChatGPT
- Claude Help Center · Attach files and images
- Apple Support · Control access to screen and system audio recording
Related guides
- How to draw on your Mac screen with Lasso
- Screen highlighter app for Mac
- How to annotate screenshots on a Mac
- Annotate a Mac screen share in Zoom, Meet or Teams
- How to draw on your screen in Google Meet on Mac
- Teach an online lesson with Lasso on your Mac
- Turn Mac screen annotations into searchable Markdown with Lasso
- Best screen annotation apps for Mac, compared by use case
Buy Lasso for $9.99 USD · Privacy
Turn Mac screen annotations into searchable Markdown with Lasso
A Lasso voice brief pairs what you say with what you draw on your Mac. Lasso transcribes speech on the device, puts numbered references to your marks in the transcript and saves a searchable brief.md file with screenshots when screen capture is allowed.
By Nika Sakandelidze. Updated 2026-11-09.
Canonical page: https://www.trylasso.online/guides/voice-briefs-for-ai-agents
Record visual feedback while drawing
Allow Microphone and Speech Recognition when prompted. On macOS 14 or 15, turn on Dictation in System Settings. Allow Screen Recording if you want annotated screenshots and close-ups in the brief.
- Open the app, design or browser page you want to discuss. Press Option–Shift–A (⌥⇧A) to start drawing in Lasso.
- Press V or click the waveform button. Speak while you circle a control, underline text or point with an arrow.
- Press V again to finish. Lasso copies the brief, so you can paste it into an AI chat, issue tracker or design review.
Example transcript with numbered screen annotations
In this example, you circle the Export button while asking for a UI change, then underline the error in the status panel. The transcript puts [1] and [2] where you made those marks.
What they said:
“Move the Export button [1] into the toolbar, and keep the ‘Export failed’ message [2] visible until it’s dismissed.”
Find and search your local voice briefs
In Finder, choose Go → Go to Folder and open ~/Library/Application Support/Lasso/Briefs. Lasso keeps the latest 20 voice brief folders. Each has a brief.md transcript and mark descriptions. When available, display-N.png shows the annotated display and mark-N.png shows a close-up of a mark.
Search the Markdown in a text editor for a control name or error message. To keep feedback with the work, copy the transcript and attach the relevant PNGs to the ticket or review.
Let a connected agent read the latest voice brief
With Lasso’s local MCP server connected in Claude Code, Claude Desktop or Cursor, ask the agent to read your latest Lasso voice brief. The get_brief tool returns the most recent brief from the current app session. To share an earlier brief, paste its saved Markdown and attach the images you want the agent to see.
Related guides
- How to draw on your Mac screen with Lasso
- Screen highlighter app for Mac
- How to annotate screenshots on a Mac
- Annotate a Mac screen share in Zoom, Meet or Teams
- How to draw on your screen in Google Meet on Mac
- Teach an online lesson with Lasso on your Mac
- Mac Screen Annotation for AI Agents with Local MCP
- Best screen annotation apps for Mac, compared by use case
Buy Lasso for $9.99 USD · Privacy
Best screen annotation apps for Mac, compared by use case
Lasso is a fit for drawing live and turning your marks into an annotated screenshot. Presentify combines drawing with a cursor halo and zoom. DemoPro is built around hold-to-draw shortcuts. ScreenBrush supports pressure-sensitive brushes, and Microsoft ZoomIt combines drawing with live magnification and recording.
By Nika Sakandelidze. Updated 2026-11-09.
Canonical page: https://www.trylasso.online/guides/best-screen-annotation-apps-mac
Compare Mac screen drawing tools
Lasso publishes this guide and makes one of the apps below. The comparison uses the developers’ documentation and App Store listings, reviewed in November 2026. We selected these apps because each can draw over a live Mac screen, then compared what each helps you do next.
| App | Choose it when | Workflow |
|---|---|---|
| Lasso | You want to keep a marked-up image after explaining something live | Draw highlights and numbered steps, then capture, crop or copy the result |
| Presentify | You need your audience to follow the cursor or see small details | Switch between on-screen drawing, cursor highlighting, spotlight and zoom |
| DemoPro | You need to interrupt a live demo for a quick mark | Hold a shortcut to draw and release it to resume the demo |
| ScreenBrush | You want pressure-sensitive strokes on compatible hardware | Use the Brush tool with variable pressure or use the overlay as a laser pointer |
| Microsoft Sysinternals ZoomIt | You want a free utility for drawing, magnifying and recording | Zoom into a live app, draw on screen or record a walkthrough |
Lasso for live markup you can send afterward
In a design review, open the app you want to discuss, press Option–Shift–A (⌥⇧A), and press H for a translucent highlight or C for numbered steps. If the next person needs a copy of what you explained, press Shift–S to capture a region with your marks. Open the capture to crop or add a label, then copy it into a ticket or message.
Lasso also has a whiteboard you can pan and zoom, and a local MCP server for compatible AI clients. It runs on macOS 14 Sonoma or later on Apple silicon and Intel Macs. The one-time price is $9.99 USD. Drawing works without macOS Screen Recording permission. Capture and blur need it.
Lasso vs. Presentify for live presentations
Both apps draw over live Mac apps and offer a whiteboard. Choose Presentify if you spend the demo moving between buttons and fields and need a halo that follows your cursor. Presentify also spotlights areas or zooms in when text is too small for viewers to read.
Choose Lasso as a Presentify alternative if the same walkthrough needs to become a screenshot. For example, place three numbered marks over the controls in a settings panel, capture the region and paste it into a follow-up. Lasso’s fading laser pointer works for a quick gesture. For a persistent cursor halo or live screen magnification, use Presentify.
DemoPro for quick marks during a live demo
DemoPro’s hold-to-draw shortcut suits a workflow where you switch frequently between drawing and operating the app you’re showing. You can choose when marks clear and use the countdown timer for a break or an exercise during a workshop.
ScreenBrush for a pressure-sensitive brush
ScreenBrush can vary the width of a stroke with compatible pressure-sensitive hardware. It also offers a laser pointer and a companion remote that can advance Keynote or PowerPoint slides. The Mac App Store lists a free download with in-app purchases.
Microsoft ZoomIt for live magnification and recording
Use Sysinternals ZoomIt if your audience needs to read small controls or code while you keep working in the app. It can magnify a live screen, draw at normal size, and record a walkthrough. Microsoft offers a free Mac version on the Mac App Store.
Check what your audience sees on a screen share
If you use a drawing overlay in Zoom, Google Meet or Teams, share the entire display you plan to draw on. A single app window or browser tab can leave the marks out. Draw a short line and check the shared preview or ask a participant whether it is visible. Use a spare display if you need to keep notes outside the share.
Sources
- Presentify’s official feature guide
- DemoPro’s official feature guide
- ScreenBrush on the Mac App Store
- Microsoft Sysinternals ZoomIt on the Mac App Store
- Microsoft’s ZoomIt for Mac documentation
Related guides
- How to draw on your Mac screen with Lasso
- Screen highlighter app for Mac
- How to annotate screenshots on a Mac
- Annotate a Mac screen share in Zoom, Meet or Teams
- How to draw on your screen in Google Meet on Mac
- Teach an online lesson with Lasso on your Mac
- Mac Screen Annotation for AI Agents with Local MCP
- Turn Mac screen annotations into searchable Markdown with Lasso