Ignite UI CLI MCP
เซิร์ฟเวอร์ MCP แบบรวมสำหรับ Ignite UI — เอกสารประกอบ, API, และการสร้างโครงร่าง CLI
เอกสาร
Ignite UI CLI



Quickly create projects, including Ignite UI for Angular and Ignite UI for Web Components, for a variety of frameworks.
Overview
Features:
- Create project structure
- Add views with Ignite UI components (e.g. Combo, Grid or Chart)
- Add scenario based templates with multiple components (e.g. a dashboard)
- Build and install npm packages
- Select a theme, support for custom themes coming soon
- Step by step guide
Supported frameworks
- Angular
- React
- Web Components
- Blazor
- jQuery
Prerequisites
The repository houses multiple packages and orchestrates building and publishing them with lerna and npm workspaces.
To build the repository locally you only need Node.js (CI uses 24.x and 26.x) and the npm that ships with it. Install the dependencies from the repository root with npm ci, which installs exactly what package-lock.json records. Use npm install only when you are changing dependencies, since it can rewrite the lockfile.
Packages
This monorepo contains several packages that combine into the igniteui-cli:
| Package | Description | Location |
|---|---|---|
| @igniteui/cli-core | Contains the core functionality of the cli tool | packages/core |
| @igniteui/angular-templates | Contains the template definitions for Angular components | packages/igx-templates |
| @igniteui/angular-schematics | IgniteUI CLI implementation to be used with Angular CLI's schematics engine | packages/ng-schematics |
| igniteui-cli | Standalone IgniteUI CLI tool for React, Blazor, Angular, jQuery and Web Components | packages/cli |
| @igniteui/mcp-server | MCP server providing AI assistants with Ignite UI documentation and API reference | packages/igniteui-mcp/igniteui-doc-mcp |
Table of Contents
Installation
Install the npm package as a global module:
npm install -g igniteui-cli
Usage
The main entry point is igniteui and is also aliased as ig. Both can be used interchangeably to call available commands. Check out our Wiki documentation for more details.
Step by step
To get a guided experience through the available options, simply run:
ig
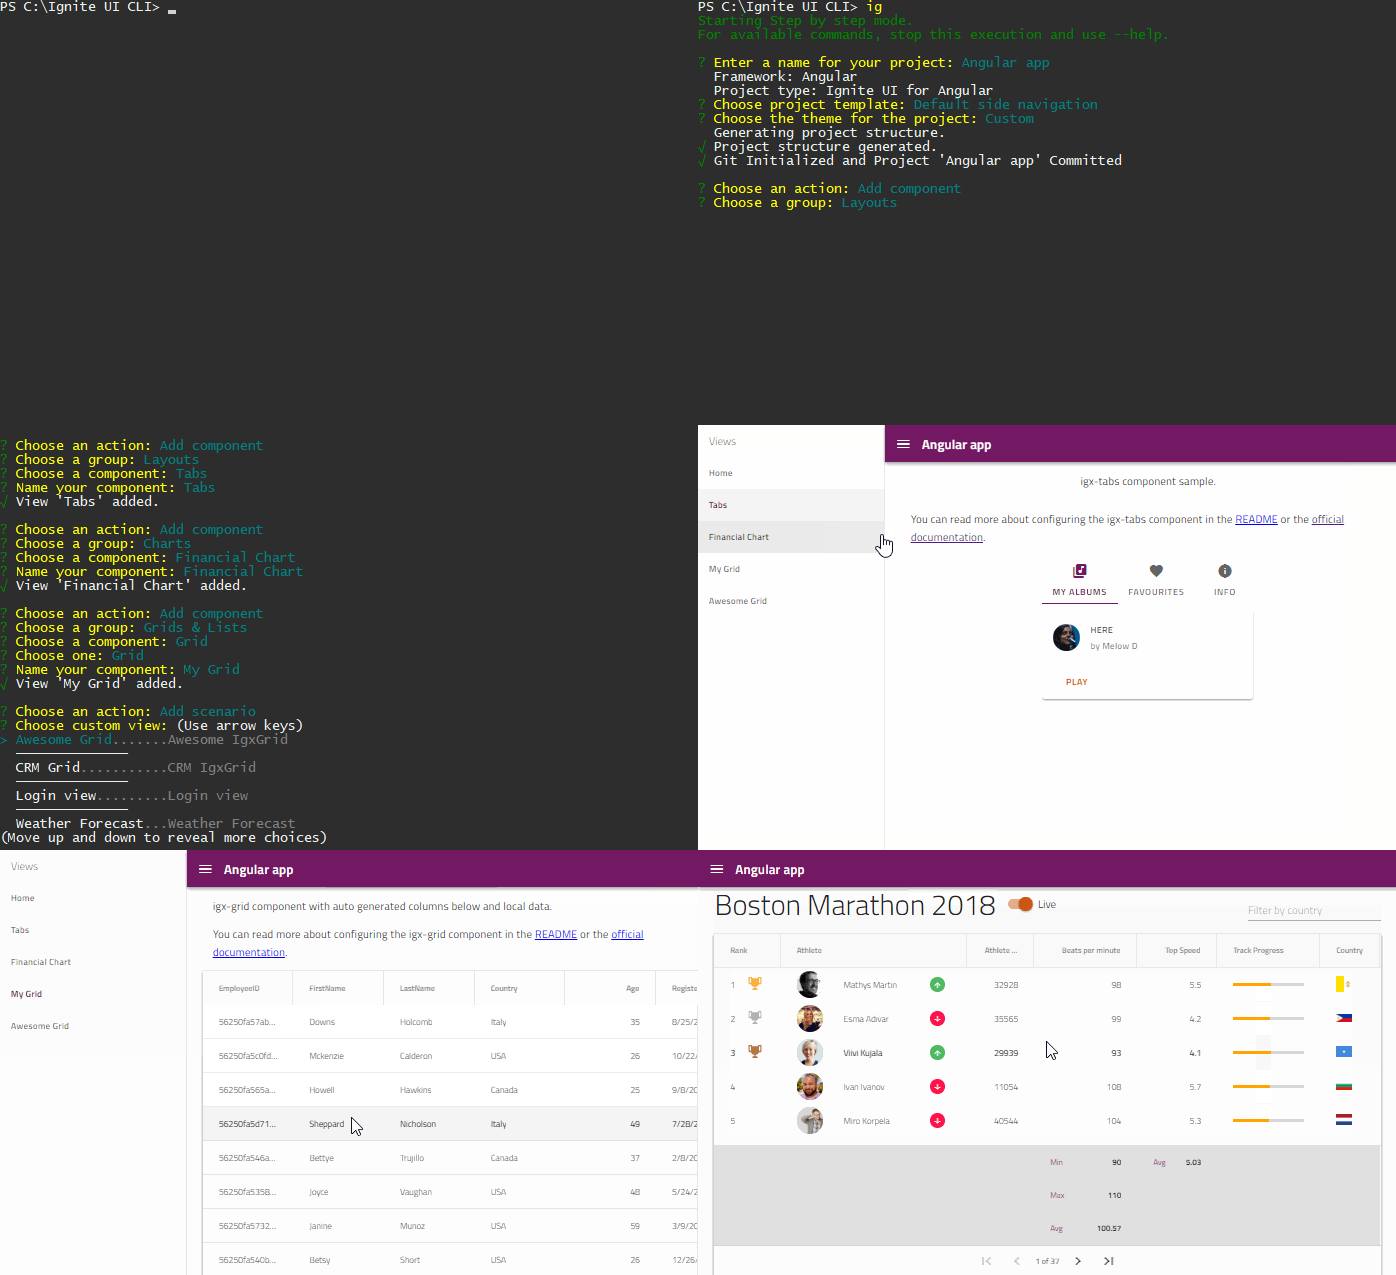
Upon creation, project will be automatically loaded in the default browser.
NOTE: If that doesn't happen the port may be already in use. Ports vary for different project types, see the description for the ig start command for details on default ports.
List the available commands.
ig help
Generating projects and adding components
Create a new project passing name, framework and style theme.
ig new <project name> --framework=<framework> --type=<proj-type> --theme=<theme>
This will create the project and will install the needed dependencies.
Parameters besides name are optional. Framework defaults to "angular", project type defaults to the first available in the framework and theme to the first available for the project. For more information visit ig new Wiki page.
Generate Ignite UI for Angular project
To create a new project with Ignite UI for Angular use ig new by specifying angular as framework, and optionally igx-ts as project type and selecting one of the project templates:
ig new "IG Project" --framework=angular --type=igx-ts --template=side-nav
The project is created with the Angular CLI (ng new, then ng add igniteui-angular), so this needs network access and always installs the project's packages: --skip-install has no effect for Angular projects.
Generate Ignite UI for React project
To create a new project with Ignite UI for React use ig new by specifying react as framework and igr-ts as project type:
ig new "IG Project" --framework=react --type=igr-ts
Generate Ignite UI for Web Components project
To create a new project with Ignite UI for Web Components use ig new by specifying webcomponents as framework:
ig new "IG Project" --framework=webcomponents
Adding components
Once you have created a project, at any point you can add additional component templates using ig add. Running the command without parameters will guide you through the available templates:
ig add
Add a new component or template to the project passing component ID and choosing a name.
ig add <component/template> <component_name>
The ID matches either a component ("grid", "combo", "text-editor", etc) or a predefined template. Predefined templates are framework/project specific and can provide predefined views with either multiple components or fulfilling a specific use case like "form-validation", "master-detail" and so on.
For full list of supported templates in the current project you can simply run ig list command:
ig list
Build and run
ig build
ig start
Configure AI Tooling
Ignite UI provides rich AI assisted development toolchain. To configure Ignite UI AI tooling — MCP servers and AI coding skills — run:
ig ai-config
You will be prompted with two selections:
- AI agents — which tools to generate skill and instruction files for (Generic and Claude are selected by default)
- Coding assistants — which assistants to configure MCP servers for (general
.mcp.jsonis selected by default, compatible with Claude Code, VS Code, and others)
You can also pass options directly:
ig ai-config --agents claude copilot generic --assistants vscode cursor
This creates or updates the assistant-specific MCP config file (e.g. .mcp.json, .vscode/mcp.json, .cursor/mcp.json) with entries for the Ignite UI MCP and igniteui-theming MCP servers (existing servers are preserved), copies AI coding skill files from installed Ignite UI packages, and generates agent-specific instruction files (e.g. CLAUDE.md, AGENTS.md).
The ig new command also prompts for AI tool configuration as part of project creation.
MCP Server
The CLI includes a bundled MCP (Model Context Protocol) server that provides AI assistants with Ignite UI documentation search, API reference lookup, and scaffolding guidance for Angular, React, Blazor, and Web Components.
Start the MCP server:
ig mcp
The server runs over stdio and supports the following options:
ig mcp --remote <url>   # Use a remote backend instead of the local SQLite database
ig mcp --debug          # Enable debug logging to mcp-server.log
Using with AI Assistants
For VS Code, the ig ai-config command handles configuration automatically (see above). For other MCP clients (e.g., Claude Desktop, Cursor), configure them manually:
{
  "mcpServers": {
    "igniteui-cli": {
      "command": "npx",
      "args": ["-y", "@igniteui/mcp-server"]
    },
    "igniteui-theming": {
      "command": "npx",
      "args": ["-y", "igniteui-theming", "igniteui-theming-mcp"]
    }
  }
}
In a project that lists igniteui-cli as a dependency, ig ai-config writes "args": ["-y", "igniteui-cli", "mcp"] instead, which starts the server bundled with the project's CLI. Use that form there too when configuring manually: with pnpm, npx -y @igniteui/mcp-server cannot start inside such a project.
The first start downloads the server into the npx cache, which can take 10 seconds or more, and npx downloads it again after each new release. If your MCP client has a short connection timeout, install the server globally (npm install -g @igniteui/mcp-server) and use "command": "igniteui-mcp" with no arguments, or pin a version ("args": ["-y", "@igniteui/mcp-server@<version>"]). Pinned and global installs don't update on their own, so the bundled documentation stays at that version until you change it.
The MCP server exposes the following tools to AI assistants:
| Tool | Description |
|---|---|
list_components | List available Ignite UI component docs. Filter by framework and optional keyword match against filename, component name, keywords, or summary. |
get_doc | Return the full markdown content of a specific component doc by name (e.g., grid-editing, accordion). |
search_docs | Full-text search across Ignite UI docs for a specific framework. Supports prefix matching (e.g., grid*). |
search_api | Search Ignite UI API entries by keyword, feature name, or partial component name. |
get_api_reference | Return the full API reference for a specific Ignite UI component or class by exact name. |
get_project_setup_guide | Returns setup guides for creating a new Ignite UI project. For Angular/React/Web Components: CLI scaffolding instructions. For Blazor: dotnet new + NuGet setup guide. |
Testing with MCP Inspector
To interactively test and debug the MCP server tools:
npx @modelcontextprotocol/inspector ig mcp
Schematics
You can also add Ignite UI for Angular components to your projects by using the igniteui/angular-schematics package. It included schematic definitions for most of the logic present in the igniteui-cli. These can be called in any existing Angular project or even when creating one. You can learn more about the schematics package on from its readme.
Contribution
See the Contribution guide to get started.
Run locally
-
Clone the repository
-
Install dependencies from the repository root with
npm ci(installs exactly whatpackage-lock.jsonrecords, for every workspace package, the MCP server included) -
Build everything from the repository root:
npm run build(compiles the monorepo packages, then builds the MCP server viabuild:mcp) -
Open in Visual Studio Code
There is a predefined launch.config file for VS Code in the root folder, so you can use VS Code View/Debug window and choose one of the predefined actions. These include launching the step by step guide, create new project for a particular framework or add components.
-
Hit Start Debugging/F5
Template smoke test
scripts/smoke-test.sh drives the locally built CLI end to end: it scaffolds a project, adds
every component template into it, installs, and builds. The Jasmine specs under spec/ stub out
PackageManager.installPackages, so they verify that files land on disk but never that the result
installs or compiles — this script covers that gap.
npm run build                 # required: the script runs your local build, not the published CLI
scripts/smoke-test.sh         # angular, react and webcomponents (~20-30 min)
Options:
| Option | Meaning |
|---|---|
-f, --frameworks LIST | comma separated; default angular,react,webcomponents |
-p, --project ID | project template to scaffold (default: the framework's own default) |
--all-projects | scaffold and build every project template, skip component adds |
--templates LIST | only these component template ids — the fast path when iterating |
--isolate | one project per component template; slow, use to bisect a failure |
--wizard each|pairs|all | create the projects through the interactive ig new wizard instead: every answer (each), every pair of answers (pairs) or every combination (all) |
--skip-build | scaffold and add only |
--keep | keep the generated projects even when everything passes |
-o, --out DIR | work directory (default output/smoke, which is gitignored) — wiped on each run, see below |
-j, --jobs N | frameworks to run in parallel (default 1) |
scripts/smoke-test.sh -f angular --templates grid,combo    # quick check, ~2 min
scripts/smoke-test.sh -f angular --all-projects            # every Angular project template
scripts/smoke-test.sh -f webcomponents --isolate           # bisect which template broke
Per-step logs land in <out>/logs/, and <out>/results.tsv is a machine-readable
framework / step / template / status / seconds table. The script exits non-zero if any step
failed and prints a summary of the failures.
The work directory is deleted and recreated on every run, so the script refuses to touch anything
it cannot show is its own: the filesystem root, your home directory, the repository or any directory
containing it, and any non-empty directory that lacks either the .smoke-test-workdir sentinel it
drops or the results.tsv of an earlier run. Point --out elsewhere, or remove the directory
yourself, if you hit that.
Two things to know if you modify it:
- Call the CLI through
cli, neverpackages/cli/bin/execute.js. The wrapper delegates tonode_modules/igniteui-cliwhenever one resolves inside the current directory, and every project template listsigniteui-clias a devDependency. Angular projects install theirs duringig new(ng addneeds the packages), so through the wrapperig addwould silently switch to the published CLI and its bundled templates.cliloads this checkout'spackages/cli/lib/cli.jsinstead. For the other frameworks, scaffolding with--skip-installstill keepsPackageManager.queuePackagefrom spawning installs, so dependencies are written topackage.jsonand installed once at the end. - Exit codes are not sufficient.
Util.errorlogs and returns without setting one, soig add does-not-exist xexits 0. Each step is judged on its exit code and an error scan of its log and an artifact check.
jQuery and Blazor are opt-in via -f. jQuery has no build script and 13 of its templates pull
ignite-ui-full from the Infragistics ProGet feed, which needs credentials; Blazor needs the .NET
SDK and has no component templates, so only dotnet build runs.
MCP Server development
The MCP server at packages/igniteui-mcp/igniteui-doc-mcp has its own build pipeline, separate from the monorepo. It uses ESM (ES2022, Node16 modules) while the rest of the monorepo uses CommonJS. See DEVELOPMENT.md for the full MCP server development guide.
Build the MCP server (from the repo root, after npm ci):
npm run build:mcp # Compiles the MCP server and copies the SQLite DB into its dist/ (also part of npm run build)
Regenerate API reference data (maintainers only):
The API reference data the server ships (docs/*-api/) is committed, so a normal build needs no submodules. To regenerate it after upstream API changes:
cd packages/igniteui-mcp/igniteui-doc-mcp
npm run build:docs:all   # build:docs:angular-api, :wc-api, :react-api and :blazor-api in turn
Test the MCP server locally:
npm run build                                               # includes build:mcp
node packages/cli/lib/cli.js mcp                            # Start via CLI
# or directly:
node packages/igniteui-mcp/igniteui-doc-mcp/dist/index.js  # Start the server
Building the CLI packages for publishing
The CLI does not bundle the MCP server: igniteui-cli depends on @igniteui/mcp-server, which is published from packages/igniteui-mcp/igniteui-doc-mcp alongside the other workspace packages. To build them the way the release workflow does:
npm ci
npm run build-pack   # production build of every package, MCP server included; also refreshes the ai-config skills from the doc submodules
npm pack in packages/cli/ and in packages/igniteui-mcp/igniteui-doc-mcp/ then produces the two tarballs; the MCP one contains the documentation database and the API reference data.
Data Collection
The Ignite UI CLI tool uses Google Analytics to anonymously report feature usage statistics and basic crash reports. This data is used to help improve the Ignite UI CLI tools over time. You can opt out of analytics before any data is sent by using
ig config set disableAnalytics true -g
when using the CLI. You can read Infragistics privacy policy at https://www.infragistics.com/legal/privacy.