MCP Toolbox for Databases
ทางการเซิร์ฟเวอร์ MCP โอเพนซอร์สที่เชี่ยวชาญด้านเครื่องมือที่ง่าย รวดเร็ว และปลอดภัยสำหรับฐานข้อมูล
คุณทำอะไรได้บ้างด้วย Toolbox For Databases MCP?
- สำรวจโครงสร้างฐานข้อมูล — ให้ผู้ช่วยของคุณแสดงรายการตารางที่มีอยู่และทำความเข้าใจโครงสร้างฐานข้อมูลของคุณโดยใช้
list_tables - รันคิวรี SQL เป็นภาษาอังกฤษธรรมดา — ให้ผู้ช่วยของคุณแปลคำถามภาษาธรรมชาติเป็น SQL และดำเนินการผ่าน
execute_sql - สร้างเครื่องมือฐานข้อมูลแบบกำหนดเอง — กำหนดคำสั่ง SQL ที่มีพารามิเตอร์ใน
tools.yamlเพื่อสร้างเครื่องมือที่ปลอดภัยและนำกลับมาใช้ใหม่ได้สำหรับเอเจนต์ของคุณ - เชื่อมต่อกับไคลเอนต์ MCP ใดก็ได้ — กำหนดค่าเซิร์ฟเวอร์ใน
mcp.jsonหรือclaude_desktop_config.jsonเพื่อใช้กับ Claude Code, Gemini CLI หรือ IDE อื่นๆ - โหลดเครื่องมือเข้าสู่เฟรมเวิร์ก AI — รวมเครื่องมือ Toolbox เข้ากับแอปพลิเคชัน LangChain, LlamaIndex หรือ ADK โดยใช้ SDK ที่ให้มา
เอกสาร
MCP Toolbox for Databases








MCP Toolbox for Databases is an open source Model Context Protocol (MCP) server that connects your AI agents, IDEs, and applications directly to your enterprise databases.
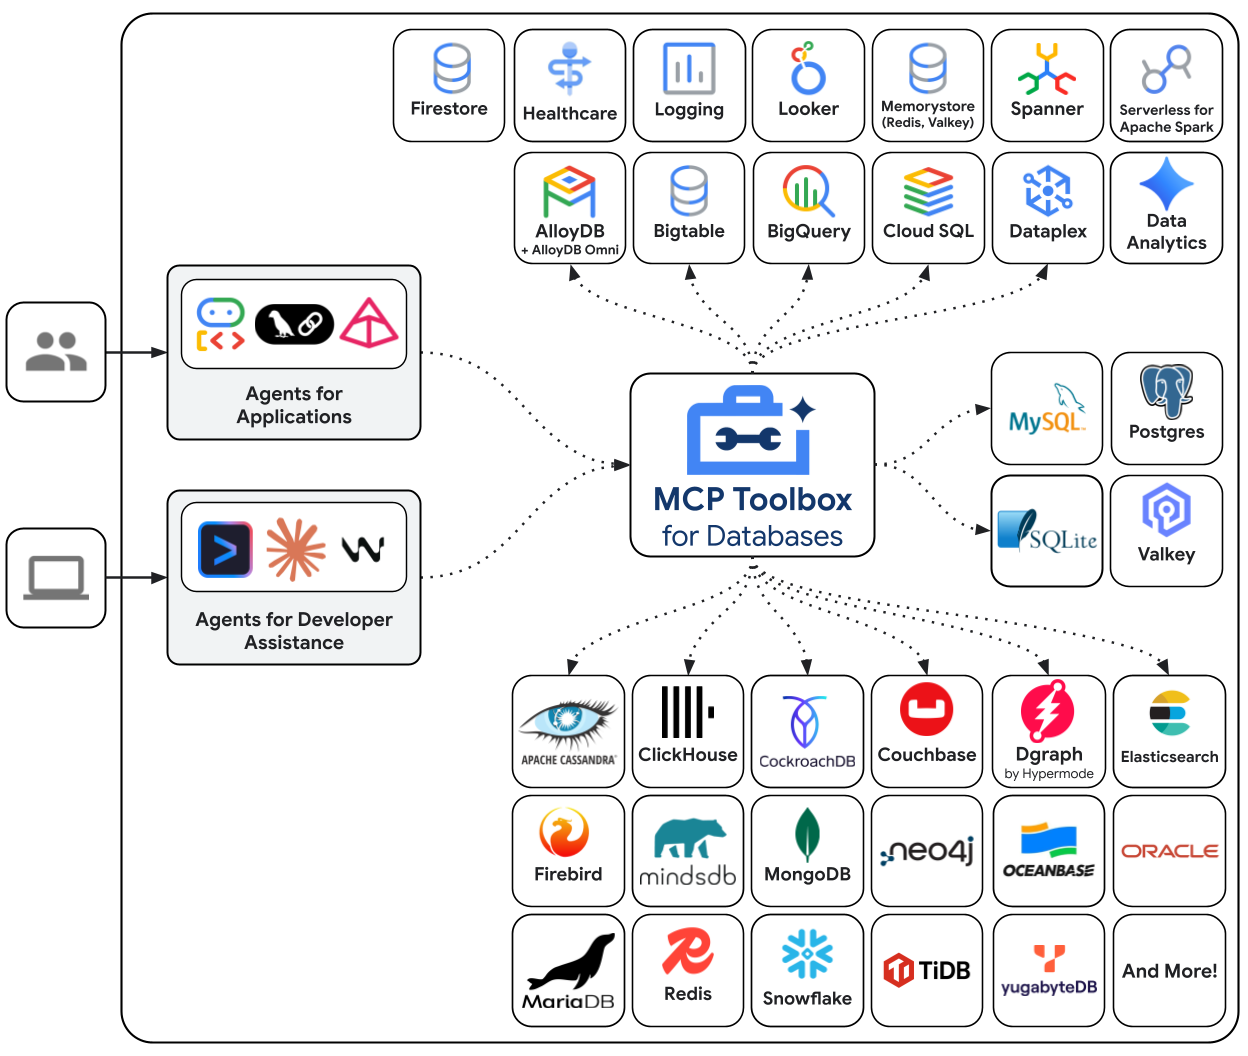
It serves a dual purpose:
- Ready-to-use MCP Server (Build-Time): Instantly connect Gemini CLI, Google Antigravity, Claude Code, Codex, or other MCP clients to your databases using our prebuilt generic tools. Talk to your data, explore schemas, and generate code without writing boilerplate.
- Custom Tools Framework (Run-Time): A robust framework to build specialized, highly secure AI tools for your production agents. Define structured queries, semantic search, and NL2SQL capabilities safely and easily.
This README provides a brief overview. For comprehensive details, see the full documentation.
[!IMPORTANT]
Repository Name Update: Thegenai-toolboxrepository has been officially renamed tomcp-toolbox. To ensure your local environment reflects the new name, you may update your remote:git remote set-url origin https://github.com/googleapis/mcp-toolbox.git
[!NOTE] This solution was originally named “Gen AI Toolbox for Databases” (github.com/googleapis/genai-toolbox) as its initial development predated MCP, but was renamed to align with the MCP compatibility.
Table of Contents
- Why MCP Toolbox?
- Quick Start: Prebuilt Tools
- Quick Start: Custom Tools
- Install & Run the Toolbox server
- Connect to Toolbox
- Additional Features
- Versioning
- Contributing
- Community
Why MCP Toolbox?
- Out-of-the-Box Database Access: Prebuilt generic tools for instant data exploration (e.g.,
list_tables,execute_sql) directly from your IDE or CLI. - Custom Tools Framework: Build production-ready tools with your own predefined logic, ensuring safety through Restricted Access, Structured Queries, and Semantic Search.
- Simplified Development: Integrate tools into your Agent Development Kit (ADK), LangChain, LlamaIndex, or custom agents in less than 10 lines of code.
- Better Performance: Handles connection pooling, integrated auth (IAM), and end-to-end observability (OpenTelemetry) out of the box.
- Enhanced Security: Integrated authentication for more secure access to your data.
- End-to-end Observability: Out of the box metrics and tracing with built-in support for OpenTelemetry.
Quick Start: Prebuilt Tools
Stop context-switching and let your AI assistant become a true co-developer. By connecting your IDE to your databases with MCP Toolbox, you can query your data in plain English, automate schema discovery and management, and generate database-aware code.
You can use the Toolbox in any MCP-compatible IDE or client (e.g., Gemini CLI, Google Antigravity, Claude Code, Codex, etc.) by configuring the MCP server.
Prebuilt tools are also conveniently available via the Google Antigravity MCP Store with a simple click-to-install experience.
-
Add the following to your client's MCP configuration file (usually
mcp.jsonorclaude_desktop_config.json):{ "mcpServers": { "toolbox-postgres": { "command": "npx", "args": [ "-y", "@toolbox-sdk/server", "--prebuilt=postgres", "--stdio" ] } } } -
Set the appropriate environment variables to connect, see the Prebuilt Tools Reference.
When you run Toolbox with a --prebuilt=<database> flag, you instantly get access to standard tools to interact with that database. You can also specify a specific toolset using the --prebuilt=<database>/<toolset> syntax (e.g., --prebuilt=postgres/data to only load SQL tools).
Supported databases currently include:
- Google Cloud: AlloyDB, BigQuery, Cloud SQL (PostgreSQL, MySQL, SQL Server), Spanner, Firestore, Knowledge Catalog (formerly known as Dataplex).
- Other Databases: PostgreSQL, MySQL, MariaDB, SQL Server, Oracle, MongoDB, Redis, Elasticsearch, CockroachDB, ClickHouse, Couchbase, Neo4j, Snowflake, Trino, and more.
For a full list of available tools and their capabilities across all supported databases, see the Prebuilt Tools Reference.
See the Install & Run the Toolbox server section for different execution methods like Docker or binaries.
[!TIP] For users looking for a managed solution, Google Cloud MCP Servers provide a managed MCP experience with prebuilt tools; you can learn more about the differences here.
Quick Start: Custom Tools
Toolbox can also be used as a framework for customized tools.
The primary way to configure Toolbox is through the tools.yaml file. If you
have multiple files, you can tell Toolbox which to load with the --config tools.yaml flag.
You can find more detailed reference documentation to all resource types in the Resources.
Sources
The sources section of your tools.yaml defines what data sources your
Toolbox should have access to. Most tools will have at least one source to
execute against.
kind: source
name: my-pg-source
type: postgres
host: 127.0.0.1
port: 5432
database: toolbox_db
user: toolbox_user
password: my-password
For more details on configuring different types of sources, see the Sources.
Tools
The tools section of a tools.yaml define the actions an agent can take: what
type of tool it is, which source(s) it affects, what parameters it uses, etc.
kind: tool
name: search-hotels-by-name
type: postgres-sql
source: my-pg-source
description: Search for hotels based on name.
parameters:
  - name: name
    type: string
    description: The name of the hotel.
statement: SELECT * FROM hotels WHERE name ILIKE '%' || $1 || '%';
For more details on configuring different types of tools, see the Tools.
Toolsets
The toolsets section of your tools.yaml allows you to define groups of tools
that you want to be able to load together. This can be useful for defining
different groups based on agent or application.
kind: toolset
name: my_first_toolset
tools:
    - my_first_tool
    - my_second_tool
---
kind: toolset
name: my_second_toolset
tools:
    - my_second_tool
    - my_third_tool
Prompts
The prompts section of a tools.yaml defines prompts that can be used for
interactions with LLMs.
kind: prompt
name: code_review
description: "Asks the LLM to analyze code quality and suggest improvements."
messages:
  - content: >
         Please review the following code for quality, correctness,
         and potential improvements: \n\n{{.code}}
arguments:
  - name: "code"
    description: "The code to review"
For more details on configuring prompts, see the Prompts.
Resources
The resources and resourceTemplates sections of your tools.yaml define read-only
content, files, or parameterized directory trees that can be discovered and retrieved
by MCP clients:
kind: resource
name: database_schema_ddl
type: text
description: "Core table definitions and constraints."
mimeType: text/x-sql
text: |
  CREATE TABLE customers (
    id SERIAL PRIMARY KEY,
    name VARCHAR(255) NOT NULL,
    email VARCHAR(255) UNIQUE NOT NULL
  );
---
kind: resource
name: database_schema
type: file
description: "PostgreSQL schema definition."
path: "./schema.sql"
---
kind: resourceTemplate
name: server_logs
type: file
description: "Application log files."
uriTemplate: "file:///var/log/{path}"
allowedPaths:
  - "/var/log"
For more details on configuring resources and resource templates, see Resources.
Install & Run the Toolbox server
You can run Toolbox directly with a configuration file:
npx @toolbox-sdk/server --config tools.yaml
This runs the latest version of the Toolbox server with your configuration file.
[!NOTE] This method is optimized for convenience rather than performance. For a more standard and reliable installation, please use the binary or container image as described in Install & Run the Toolbox server.
Install Toolbox
For the latest version, check the releases page and use the following instructions for your OS and CPU architecture.
Binary
To install Toolbox as a binary:
Linux (AMD64)
To install Toolbox as a binary on Linux (AMD64):
# see releases page for other versions
export VERSION=1.13.1
curl -L -o toolbox https://storage.googleapis.com/mcp-toolbox-for-databases/v$VERSION/linux/amd64/toolbox
chmod +x toolbox
macOS (Apple Silicon)
To install Toolbox as a binary on macOS (Apple Silicon):
# see releases page for other versions
export VERSION=1.13.1
curl -L -o toolbox https://storage.googleapis.com/mcp-toolbox-for-databases/v$VERSION/darwin/arm64/toolbox
chmod +x toolbox
macOS (Intel)
To install Toolbox as a binary on macOS (Intel):
# see releases page for other versions
export VERSION=1.13.1
curl -L -o toolbox https://storage.googleapis.com/mcp-toolbox-for-databases/v$VERSION/darwin/amd64/toolbox
chmod +x toolbox
Windows (Command Prompt)
To install Toolbox as a binary on Windows (Command Prompt):
:: see releases page for other versions
set VERSION=1.13.1
curl -o toolbox.exe "https://storage.googleapis.com/mcp-toolbox-for-databases/v%VERSION%/windows/amd64/toolbox.exe"
Windows (PowerShell)
To install Toolbox as a binary on Windows (PowerShell):
# see releases page for other versions
$VERSION = "1.13.1"
curl.exe -o toolbox.exe "https://storage.googleapis.com/mcp-toolbox-for-databases/v$VERSION/windows/amd64/toolbox.exe"
Windows ARM64 (Command Prompt)
To install Toolbox as a binary on Windows ARM64 (Command Prompt):
:: see releases page for other versions
set VERSION=1.13.1
curl -o toolbox.exe "https://storage.googleapis.com/mcp-toolbox-for-databases/v%VERSION%/windows/arm64/toolbox.exe"
Windows ARM64 (PowerShell)
To install Toolbox as a binary on Windows ARM64 (PowerShell):
# see releases page for other versions
$VERSION = "1.13.1"
curl.exe -o toolbox.exe "https://storage.googleapis.com/mcp-toolbox-for-databases/v$VERSION/windows/arm64/toolbox.exe"
Container image
You can also install Toolbox as a container:# see releases page for other versions
export VERSION=1.13.1
docker pull us-central1-docker.pkg.dev/database-toolbox/toolbox/toolbox:$VERSION
Homebrew
To install Toolbox using Homebrew on macOS or Linux:
brew install mcp-toolbox
Compile from source
To install from source, ensure you have the latest version of Go installed, and then run the following command:
go install github.com/googleapis/mcp-toolbox@v1.13.1
Gemini CLI
Check out the [Gemini CLI extensions](https://geminicli.com/extensions/) to install prebuilt tools for specific databases like AlloyDB, BigQuery, and Cloud SQL directly into Gemini CLI.# Install Gemini CLI
npm install -g @google/gemini-cli
# Install the extension
gemini extensions install https://github.com/gemini-cli-extensions/cloud-sql-postgres
# Run Gemini CLI
gemini
Interact with your custom tools using natural language through the Gemini CLI.
# Install the extension
gemini extensions install https://github.com/gemini-cli-extensions/mcp-toolbox
Run Toolbox
Configure a tools.yaml to define your tools, and then
execute toolbox to start the server:
Binary
To run Toolbox from binary:
./toolbox --config "tools.yaml"
ⓘ Note
Toolbox enables dynamic reloading by default. To disable, use the--disable-reloadflag.
Container image
To run the server after pulling the container image:
export VERSION=0.24.0 # Use the version you pulled
docker run -p 5000:5000 \
-v $(pwd)/tools.yaml:/app/tools.yaml \
us-central1-docker.pkg.dev/database-toolbox/toolbox/toolbox:$VERSION \
--config "/app/tools.yaml"
ⓘ Note
The-vflag mounts your localtools.yamlinto the container, and-pmaps the container's port5000to your host's port5000.
Source
To run the server directly from source, navigate to the project root directory and run:
go run .
ⓘ Note
This command runs the project from source, and is more suitable for development and testing. It does not compile a binary into your$GOPATH. If you want to compile a binary instead, refer the Developer Documentation.
Homebrew
If you installed Toolbox using Homebrew, the toolbox
binary is available in your system path. You can start the server with the same
command:
toolbox --config "tools.yaml"
NPM
To run Toolbox directly without manually downloading the binary (requires Node.js):
npx @toolbox-sdk/server --config tools.yaml
Gemini CLI
After installing a [Gemini CLI extensions](https://geminicli.com/extensions/), the prebuilt tools will be available during use.# Run Gemini CLI
gemini
# List extensions
/extensions list
# List MCP servers
/mcp list
You can use toolbox help for a full list of flags! To stop the server, send a
terminate signal (ctrl+c on most platforms).
For more detailed documentation on deploying to different environments, check out the resources in the Deploy Toolbox section
Connect to Toolbox
Once your Toolbox server is up and running, you can load tools into your MCP-compatible client or application.
MCP Client
Add the following configuration to your MCP client configuration:
{
  "mcpServers": {
    "toolbox": {
      "type": "http",
      "url": "http://127.0.0.1:5000/mcp",
    }
  }
}
If you would like to connect to a specific toolset, replace url with "http://127.0.0.1:5000/mcp/{toolset_name}".
Toolbox SDKs: Integrate with your Application
Toolbox Client SDKs provide the easy-to-use building blocks and advanced features for connecting your custom applications to the MCP Toolbox server. See below the list of Client SDKs for using various frameworks:
Python (Github)
Core
Install Toolbox Core SDK:
pip install toolbox-coreLoad tools:
from toolbox_core import ToolboxClient

# update the url to point to your server
async with ToolboxClient("http://127.0.0.1:5000") as client:

    # these tools can be passed to your application!
    tools = await client.load_toolset("toolset_name")
For more detailed instructions on using the Toolbox Core SDK, see the project's README.
LangChain / LangGraph
Install Toolbox LangChain SDK:
pip install toolbox-langchainLoad tools:
from toolbox_langchain import ToolboxClient

# update the url to point to your server
async with ToolboxClient("http://127.0.0.1:5000") as client:

    # these tools can be passed to your application!
    tools = client.load_toolset()
For more detailed instructions on using the Toolbox LangChain SDK, see the project's README.
LlamaIndex
Install Toolbox Llamaindex SDK:
pip install toolbox-llamaindexLoad tools:
from toolbox_llamaindex import ToolboxClient

# update the url to point to your server
async with ToolboxClient("http://127.0.0.1:5000") as client:

    # these tools can be passed to your application!
    tools = client.load_toolset()
For more detailed instructions on using the Toolbox Llamaindex SDK, see the project's README.
Javascript/Typescript (Github)
Core
Install Toolbox Core SDK:
npm install @toolbox-sdk/coreLoad tools:
import { ToolboxClient } from '@toolbox-sdk/core';

// update the url to point to your server
const URL = 'http://127.0.0.1:5000';
let client = new ToolboxClient(URL);

// these tools can be passed to your application!
const tools = await client.loadToolset('toolsetName');
For more detailed instructions on using the Toolbox Core SDK, see the project's README.
LangChain / LangGraph
Install Toolbox Core SDK:
npm install @toolbox-sdk/coreLoad tools:
import { ToolboxClient } from '@toolbox-sdk/core';

// update the url to point to your server
const URL = 'http://127.0.0.1:5000';
let client = new ToolboxClient(URL);

// these tools can be passed to your application!
const toolboxTools = await client.loadToolset('toolsetName');

// Define the basics of the tool: name, description, schema and core logic
const getTool = (toolboxTool) => tool(currTool, {
    name: toolboxTool.getName(),
    description: toolboxTool.getDescription(),
    schema: toolboxTool.getParamSchema()
});

// Use these tools in your Langchain/Langraph applications
const tools = toolboxTools.map(getTool);
Genkit
Install Toolbox Core SDK:
npm install @toolbox-sdk/coreLoad tools:
import { ToolboxClient } from '@toolbox-sdk/core';
import { genkit } from 'genkit';

// Initialise genkit
const ai = genkit({
    plugins: [
        googleAI({
            apiKey: process.env.GEMINI_API_KEY || process.env.GOOGLE_API_KEY
        })
    ],
    model: googleAI.model('gemini-2.0-flash'),
});

// update the url to point to your server
const URL = 'http://127.0.0.1:5000';
let client = new ToolboxClient(URL);

// these tools can be passed to your application!
const toolboxTools = await client.loadToolset('toolsetName');

// Define the basics of the tool: name, description, schema and core logic
const getTool = (toolboxTool) => ai.defineTool({
    name: toolboxTool.getName(),
    description: toolboxTool.getDescription(),
    schema: toolboxTool.getParamSchema()
}, toolboxTool)

// Use these tools in your Genkit applications
const tools = toolboxTools.map(getTool);
ADK
Install Toolbox ADK SDK:
npm install @toolbox-sdk/adkLoad tools:
import { ToolboxClient } from '@toolbox-sdk/adk';

// update the url to point to your server
const URL = 'http://127.0.0.1:5000';
let client = new ToolboxClient(URL);

// these tools can be passed to your application!
const tools = await client.loadToolset('toolsetName');
For more detailed instructions on using the Toolbox ADK SDK, see the project's README.
Go (Github)
Core
Install Toolbox Go SDK:
go get github.com/googleapis/mcp-toolbox-sdk-goLoad tools:
package main

import (
  "github.com/googleapis/mcp-toolbox-sdk-go/core"
  "context"
)

func main() {
  // Make sure to add the error checks
  // update the url to point to your server
  URL := "http://127.0.0.1:5000";
  ctx := context.Background()

  client, err := core.NewToolboxClient(URL)

  // Framework agnostic tools
  tools, err := client.LoadToolset("toolsetName", ctx)
}
For more detailed instructions on using the Toolbox Go SDK, see the project's README.
LangChain Go
Install Toolbox Go SDK:
go get github.com/googleapis/mcp-toolbox-sdk-goLoad tools:
package main import ( "context" "encoding/json" "github.com/googleapis/mcp-toolbox-sdk-go/core" "github.com/tmc/langchaingo/llms" ) func main() { // Make sure to add the error checks // update the url to point to your server URL := "http://127.0.0.1:5000" ctx := context.Background() client, err := core.NewToolboxClient(URL) // Framework agnostic tool tool, err := client.LoadTool("toolName", ctx) // Fetch the tool's input schema inputschema, err := tool.InputSchema() var paramsSchema map[string]any _ = json.Unmarshal(inputschema, ¶msSchema) // Use this tool with LangChainGo langChainTool := llms.Tool{ Type: "function", Function: &llms.FunctionDefinition{ Name: tool.Name(), Description: tool.Description(), Parameters: paramsSchema, }, } }Genkit
Install Toolbox Go SDK:
go get github.com/googleapis/mcp-toolbox-sdk-goLoad tools:
package main
import (
  "context"
  "log"

  "github.com/firebase/genkit/go/genkit"
  "github.com/googleapis/mcp-toolbox-sdk-go/core"
  "github.com/googleapis/mcp-toolbox-sdk-go/tbgenkit"
)

func main() {
  // Make sure to add the error checks
  // Update the url to point to your server
  URL := "http://127.0.0.1:5000"
  ctx := context.Background()
  g := genkit.Init(ctx)

  client, err := core.NewToolboxClient(URL)

  // Framework agnostic tool
  tool, err := client.LoadTool("toolName", ctx)

  // Convert the tool using the tbgenkit package
  // Use this tool with Genkit Go
  genkitTool, err := tbgenkit.ToGenkitTool(tool, g)
  if err != nil {
    log.Fatalf("Failed to convert tool: %v\n", err)
  }
  log.Printf("Successfully converted tool: %s", genkitTool.Name())
}
Go GenAI
Install Toolbox Go SDK:
go get github.com/googleapis/mcp-toolbox-sdk-goLoad tools:
package main

import (
  "context"
  "encoding/json"

  "github.com/googleapis/mcp-toolbox-sdk-go/core"
  "google.golang.org/genai"
)

func main() {
  // Make sure to add the error checks
  // Update the url to point to your server
  URL := "http://127.0.0.1:5000"
  ctx := context.Background()

  client, err := core.NewToolboxClient(URL)

  // Framework agnostic tool
  tool, err := client.LoadTool("toolName", ctx)

  // Fetch the tool's input schema
  inputschema, err := tool.InputSchema()

  var schema *genai.Schema
  _ = json.Unmarshal(inputschema, &schema)

  funcDeclaration := &genai.FunctionDeclaration{
    Name:        tool.Name(),
    Description: tool.Description(),
    Parameters:  schema,
  }

  // Use this tool with Go GenAI
  genAITool := &genai.Tool{
    FunctionDeclarations: []*genai.FunctionDeclaration{funcDeclaration},
  }
}
OpenAI Go
Install Toolbox Go SDK:
go get github.com/googleapis/mcp-toolbox-sdk-goLoad tools:
package main import ( "context" "encoding/json" "github.com/googleapis/mcp-toolbox-sdk-go/core" openai "github.com/openai/openai-go" ) func main() { // Make sure to add the error checks // Update the url to point to your server URL := "http://127.0.0.1:5000" ctx := context.Background() client, err := core.NewToolboxClient(URL) // Framework agnostic tool tool, err := client.LoadTool("toolName", ctx) // Fetch the tool's input schema inputschema, err := tool.InputSchema() var paramsSchema openai.FunctionParameters _ = json.Unmarshal(inputschema, ¶msSchema) // Use this tool with OpenAI Go openAITool := openai.ChatCompletionToolParam{ Function: openai.FunctionDefinitionParam{ Name: tool.Name(), Description: openai.String(tool.Description()), Parameters: paramsSchema, }, } }ADK Go
Install Toolbox Go SDK:
go get github.com/googleapis/mcp-toolbox-sdk-goLoad tools:
package main

import (
  "github.com/googleapis/mcp-toolbox-sdk-go/tbadk"
  "context"
)

func main() {
  // Make sure to add the error checks
  // Update the url to point to your server
  URL := "http://127.0.0.1:5000"
  ctx := context.Background()
  client, err := tbadk.NewToolboxClient(URL)
  if err != nil {
    return fmt.Sprintln("Could not start Toolbox Client", err)
  }

  // Use this tool with ADK Go
  tool, err := client.LoadTool("toolName", ctx)
  if err != nil {
    return fmt.Sprintln("Could not load Toolbox Tool", err)
  }
}
For more detailed instructions on using the Toolbox Go SDK, see the project's README.
Additional Features
Test tools with the Toolbox UI
To launch Toolbox's interactive UI, use the --ui flag. This allows you to test
tools and toolsets with features such as authorized parameters. To learn more,
visit Toolbox UI.
./toolbox --ui
Telemetry
Toolbox emits traces and metrics via OpenTelemetry. Use --telemetry-otlp=<endpoint>
to export to any OTLP-compatible backend like Google Cloud Monitoring, Agnost AI, or
others. See the telemetry docs for details.
Generate Agent Skills
The skills-generate command allows you to convert a toolset into an Agent Skill compatible with the Agent Skill specification. This is useful for distributing tools as portable skill packages.
toolbox --config tools.yaml skills-generate \
  --name "my-skill" \
  --toolset "my_toolset" \
  --description "A skill containing multiple tools"
Once generated, you can install the skill into the Gemini CLI:
gemini skills install ./skills/my-skill
For more details, see the Generate Agent Skills guide.
The repository also ships ready-to-use Agent Skills (e.g. maintainer workflows). See skills/ for the catalog and install instructions.
Versioning
MCP Toolbox for Databases follows Semantic Versioning.
The Public API includes the Toolbox Server (CLI, configuration manifests, and pre-built toolsets) and the Client SDKs.
- Major versions are incremented for breaking changes, such as incompatible CLI or manifest changes.
- Minor versions are incremented for new features, including modifications to pre-built toolsets or beta features.
- Patch versions are incremented for backward-compatible bug fixes.
For more details, see our Full Versioning Policy.
Contributing
Contributions are welcome. Please, see the CONTRIBUTING guide to get started.
For technical details on setting up a environment for developing on Toolbox itself, see the DEVELOPER guide.
Please note that this project is released with a Contributor Code of Conduct. By participating in this project you agree to abide by its terms. See Contributor Code of Conduct for more information.
Community
Join our Discord community to connect with our developers!