Dot - AI Data Analyst
Remote MCP server for Dot, the AI data analyst. Ask in plain English; Dot writes read-only SQL, runs it on your warehouse (Snowflake, BigQuery, Databricks, Postgres and more) and returns tables and charts. OAuth or API key.
Hosted MCP Server
npx add-mcp 'https://app.getdot.ai/ai/mcp'Installs into Claude Code, Codex, Cursor and more
Documentation
For the complete documentation index, see llms.txt. Markdown versions of documentation pages are available by appending
.mdto page URLs; this page is available as Markdown.
MCP
What is MCP?
MCP (Model Context Protocol) lets AI assistants like Claude, Cursor, and ChatGPT connect directly to your data sources through secure connections. With Dot's MCP integration, your assistant can query your business data while respecting all of your existing Dot permissions and setup.
Your Dot MCP URL
You'll paste this URL into every client below. It depends on which region you sign into Dot from:
- US:
https://app.getdot.ai/ai/mcp - EU:
https://eu.getdot.ai/ai/mcp
Use the same host you use to sign into Dot in the browser. You can also copy the exact URL from Settings → Integrations inside Dot.
{% hint style="success" %} OAuth is the default. For supported clients (Claude, Cursor, Windsurf), OAuth means no tokens to copy or manage — just sign into Dot in your browser and click Allow. Sessions last up to a year.
If OAuth isn't supported by your client (ChatGPT, Raycast, generic MCP clients) or something goes wrong, see Using an API token. {% endhint %}
Claude (Web, Desktop, Cowork, Mobile)
Requirements: Free, Pro, Max, Team, or Enterprise plan. Free users can connect one custom connector at a time.
{% hint style="info" %} You only need to set this up once. Custom connectors are remote MCP servers hosted by Dot, so Anthropic syncs them across every Claude surface automatically. Adding Dot on claude.ai makes it available in Claude Desktop, Cowork, and the Claude mobile apps with no per-device setup. Prefer to start from Claude Desktop? Open Settings → Connectors → Add custom connector and follow the same steps — it'll sync back to the web. {% endhint %}
{% tabs %} {% tab title="Pro / Max" %} {% stepper %} {% step %}
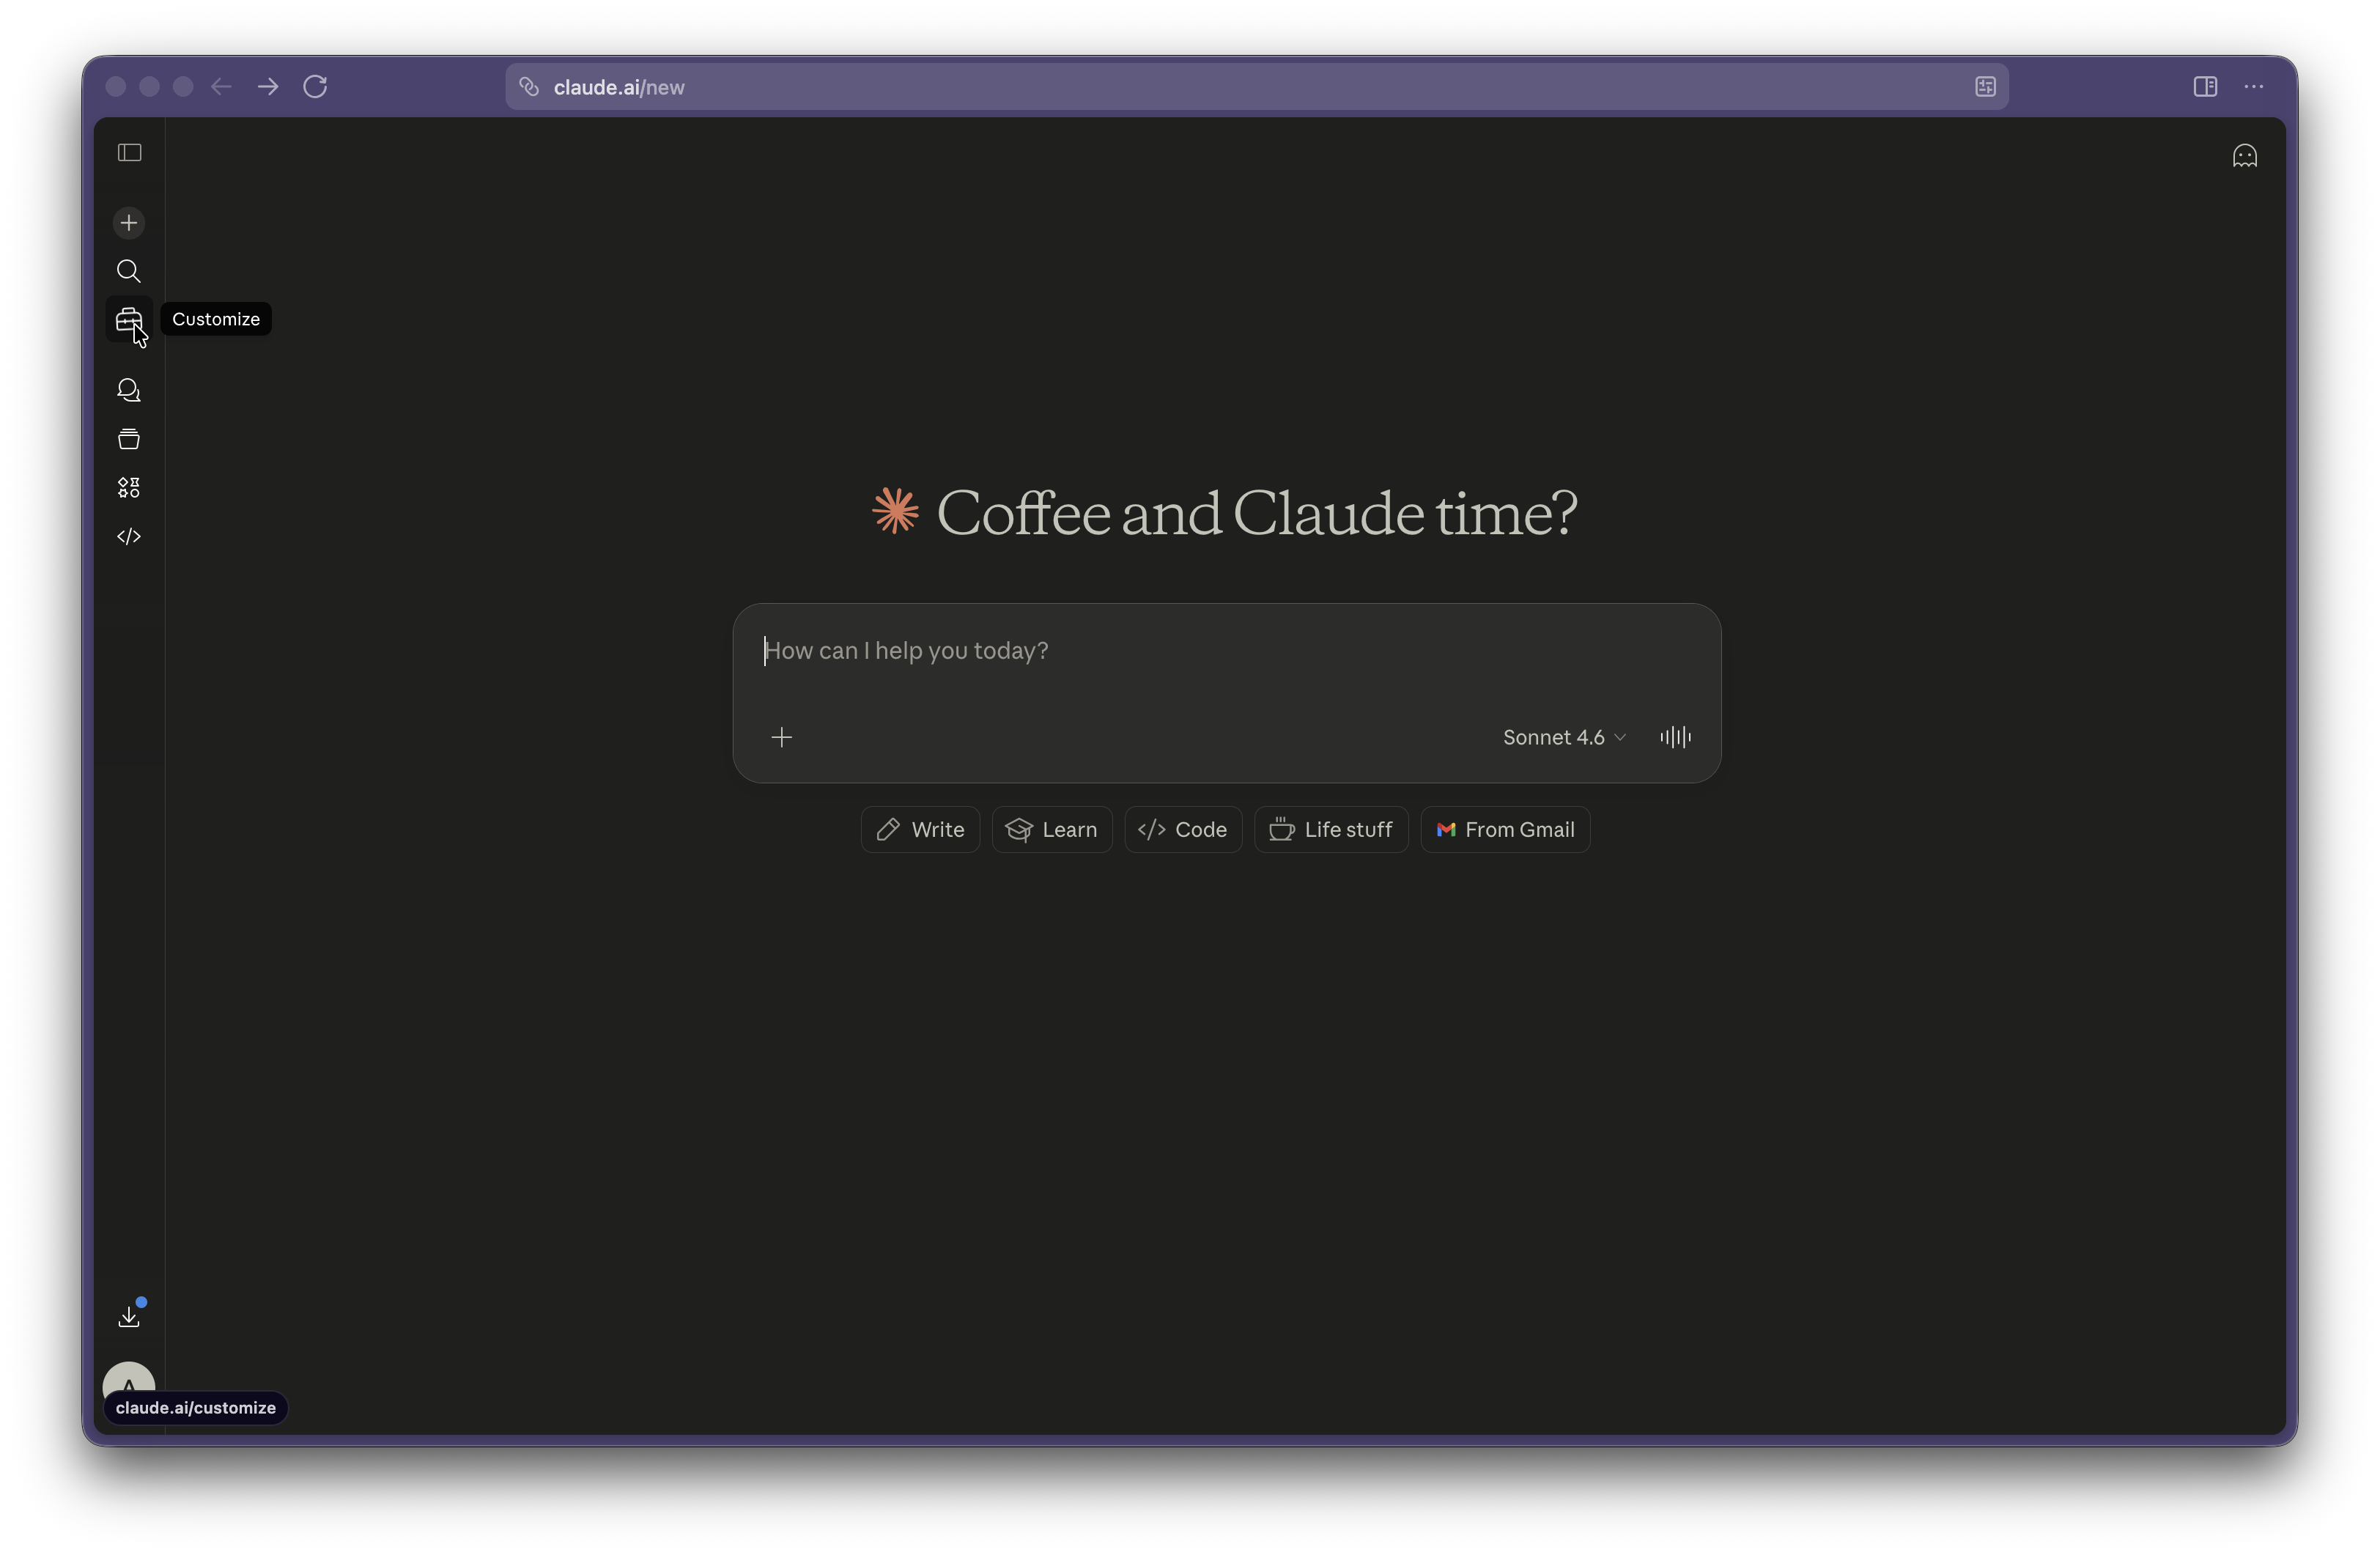
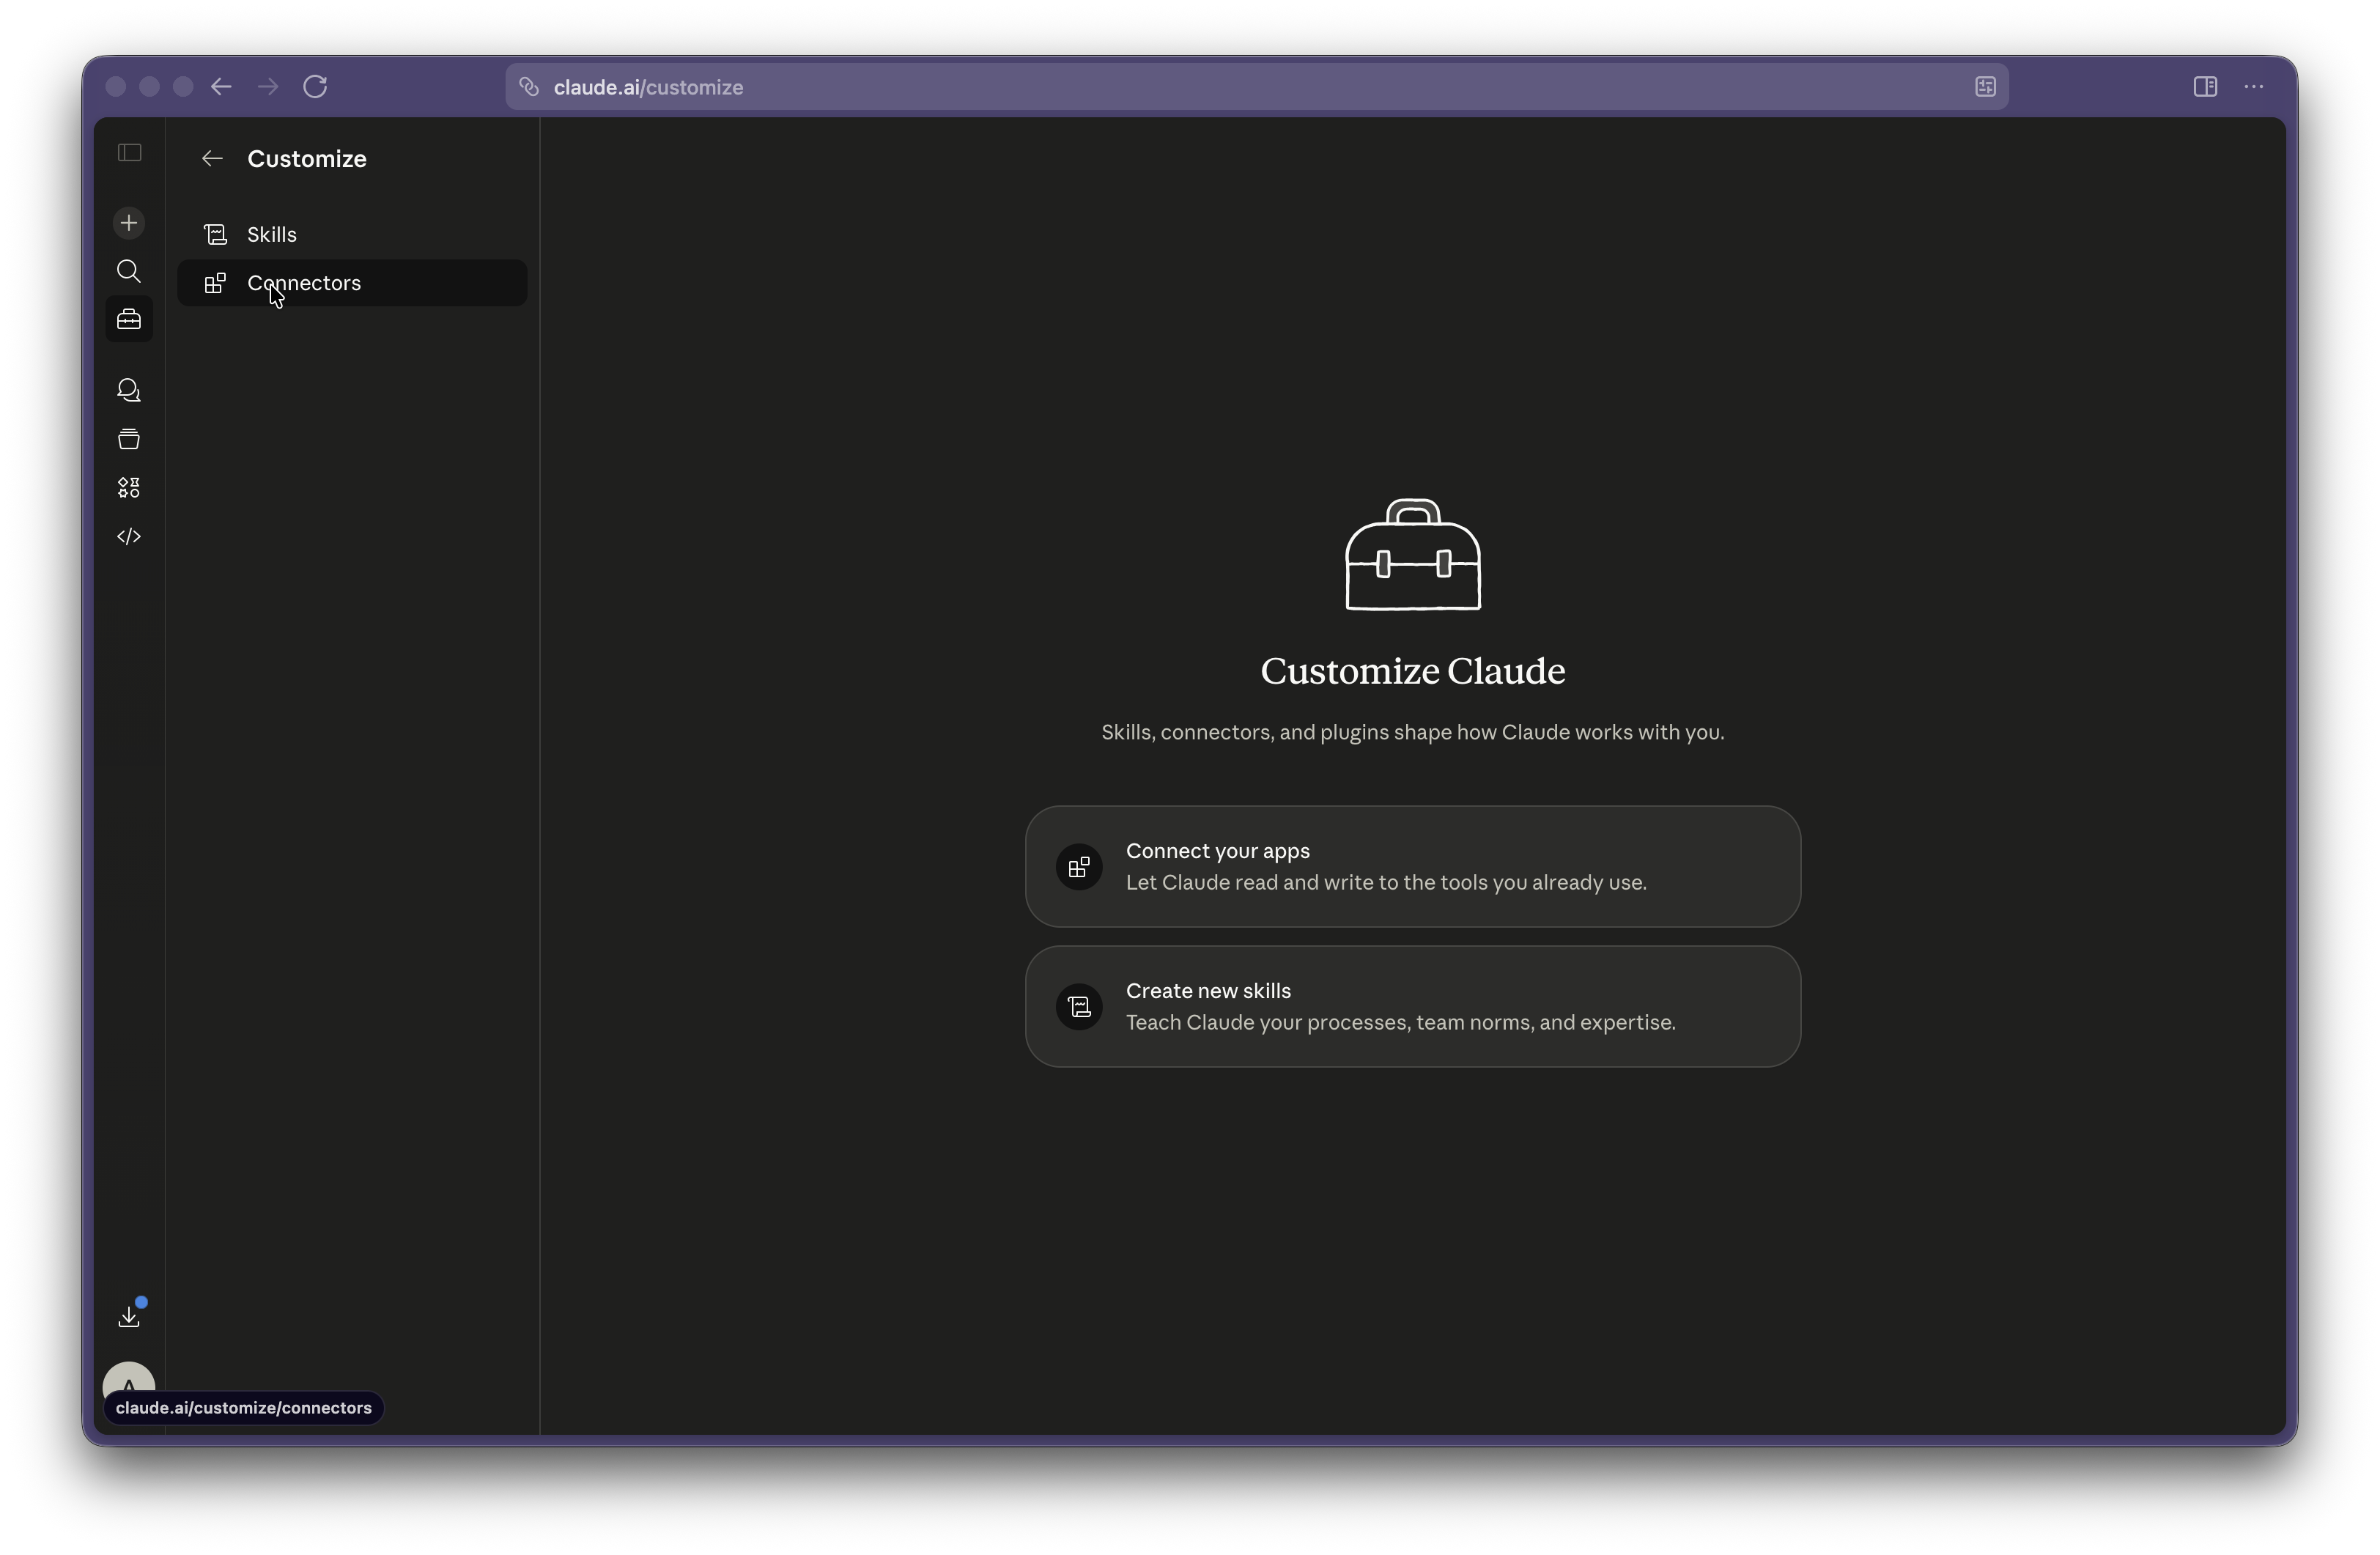
Open Customize → Connectors
In Claude, click your profile → Customize → Connectors.
 {% endstep %}
{% step %}
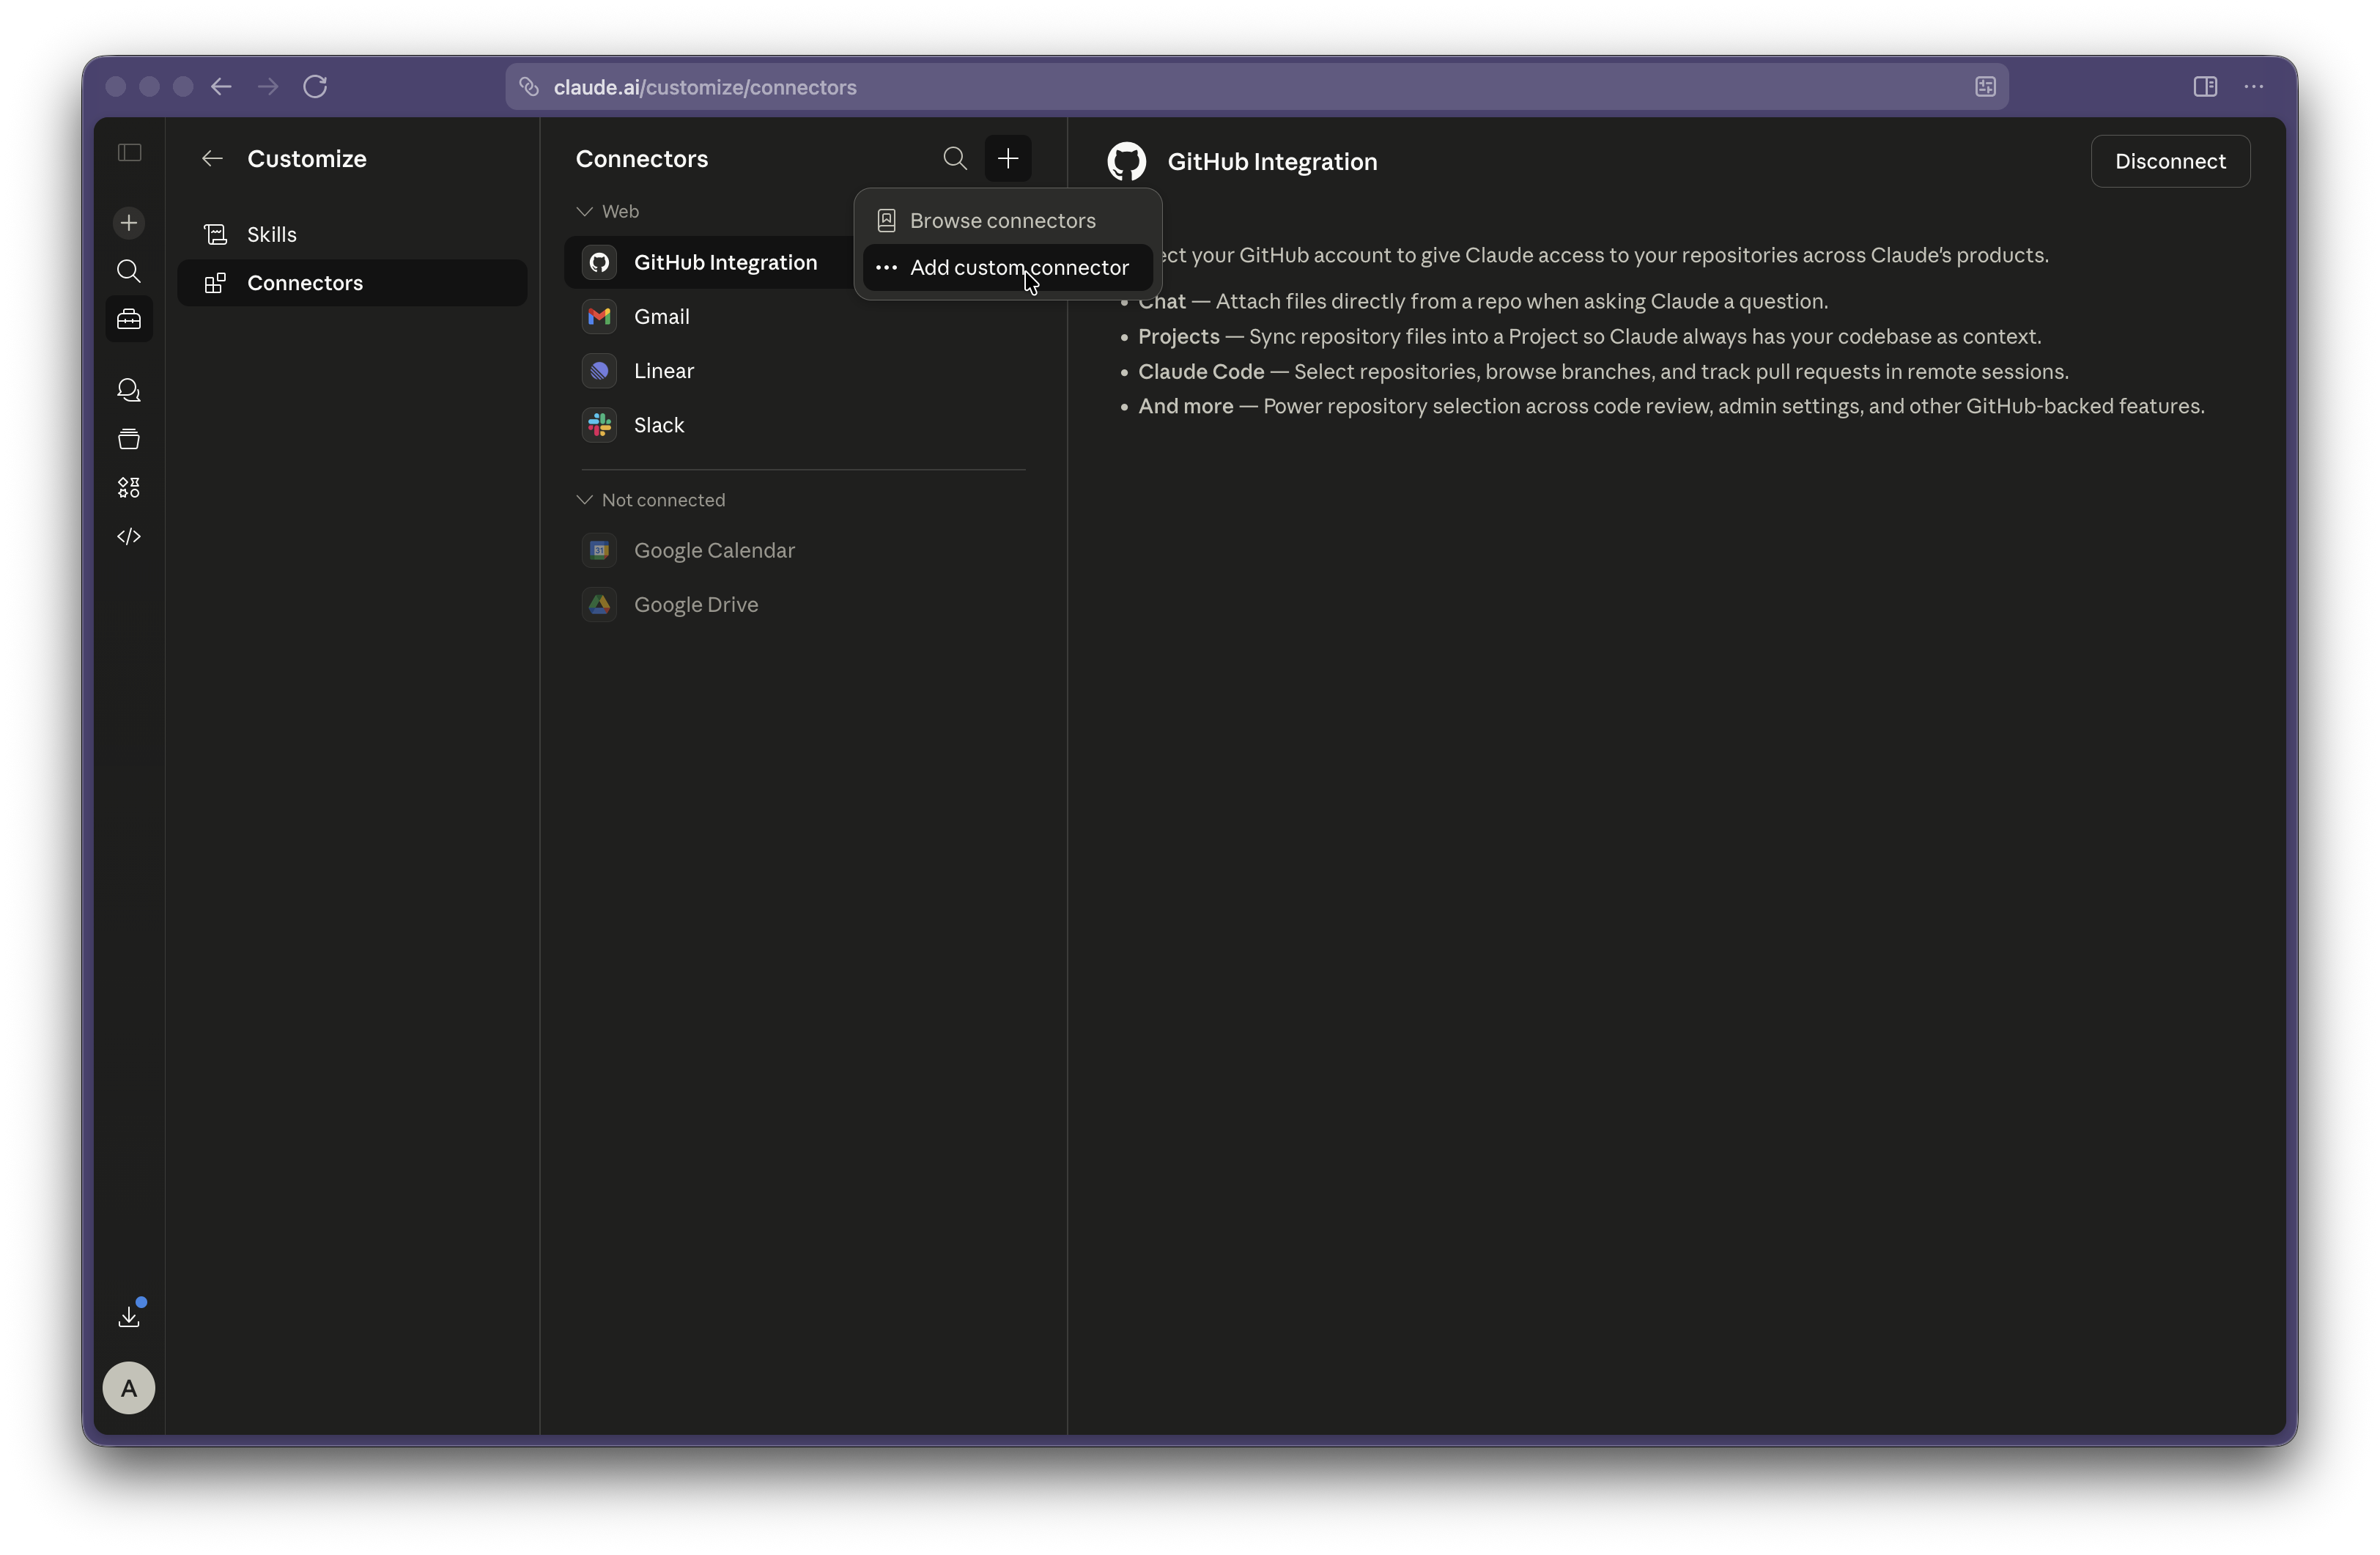
Add a custom connector
Click the + next to the Connectors header and choose Add custom connector.
 {% endstep %}
{% step %}
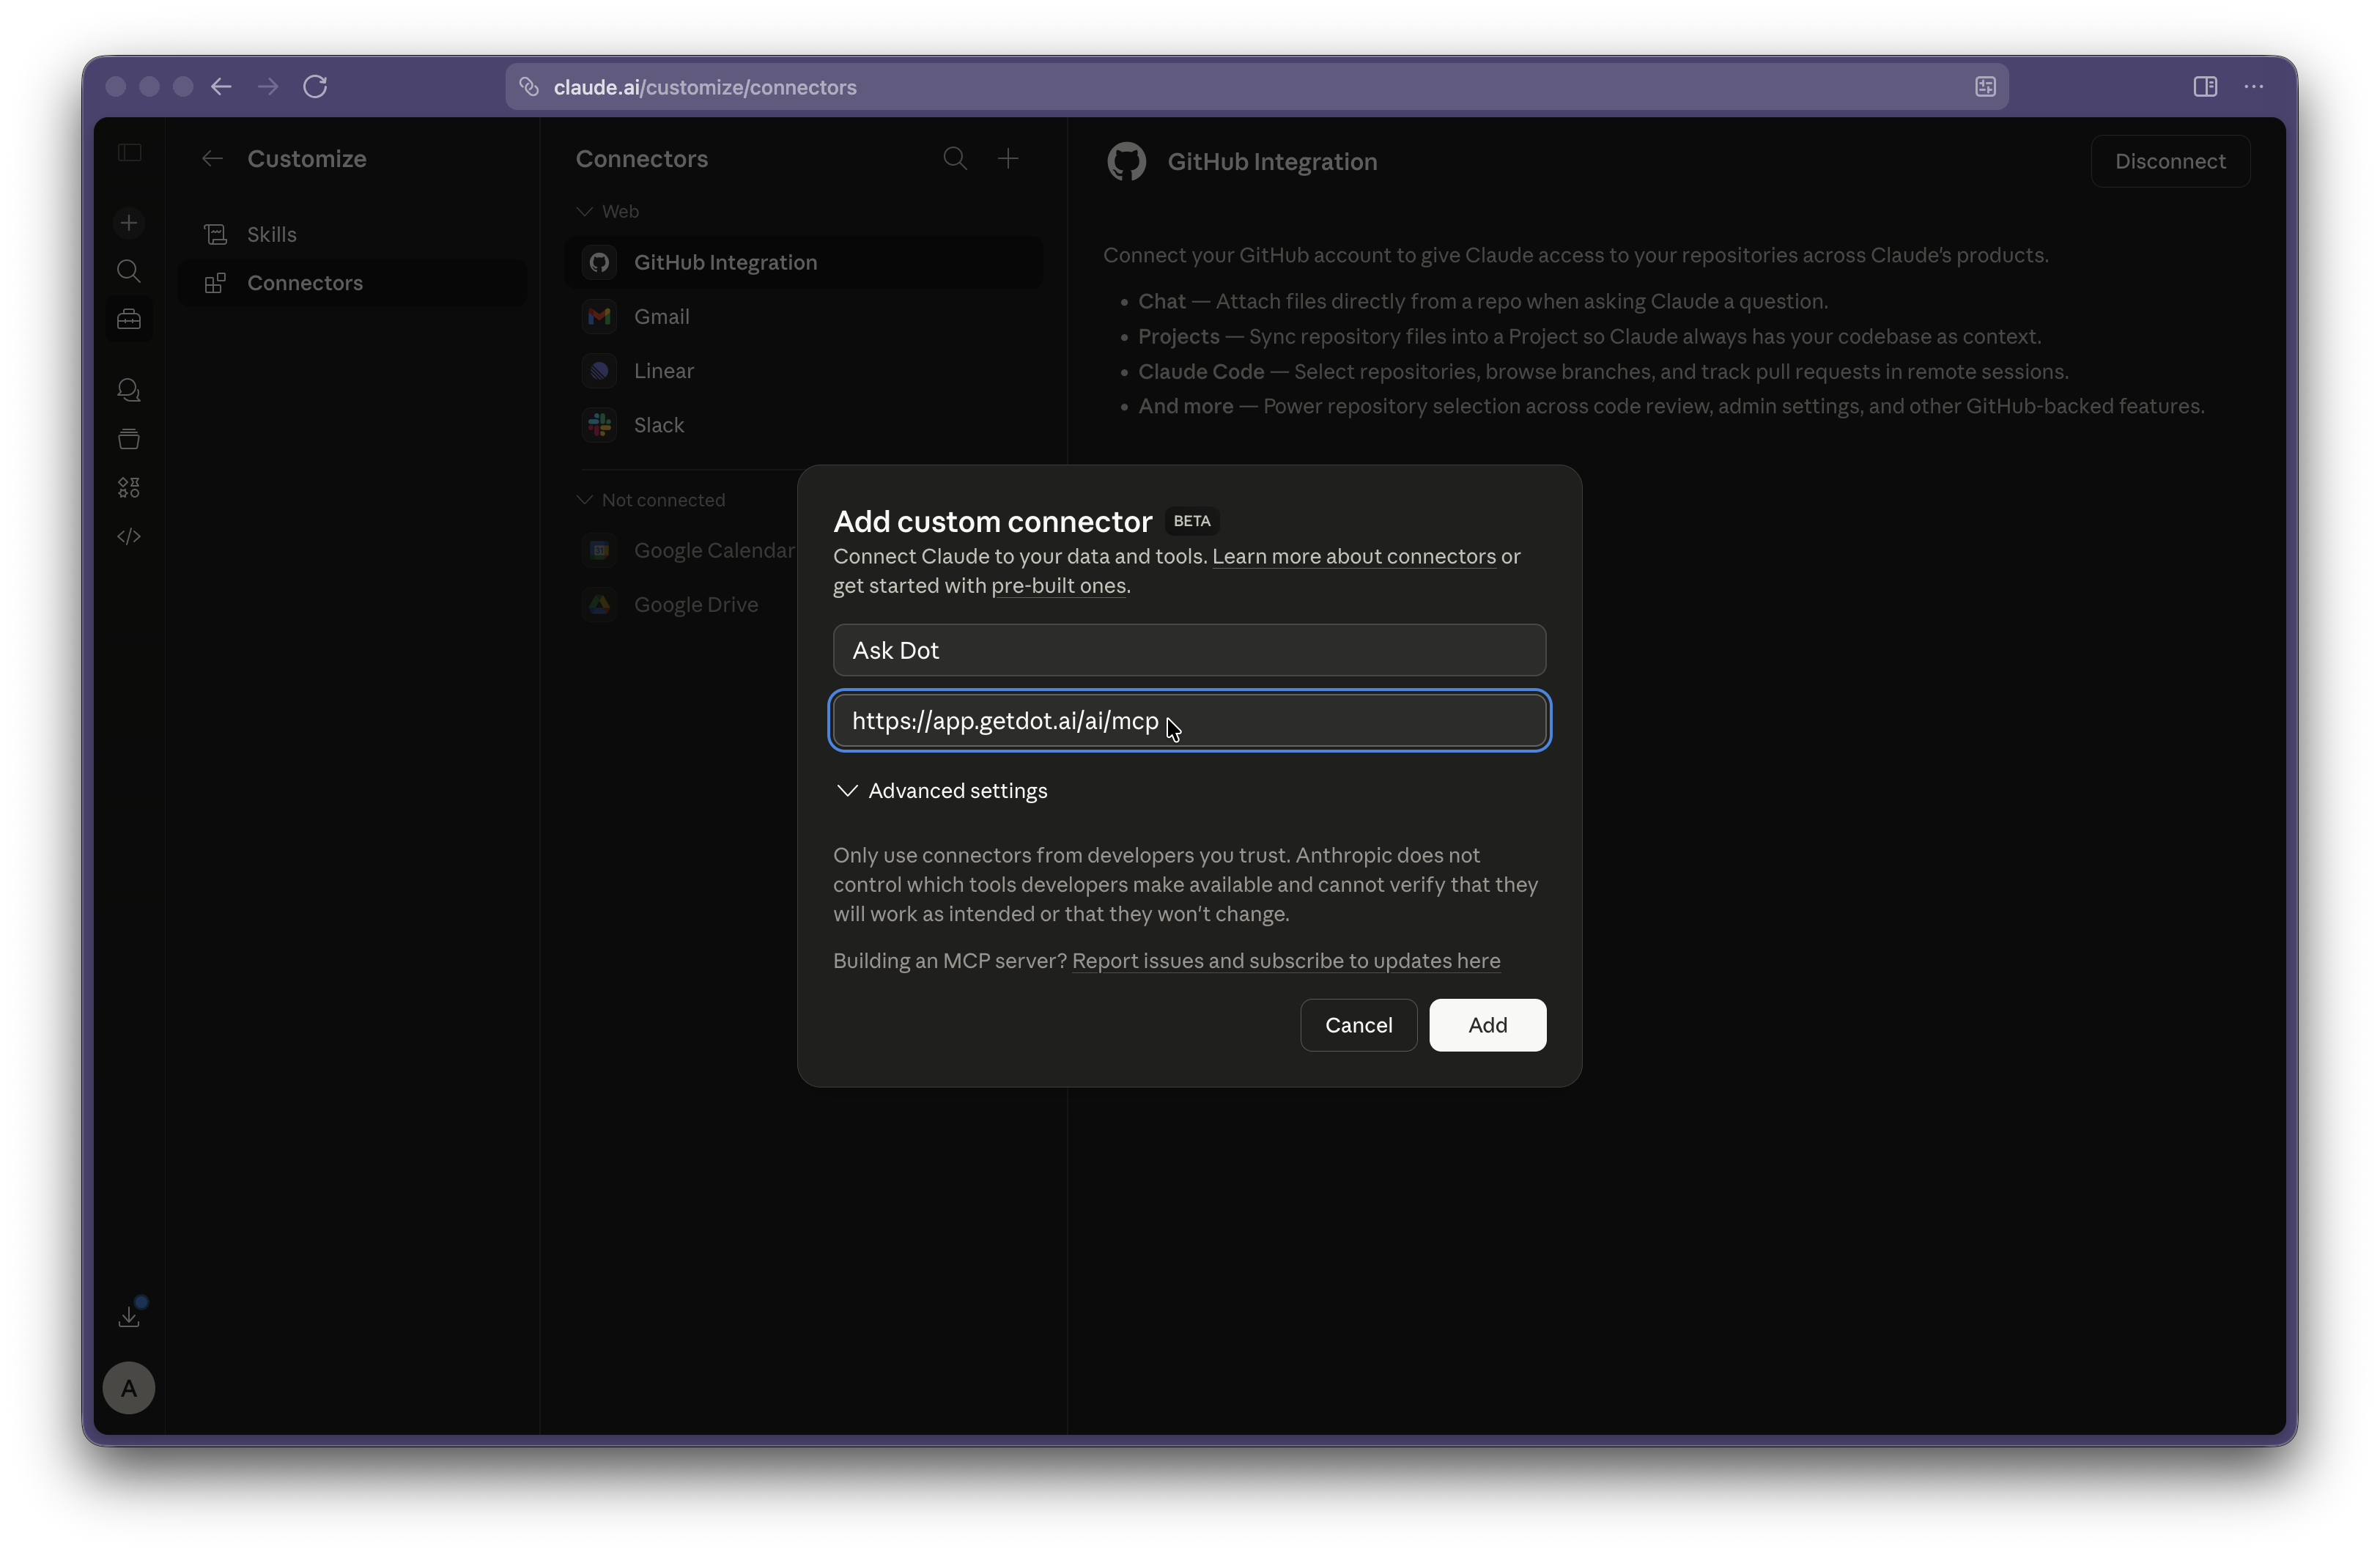
Name it and paste the URL
Name it Ask Dot, paste your Dot MCP URL, then click Add.
 {% endstep %}
{% step %}
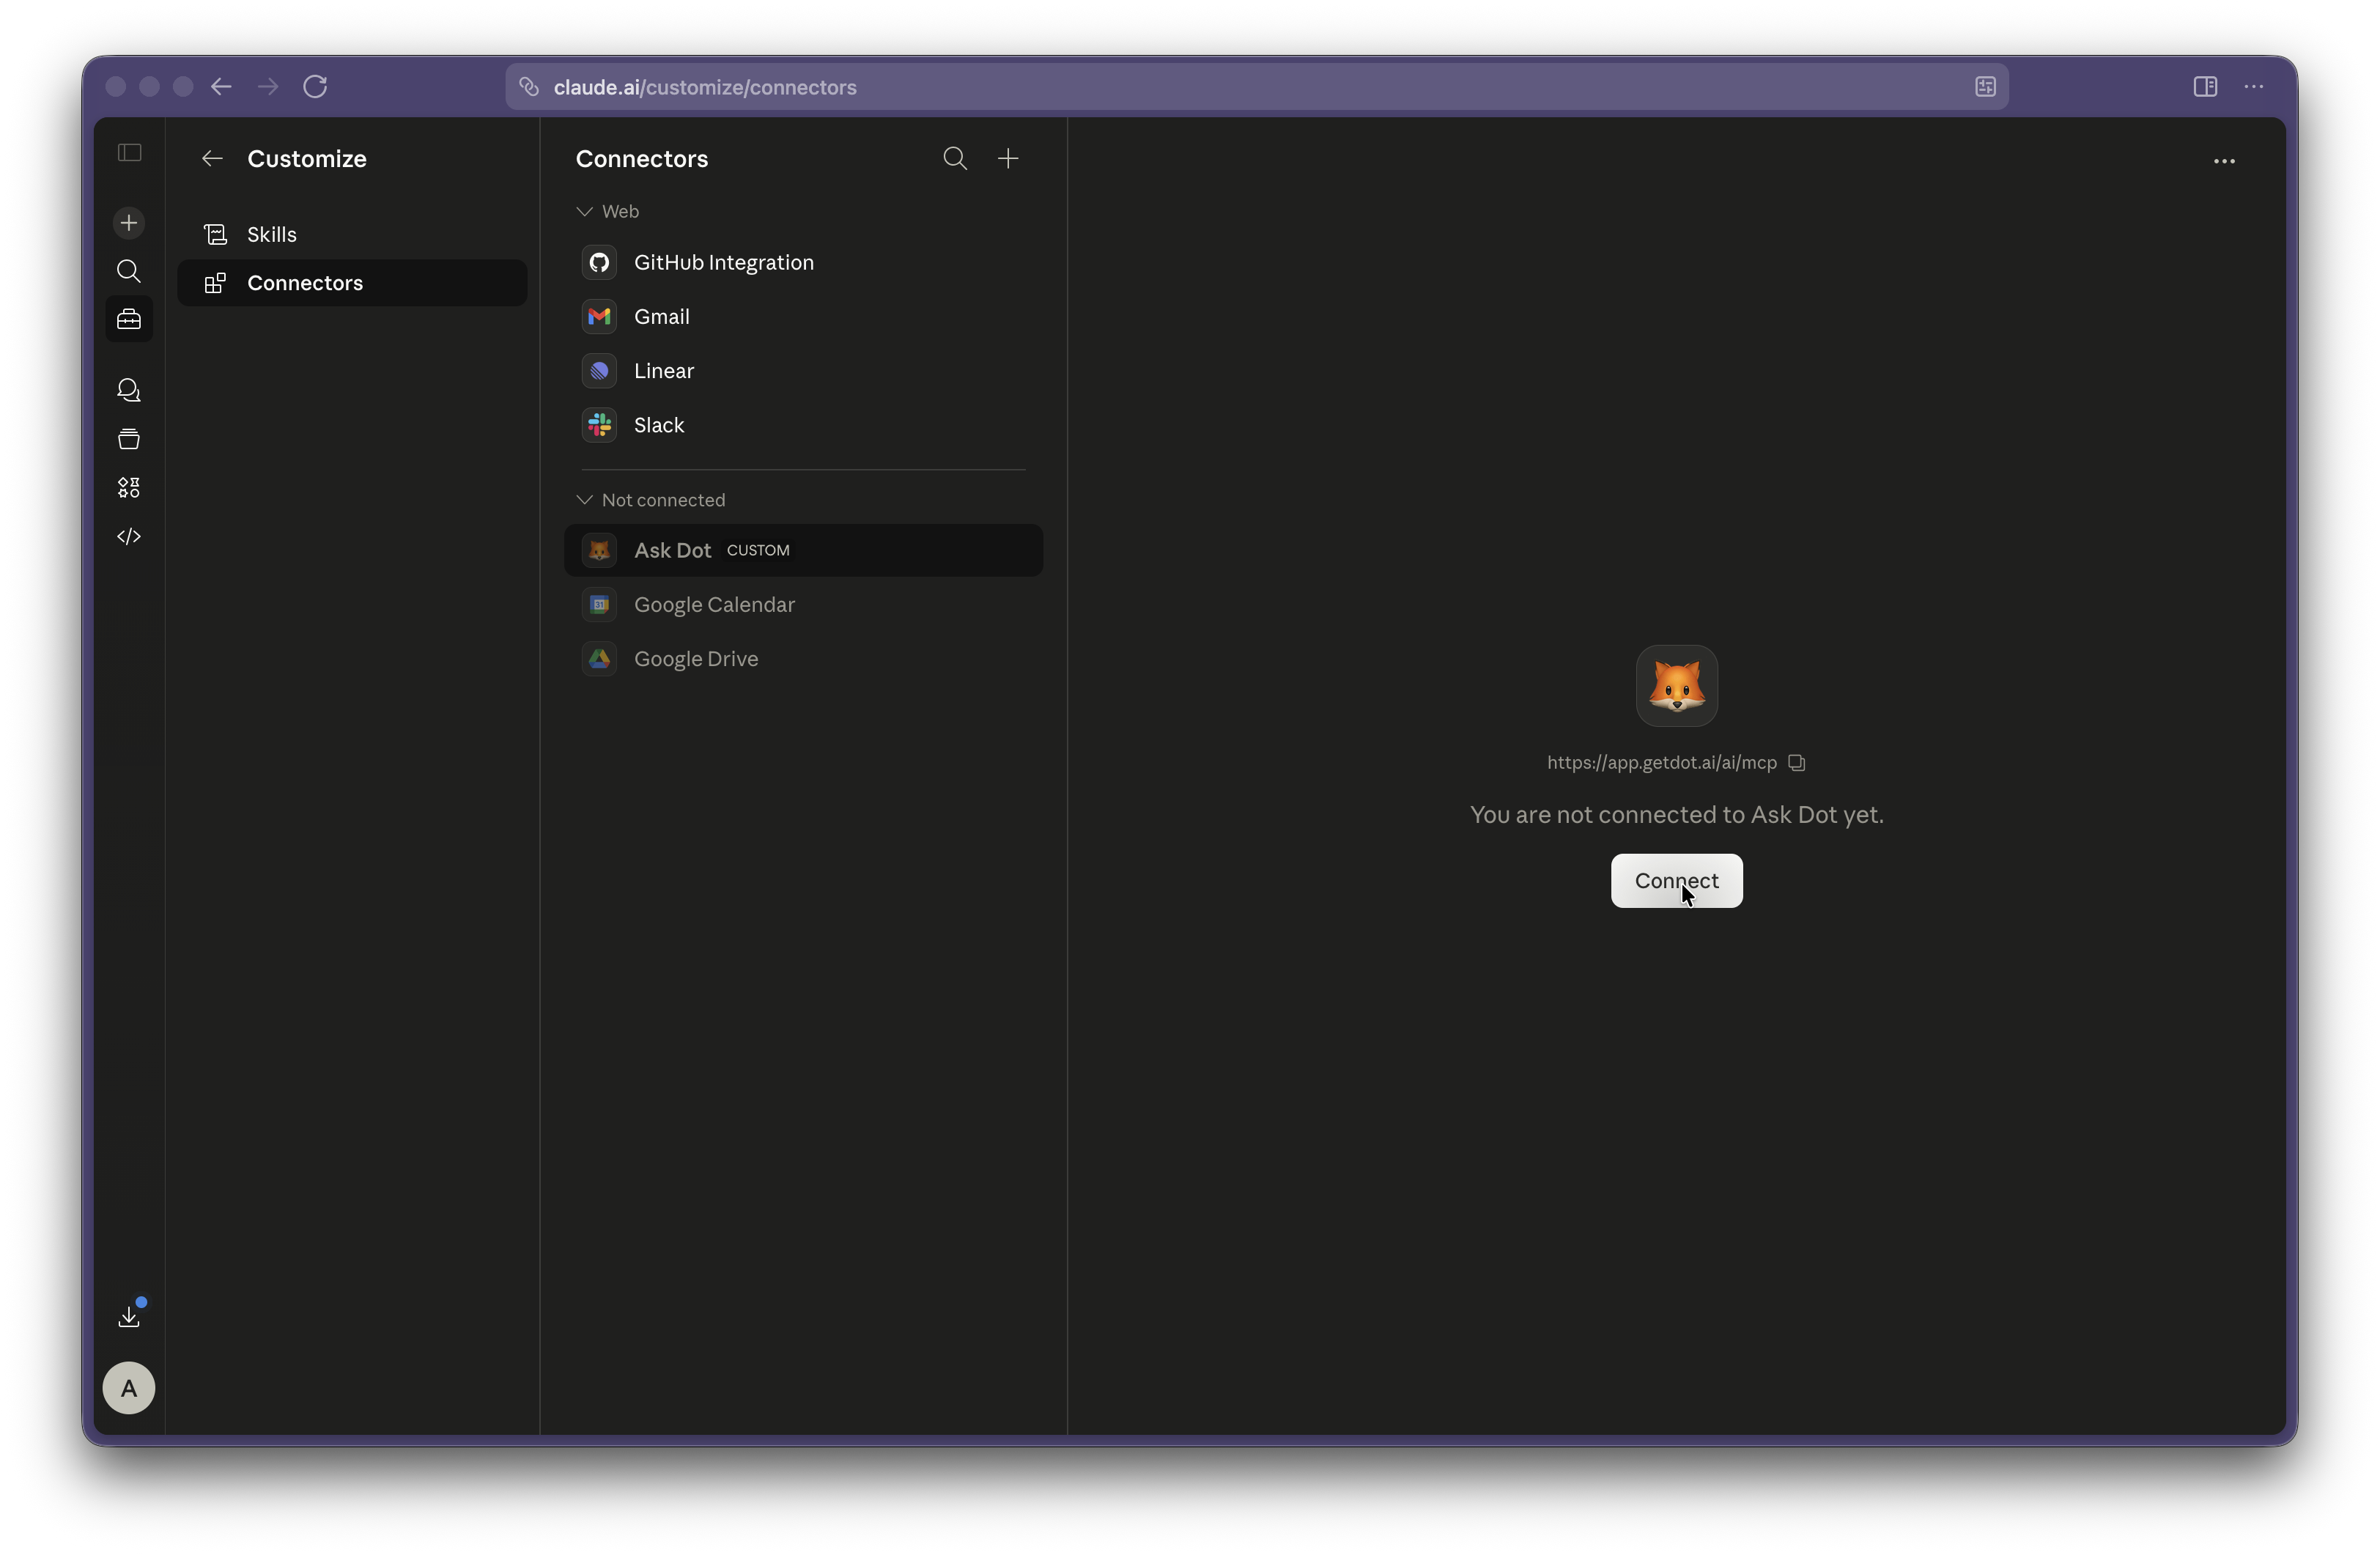
Connect
Click Connect on the new Ask Dot entry.
 {% endstep %}
{% step %}
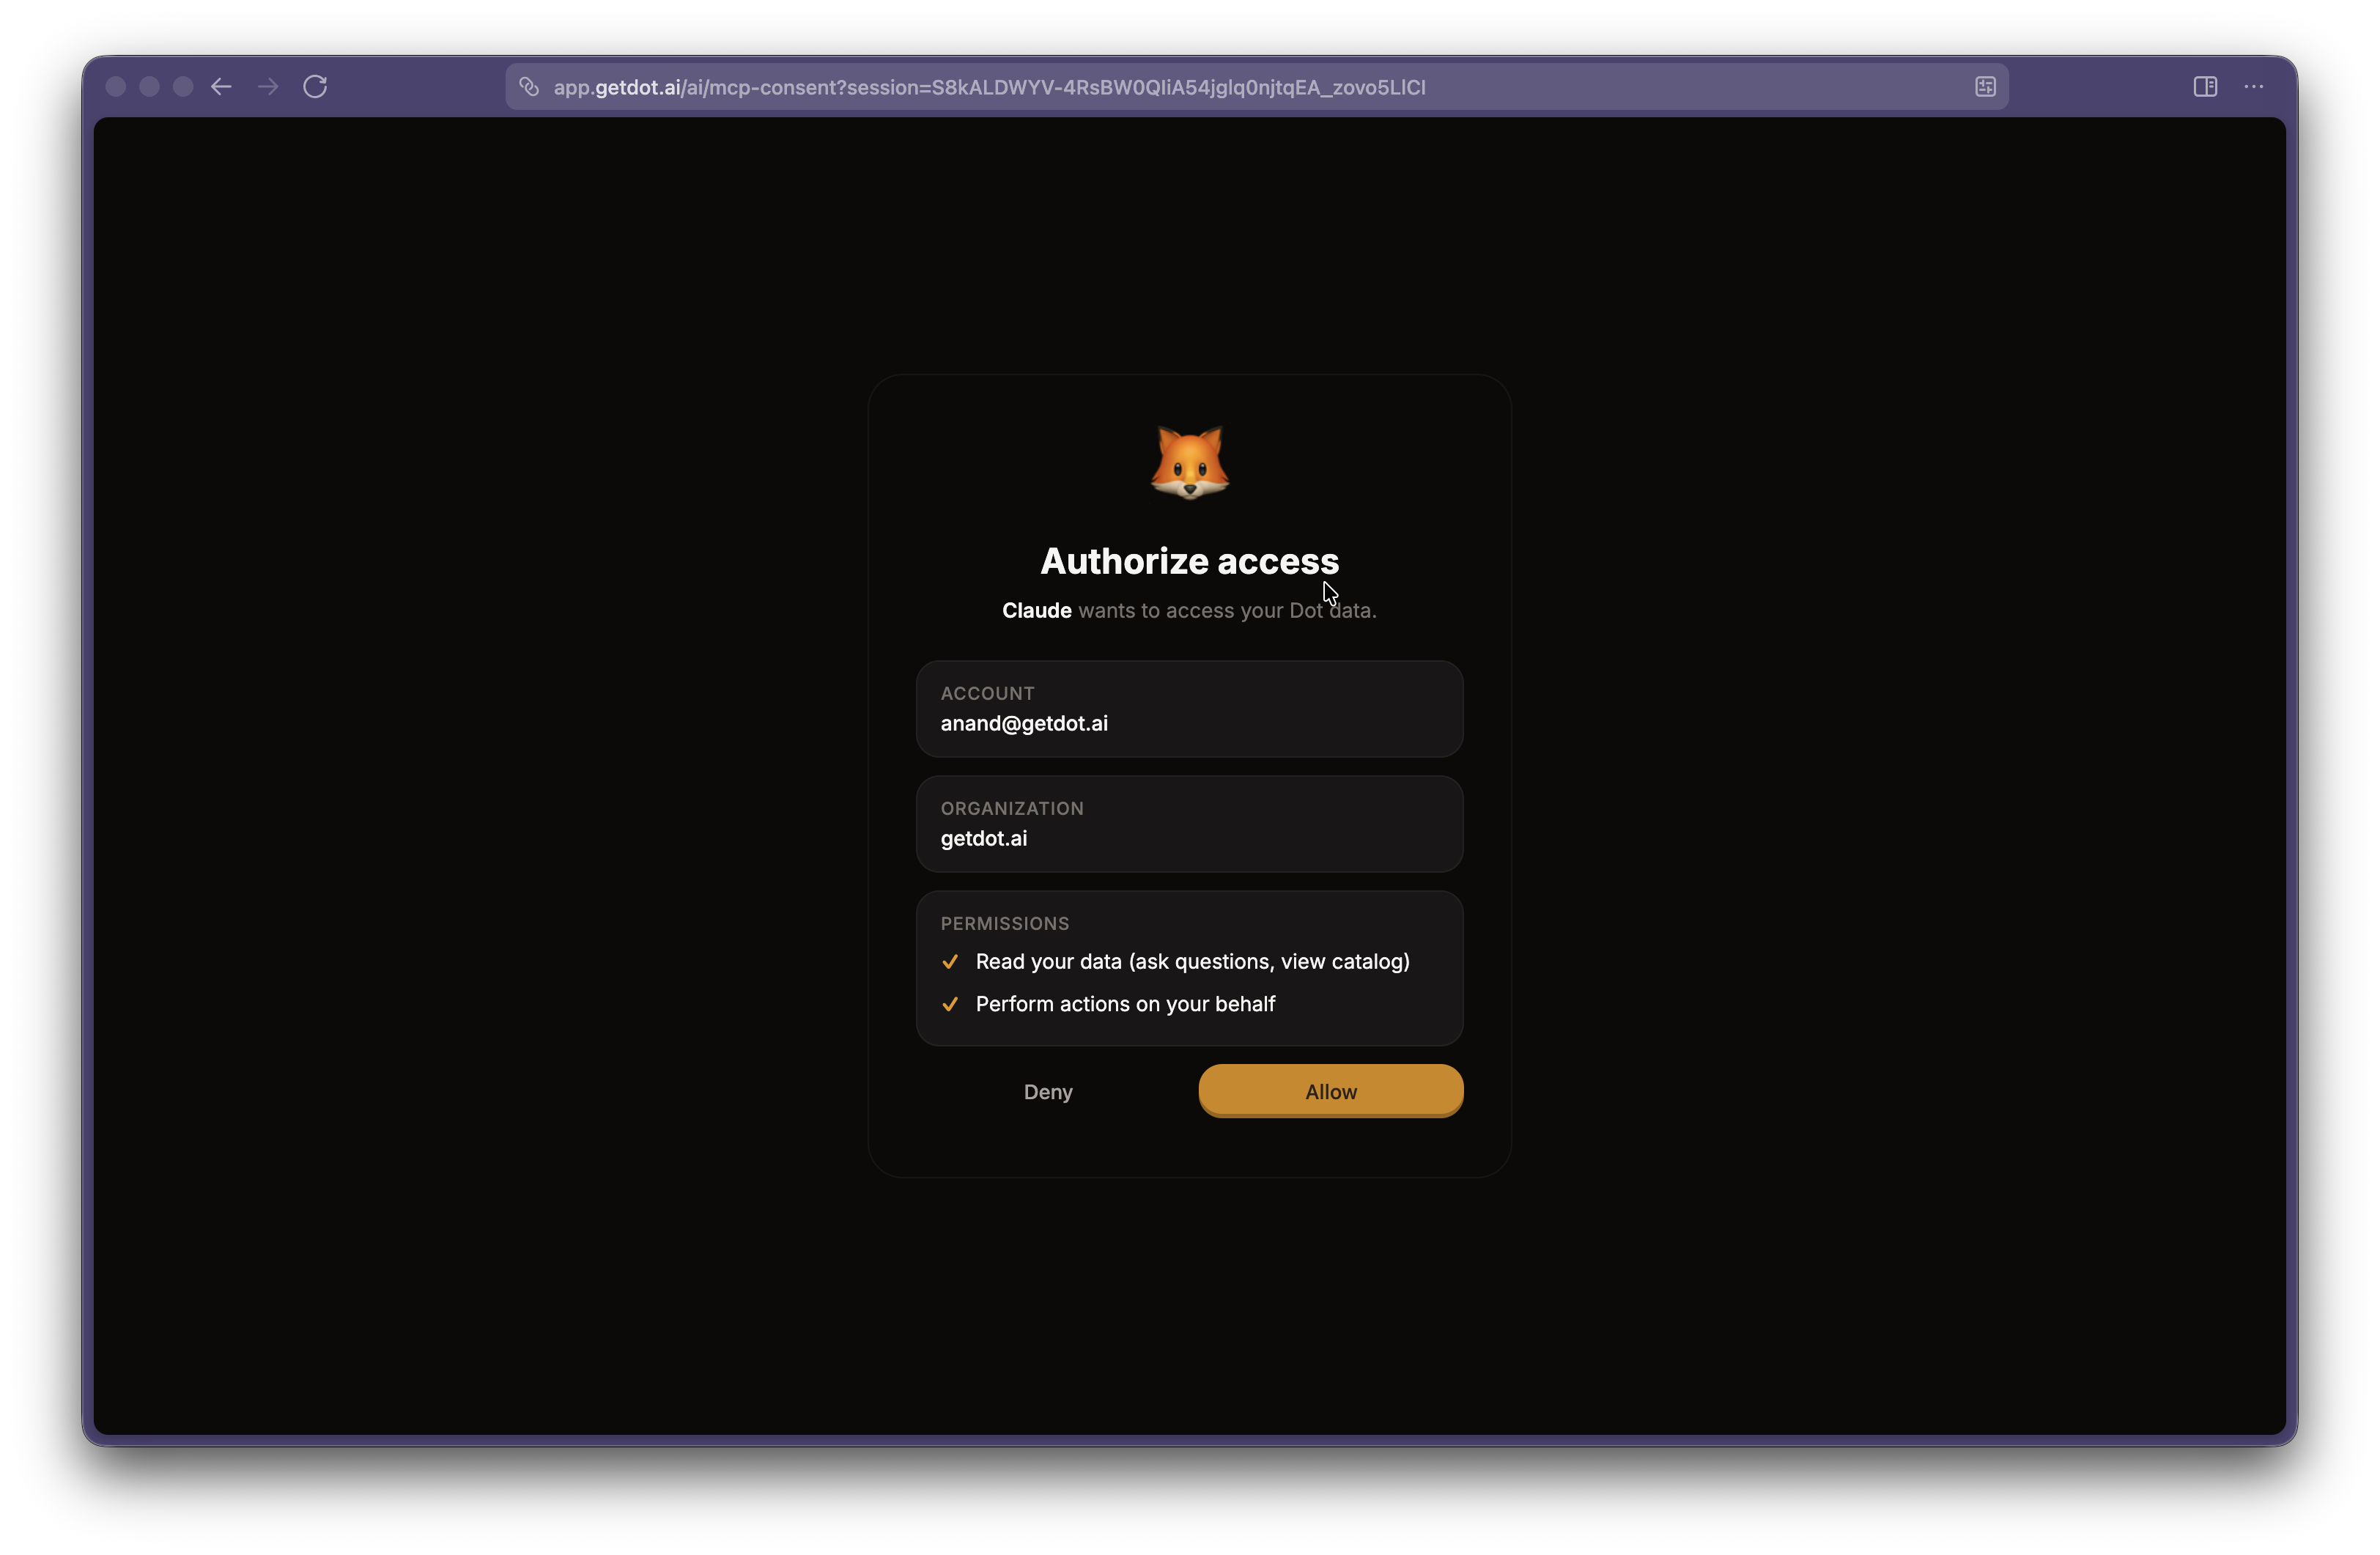
Authorize in Dot
A Dot tab opens. Review the requested permissions and click Allow.
 {% endstep %}
{% step %}
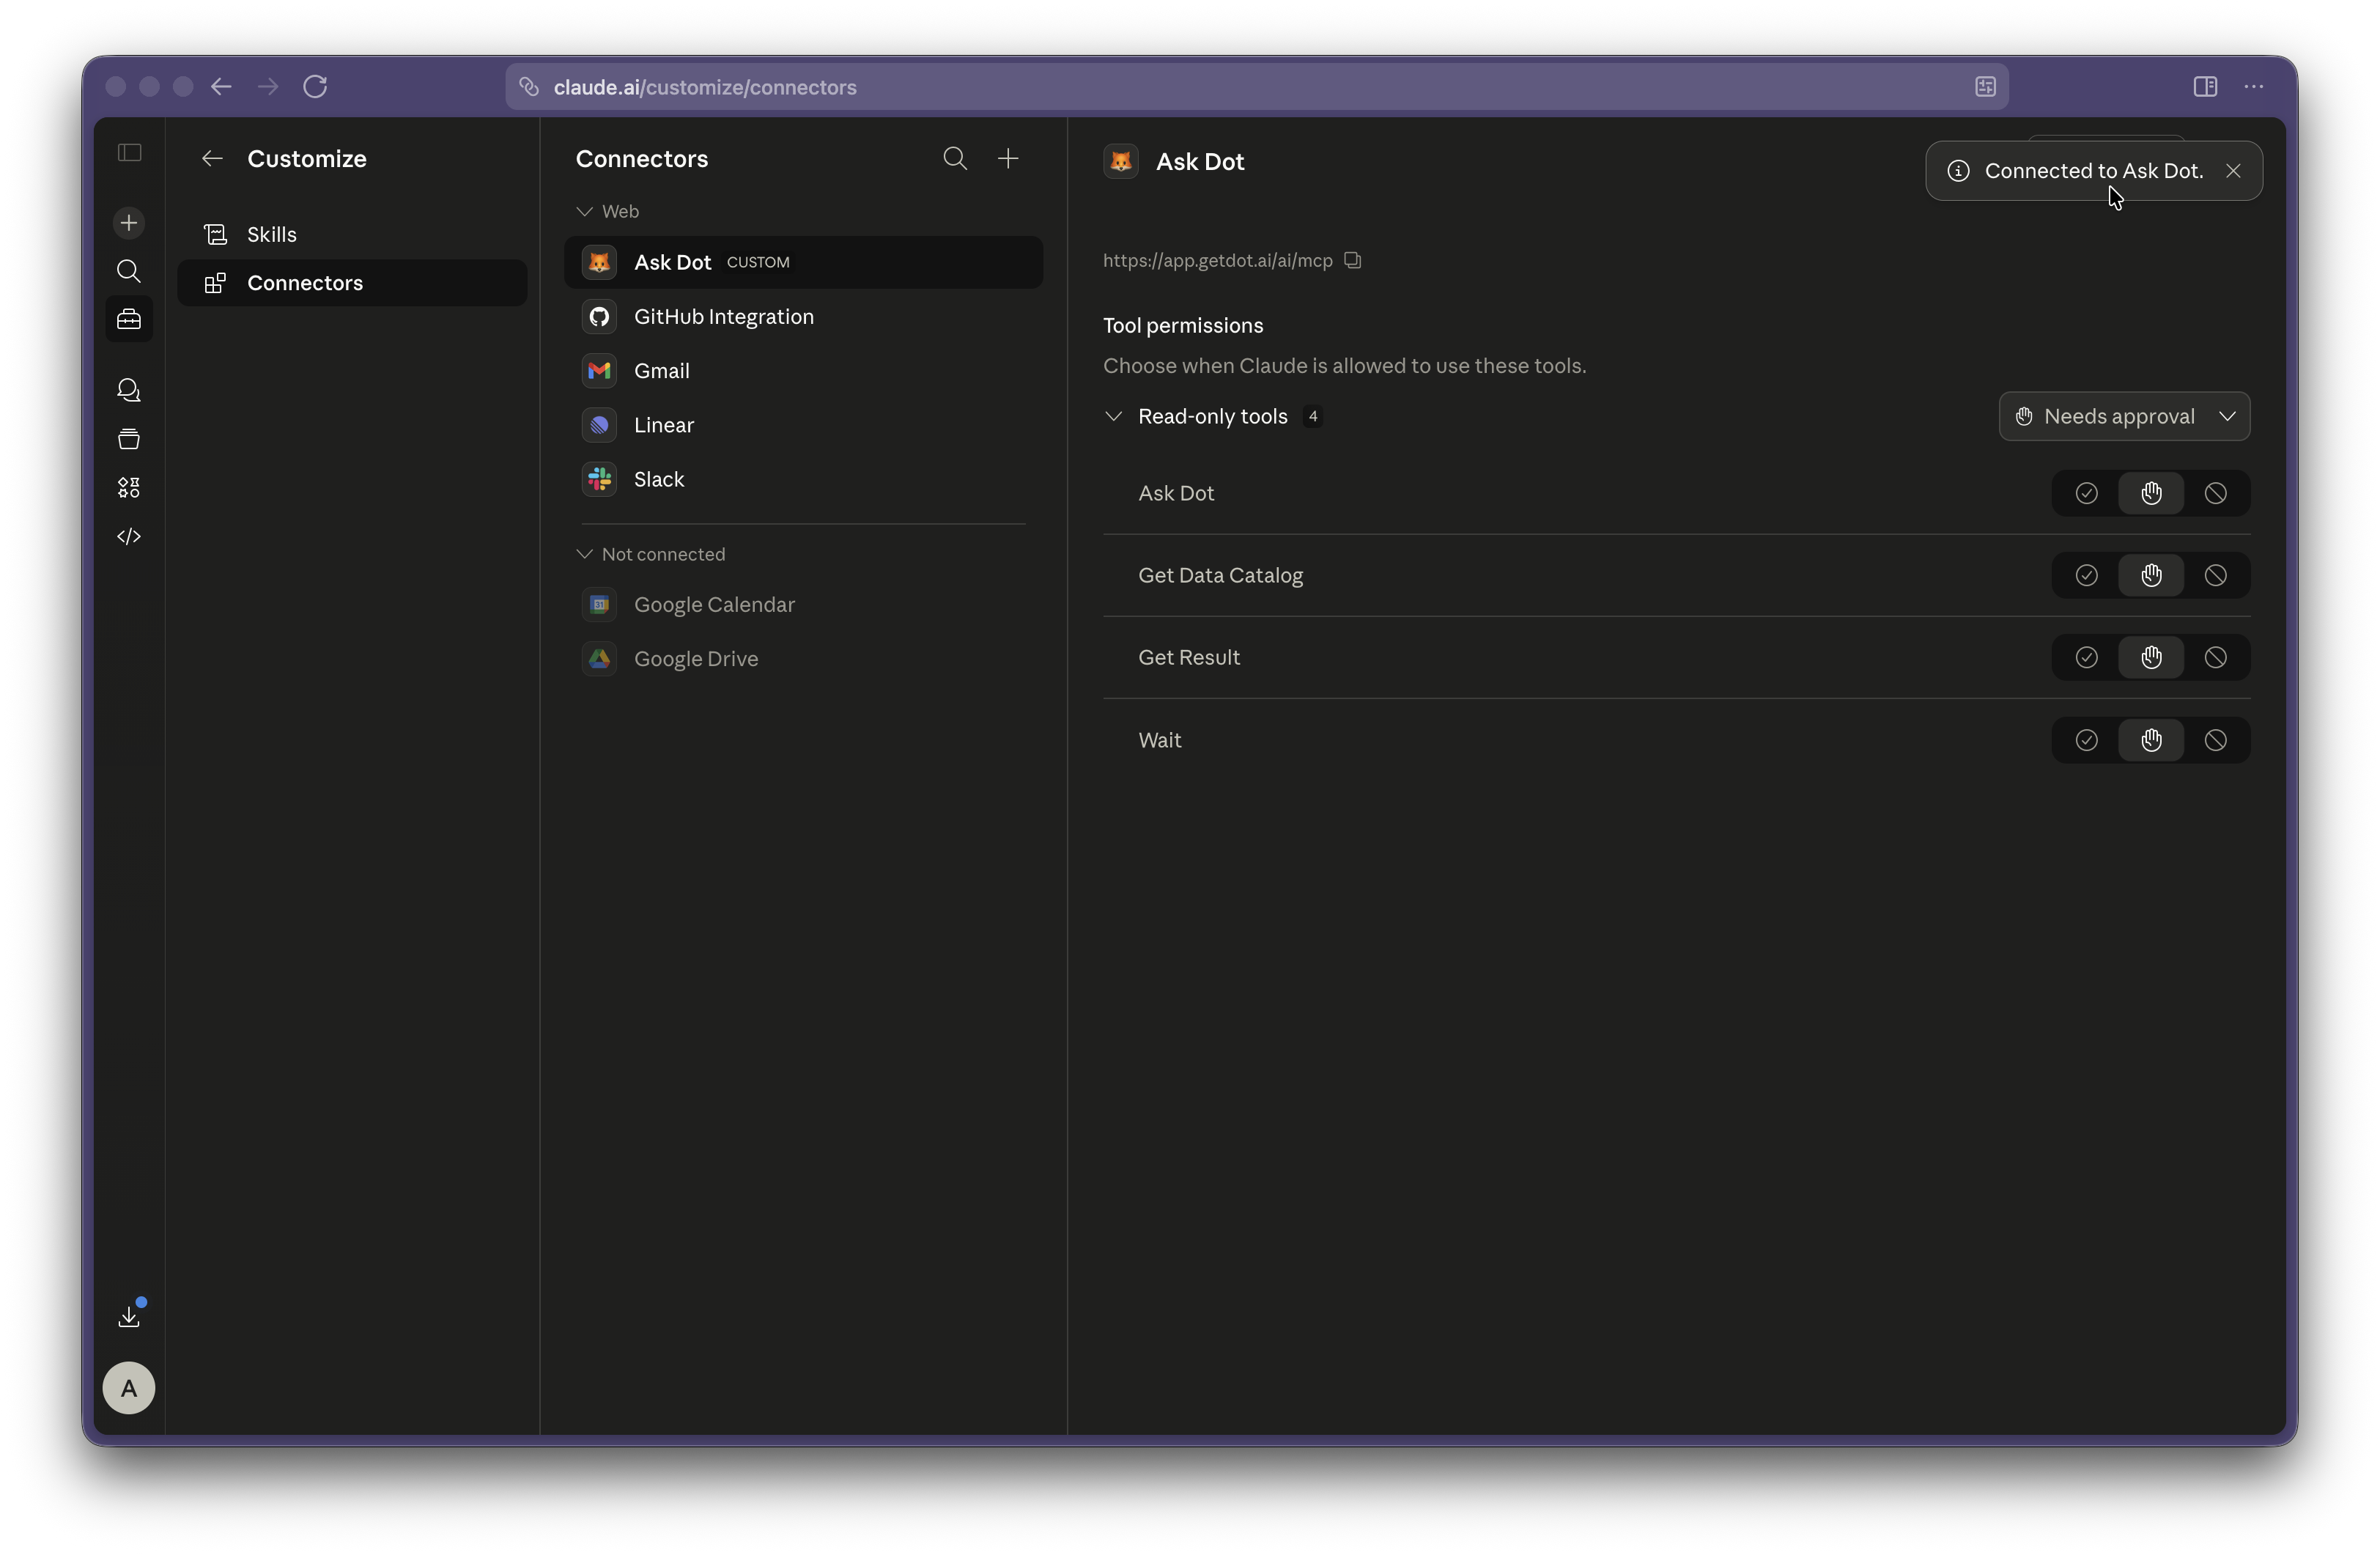
Done
Back in Claude, Ask Dot now shows as Connected with its available tools. Enable it in any chat via the + button → Connectors.
 {% endstep %}
{% endstepper %}
{% endtab %}
{% endstep %}
{% endstepper %}
{% endtab %}
{% tab title="Team / Enterprise" %} Team and Enterprise workspaces use a two-step flow: an owner adds the connector once for the organization, then each member connects their own Dot account.
Owner (one-time setup):
{% stepper %} {% step %}
Open Organization settings → Connectors
In Claude, go to Organization settings → Connectors. {% endstep %}
{% step %}
Add a custom web connector
Click Add → Custom → Web. {% endstep %}
{% step %}
Paste the Dot MCP URL
Name it Ask Dot, paste your Dot MCP URL, then click Add. {% endstep %} {% endstepper %}
Each member (once):
{% stepper %} {% step %}
Open Customize → Connectors
Find Ask Dot in the list — it'll be marked Custom. {% endstep %}
{% step %}
Connect
Click Connect.
{% endstep %}
{% step %}
Authorize in Dot
A Dot tab opens. Review the permissions and click Allow.
{% endstep %}
{% endstepper %}
{% endtab %}
{% endtabs %}
Claude Code
Run the command from Dot's Integrations page:
claude mcp add --transport http ask_dot https://app.getdot.ai/ai/mcp
OAuth will open your browser to authenticate on first use.
{% hint style="info" %} Claude Code with a signed-in Anthropic account also picks up custom connectors synced from your Claude Web/Desktop setup. If you've already connected Dot there, you can skip this command. {% endhint %}
Cursor IDE
Cursor connects to Dot directly as a remote MCP server.
One-click install: Click the Add to Cursor button on Dot's Integrations page. Cursor will open your browser to authorize.
Manual install: Add this to ~/.cursor/mcp.json (use https://eu.getdot.ai/ai/mcp for the EU instance):
{
  "mcpServers": {
    "ask_dot": {
      "url": "https://app.getdot.ai/ai/mcp"
    }
  }
}
Save the file, then restart Cursor (or toggle the server in Settings → Tools & Integrations → MCP Tools). On first connect, Cursor opens your browser to authorize and keeps the session for up to a year.
If you set Dot up earlier with the npx mcp-remote proxy, replace that entry with the config above. The proxy could ask you to sign in again and again when more than one Cursor window was open.
{% hint style="info" %} If you'd rather use a static API token instead of OAuth, see Using an API token → JSON config below for the Cursor-specific shape. {% endhint %}
Windsurf
Copy the URL from Dot's Integrations page and add it as an MCP server in Windsurf settings. Windsurf will open your browser to authenticate.
ChatGPT
Requirements: ChatGPT Enterprise, Education, or Team subscription.
ChatGPT supports token-based auth only — see Using an API token for how to generate a token. Then in ChatGPT's connector settings, add a new connector:
- Name: Ask_dot
- Description: Dot AI-powered data analysis platform. <Add additional info about the data you have connected and when to use it>
- MCP Server URL: the URL from Dot's Integrations page
- Authentication: your MCP token, sent in an
X-API-KEYheader (see Using an API token)
Raycast AI
Raycast uses token-based auth — see Using an API token to generate one.
- Run "Manage MCP Servers" command in Raycast
- Press
Cmd + Nto add a new server - Paste the configuration from Dot's Integrations page
- Submit and use by @-mentioning "dot" in Raycast AI

Other MCP clients
Most MCP clients support URL-based configuration. If your client supports OAuth / MCP authorization, use the plain Dot MCP URL — that's it. Otherwise, follow Using an API token and send the token in a header.
Using an API token
Use a token when your client doesn't support OAuth (ChatGPT, Raycast, generic MCP clients) or as a fallback if OAuth isn't working.
Generate a token
- Go to Settings → Integrations in Dot
- Select your client and switch to the API Token tab
- Click Generate MCP Token and copy it immediately — you won't see it again
Apply the token
Depending on how your client accepts credentials, use one of these:
{% tabs %}
{% tab title="Header" %}
Send the token in an X-API-KEY header. That's how token auth works now, so use it anywhere your client lets you set request headers.
For Claude Code, pass the header on the add command:
claude mcp add --transport http ask_dot https://app.getdot.ai/ai/mcp --header "X-API-KEY: YOUR_TOKEN"
If your client only takes a plain URL and can't set headers, use OAuth instead (see the top of this page). Putting the token in the URL is no longer supported. {% endtab %}
{% tab title="JSON config (Cursor, etc.)" %} For clients that accept an MCP server block:
- In Cursor, go to Settings → Tools & Integration → Add new MCP Server to open
mcp.json - Grab the URL and API key from the JSON config section under "Others" on Dot's Integrations page
- Add to
mcpServers:
{
  "mcpServers": {
    "ask_dot": {
      "url": "https://app.getdot.ai/ai/mcp",
      "headers": {
        "API-KEY": "<your-dot-mcp-api-key>"
      }
    }
  }
}
{% endtab %}
{% tab title="Claude Desktop config file" %} Edit Claude Desktop's config file:
- macOS:
~/Library/Application Support/Claude/claude_desktop_config.json - Windows:
%APPDATA%\Claude\claude_desktop_config.json
Paste the Dot server block from the API Token tab on Dot's Integrations page, save, and restart Claude Desktop. Look for the MCP indicator (hammer icon) in the chat input. {% endtab %} {% endtabs %}
Token management
- Special MCP token with limited scope — separate from regular API tokens
- One active token per user — generating a new token revokes the previous one
- 365-day expiry — tokens expire after one year
- Immediate revocation — admins can delete tokens anytime via the UI
Asking questions
Once configured, you can ask your AI assistant questions about your data:
- "What were total sales last quarter?"
- "Show me top 10 customers by revenue"
- "Compare this month's performance to last month"
- "What data sources are available?"
Security
OAuth sessions
- OAuth uses industry-standard OAuth 2.1 with PKCE for secure authorization
- Access tokens expire after 1 hour and are automatically refreshed
- Refresh tokens are valid for 1 year — after that, re-authentication is required
- To end MCP access, disconnect or remove Dot in your client, which revokes that session, or delete your MCP token in Settings. Note that changing your Dot password does not revoke existing MCP connections on its own
- The consent page shows exactly which permissions the client is requesting before you approve
Data access
- MCP respects all your Dot permissions and has the same data permissions as the user
- Queries run within your organization's scope and user scope
- All data filtering rules are enforced
- All queries are logged for compliance
Troubleshooting
OAuth issues
Browser doesn't open for authentication
- Ensure your AI client is up to date
- Try the token-based method as a fallback
- Check that your browser isn't blocking pop-ups from Dot
"Authorization session expired" error
- The consent page expires after 10 minutes — restart the connection from your AI client
"Sign in to continue" on consent page
- You need to be signed into Dot in your browser first
- Click "Open Dot Login", sign in (password or SSO), then click "Continue"
Token issues
"Invalid API token" error
- Verify you copied the complete token
- Check if token was revoked or replaced
- Ensure you're using the correct Dot URL
"Token does not have required MCP access" error
- Generate a new MCP token from Settings → Integrations
- Ensure you're not using a regular API token
Connection issues
Connection timeout
- Check network connection to Dot
- Verify the Dot instance URL is correct
- Some clients have a tool timeout setting — adjust it accordingly