Lottie Creator MCP
公式Lottie Creator MCPは、AIアシスタントをアニメーションワークフローに直接統合し、LottieFiles Creatorへの完全なアクセスを提供することで、自然言語を通じてLottieアニメーションの作成や編集を代行できるようにします。
ドキュメント
Lottie Creator MCP
未定義
Lottie Creator MCP
Lottie Creator MCP は、あなたの AI アシスタントをアニメーションワークフローに直接組み込み、LottieFiles Creator へのフルアクセスを提供することで、自然言語による Lottie アニメーションの作成と編集を代行します。インストール手順は後述します。
MCP サーバーは、Model Context Protocol を使用して AI エージェントがデータソースとやり取りするための標準化されたインターフェースの一部です。Lottie Creator MCP は、Claude、Cursor、Windsurf などの AI アシスタントをローカルブリッジ経由で Creator API に接続します。つまり、あなたの AI はあなたと同じように Creator へフルアクセスできるようになります。
MCP を有効にすると、以下のことが可能になります:
✦ アニメーションをゼロから作成
ローディングスピナー、プログレスバー、キャラクターアニメーションなど、希望するものを説明するだけで、AI が Creator 内でレイヤーごとに構築します。
✦ 既存のアニメーションを編集・修正
色の変更、タイミングの調整、イージングカーブの入れ替え、レイヤー名の変更、シーン全体のリファクタリングなど。AI がファイルの現在の状態を読み取り、リアルタイムで編集します。
✦ アニメーションのバリエーションを一括生成
ダークテーマとライトテーマ、異なるサイズ、ブランドカラーのバリエーションなど、アニメーションの複数バージョンを一度に自動生成します。
✦ アクセシビリティとブランドのためのアニメーション分析
コントラストの問題、モーション速度、色の一貫性、ブランドガイドラインとの整合性などを AI に検査させ、見つかった問題を修正させることができます。
✦ プロジェクトワークフローへの統合
より大きなプロジェクトに取り組みながら、アニメーションアセットをオンザフライで生成します。
MCP を使用するには、AI クライアントにインストールし、LottieFiles Creator で有効にします。以下のセクションで各手順を説明します。
前提条件
インストール前に、以下がセットアップされていることを確認してください:
✅ 📦 Node.js 18+: npx 経由で MCP パッケージを実行するために必要です。Node.js をダウンロード →
✅ 🎬 LottieFiles Creator: ブラウザで creator.lottiefiles.com を開き、このタブを開いたままにしてください。
✅ 🤖 MCP 互換 AI: Claude、Cursor、Windsurf、VS Code Copilot、またはその他の MCP 対応アシスタント。
まず、Creator MCP README ファイル にアクセスし、MCP 文字列とコマンドを取得してください。
MCP のインストール
すべての AI ツールで、以下の設定を使用できます:
{
  "mcpServers": {
    "lottiefiles-creator": {
      "command": "npx",
      "args": ["-y", "@lottiefiles/creator-mcp@latest"]
    }
  }
}
このドキュメントでは、サポートされている一部の MCP クライアントのインストール手順を説明します。サポートされている MCP クライアントのインストールガイドの一覧は、以下を参照してください:
サポートされている MCP クライアント
お使いのクライアントに応じた手順に従って、Lottie Creator MCP をインストールして接続してください。一部のクライアントはスキルもサポートしており、モーションデザインの知識を追加することで、AI がより意図的で洗練されたアニメーションを生成できるようになります。🖇️ LottieFiles の モーションデザインスキル はこちらです。
お使いの MCP クライアントの手順に従ってください:
**1. Claude デスクトップ設定を開く**
**設定 → 開発者** に移動し、**「設定を編集」** をクリックします。これにより、コンピューター上の JSON 設定ファイルが開き、VS Code、Cursor、または任意のテキストエディターで編集できます。

<Image src="https://assets.docs.lottiefiles.com/static/cbcf2779e6-640.webp" alt="Claude Desktop Settings → Developer, Edit Config" caption="Claude Desktop Settings" zoom variant="default" srcSet="https://assets.docs.lottiefiles.com/static/cbcf2779e6-640.webp 640w, https://assets.docs.lottiefiles.com/static/cbcf2779e6-1024.webp 1024w" width="1490" height="1070" loading="lazy" data-blur="data:image/png;base64,iVBORw0KGgoAAAANSUhEUgAAAAgAAAAGCAIAAABxZ0isAAAACXBIWXMAAAPoAAAD6AG1e1JrAAAAXklEQVR4nGWNSwqAMAxEc/8DiXgXF4rgp41pTNNWuxGpFEGYxcCbDwgjO5tPVaEUJZ9aBLtdinNkhFGFhPEBhOuVfA0G79DML6gL49B3bSOMMRxQin+B3Sb1+L0t4AYM8YjEckZSmwAAAABJRU5ErkJggg==" />

**2. MCP 設定を追加する**

`mcpServers` オブジェクト内の設定ファイルに以下を貼り付けます。JSON を有効に保つために、括弧やカンマの追加・削除が必要になる場合があります。

```jsx
{
  "mcpServers": {
    "lottiefiles-creator": {
      "command": "npx",
      "args": ["-y", "@lottiefiles/creator-mcp@latest"]
    }
  }
}
```

上記の設定を貼り付けた後の設定ファイルの例は次のとおりです:

```jsx
{
  "mcpServers": {
    "lottiefiles-creator": {
      "command": "npx",
      "args": ["-y", "@lottiefiles/creator-mcp@latest"]
    }
  },
  "preferences": {
    "quickEntryShortcut": "off",
    "coworkScheduledTasksEnabled": false,
    "ccdScheduledTasksEnabled": false,
    "sidebarMode": "chat",
    "coworkWebSearchEnabled": true,
    "floatingAtollActive": true
  }
}
```

**3. 接続を確認する**

チャットで **「+」** ボタンをクリックし、**コネクター** に移動して、`lottiefiles-creator` トグルがオンになっていることを確認します。

<Image src="https://assets.docs.lottiefiles.com/static/661d017685-640.webp" alt="Claude Desktop Connectors with lottiefiles-creator enabled" zoom variant="default" srcSet="https://assets.docs.lottiefiles.com/static/661d017685-640.webp 640w, https://assets.docs.lottiefiles.com/static/661d017685-1024.webp 1024w" width="1470" height="840" loading="lazy" data-blur="data:image/png;base64,iVBORw0KGgoAAAANSUhEUgAAAAgAAAAFCAYAAAB4ka1VAAAACXBIWXMAABYlAAAWJQFJUiTwAAAAXUlEQVR4nE1NQQ7AIAjz/1/14CZGBJEu6JaMpGkobUmqioC7IybYfWGtgCEREUQEYzCuu6J1xZxnNzOkUgrMJoJzzhCdYO5QldNQiXZdJJh5i+eFvYYW4hH+h8/wAH2hnMwEoNxAAAAAAElFTkSuQmCC" />
以上です。Claude Code が自動的に MCP をインストールして登録します。

```
claude mcp add lottiefiles-creator -- npx -y @lottiefiles/creator-mcp@latest
```
1. `Cmd + Shift + P` (Mac) または `Ctrl + Shift + P` (Windows/Linux) を押し → **「Cursor 設定」** を検索
2. サイドバーで **ツールと MCP** に移動
3. **「カスタム MCP を追加」** をクリック

<Image src="https://assets.docs.lottiefiles.com/static/1d779c5bf1-640.webp" alt="Cursor Settings → Tools & MCP, Add custom MCP" caption="Cursor Settings" zoom variant="default" srcSet="https://assets.docs.lottiefiles.com/static/1d779c5bf1-640.webp 640w, https://assets.docs.lottiefiles.com/static/1d779c5bf1-1024.webp 1024w" width="1724" height="1122" loading="lazy" data-blur="data:image/png;base64,iVBORw0KGgoAAAANSUhEUgAAAAgAAAAFCAYAAAB4ka1VAAAACXBIWXMAABYlAAAWJQFJUiTwAAAAYElEQVR4nD2OWQpFMQhDXUVnh1JKu/8N5qKPvg8hJPEoqSqYGbVWlFKQUkLO+T8kIhGOMXDvhZnFgpqGR27MOdF7j8JaC04VFbDyr/AoHuy9cc4JUmsN5BgXft9L75enP/5xNWNuTqnuAAAAAElFTkSuQmCC" />

4. 以下を貼り付け:

```jsx
{
  "mcpServers": {
    "lottiefiles-creator": {
      "command": "npx",
      "args": ["-y", "@lottiefiles/creator-mcp@latest"]
    }
  }
}
```

保存して **Cursor を完全に再起動** します (再読み込みではなく、終了して再度開きます)

再起動後、**設定 → ツールと MCP** に移動すると、`lottiefiles-creator` の横に緑色の点が表示され、接続が確認されます。

<Image src="https://assets.docs.lottiefiles.com/static/d5e4c14c2c-640.webp" alt="Cursor Settings → Tools & MCP, lottiefiles-creator connected" zoom variant="default" srcSet="https://assets.docs.lottiefiles.com/static/d5e4c14c2c-640.webp 640w, https://assets.docs.lottiefiles.com/static/d5e4c14c2c-1024.webp 1024w" width="1724" height="1118" loading="lazy" data-blur="data:image/png;base64,iVBORw0KGgoAAAANSUhEUgAAAAgAAAAFCAYAAAB4ka1VAAAACXBIWXMAABYlAAAWJQFJUiTwAAAAYUlEQVR4nD2NSw7AIAhEOYVfBHSlsfe/3jTY2MUEeDAMqSpEBKUUpJQQQkCM8Rf5MucMZsacE713tNagZoeRmR3ow1oLY4xzICoQU5BHOKhcsZ/9fWCGG5sKyJ033+vtr14GGTV0KRWZBgAAAABJRU5ErkJggg==" />
1. [LottieFiles MCP サーバーディープリンク](https://vscode.dev/redirect/mcp/install?name=%40lottiefiles%2Fcreator-mcp\&config=%7B%22command%22%3A%22npx%22%2C%22args%22%3A%5B%22-y%22%2C%22%40lottiefiles%2Fcreator-mcp%22%5D%7D) をクリックします。これにより、VS Code で MCP 設定が開きます。
2. **インストール** ボタンを押します。

<Image src="https://assets.docs.lottiefiles.com/static/215df2a202-640.webp" alt="VS Code Install MCP Server prompt for Lottie Creator" zoom variant="default" srcSet="https://assets.docs.lottiefiles.com/static/215df2a202-640.webp 640w, https://assets.docs.lottiefiles.com/static/215df2a202-1024.webp 1024w" width="1720" height="736" loading="lazy" data-blur="data:image/png;base64,iVBORw0KGgoAAAANSUhEUgAAAAgAAAADCAIAAAAhqtkfAAAACXBIWXMAAAPoAAAD6AG1e1JrAAAANUlEQVR4nGNQ19TW0NFX0tCSlVcQk5AUFBaFIAYJKRlxSSlhUXG4EFRCSkZOUlpWXFIKTQIAGEcGwVfSfA0AAAAASUVORK5CYII=" />

**オプション B: CLI または設定ファイル**

または CLI 経由:

ターミナル

```
code --add-mcp '{"name":"lottiefiles-creator","command":"npx","args":["-y","@lottiefiles/creator-mcp@latest"]}'
```

または `.vscode/mcp.json` に追加:

JSON — .vscode/mcp.json

```
{
  "servers": {
    "lottiefiles-creator": {
      "command": "npx",
      "args": ["-y", "@lottiefiles/creator-mcp@latest"]
    }
  }
}
```

ℹ️ VS Code で MCP ツールを使用するには、アカウントで [GitHub Copilot](https://github.com/features/copilot) が有効になっている必要があります。
```
[mcp_servers.lottiefiles-creator]
command = "npx"
args = ["-y", "@lottiefiles/creator-mcp@latest"]
```

または CLI 経由で追加:

```
codex mcp add lottiefiles-creator -- npx -y @lottiefiles/creator-mcp@latest
```
```
code --add-mcp '{"name":"lottiefiles-creator","command":"npx","args":["-y","@lottiefiles/creator-mcp@latest"]}'
```
- 名前: `lottiefiles-creator`
- コマンド: `npx`
- 引数: `y @lottiefiles/creator-mcp@latest`
Lottie Creator への接続
- Lottie Creator を開く
ブラウザで creator.lottiefiles.com に移動し、セッション中はこのタブを開いたままにしてください。MCP はこのブラウザタブを通じて Creator と通信します。
- Creator で MCP を有効にする
Creator で、設定 → MCP 設定 → MCP を有効にする に移動します。
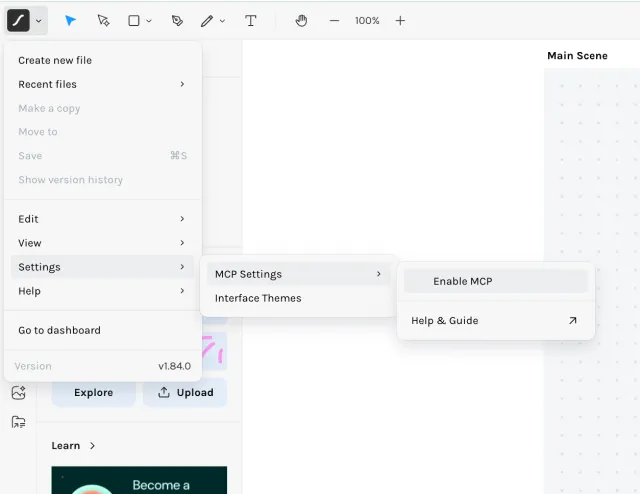
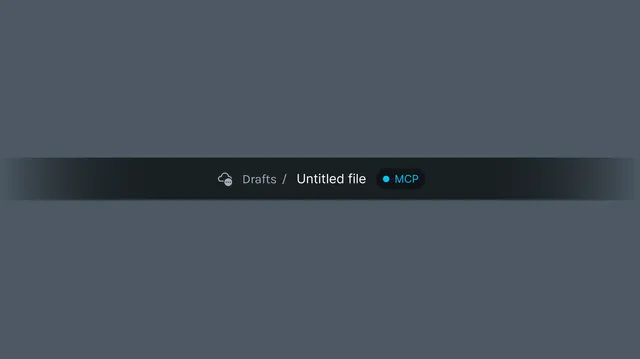
- 接続を確認する
Creator に通知が表示されるはずです: ローカル MCP ブリッジが接続されました

これが表示されれば、セットアップは完了し、プロンプトを開始する準備が整いました!アニメーションの品質は使用するモデルに大きく依存するため、利用可能な最適なモデルを使用するようにしてください。
スキルについて
スキルは、エージェントがアニメーションタスクにどのようにアプローチすべきかのガイダンスを提供します。MCP ツール呼び出しと、再利用可能な指示として組み込まれた深いモーションデザインの知識を組み合わせて使用します。
Lottie Creator MCP は個々のツール (レイヤーの作成、キーフレームの設定、塗りつぶしの調整) を公開しますが、スキルは AI がそれらを うまく使う方法 を理解するのに役立ちます。バウンスとフェードに適したイージングカーブの選択、複数要素のエントランスのシーケンス方法、アニメーションが機械的ではなく意図的に感じられるようにタイミングを構成する方法などです。
スキルは MCP 接続を置き換えたり、新しいツールを追加したりするものではありません。モーションデザインの専門知識を指示にパッケージ化することで、AI がアニメーションに取り組む際に自動的にそれを利用できるようにし、推測の余地を減らします。
モーションデザインスキルのインストール
このコマンドをターミナルで一度実行してください。Claude Code、Cursor、Codex、GitHub Copilot を含む 40 以上のエージェントで動作します。
ターミナル
npx skills add LottieFiles/motion-design-skill
✨ 強く推奨します。 硬く機械的なアニメーションを生成する AI と、洗練された意図的なモーションを生成する AI の違いは、ほぼこのコンテキストがあるかどうかにかかっています。一度インストールすれば、すべてのアニメーションセッションに適用されます。
GitHub で完全なスキルを表示 → LottieFiles/motion-design-skill
機能
MCP は AI に Creator API へのフルアクセスを提供します。以下が可能なすべてのことです:
🎬 シーン管理
- シーンの作成 — 名前、サイズ、フレームレート、長さを設定
- シーン間の切り替え
- 背景色の設定 (プレビューのみ、エクスポートされません)
- シーンプロパティの読み取り — レイヤー、サイズ、フレームレート
- シーンを Lottie JSON にエクスポート
- Lottie JSON、dotLottie、SVG、または画像をインポート
🗂 レイヤー管理
- 表示/非表示、ロック状態、フォーカスの設定
- タイミングの制御 — 開始フレーム、終了フレーム、オフセット
- ブレンドモードの設定 (乗算、スクリーン、オーバーレイなど 16 モード)
- マスクとマットの適用とアニメーション化
- レイヤーの整列と反転
- トランスフォームのアニメーション化 — 位置、回転、スケール、スキュー
🔷 シェイプ作成
- 長方形 — 位置、サイズ、角の丸み
- 楕円 — 位置、サイズ
- 多角形 — ポイント、半径、丸み
- 星 — 内側/外側の半径、ポイント
- パス — 完全な接線制御を持つカスタムベジェ
- グループ — 既存のシェイプをグループ化
🎨 塗りつぶしとストローク
- ソリッドカラー塗りつぶし — 静的またはアニメーション化された RGB
- 線形グラデーション塗りつぶし — カスタムの開始点/終了点
- 放射状グラデーション塗りつぶし — ハイライトの角度と長さ
- ソリッドおよびグラデーションストローク — アニメーション化可能な幅
- トリムパス — 描画のアニメーション化 (開始 %、終了 %、オフセット)
⏱️ アニメーションとキーフレーム
- 特定のフレームに値を持つキーフレームを追加
- 静的な値の設定 (アニメーションなし)
- キーフレームの読み取り、検査、削除
- イージングの設定 — リニアまたは 3 次ベジェ (x1, y1, x2, y2)
- アニメーション化: 位置、回転、スケール、不透明度、色、パスなど
🖼 アセットと再生
- アセット (シーンと画像) の一覧表示、クローン、削除
- 画像プロパティの読み取り — 幅、高さ、base64 URI
- 再生、一時停止、特定のフレームへのジャンプ
- 現在のフレームと再生状態の読み取り
- 選択されたノードとキーフレームの読み取り
近日公開: ステートマシンとモーショントークン
ベストプラクティス
- より良い品質のためにモーションデザインスキルをインストールする: MCPはAIにツールを提供します。モーションデザインスキルは、イージングカーブ、タイミングの原則、振り付けなど、それらをうまく使いこなすための判断力を与えます。1つのコマンドで、出力が大幅に向上します。モーションデザインスキルはこちらにあります。
- 独自のSVGから始めて、アニメーション化する: AIがゼロからイラストの形状を生成する場合、予測不可能なことがあります。最良の結果を得るには、まず既存のSVGアセットをCreatorにインポートし、それからAIにアニメーション化を依頼してください。これにより、ビジュアルスタイルの一貫性が保たれ、AIは最も得意とするモーション、タイミング、シーケンス処理に集中できます。
- 以下のリミックスリンクを試してみてください
- 常に利用可能な最良のモデルを使用する: アニメーションの品質はモデルに直接比例します。Claude SonnetやOpusにアクセスできる場合は、より小さなモデルよりもそれらを使用してください。タイミング、シーケンス処理、空間認識の処理方法に顕著な違いが現れます。
- プロンプトを出す前にレイヤーに名前を付ける: AIはアニメーションの構造を理解するためにレイヤー名を読み取ります。
left_arm、right_leg、bg_circle、text_headlineのような適切な名前のレイヤーは、適切な要素をターゲットにし、ミスを避け、複雑なシーン全体で整理された状態を保つのに役立ちます。Shape 1やGroup 4のような一般的な名前では、AIが正確に作業を進めるのが難しくなります。 - 複雑なアニメーションをステップに分割する: 「完全なオンボーディングアニメーションを作って」と依頼する代わりに、シーンごとに進めてください。シーンを作成する → シェイプを追加する → キーフレームを追加する → タイミングを調整する。小さなステップにより、制御しやすくなり、エラーを見つけて修正するのも容易になります。
- タイミングと感触を具体的に指定する: 「スムーズなフェード」は曖昧です。「400msのフェードイン、イーズアウトで」と指定すれば、AIが作業しやすくなります。スナッピー、バウンシー、スローでシネマティックなど、感触を詳しく説明するほど、最初の結果が想像に近づきます。