Rootr — Team Knowledge Base
Rootr donne à Claude et ChatGPT un accès direct et autorisé aux documents partagés, aux données structurées et aux connaissances institutionnelles de votre équipe — pour que votre IA sache déjà ce que votre équipe sait.
Documentation
Rootr User Guide
A guide for people using Rootr for the first time. We unpack every term as we go, so you can follow along even if the jargon is new to you. First things first — we start by connecting your AI to Rootr.
Connect & start
①Integration — Connect your AI to Rootr
By the end of this chapter, the AI you use (for example, Claude) will be able to read, edit, search, and ask questions of your documents in Rootr directly.
Rootr is a "document tool that your AI writes alongside you." So the very first thing to do is connect your AI to Rootr. There are three ways in — you do not need all of them, just pick one.
For non-developers · ~2 minPaste a URLPaste one address into Claude or ChatGPT and log in. Nothing to install, no terminal.Start this way → ~5 min · copy & pasteOne-click MCP keyCopy the configuration Rootr builds for you into Claude Code, Claude Desktop, or Codex on your own computer.Start this way → For developersConfig file · CLI · APIWrite the config file yourself, or call Rootr straight from the terminal or your own code.Start this way →
›Wait — MCP? API key? Workspace? Here are the 5 terms first
- AI agent: an AI that does not just chat with you but actually carries out the work you ask of it. Examples are programs like Claude Code, Claude Desktop, and Codex. Throughout this guide, whenever you see "agent," just think "your AI."
- API: a channel through which programs exchange information. Instead of a person clicking buttons on a screen, your AI uses this channel to send Rootr requests like "show me this document" or "add a line here."
- API key: the "key" that opens that channel, and also your ID badge. It is a long string that starts with
rootr_, and only an AI holding this key can reach your material. That is why, like a password, you must never show it to anyone. - MCP: a rule (a convention) that lets an AI use outside tools in a standard way. In plain terms, it is a "universal adapter between your AI and Rootr." Connect over MCP and your AI treats Rootr like a folder on its own computer.
- Workspace: the space where your documents and folders live. Think of it as one "work room" for a company. Each workspace has its own id.
Once your AI connects to Rootr over MCP or the API, holding your key (API key), it can work with documents, questions, and data directly.
1.1
Paste a URL — connect with nothing installed
For non-developersEasiest~2 minClaude · ChatGPT
This is the non-developer route. No install, no terminal, no config files. Claude and ChatGPT both connect with this one address:
- 1 In your AI's settings, open Connectors → Add custom connector. Paste the address above into the address field.
- 2 A Rootr screen opens in your browser: log in and press Allow. This is where you pick the workspace to connect and a permission level (read-only / read + write).
- 3 Rootr tools appear in your AI — that means it worked. Try asking: "What documents are in my workspace?"
Settings → Connectors → Add custom connector, then paste the address. It is the same on web and in the desktop app, and it works on the free plan.
Connecting automatically creates an "MCP remote connector" key in Settings → Integrations. Disconnect = revoke that key (access stops immediately).
A screenshot-by-screenshot guide to connecting Claude and ChatGPT →
1.2
One-click MCP key — connect the AI on your computer
~5 minClaude Code · Desktop · Codex
Rootr builds the settings you need for the connection automatically. All you do is copy them and paste them into your AI.
- 1 Open Settings from the left-hand menu, then click the Integrations tab.
- 2 Under "AI agent integration (MCP)", press the Create MCP key… button.
- 3 Give the key a name, choose how much access to allow (permissions), and press Create. Pick a name you will recognize later — for example, "Claude on my laptop".
- 4 A configuration with your key (API key) already filled in appears in the code box below.
- 5
Press the copy button that matches the AI you use, and paste it in as the tabs below explain.
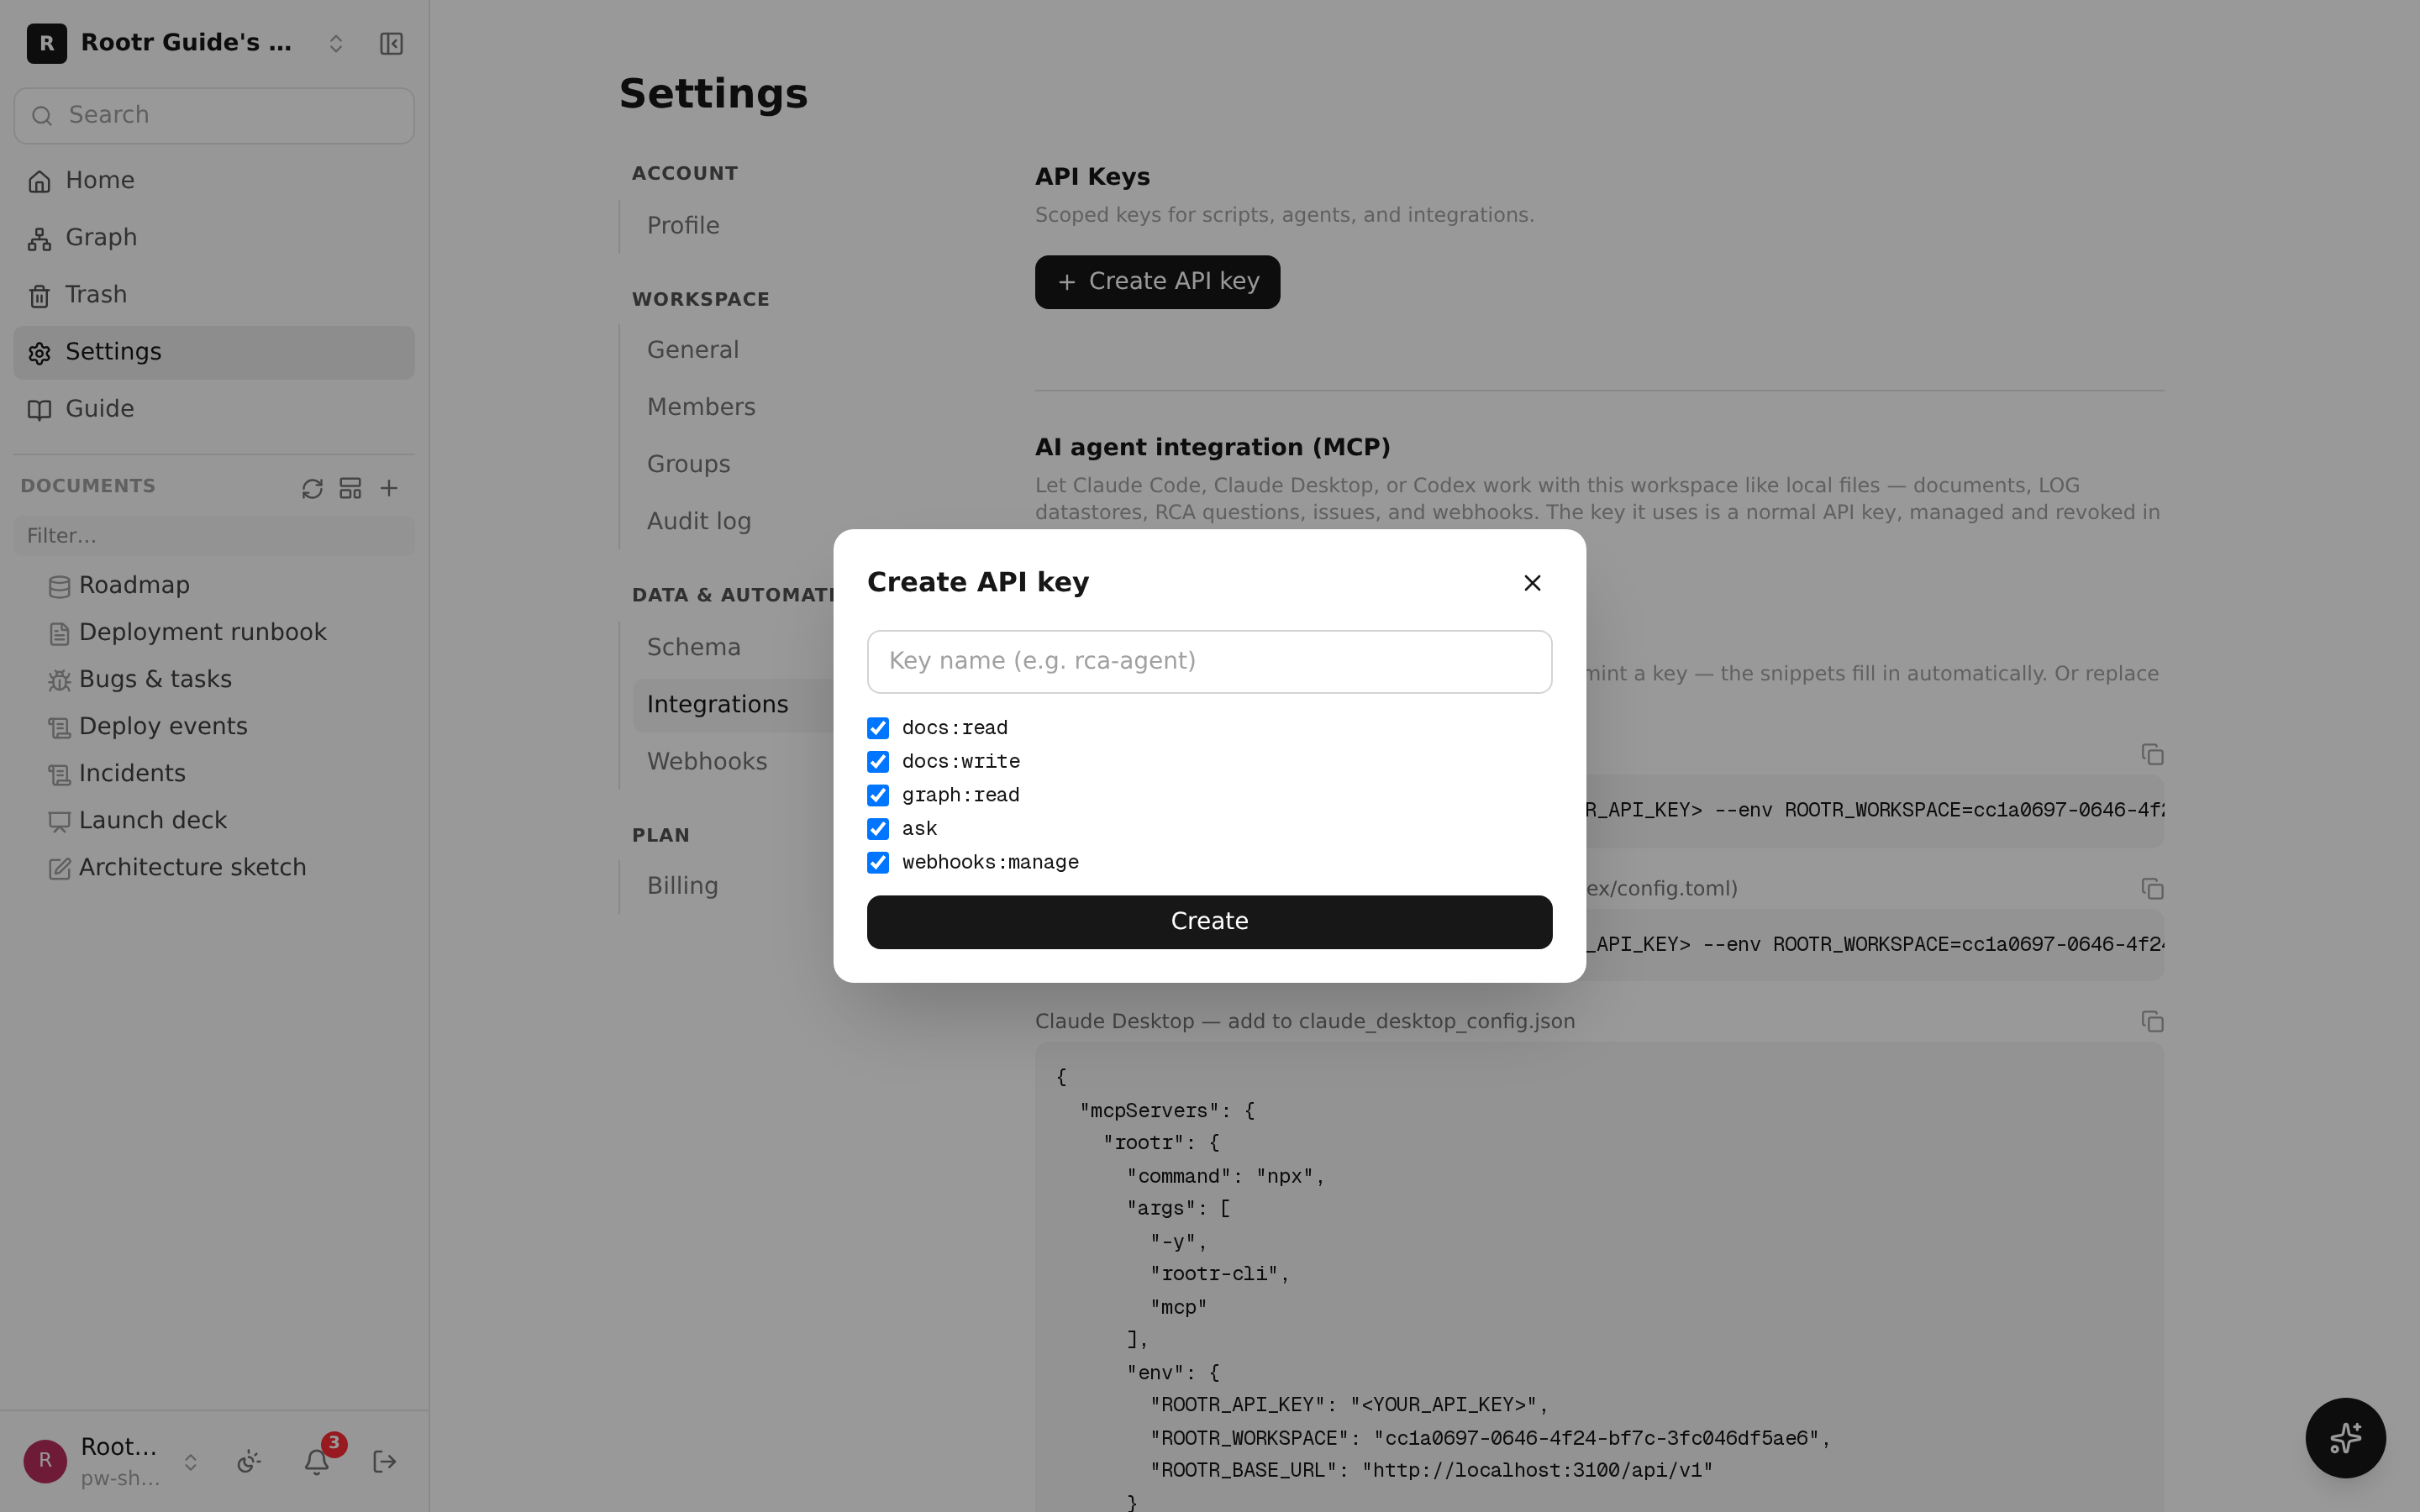
The one-click MCP integration screen in Settings → Integrations. It shows a copy-ready configuration with the issued key filled in, plus per-target copy buttons.
This is Claude in the terminal. Paste the one-line command you copied straight into a terminal window and run it — the connection is done.
Important: the API key (your key) is shown on screen only once, at creation time. Once you close the window you cannot see it again, so copy it somewhere safe. If you ever lose it or it leaks, just delete (revoke) that key from the key list in Settings → Integrations and create a new one.
From here on: for developers
1.3
Registering MCP in a config file yourself
For developers
If you are comfortable with development and want to manage config files directly, add it as shown below. This is a setting that tells your AI to "run a small program (rootr-cli) that connects to Rootr." Put the key you made above into ROOTR_API_KEY, and your workspace id into ROOTR_WORKSPACE.
{
"mcpServers": {
"rootr": {
"command": "npx",
"args": ["-y", "rootr-cli", "mcp"],
"env": {
"ROOTR_API_KEY": "rootr_xxxxxxxxxxxxxxxx",
"ROOTR_WORKSPACE": "ws_123"
}
}
}
}
For Claude Code, put this into the ~/.claude.json file; for Claude Desktop, put it into the mcpServers part of the claude_desktop_config.json file. If you installed rootr-cli globally on your computer, you can shorten command to "rootr" and args to ["mcp"].
1.4
The rootr CLI — a person, straight from the terminal
For developers
A CLI (command-line tool) is a way to work with Rootr by typing commands into a black terminal window. It is handy when a person works directly without an AI, or when you put it into a script that runs automatically at a set time. Try running the commands below in order.
# 1) Install — add the rootr command to your computer
npm install -g rootr-cli
rootr config --api-key rootr_xxxxxxxxxxxxxxxx --workspace ws_123
# 3) Usage examples
rootr ls /notes # list the documents inside the /notes folder
rootr read /notes/todo.md # open one document and read its content
rootr append /notes/log.md "Deploy finished" # safely add one line to the end of a document
rootr edit /notes/todo.md --find "- [ ] Deploy" --replace "- [x] Deploy" # change a specific line
rootr search "deploy procedure" # search across the whole workspace
rootr rm /notes/old.md # move a document to the trash (recoverable; --yes skips the prompt)
rootr ask "why did latency rise after last week's deploy?" # ask the AI for the root cause
- How to write paths: if it starts with a slash (/), it is read as a "folder path"; otherwise it is read as a document's unique number (id). Rootr figures this out for you.
- We recommend "append": it only adds to the end of a document rather than rewriting the whole thing, so it never conflicts even when other people or other programs edit at the same time.
- Deleting moves the document to the trash, so it can be restored. After 30 days it is removed for good.
- If you need a line-by-line explanation, type
rootr --helpand the usage appears.
1.5
Calling the REST API directly
For developers
If you are building your own program, you can call Rootr with an internet request (HTTP) from any language. The address is https://rootr.io/api/v1, and with each request you carry your key in a label called x-api-key. Below are examples you can try right away in the terminal.
# Safely add one line to the end of a document
curl -X POST https://rootr.io/api/v1/docs/by-path/append \
-H "x-api-key: rootr_xxxxxxxxxxxxxxxx" \
-H "content-type: application/json" \
-d '{"workspaceId":"ws_123","path":"/notes/log.md","content":"Deploy finished"}'
# Ask your knowledge a question and get an answer with evidence
curl -X POST https://rootr.io/api/v1/workspaces/ws\_123/ask \
-H "x-api-key: rootr_xxxxxxxxxxxxxxxx" \
-H "content-type: application/json" \
-d '{"question":"why have payment failures increased?"}'
It is fine if you do not know exactly what each command means. The point is that you "carry your key in the header and send a request to the address." You can find the complete list of every request you can make in the technical document (OpenAPI) linked from ⑩ Reference.
Reference — keys · permissions · limits
1.6
The two kinds of keys (API keys) and their permissions
There are two kinds of keys, and they differ in how wide a range they can open. Each key also carries a set of permissions (scopes) that decide "how much it is allowed to do." Allowing only as much as you need is the safe choice.
| Type | Range it can open | When to use it |
|---|---|---|
| Workspace key | Only within that one workspace (work room) | Reading/writing documents, searching, asking, and nearly every other connection — usually this is enough |
| Account key (PAT) | Your whole account (all of your workspaces) | When the AI needs to move between several work rooms, or create an entire new workspace |
- Examples of permissions (scopes): docs:read (read documents) · docs:write (edit documents) · graph:read (browse knowledge) · ask (ask questions) · webhooks:manage (set up notifications). If you only want it to read, turn on docs:read alone.
- The principle: for most connections, a workspace key is enough. An account key has broad permissions, so use it only when you truly need it.
- To move between work rooms: a workspace key does not open anything outside its own room. For the AI to switch with rootr_use_workspace, use an account key, or issue one key per room and register them with
rootr config --add-key <key>.
Keys are shown only once. Managing and revoking (deleting) them is all done in one place — the key list in Settings → Integrations.
1.7
Tips for putting your AI to work
Once connected, you just tell your AI in plain language ("summarize this document and add it below"). For results that are safer and more accurate, have it follow the points below.
- For adding content, have it use "append" first, and for partial changes, "find and replace" (edit). The approach of rewriting the whole document can accidentally erase existing content, so use it only when it is truly needed.
- When building a workspace from a structure up, have the AI plan first, ask a few questions, and only then create it (so it does not build blindly).
- If you have set the AI to receive change notifications (webhooks) again, have it ignore "changes the AI itself made." Otherwise you get an endless loop where it reacts to the very notifications it created.
1.8
The list of tools your AI can use (90+)
Once connected, your AI can use the tools below. This is a table summarized by category; a detailed description of each tool is in ⑩ Reference. For now, just get a sense of "wow, I can have it do this many different things."
›Open the full table by group (16 groups)
| Group | Count | Representative tools (what they do) |
|---|---|---|
| Documents | 6 | list · read · append · find and replace · full rewrite · search |
| Creating workspaces | 4 | see my workspaces · plan a structure · create a new workspace · apply to an existing one |
| Data records (LOG) | 5 | create a logbook · add an entry · query · statistics · edit an entry's format |
| Questions (RCA) | 1 | ask in natural language and get a cited answer |
| Issue (task/bug) management | 6 | create an issue · list · detail · edit · comment · create a tracker |
| Table (DATABASE) rows & columns | 8 | read a table · list rows · add a row · edit a row · delete a row · add a column · rename a column / set its choices · delete a column |
| Presentations | 8 | create a deck · read · add a slide · edit a slide · reorder · settings · draw a diagram onto a slide · look up a diagram's shape |
| Change notifications (webhooks) | 3 | list notifications · create a notification · delete a notification |
| Versions / deletion | 3 | view a document's version history · send a document to the trash · restore something deleted |
| Spreadsheets · whiteboards · forms | 15 | calculations · freeform canvas · build a form and read responses |
| Recordings · CRM · attachments | 20+ | turn a meeting recording into notes · track customers and deals · upload files |
| Table locks & alerts | 4 | read/set a table’s locks (manager-only columns, own-rows-only) · read/set who gets pinged when a row is added, changed or deleted |
| Table buttons | 3 | list the action buttons above a table · create and edit them · press one (add a row, set values, let AI fill a cell) |
| Visibility & access | 4 | see who can open a page · make it private · give one person access · take it back |
| Form responses | 3 | build the table/sheet that collects answers · fix a submitted response · delete one |
| Change proposals | 3 | list proposals on a published page · merge one · reject one |
Your AI fetches the exact, current list when it connects. The table above is a summary to give you a feel for what you can ask for.
1.9
Switching between workspaces
If you have several workspaces, you can move between them mid-conversation without reconfiguring anything — just tell the AI "switch to the sales workspace" (by name or by id).
- With an account key (PAT): you can switch to any workspace you belong to.
- With a separate key per workspace: register each key once (
rootr config --add-key <key> --label "Sales") and the right key is selected — and remembered — whenever you switch. - A remote connector (the paste-a-URL option) stays bound to the single workspace you approved, by design. Issue another connector for another workspace.
1.10
How much you can use (rate limits)
Only reads, searches, and questions count against a limit. Writing documents and uploading files never do (they are bounded by storage instead).
| Plan | Limit |
|---|---|
| Free | 180 / day (refills at midnight KST) |
| Team | 5,000 / hour |
| Business | 50,000 / hour |
| Platform | Unlimited |
- At 80% used, your AI tells you how many queries are left today — so you are never cut off mid-task without warning.
- When the quota runs out, your AI reports it and points you at the upgrade page. It refills at midnight.
1.5
First things to try
Example prompts
Once connected, try these. They exercise reading, creating and structured data in one pass.
- Read — "Find last week's meeting notes in my workspace and summarize just the decisions"
- Create — "Turn what we just discussed into a 'Project kickoff' document and save it to Rootr"
- Table — "Create a task tracker table with title, owner, status and due date columns, and add the tasks we listed as rows"
- Ask — "Using our workspace documents as evidence, find out why payment failures keep recurring" (answers come with citations)
- Memory — "Remember that we only touch the PAUSE file to stop outbound sends" (every teammate's AI learns the rule)
1.6
What data the connector handles
Data handling
Plainly, what moves where when you connect an AI.
- Collection — the connector can only reach the single workspace you approve on the OAuth consent screen. What travels is tool calls (read/write/search documents, etc.) and their results; your conversation with the AI itself is never sent to or stored by Rootr.
- Retention — documents and rows created by tool calls stay in your workspace (that is the point). Access tokens are stored as hashes only and are revoked the moment you disconnect.
- Sharing — we do not sell customer data or use it for advertising. It is passed only to sub-processors required to run the product (cloud infrastructure, LLM APIs).
- Deletion — deleting the connector key in Settings → Integrations blocks it immediately. Workspace data deletion follows the normal flow (trash → permanent delete).
②Get started in 5 minutes
From sign-up to your first document, and building a whole workspace with AI — it takes just five minutes.
If Rootr is new to you, just follow this order. No development knowledge is needed.
2.1 Sign up and log in
- You can sign up with an email and password, or start in one click with a Google account.
- The first time you log in, you see a prompt: "Create your first workspace." A workspace is your own space that holds documents and folders.
2.2 Creating documents and folders
On the left of the screen is a tree (a list that unfolds like branches). Here you create folders to organize things and create documents inside them. Think of it just like the folders and files on your computer.
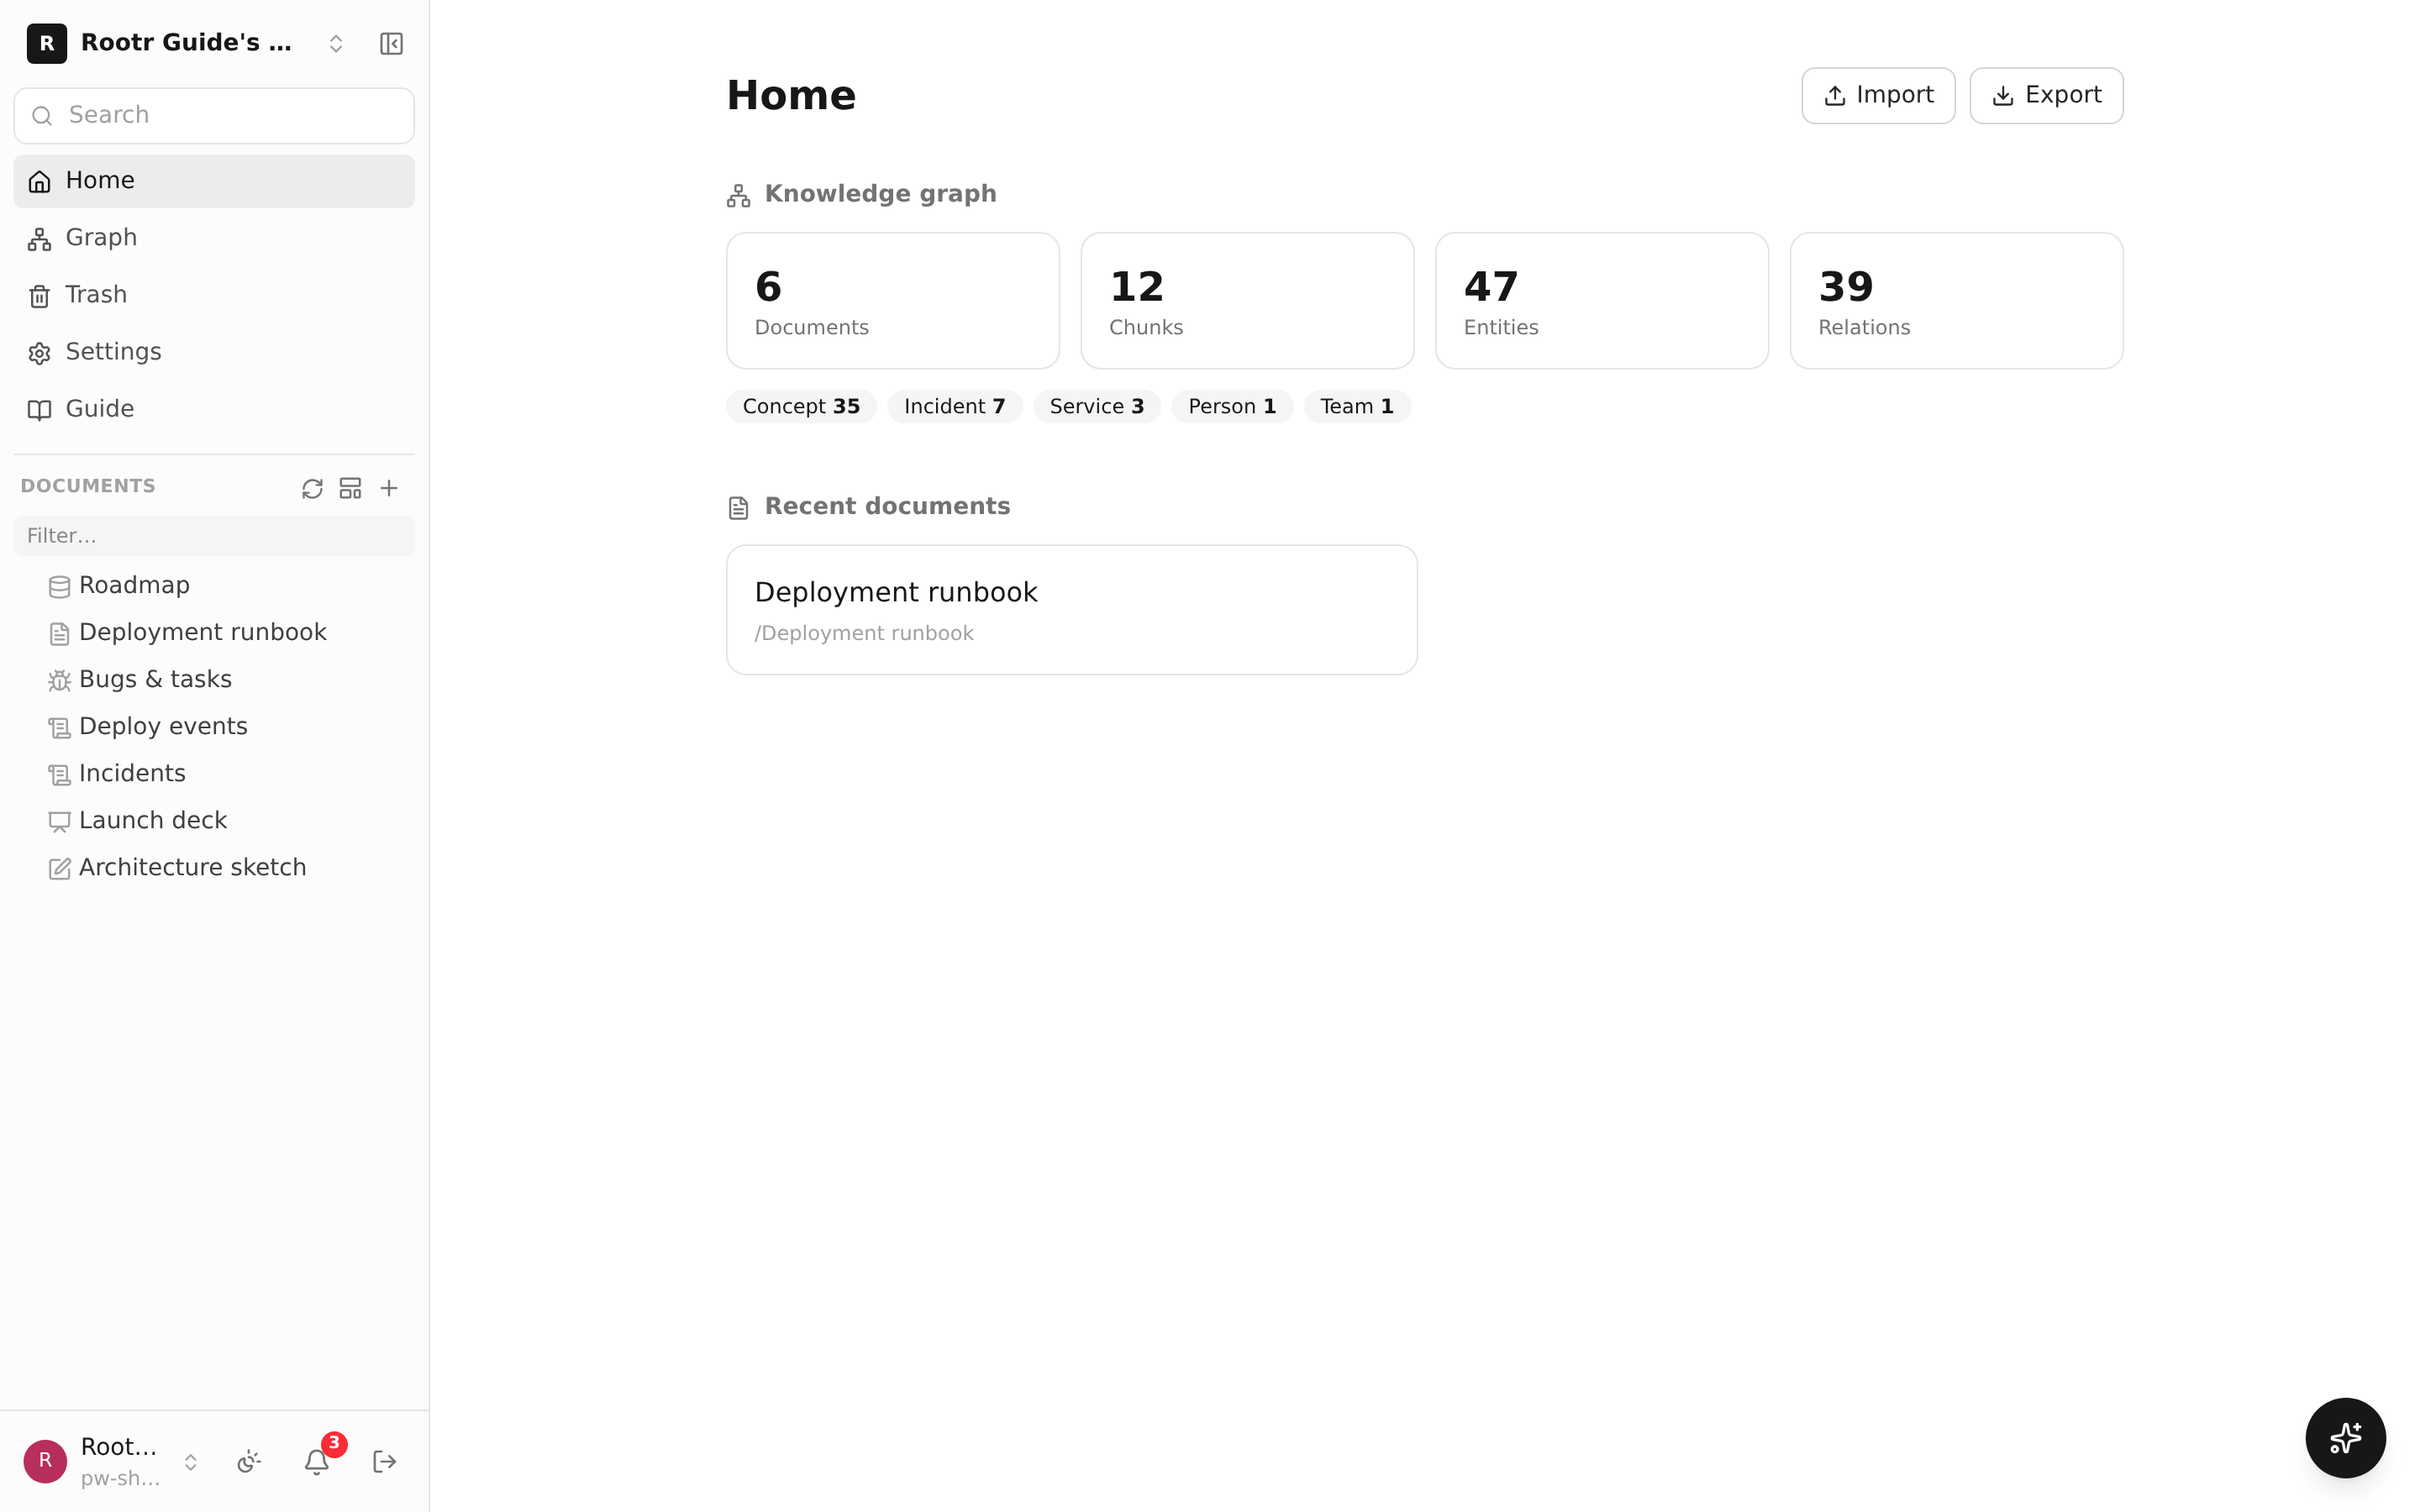
A newly created workspace and the document tree (list of folders and documents) on the left.
2.3 Building it all at once with "Create with AI"
You do not have to build everything piece by piece from a blank screen. Write in one sentence "what you want to do" (for example, "make me a space to prepare a new product launch"), and after asking you a few questions, the AI automatically builds a ready-to-use structure complete with folders, documents, and tables.
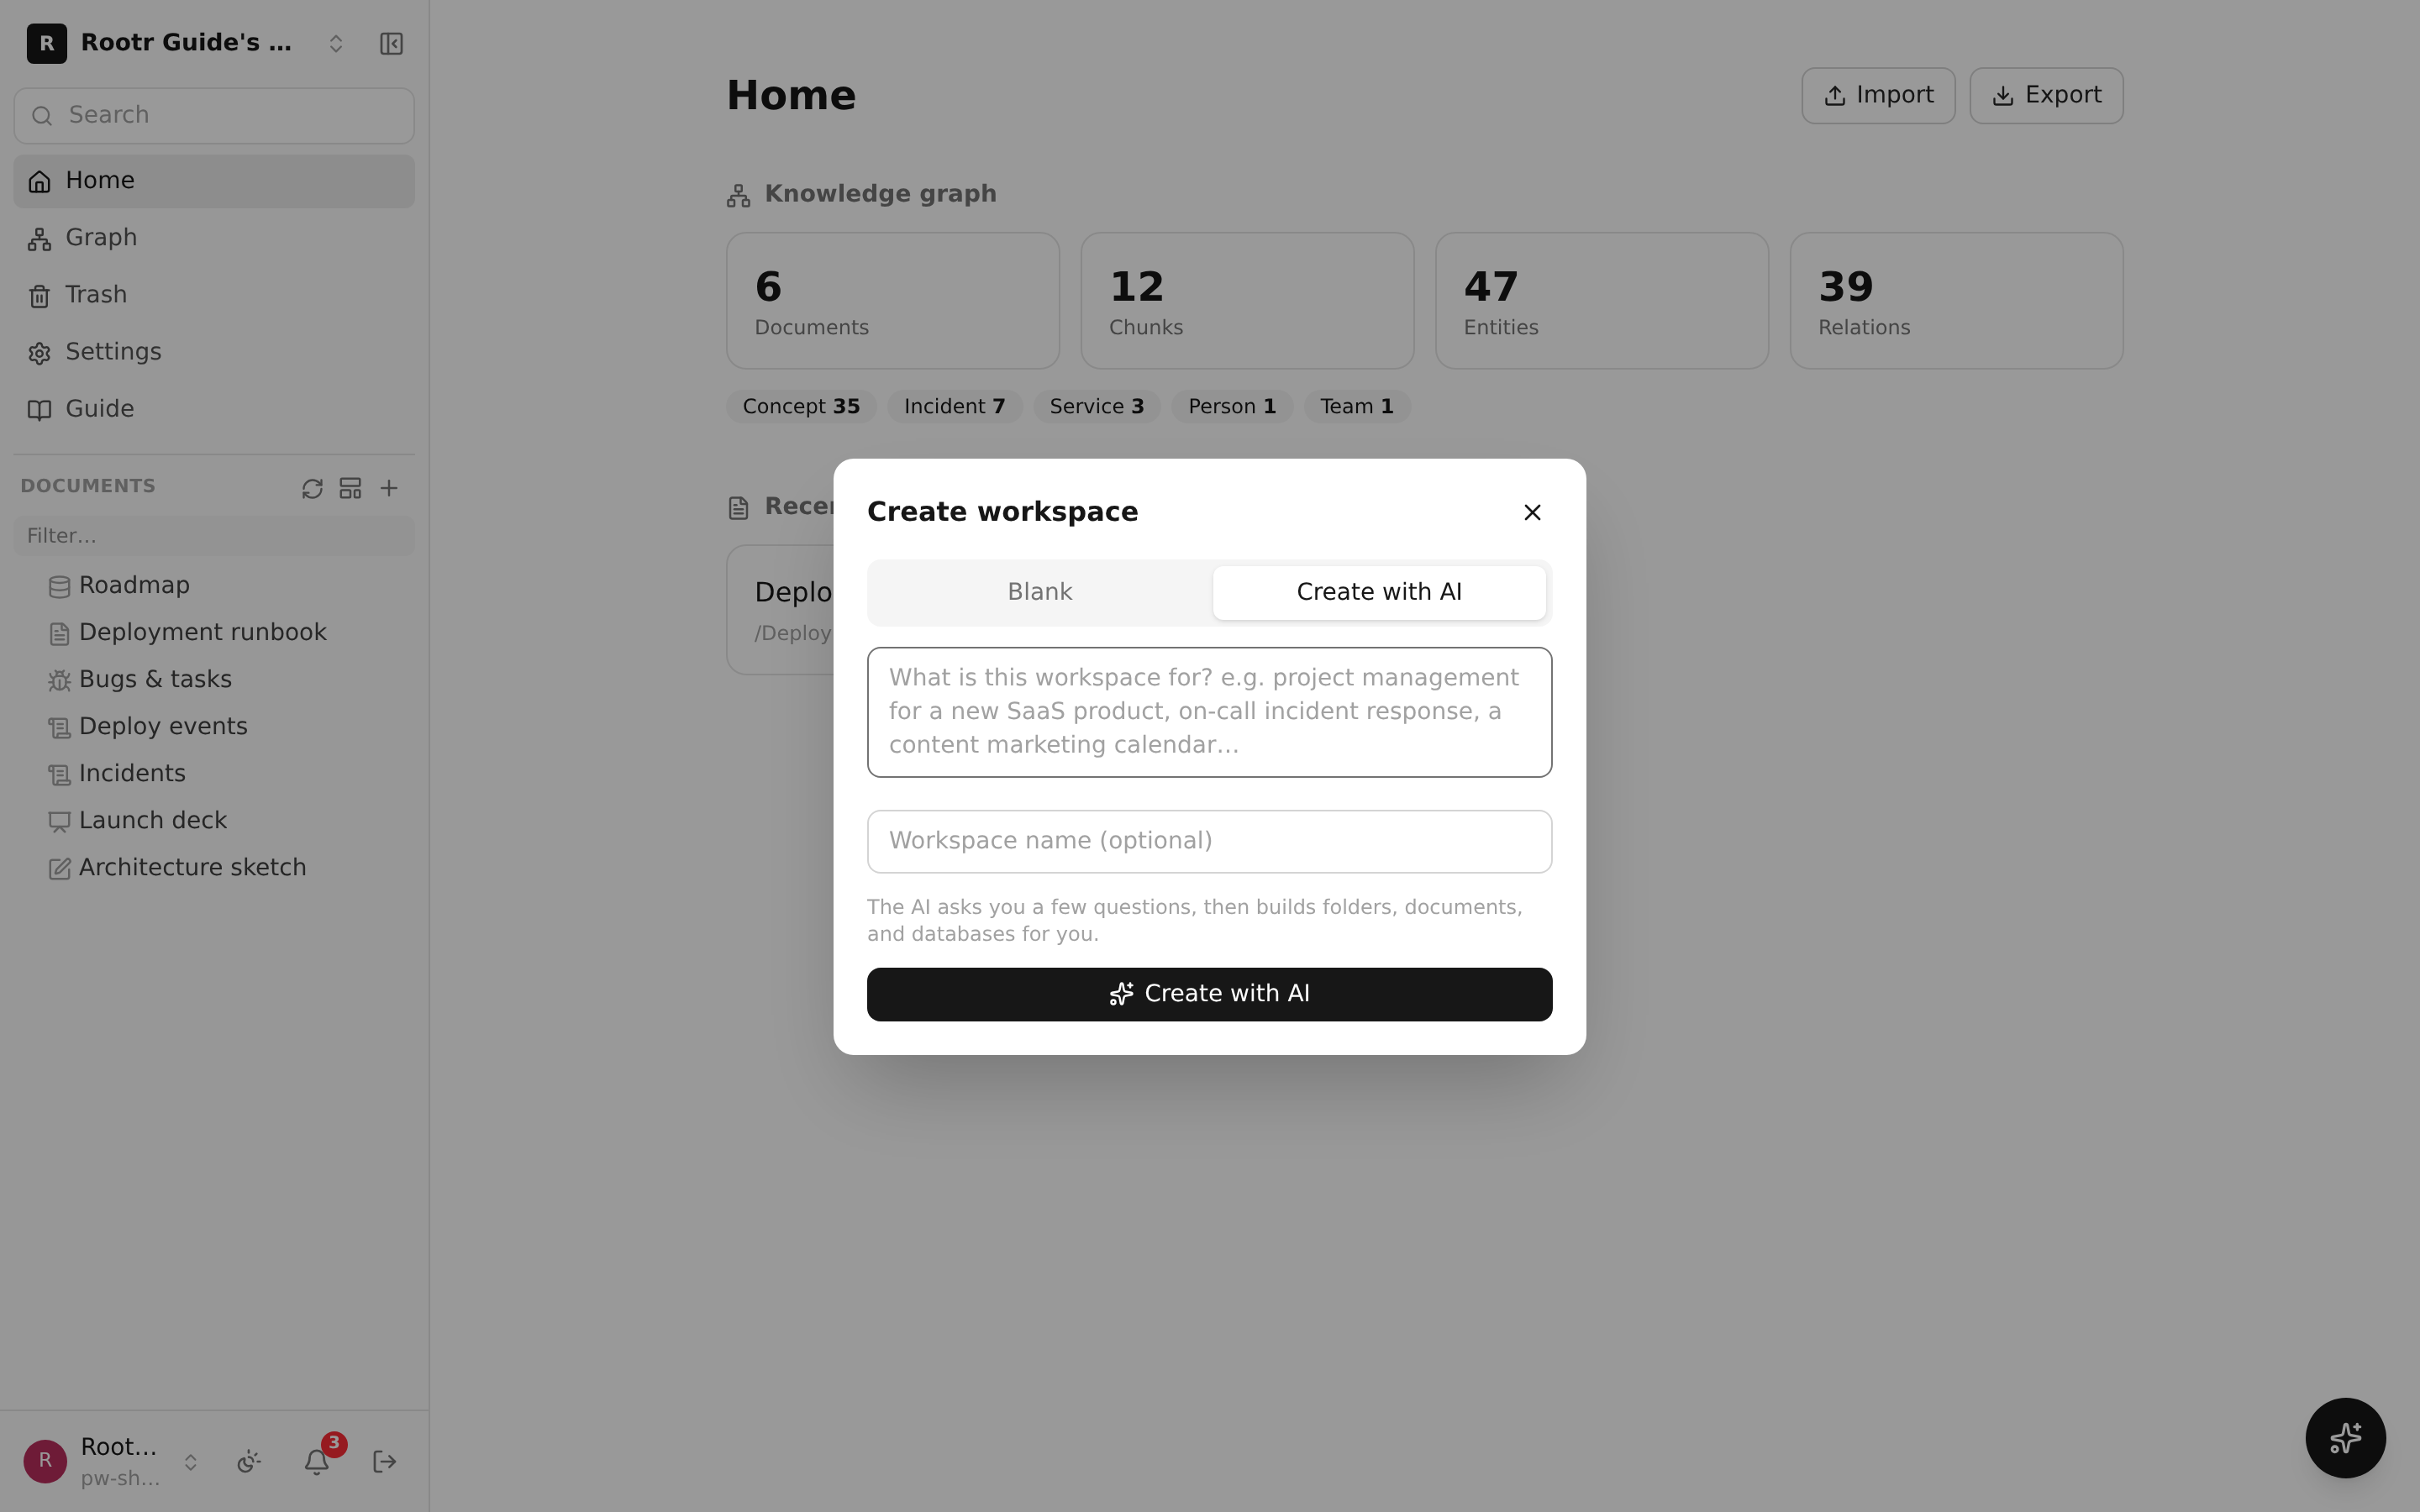
The "Create with AI" window. Write what you want to do as a sentence and it generates a workspace structure automatically.
When you save a document, its contents are automatically organized into a "knowledge graph" in the background (details in chapter ⑥). Then go straight to chapter ① and connect your AI — that is where the real power of Rootr begins.
Documents & structure
③Writing documents together (basics)
Many people can write comfortably at the same time, and just by saving, the content automatically becomes searchable, queryable knowledge.
Rootr documents are made of pieces called "blocks." A heading, a paragraph, a list, a table, an image — each is a block. You can drop them in wherever you like and reorder them, which makes writing far more flexible.
- Real-time co-editing: even when several people open the same document and edit it at once, everyone's changes show up instantly. You can also see who is looking at what.
- Version history (an automatic save log): every time you edit a document, its previous state is saved automatically. Even if you delete something by mistake, you can roll back to an earlier version (the clock icon in the top right).
- Special blocks: you can add highlight boxes (callouts), tags (labels), and mermaid diagrams — pictures like flowcharts drawn with code. Even when the AI writes a document, it draws these diagrams automatically.
- Content added from outside shows in real time too: when an AI or a program adds text to a document via the API, it appears right away on the screen of whoever has that document open.
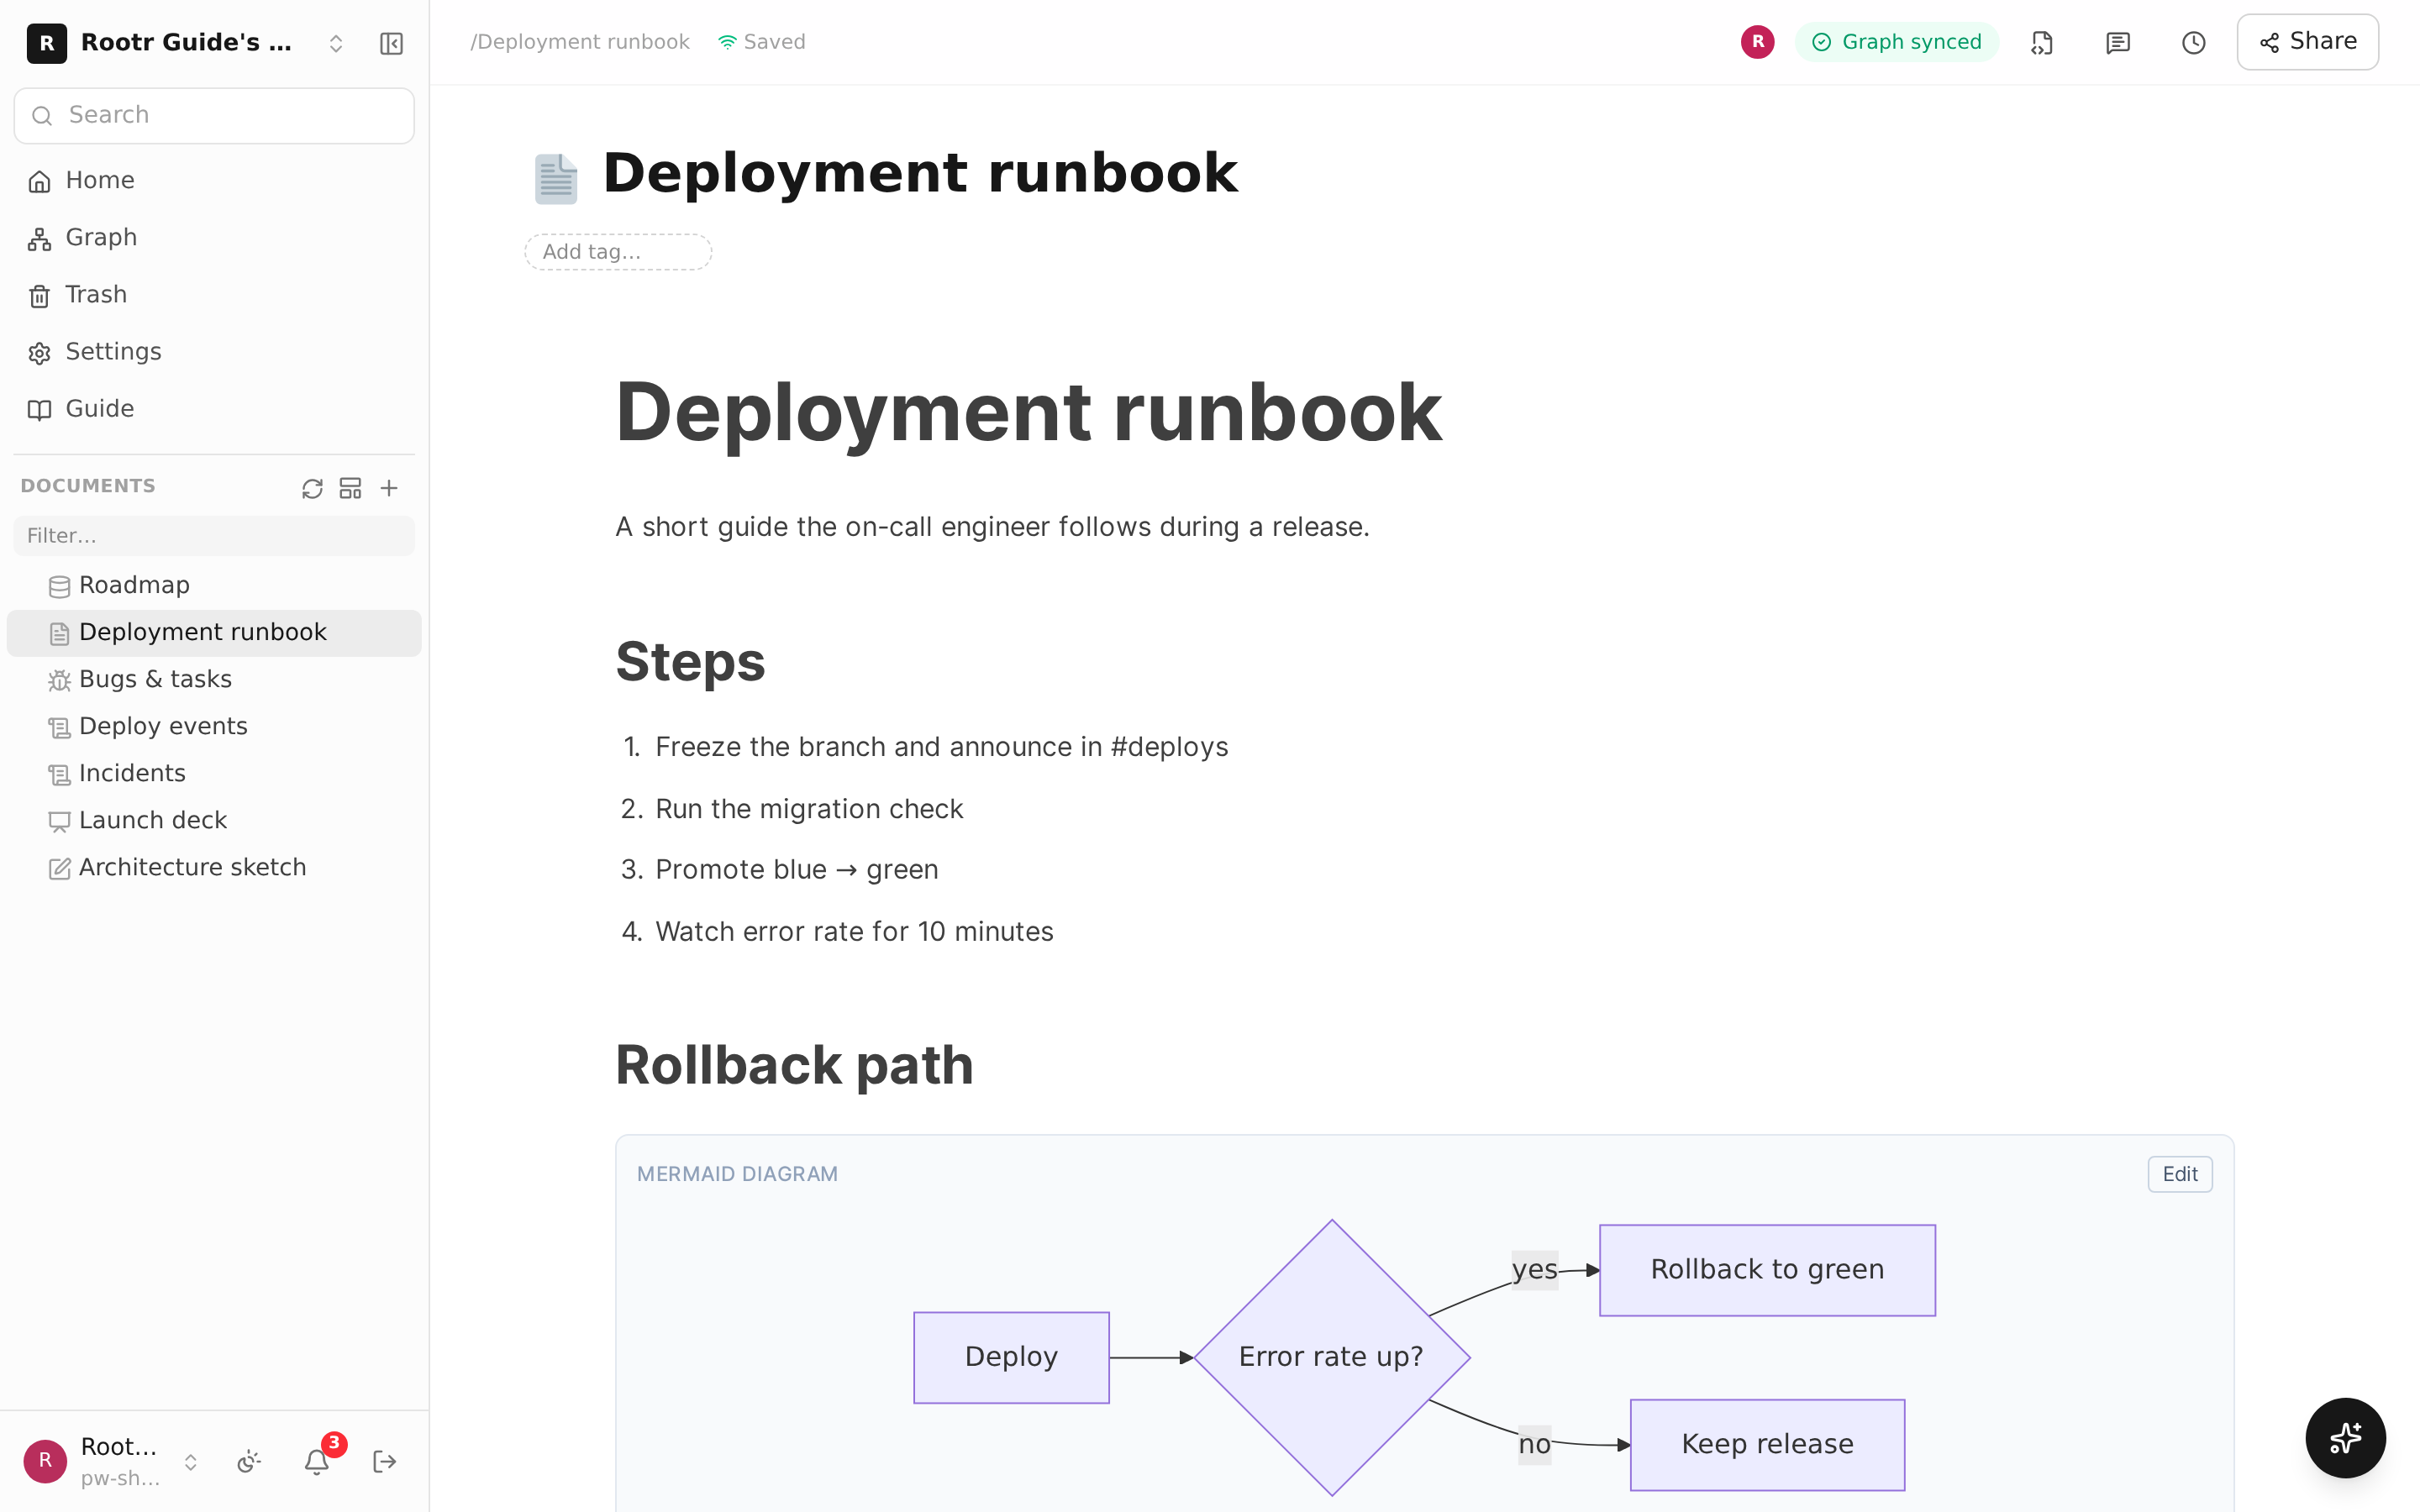
The block editor screen. Alongside a heading and a list, a flowchart (mermaid diagram) is drawn.
Below is the version history screen. The moments you edited the document remain as a list, so you can check or roll back to the content at any of those points anytime.
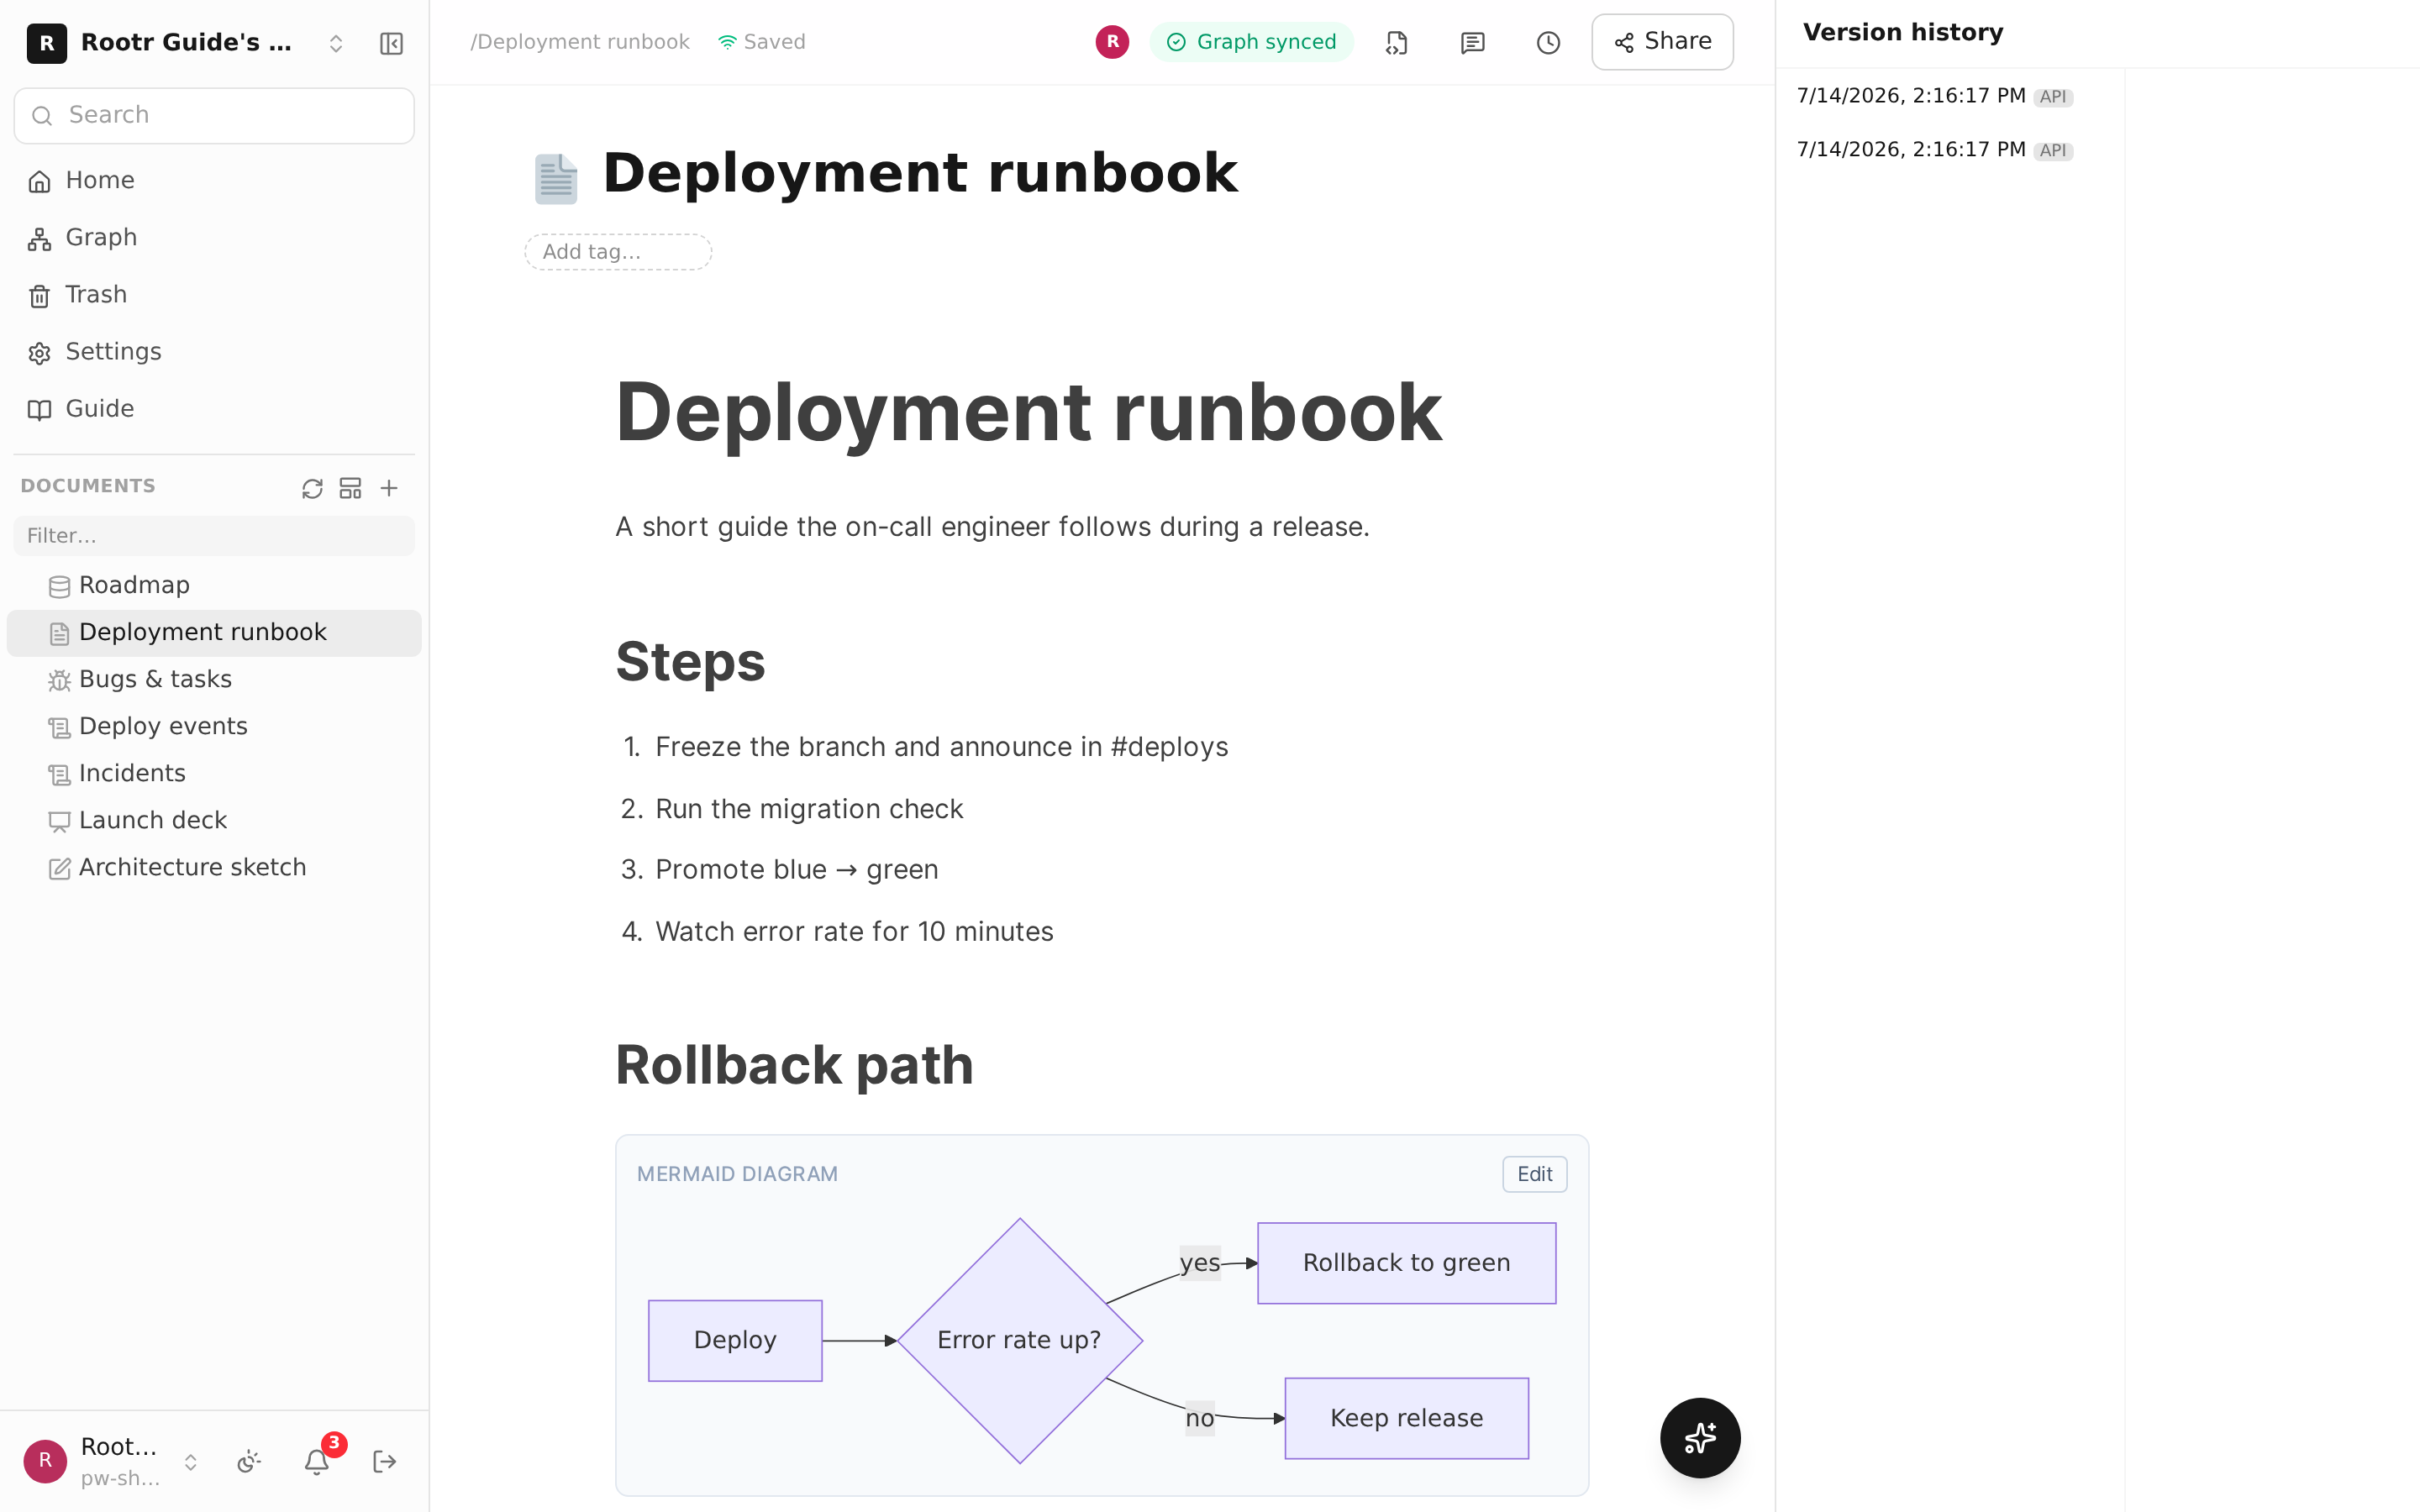
The document's version history panel. The moments of editing are listed in chronological order.
What "/" inserts
Type / on an empty line and the block menu appears. It searches in Korean too, so /토글 finds the toggle.
| Block | What it does |
|---|---|
| Heading · list · quote · table · code | The bones of a document |
| Toggle | Folds away detail. The folded state survives a refresh |
| Callout | A paragraph that has to stand out — "note", "summary" |
| Tag | Colors a phrase inline |
| Table of contents | Collects this document's headings; updates as they change |
| Bookmark | A link as a card with title and site, not a bare URL |
| Embed | Another document, table, sheet, deck, whiteboard, form, recording or tracker, inline |
| Diagram (mermaid) | Flowcharts and sequence diagrams written as text. Agents can draw them for you |
| Image · video · file | Drag or paste to upload (video up to 75MB) |
An embed card previews the first rows of a table, the top-left cells of a sheet, or the slide count of a deck. Anything you cannot open normally will not open here either — embedding never widens permissions.
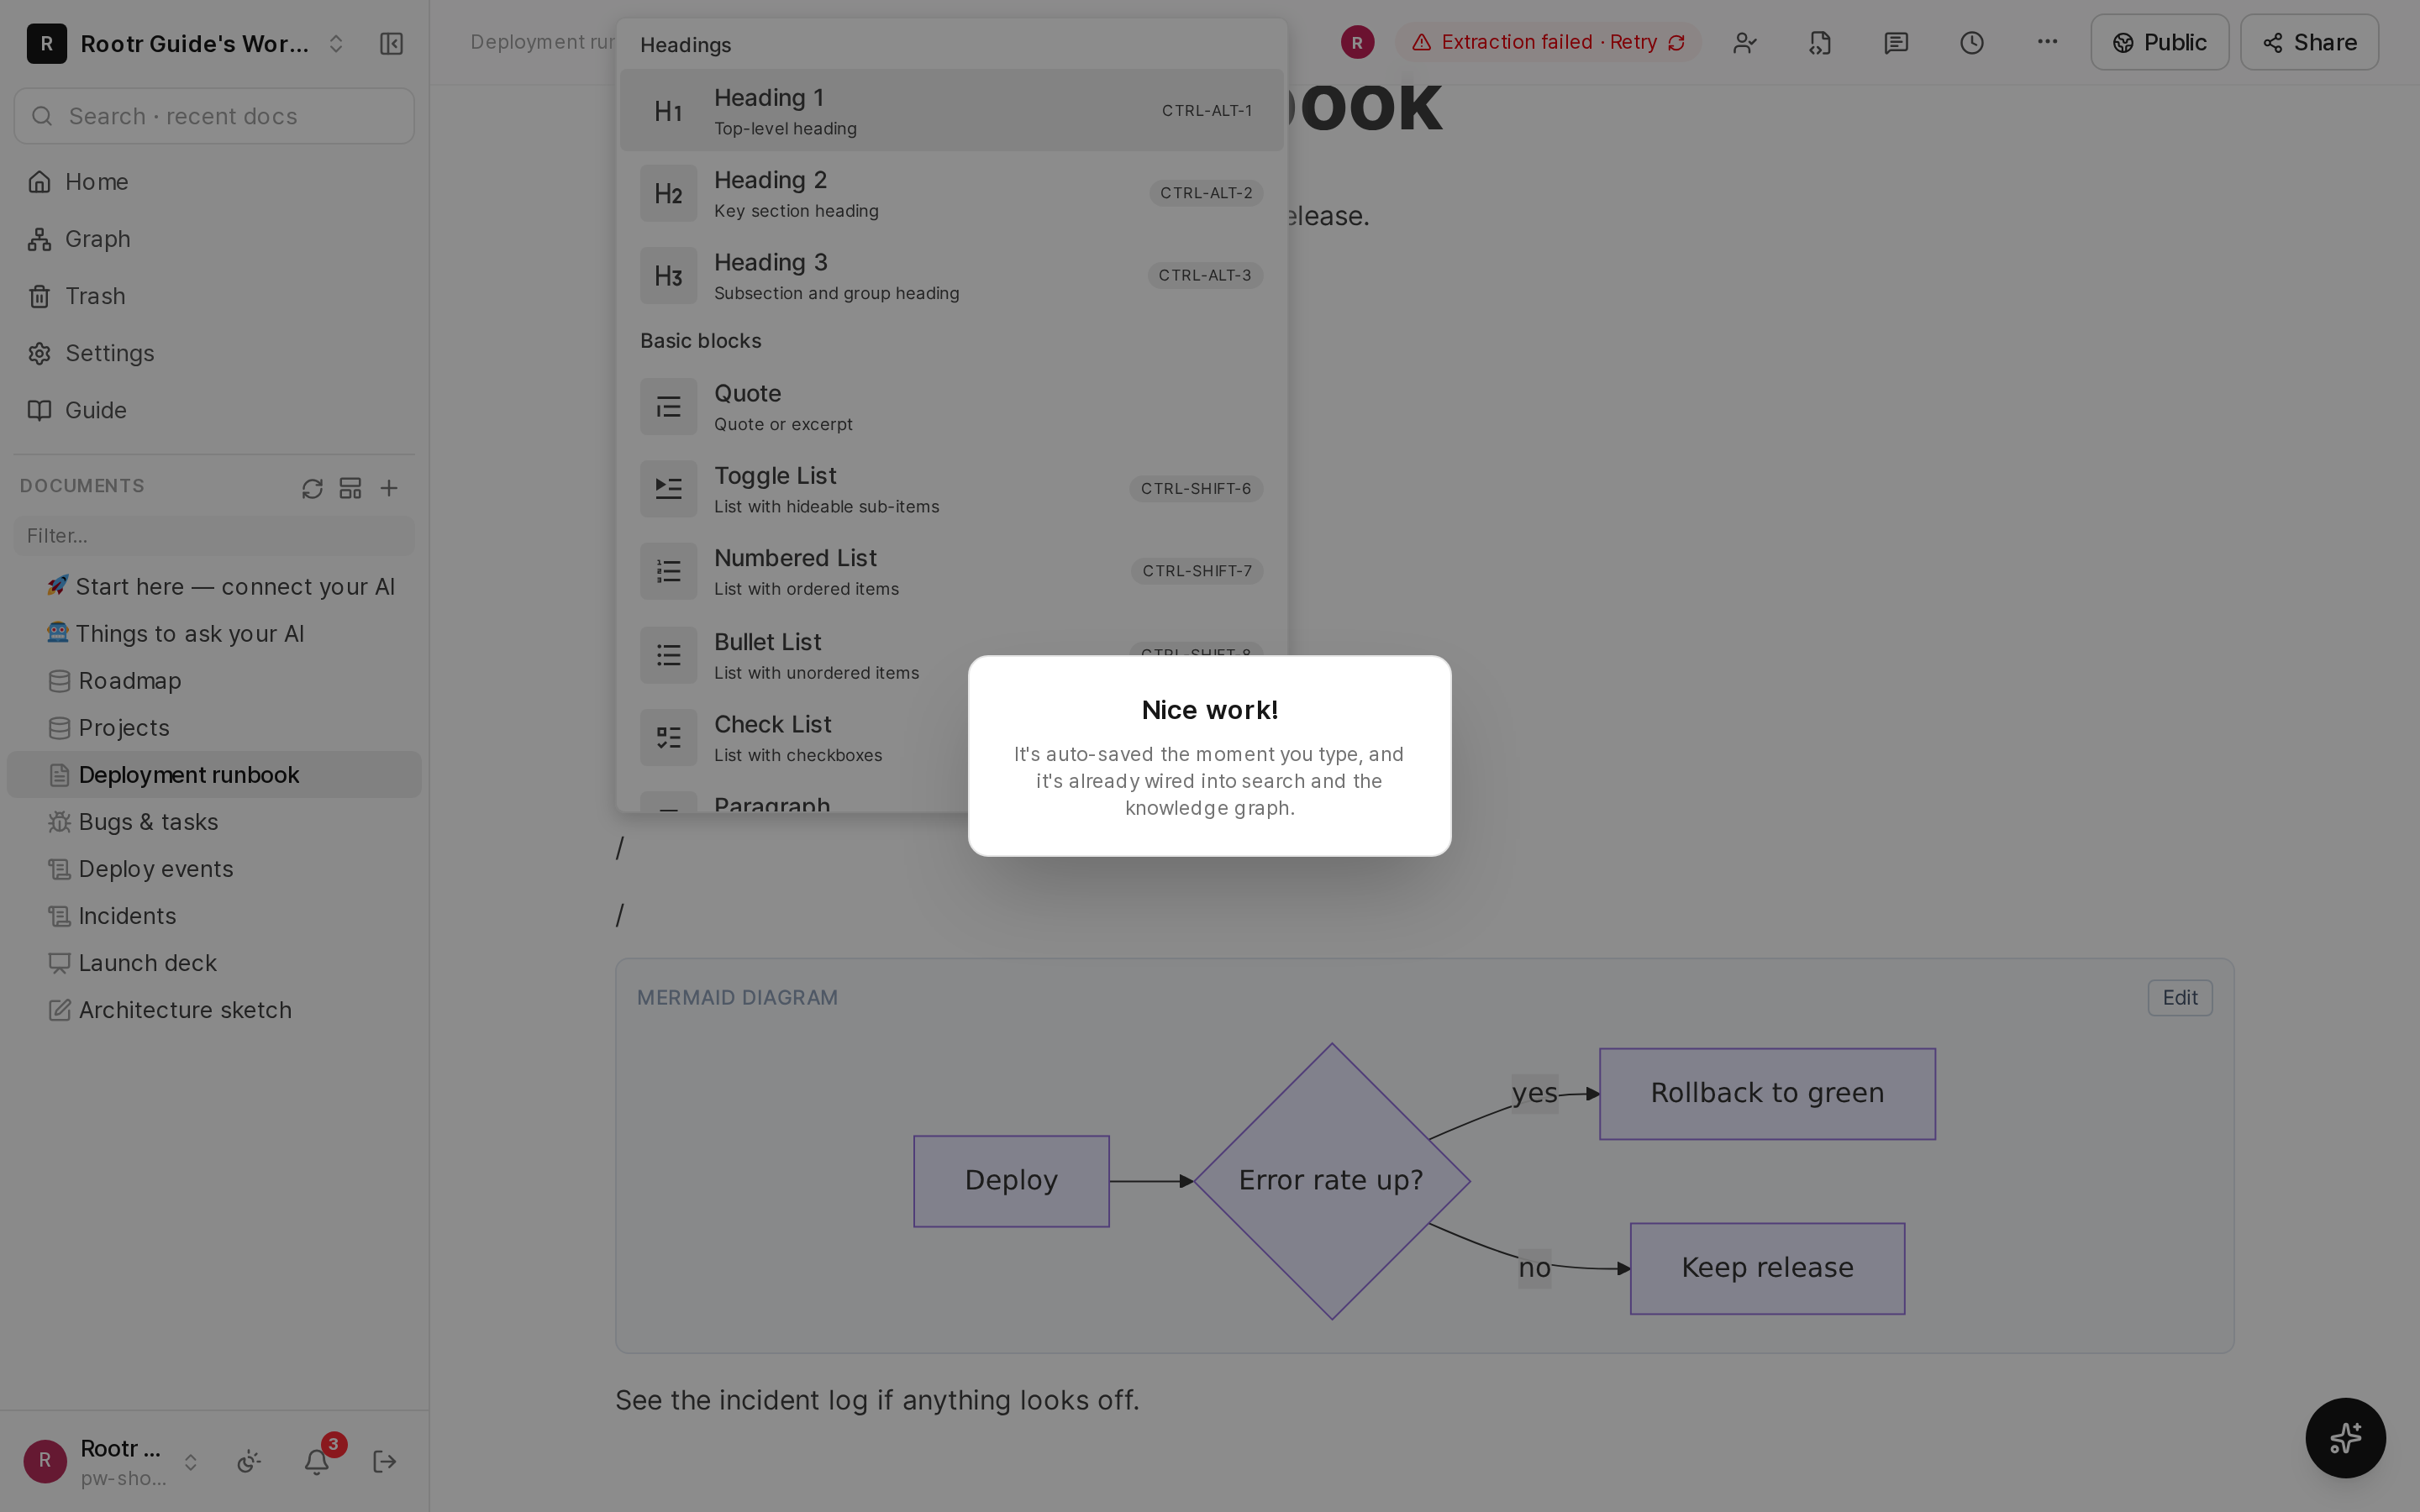
The block menu opened with "/" inside a document.
Comments and subpages
- Comments: select a paragraph and comment on it.
@namenotifies that person. - Subpages: right-click a document in the tree and choose "New subdocument" — it nests under that document. Tables can hold subpages too.
- Read receipts: for announcements that must be read, name the audience and Rootr shows how many have.
④Document kinds (node types) in full
Do not force everything into a plain document. Picking the kind that fits your purpose makes things much easier.
"Node" is the word for each item that goes into the tree (the list on the left). A document is a node, a folder is a node, a table is a node. Rootr has several kinds of nodes, as below, and you pick the one that fits what you are trying to do. First, here is the whole picture at a glance; then we explain the important ones one by one.
| Kind | Use it when | Key features |
|---|---|---|
| DOCUMENT | Writing — descriptions, plans, meeting notes, etc. | Block editor · co-editing · versions · automatic knowledge-building |
| FOLDER | Grouping several items to organize them | Grouping + passing permissions down to children |
| DATABASE (table) | Managing things as a list — to-dos, requirements, issues | A table with a defined format per column + 4 views |
| SPREADSHEET | Tables that need calculation — budgets, quotes | A table with formulas (=sum, etc.) |
| WHITEBOARD | Sketching ideas freely with drawings and shapes | Free placement on an infinite canvas |
| FORM (survey/form) | Getting responses from people outside | A form to fill in → collected into a table automatically |
| ISSUE_TRACKER (issues) | Tracking bugs and tasks by number | GitHub-style issues (#number · status · label · comments) |
| PRESENTATION | Slide presentation materials | A slide deck (16:9) |
| PAGE | A web page for people outside the team (notice, event, pricing) | Assembled from blocks → published at a public address |
| LOG (data records) | Recording metrics, incidents, events | A formatted logbook → data lineage (⑦) |
| SIGNED (signed document) | Records that must be provable — approvals, research notes | Freezes on submit → signed in order → tamper check |
DATABASE (table) — a list with a defined format
Think of it as a spreadsheet table crossed with a structured database. For each cell (column) you set a format — "this column is text, that one is a date, this one is a status (a choice)." You can look at the same data in four ways — as a table, as a kanban board (where cards form columns by status), as a calendar, and as a timeline. You can add and edit rows both on the screen and by asking the AI to do it.
Clicking a card opens the row on the right, where you can write a detail note under the properties. That note is a document of its own beneath the table, so your AI can write it too — pass body when it adds or updates a row.
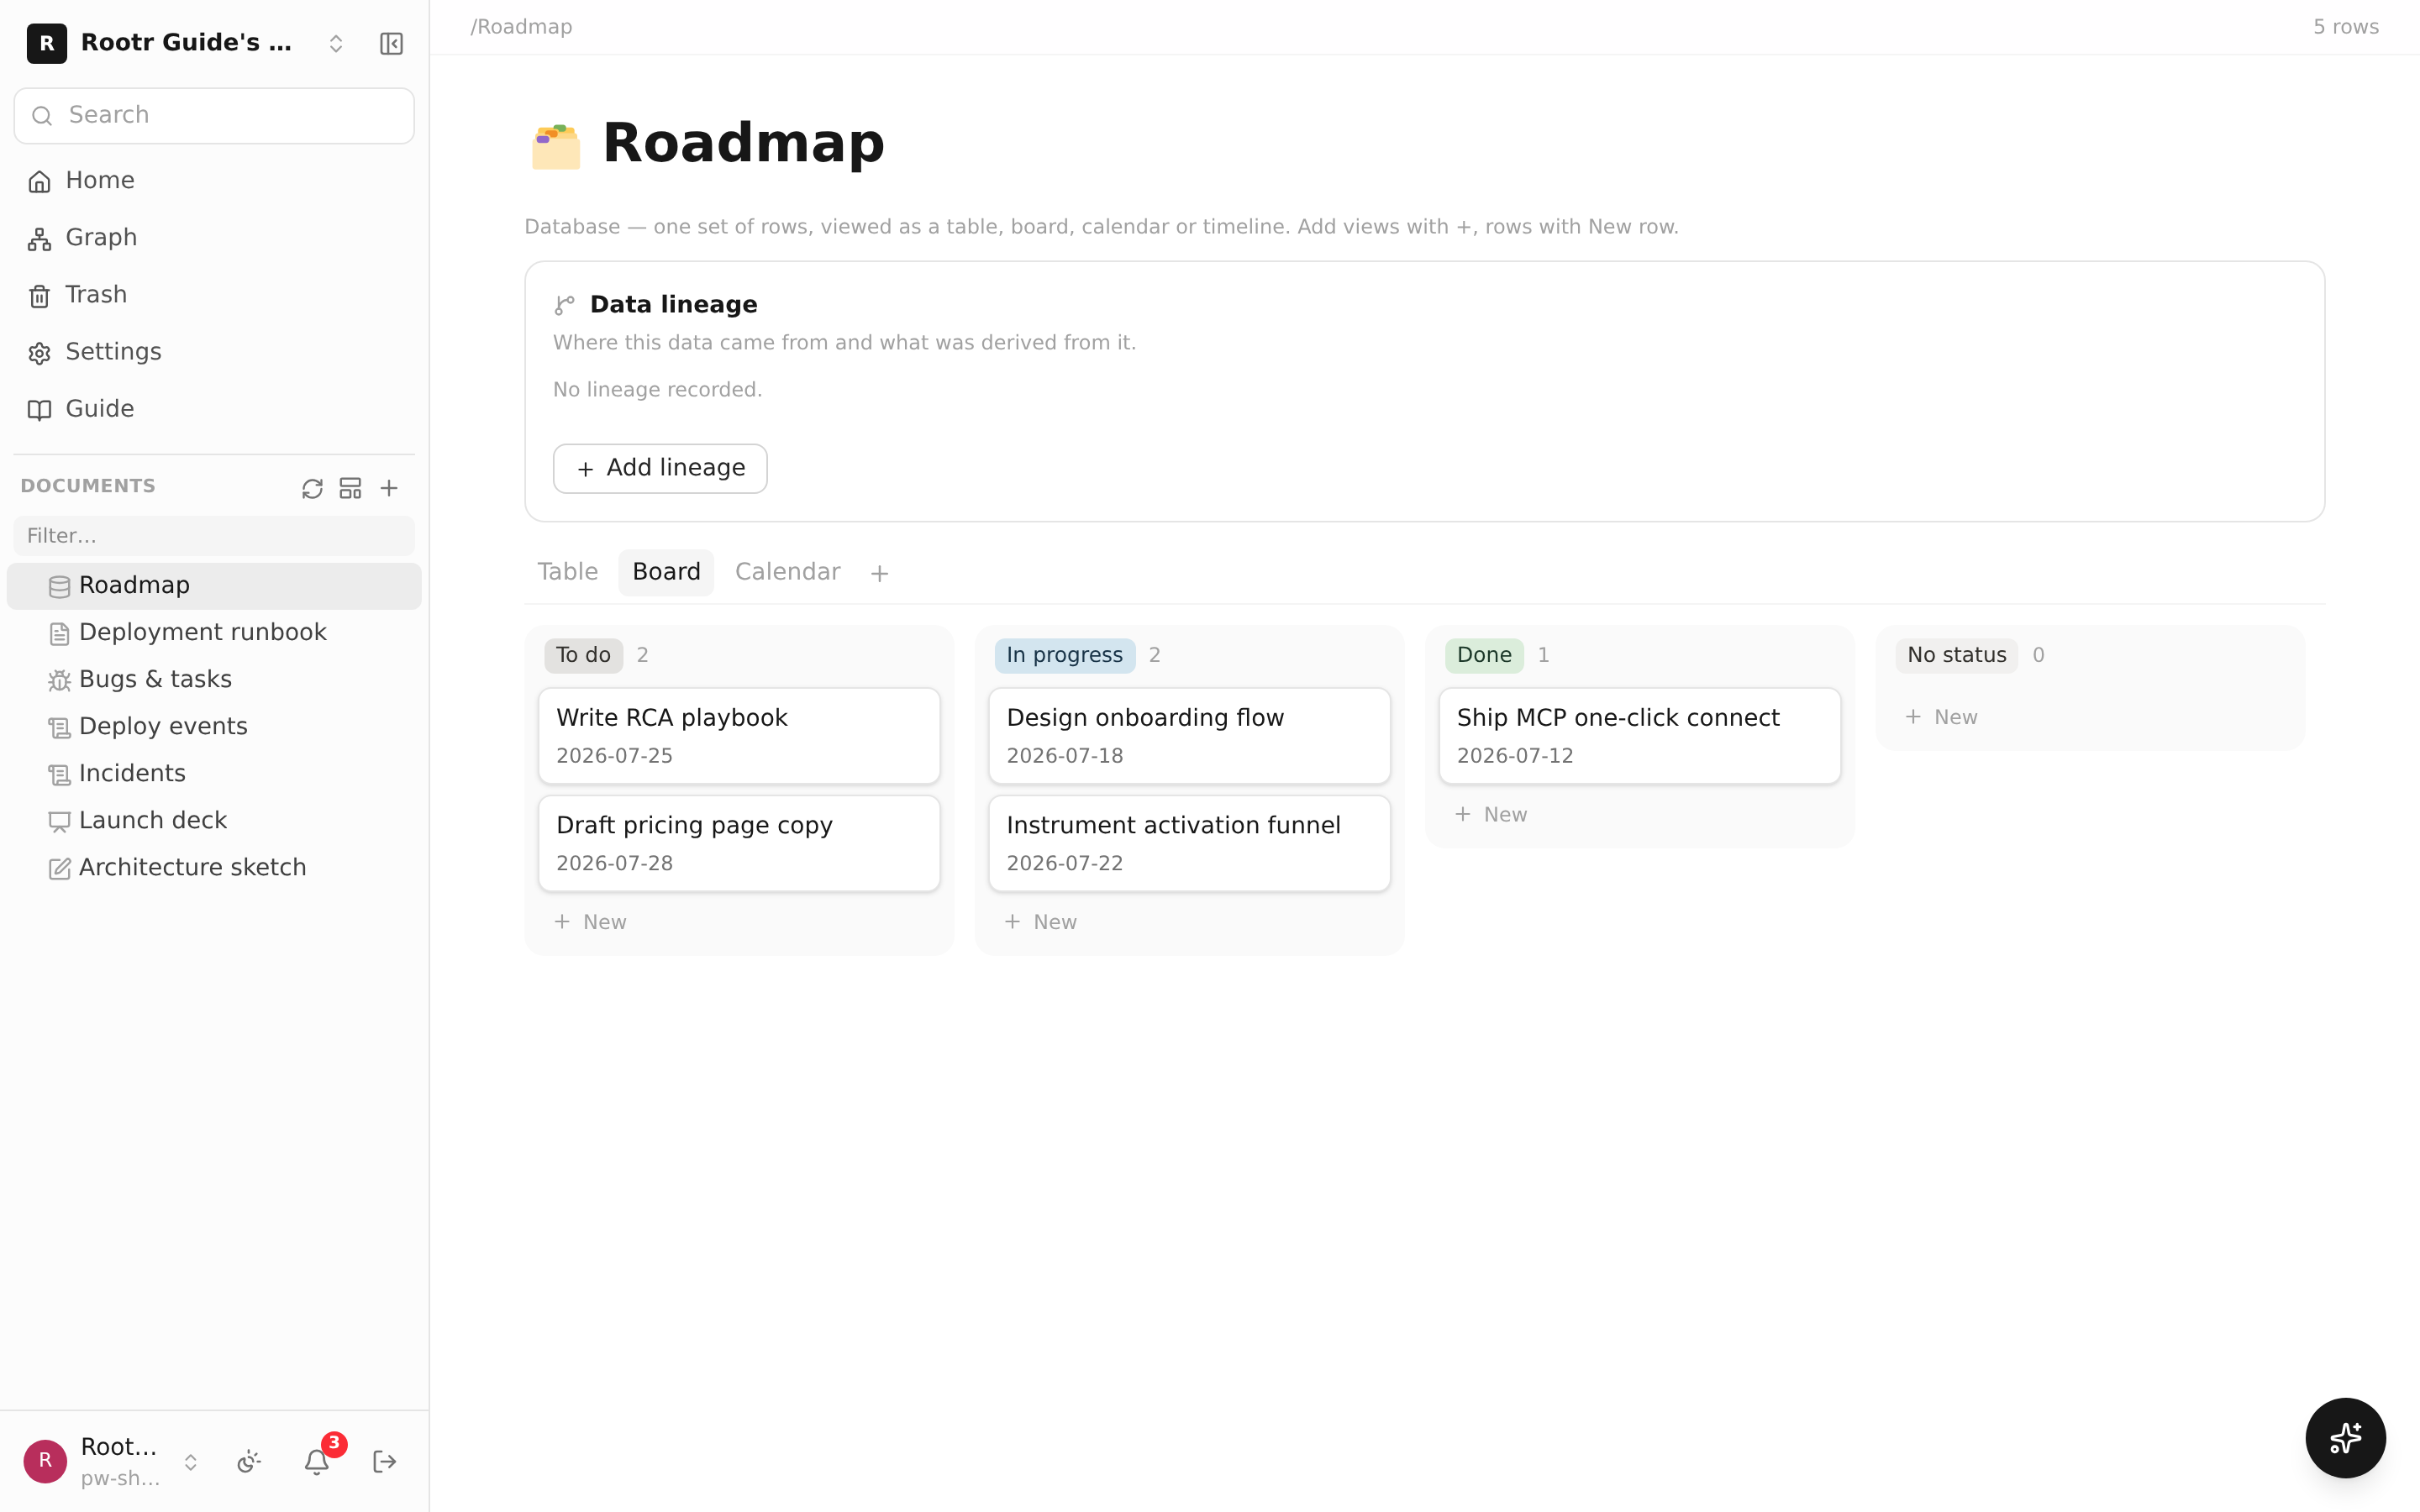
A DATABASE node viewed as a kanban board. Cards sit in the To do / In progress / Done columns.
Columns the server fills in — always right, never edited by hand
These columns hold facts, not values you type. The server recomputes them on every read, so they cannot drift and nobody can edit them into disagreement with reality.
| Column type | What it holds | Use it for |
|---|---|---|
| Formula | A value computed from other columns, e.g. {Qty} * {Price} | Amounts, days left, tiers |
| Rollup | Values gathered through a relation (count, sum, average, percent done) | "How many tasks on this project, and what do they add up to" |
| Created by / Last edited by | Who created the row and who touched it last | Keeping an honest record of who put a line in |
| Created time / Last edited time | When the row appeared and when it last changed | Knowing how old a line is |
| ID | A number unique within the table, e.g. TASK-42 | The name people use out loud in meetings |
Formulas support if, concat, round, min, max and dateBetween (days between two dates), among others — for example if(dateBetween({Due}, now()) < 0, "overdue", "on time"). IDs are never reused: the TASK-42 you talked about yesterday must not point at a different row today.
Locking a table (Notion has no equivalent)
The "Permissions" button above a table gives you three locks. None of them apply to managers, and a table you never configure behaves exactly as it did before.
- Only managers change columns and views: editors still fill in rows. Stops someone deleting a column everyone depends on.
- People only see rows they created: for applications or report boxes where submissions must stay private. Managers see everything.
- Columns only managers can edit: approval flags, final scores — the cells that must not move.
Putting other things inside a document (wider than Notion)
Notion lets you embed a database in a page. Rootr lets you embed a table, spreadsheet, deck, whiteboard, form, recording or issue tracker — because a meeting note is more useful when that meeting's recording, decision table and deck are on the same page.
Type "/" in a document, choose Embed, and search by name. The card previews the first rows of a table, the top-left cells of a sheet, the slide count of a deck. Anything you cannot open, you cannot embed-preview either — embedding never widens what someone can see.
The same menu adds a Table of contents (built from the document's own headings) and a Bookmark (a link shown as a card instead of a bare URL).
WHITEBOARD · PRESENTATION · FORM
- Whiteboard: a wide canvas where you draw freely with shapes and connectors. Great for structure diagrams or organizing ideas.
- Presentation (PRESENTATION): where you make slides. The "text" you write in a slide's title, body, and notes is linked automatically into the knowledge graph, so always write important content as text, and add descriptions (captions) to images.
- Survey/form (FORM): a form for requests and surveys. Members can fill it in inside the workspace (a leave request, say), and you can also send it as a link to people outside. Responses are gathered automatically into a table (DATABASE), and each person sees only what they submitted.
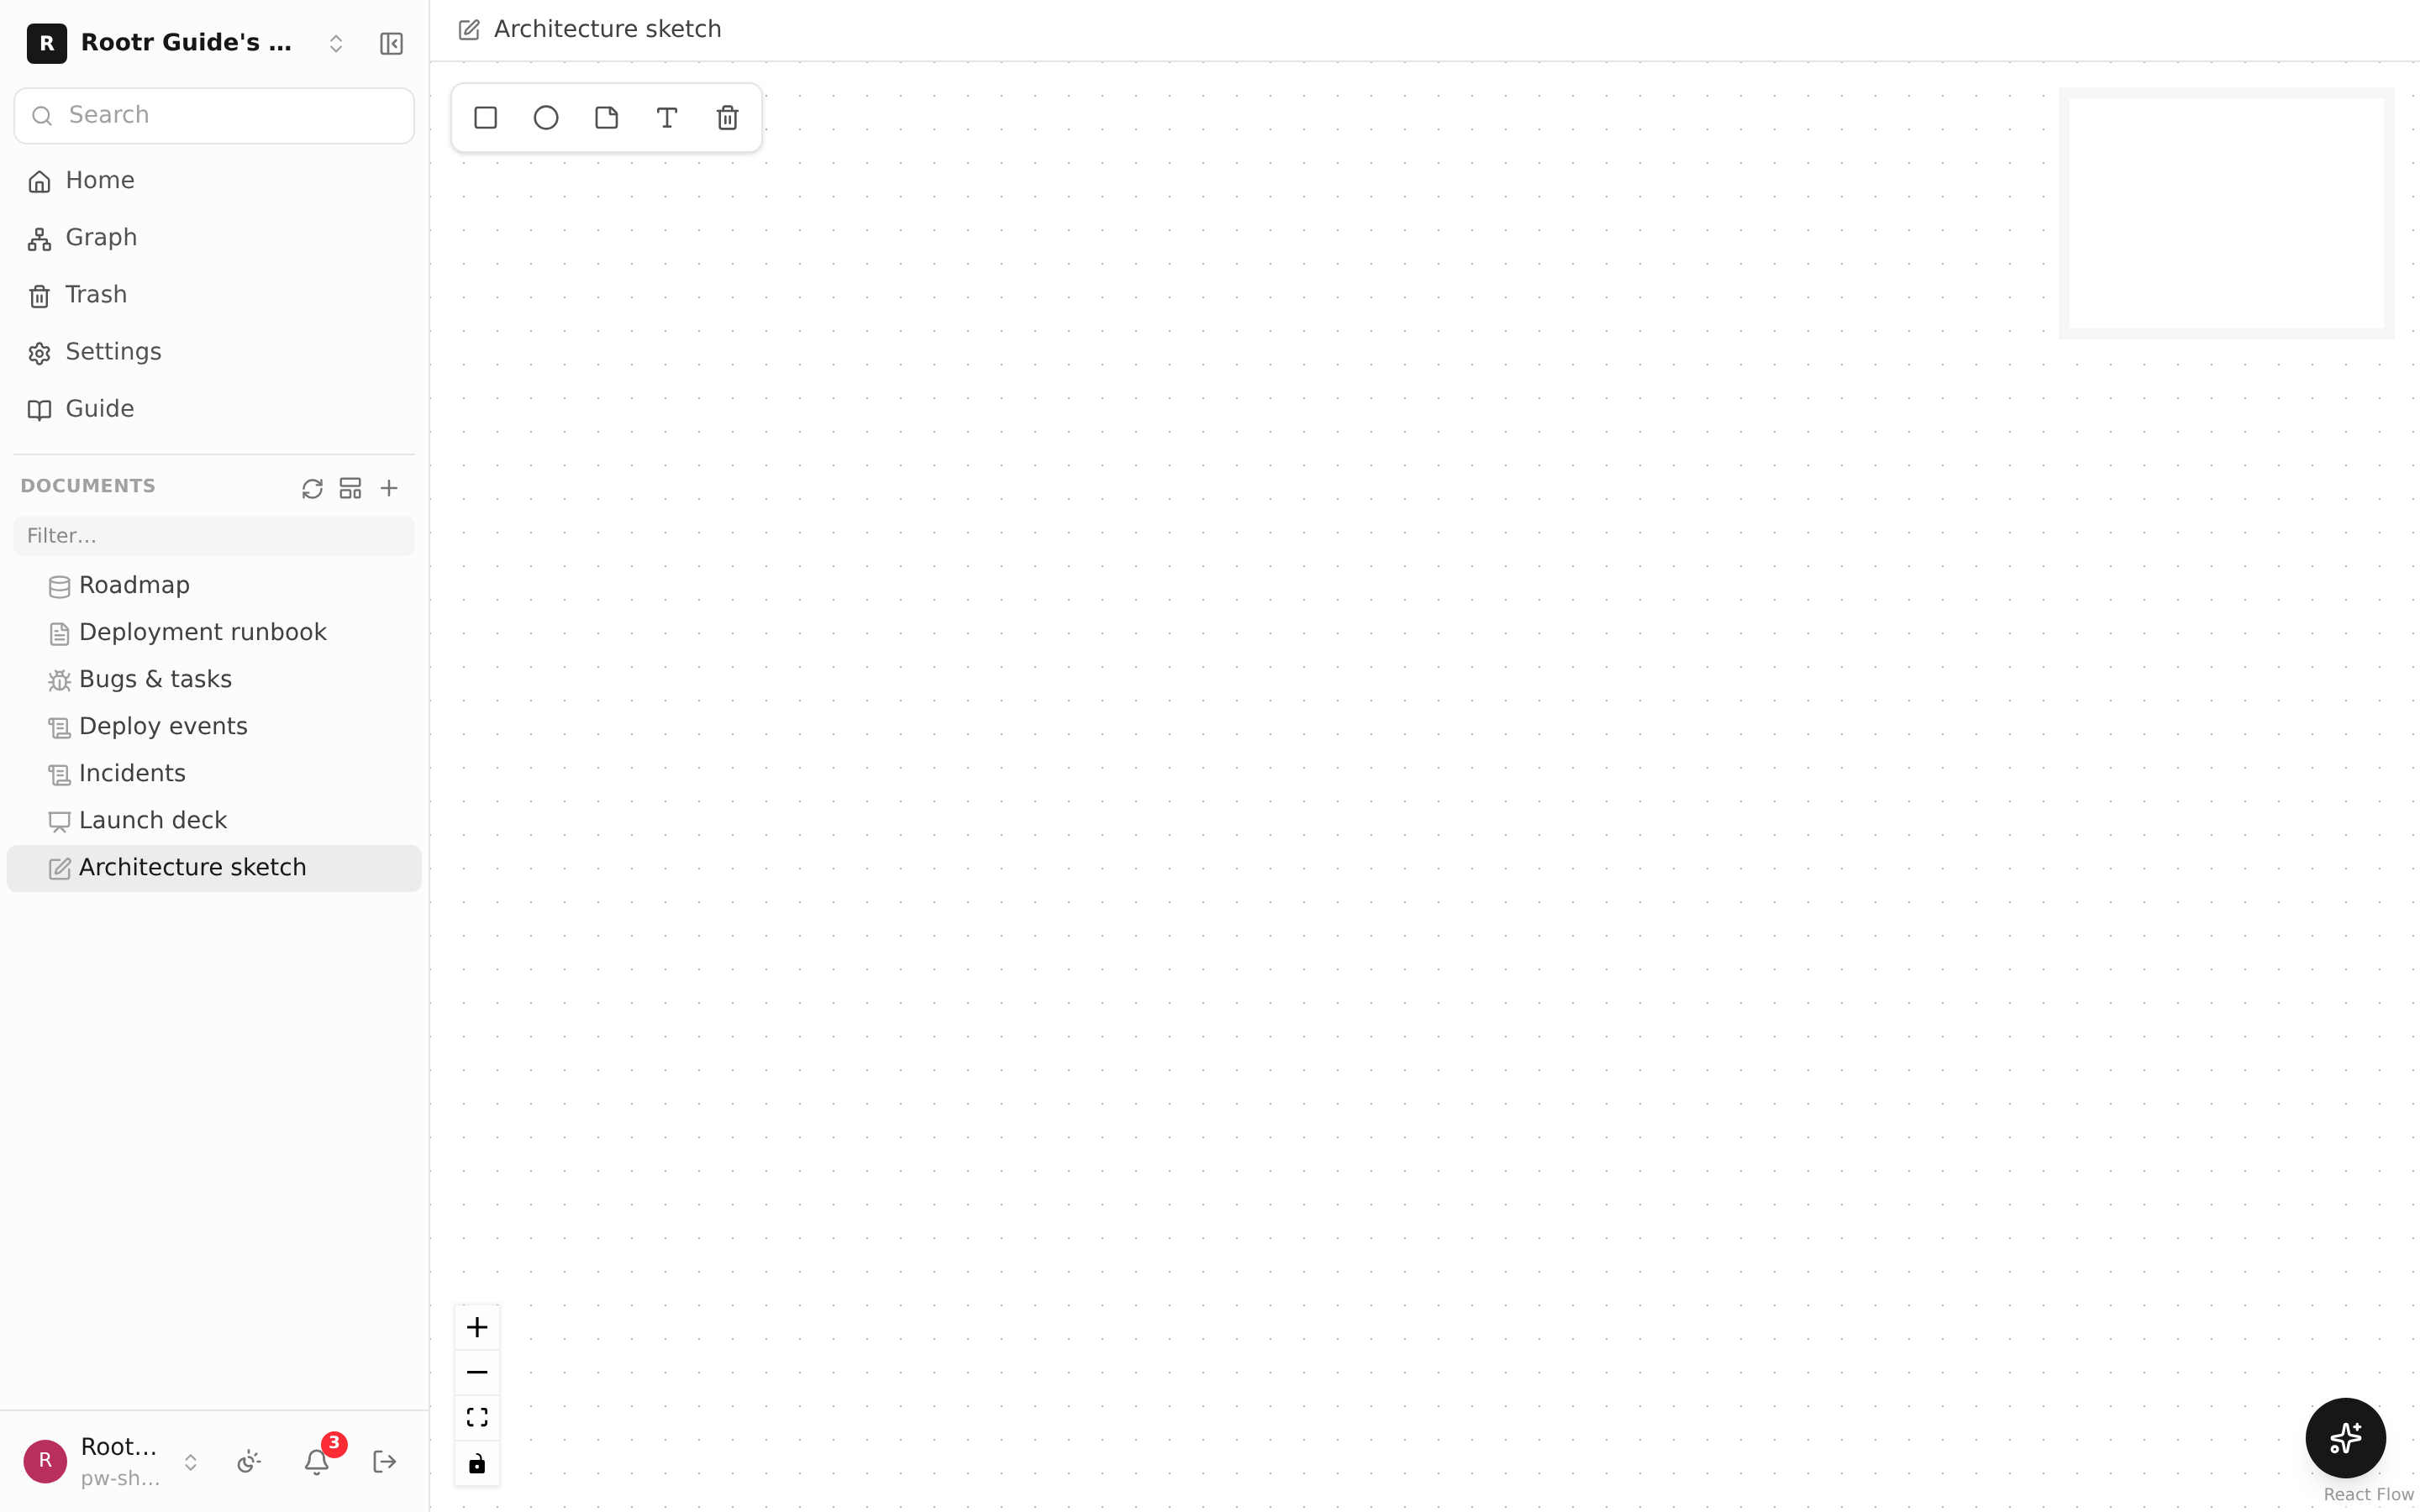
A WHITEBOARD freeform canvas screen.
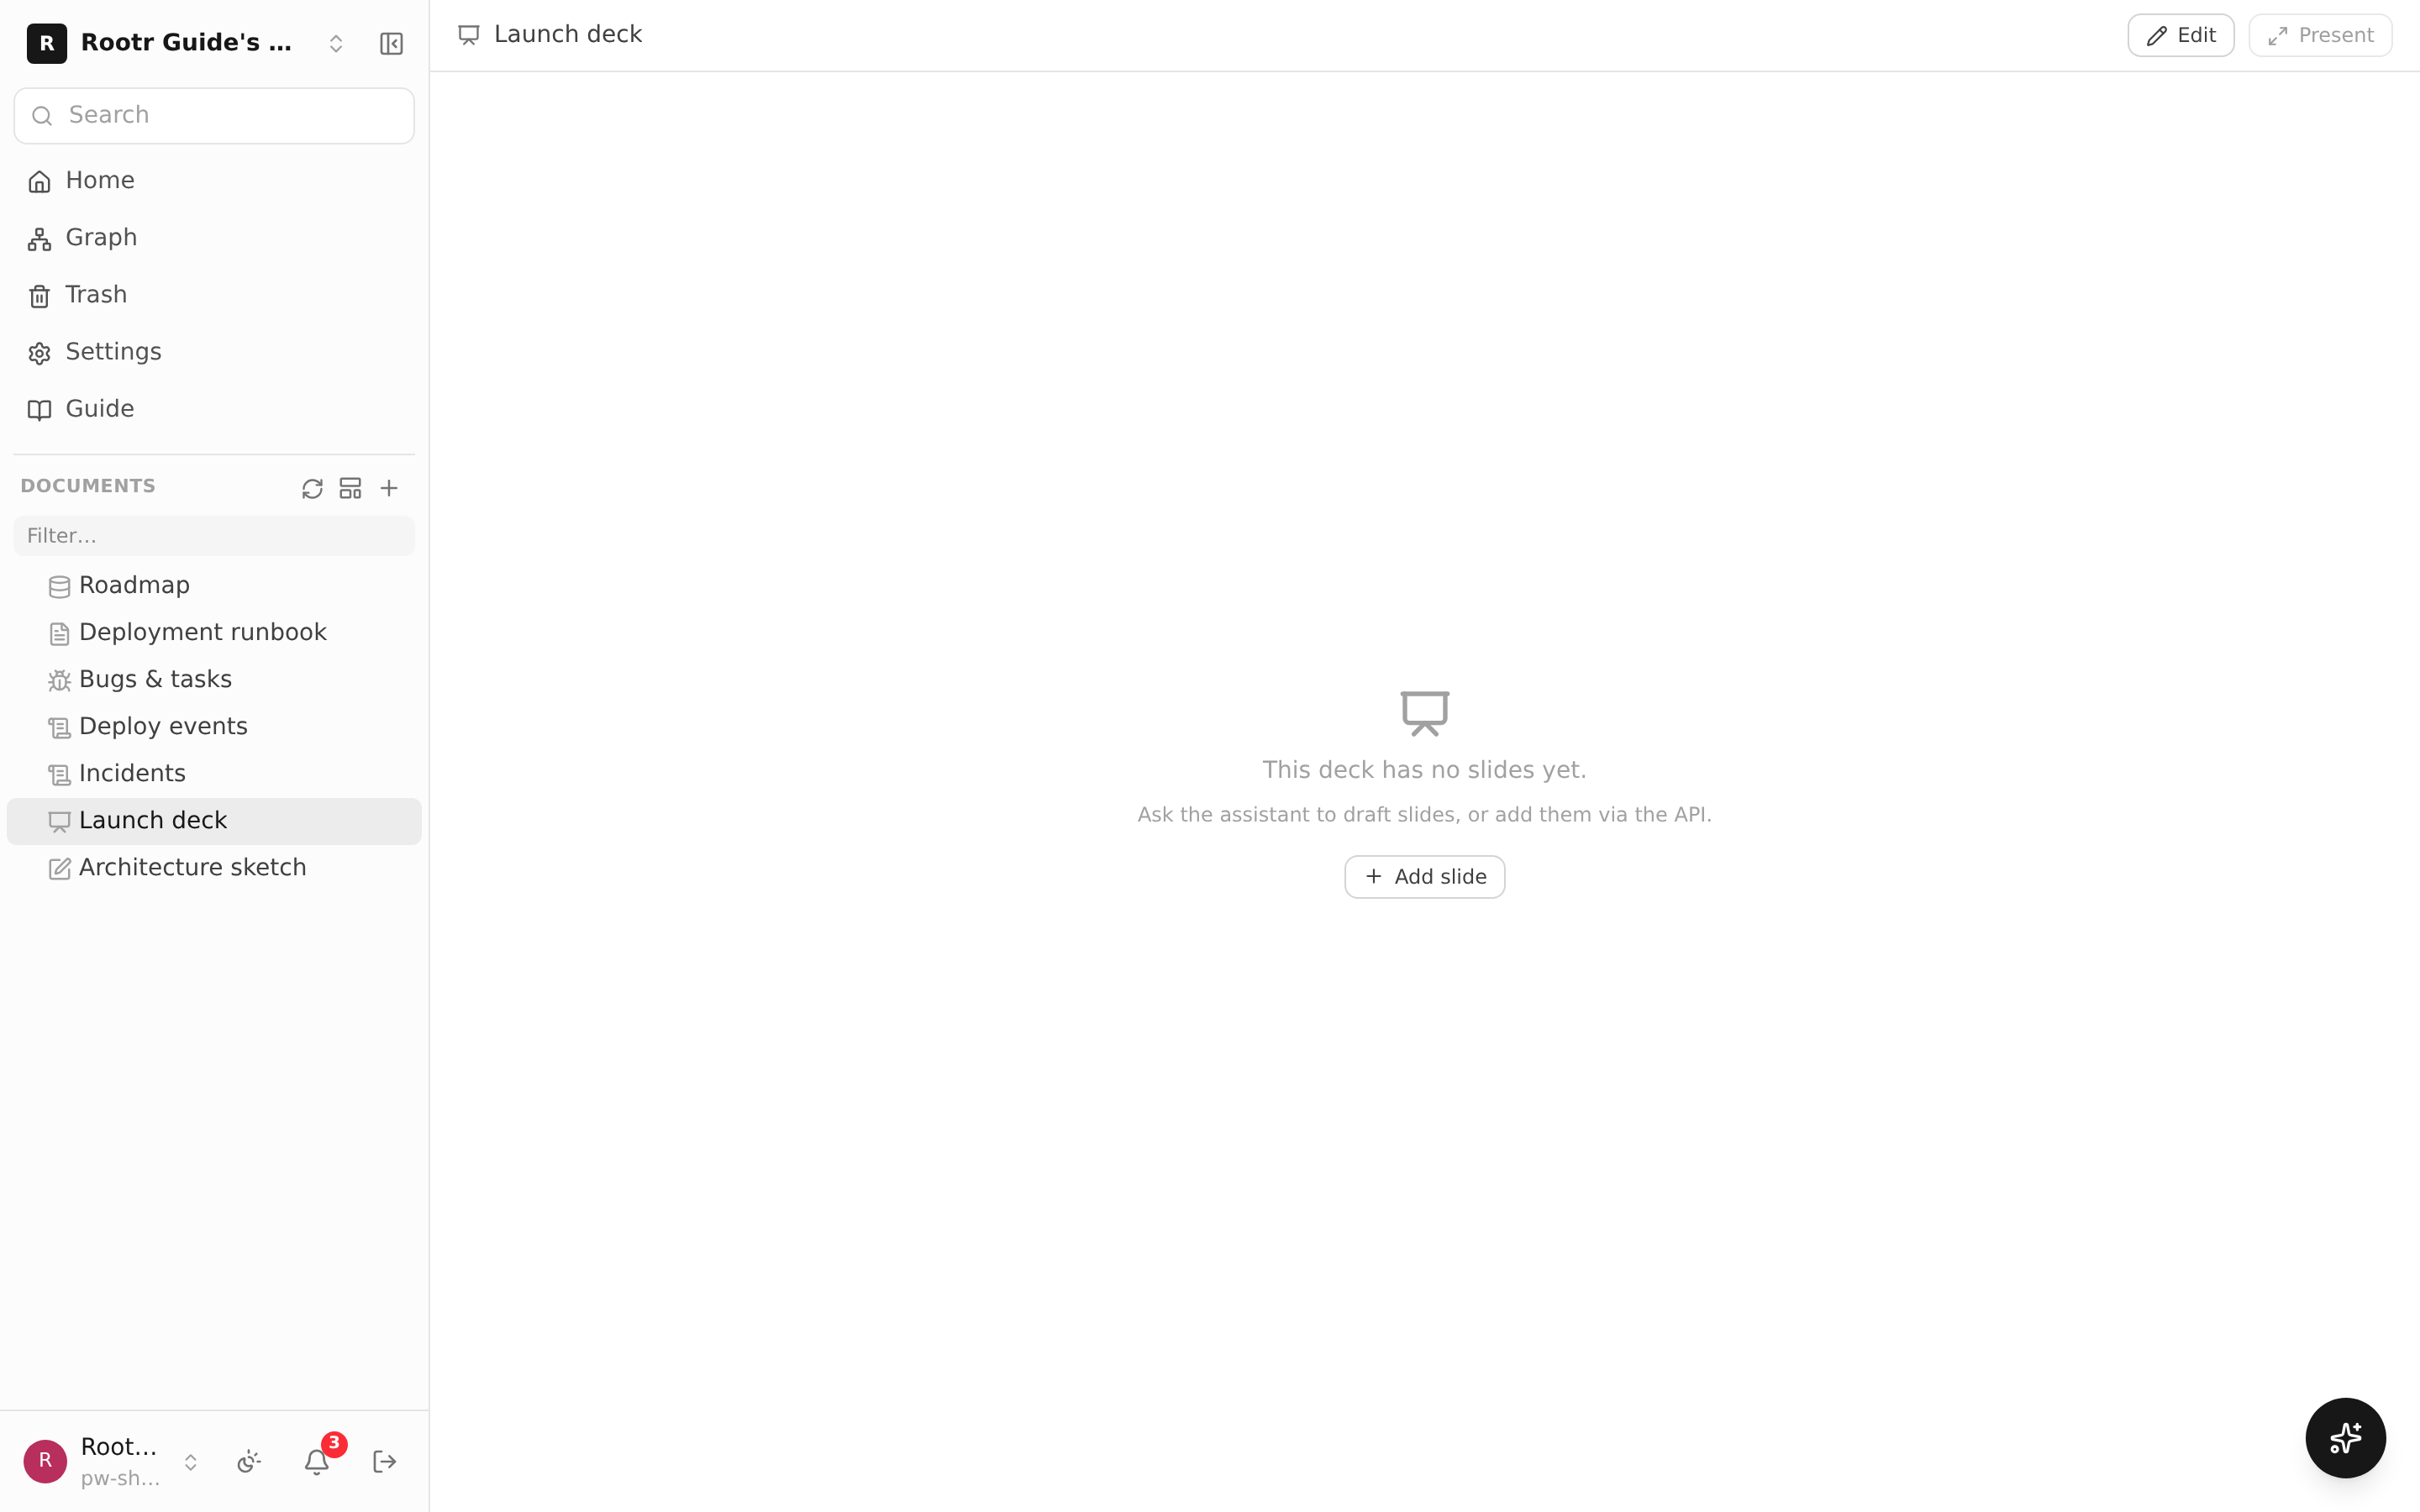
A PRESENTATION slide-deck editing screen.
Ask the AI to "draw this as a diagram and put it on a slide" and it picks the right one of five kinds — architecture, workflow, sequence, data flow, or lifecycle — and draws it in. The drawing survives export too: it appears in the PDF and PPTX, not just on screen. Text inside the drawing is not searchable, though, so keep the important points in the slide title and body as well.
PAGE — a web page for people outside the team
A document is something your team reads; a page is a screen a stranger looks at. Event notices, product intros, signup pages — anything you hand out as a link — belong in a page. Turn the address on and it opens at rootr.io/p/….
You never write HTML. A page is assembled from 14 ready-made blocks: hero, text, features, gallery, pricing, testimonials, FAQ, timeline, call to action, footer, three that read numbers straight out of a table (stat cards, table, chart), and a signup form. There is no field anywhere that takes code or a script, so a published page has nowhere to hide anything dangerous.
- Pick one of 8 themes (classic, minimal, warm, pastel, editorial, mono, dark, midnight) and the colors and typeface change together. Skip the accent color and the theme picks one that matches.
- Numbers pulled from a table are always current. Put a signup count, a total or a leaderboard on the page and it follows the table — build it once and leave it alone.
- You can embed a signup form. Pick a form you already made and visitors fill it in right there. The form does not need to be published separately — putting it on a published page is the act of publishing it.
- Buttons and links can point at one of your documents instead of an address. Members go to the document; visitors on the published page go to its public address; and if that document is not published, the button is hidden entirely.
- Every published page carries the Rootr signature at the bottom.
When the ready-made blocks are not enough, use the Custom block: write your own HTML and CSS. It renders inside an isolated frame — however bold the CSS, it cannot touch the rest of the page or cover the screen, and scripts do not run (they are stripped on save). Inside the frame the page theme is available as var(--pg-text), var(--pg-card), var(--pg-accent), so a custom block matches the page instead of fighting it.
You can ask the AI for it too — "make an event page, add the signup form, and show how many people signed up from the applicants table" — and it assembles the blocks. Publishing (turning the address on) stays a human click.
SIGNED (signed document) — approvals and research notes in one
It looks like an ordinary document, but the moment you press [Submit] the body freezes. After that nobody can change it — not on screen, not through AI, not by restoring an old version. The people on the approval line sign in order, and every signature carries a timestamp from an outside authority plus a hash that links it to the signature before it. So months later, "is this really what it said back then?" is answered by one screen instead of an argument.
The three things a Korean national R&D electronic research note must have — ① an electronic signature ② an automatically recorded time ③ a tamper check — are exactly these three. Approvals and research notes are not separate features here, because they do the same job. A document that carries a signature cannot be deleted (30-year retention); deleting the folder it sits in is refused for the same reason.
- Create: [New] in the tree → "New signed document". Edit the body normally until you submit.
- Who signs: add them in order in the signing panel on the right. For a research note, picking just the reviewer (the principal investigator) builds the two steps — author, then reviewer — for you.
- Signing: pressing [Submit] mails you a 6-digit confirmation code. A code, not your password — people who signed up with Google have no password at all.
- Sending it back: reject it with a reason and the document unlocks so the author can fix it.
- Changing a signed document: you do not edit it, you create a revision. The original stays, marked as superseded — the guideline requires both the correction and the original to remain visible.
- Proof: [Show verification] recomputes the body hash, every signature, every timestamp and the ledger links, and shows the result. Print it for submission.
You get an email when it is your turn. The moment the person before you signs, the next signer receives a "please sign" mail whose link opens that exact document. There is no separate queue to check — open the document and sign from the panel on the right.
Getting a signature from someone outside your company
When you add a signer, enter just an email address and that person needs no Rootr account. On submit a link is mailed to that address; opening it lets them read the document and sign right there. Use it for agreements and change orders with a client or supplier.
- The link alone signs nothing. It only lets them read. Signing still needs a 6-digit code sent to that same mailbox, so a forwarded or leaked link is not enough.
- Other signers' addresses are masked on that page (ki *@corp.com), so a signing link never becomes a contact list.
- The link opens that one document and nothing else in the workspace.
- They can send it back instead — with a reason, which unlocks the document so you can fix it.
When every signature is in, a PDF copy is mailed out automatically — to the outside signer and to everyone on your side who signed. The copy carries the body, who signed when, the content fingerprint (hash), and the address where anyone can check later that it is genuine. Print it and file it as is.
Open a DATABASE row and choose signed document and that row becomes a record with signatures and timestamps. Use it for experiment logs and inspection registers — tables where one row is one record that has to be signed. To make a whole table work that way, ask your AI for it (that becomes the table default). Rows whose page is already signed cannot be deleted.
AI can drive all of this — creating the document, building the approval line, listing what is pending, verifying integrity. The one thing it will not do is sign for you. The confirmation code goes only to a person's mailbox, and that code is the only evidence a human pressed sign; AI asks you for the six digits instead.
ISSUE_TRACKER (issues) · LOG (data records)
- Issue tracker: turn each bug or task into an "issue" and track it with a number (#1, #2…), a status (open/closed), labels, an assignee, and comments. It works the same way as the issues in a development-collaboration tool (GitHub).
- LOG (data logbook): a place to put records that pile up over time (for example, server response times or incident events) in a defined format. When you use a "relation" column here, a "data lineage" is created automatically, tracing where each record came from (chapter ⑦).
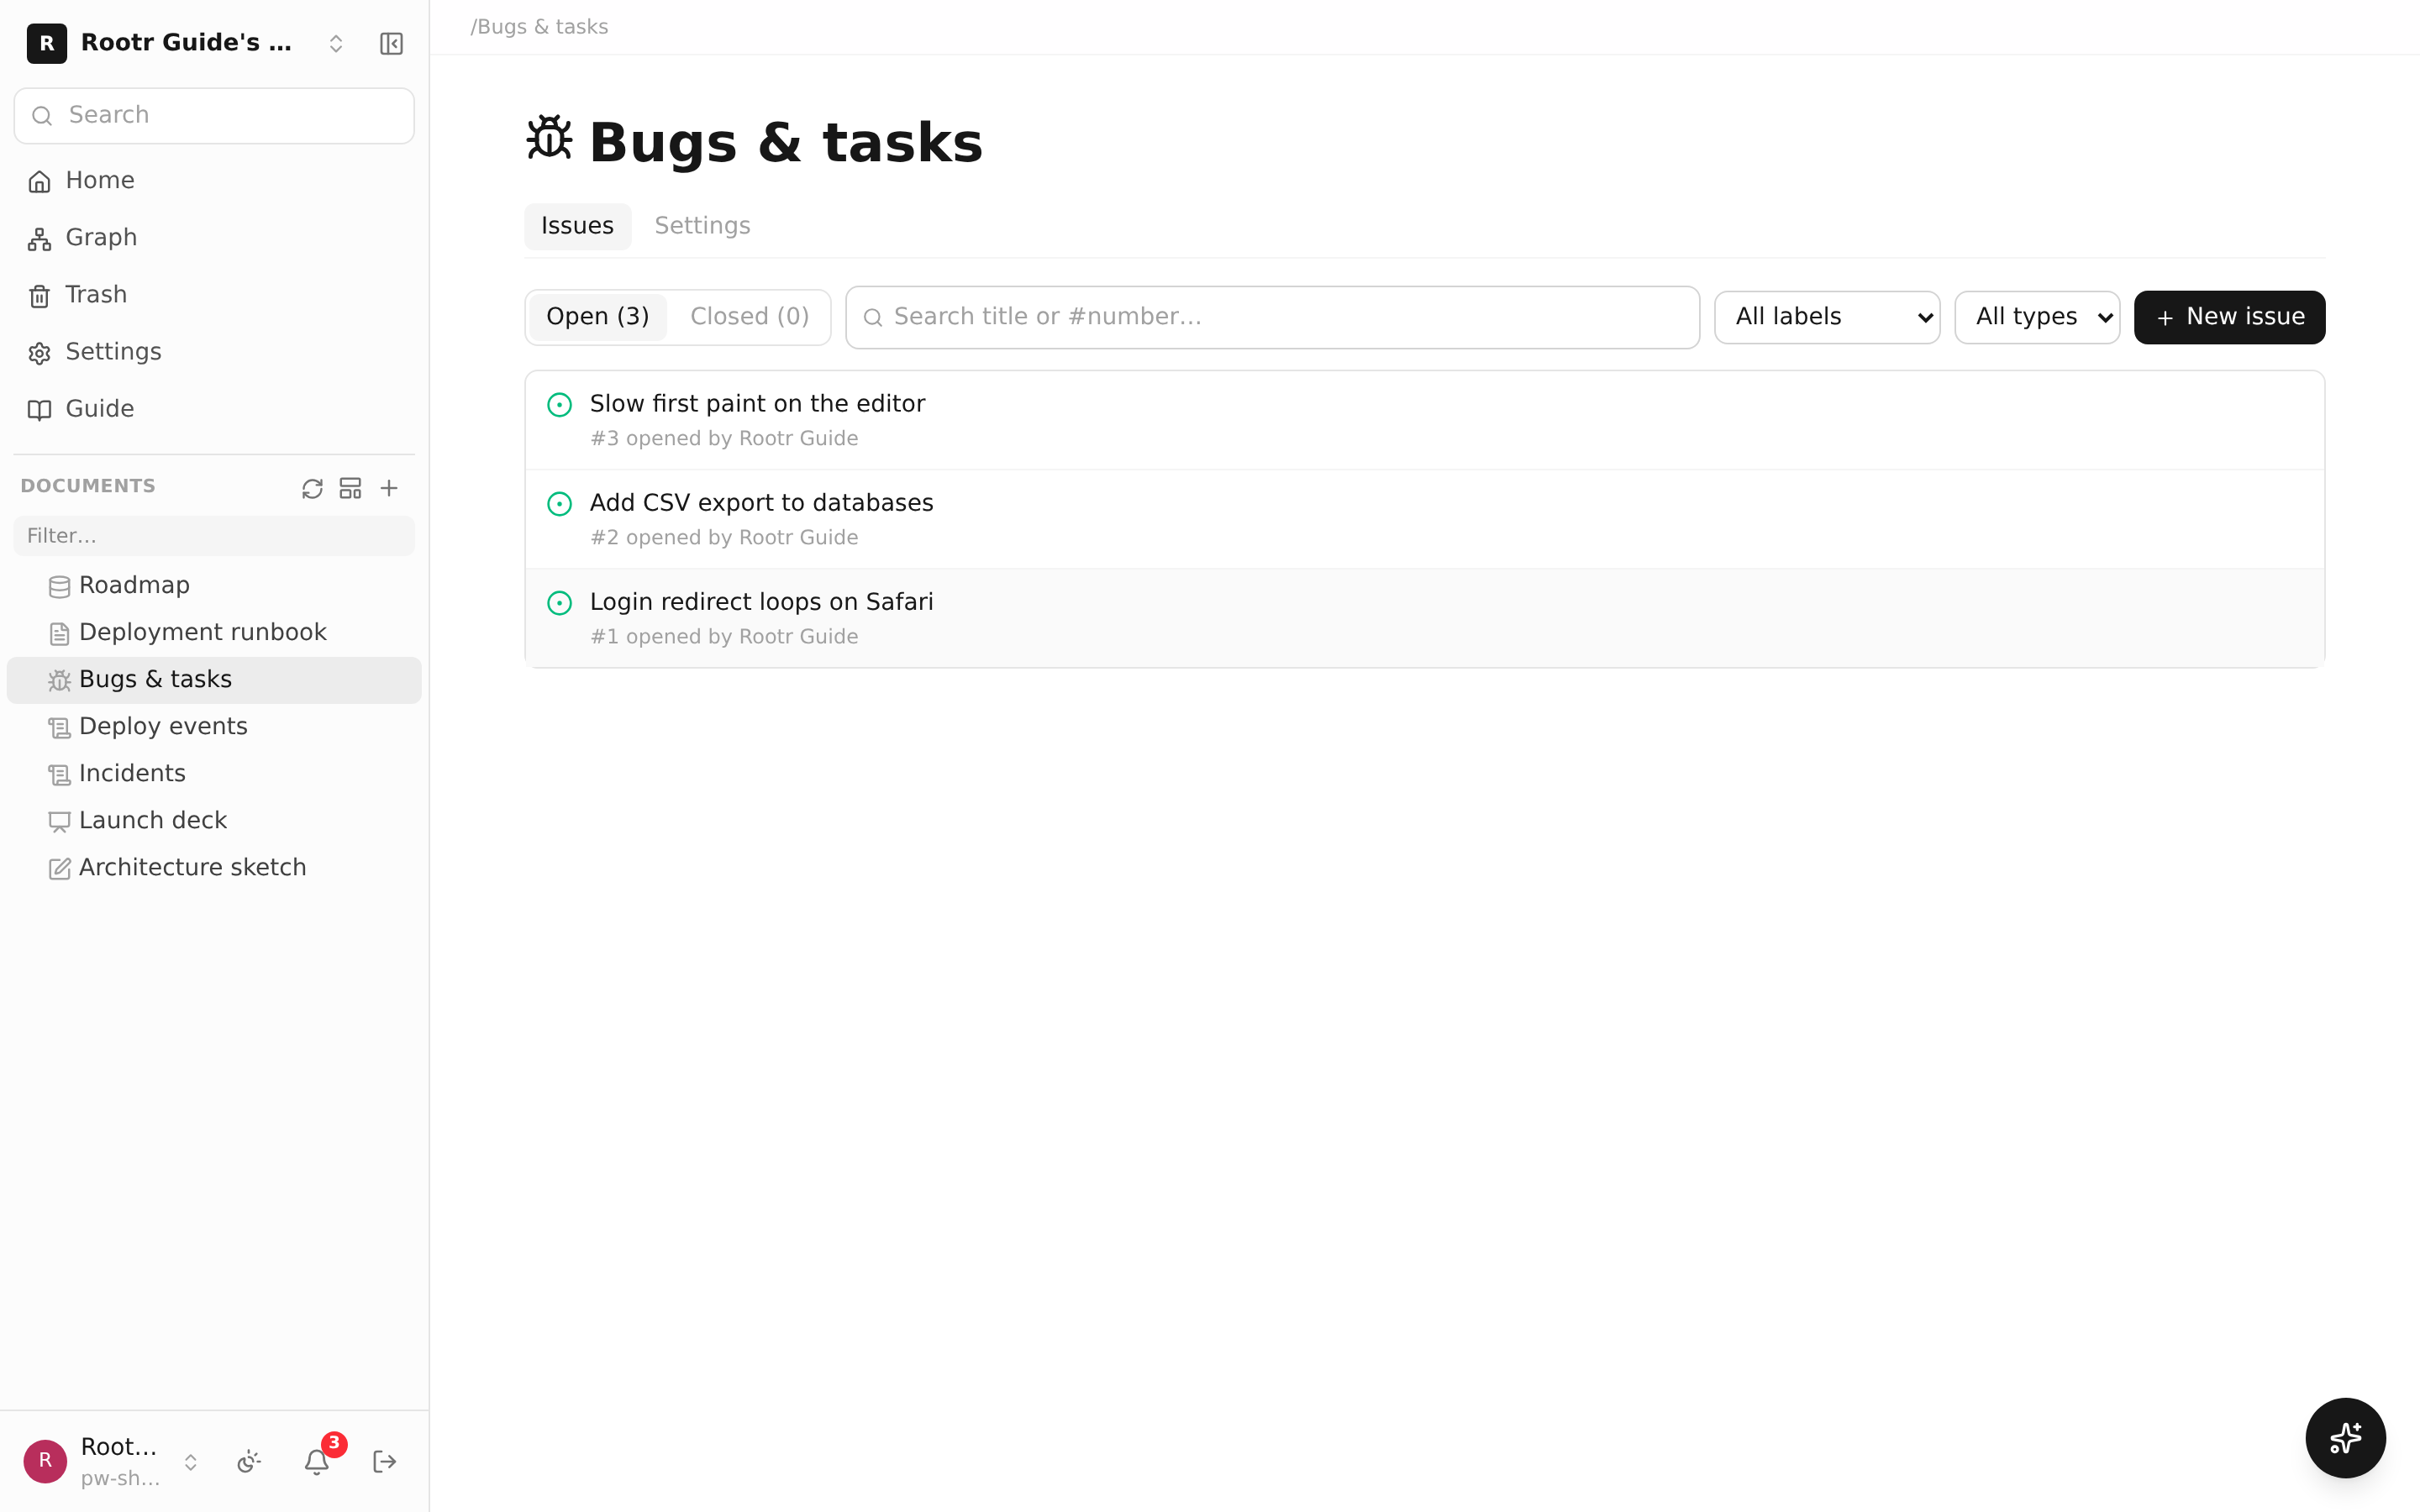
The issue-list screen of an ISSUE_TRACKER.
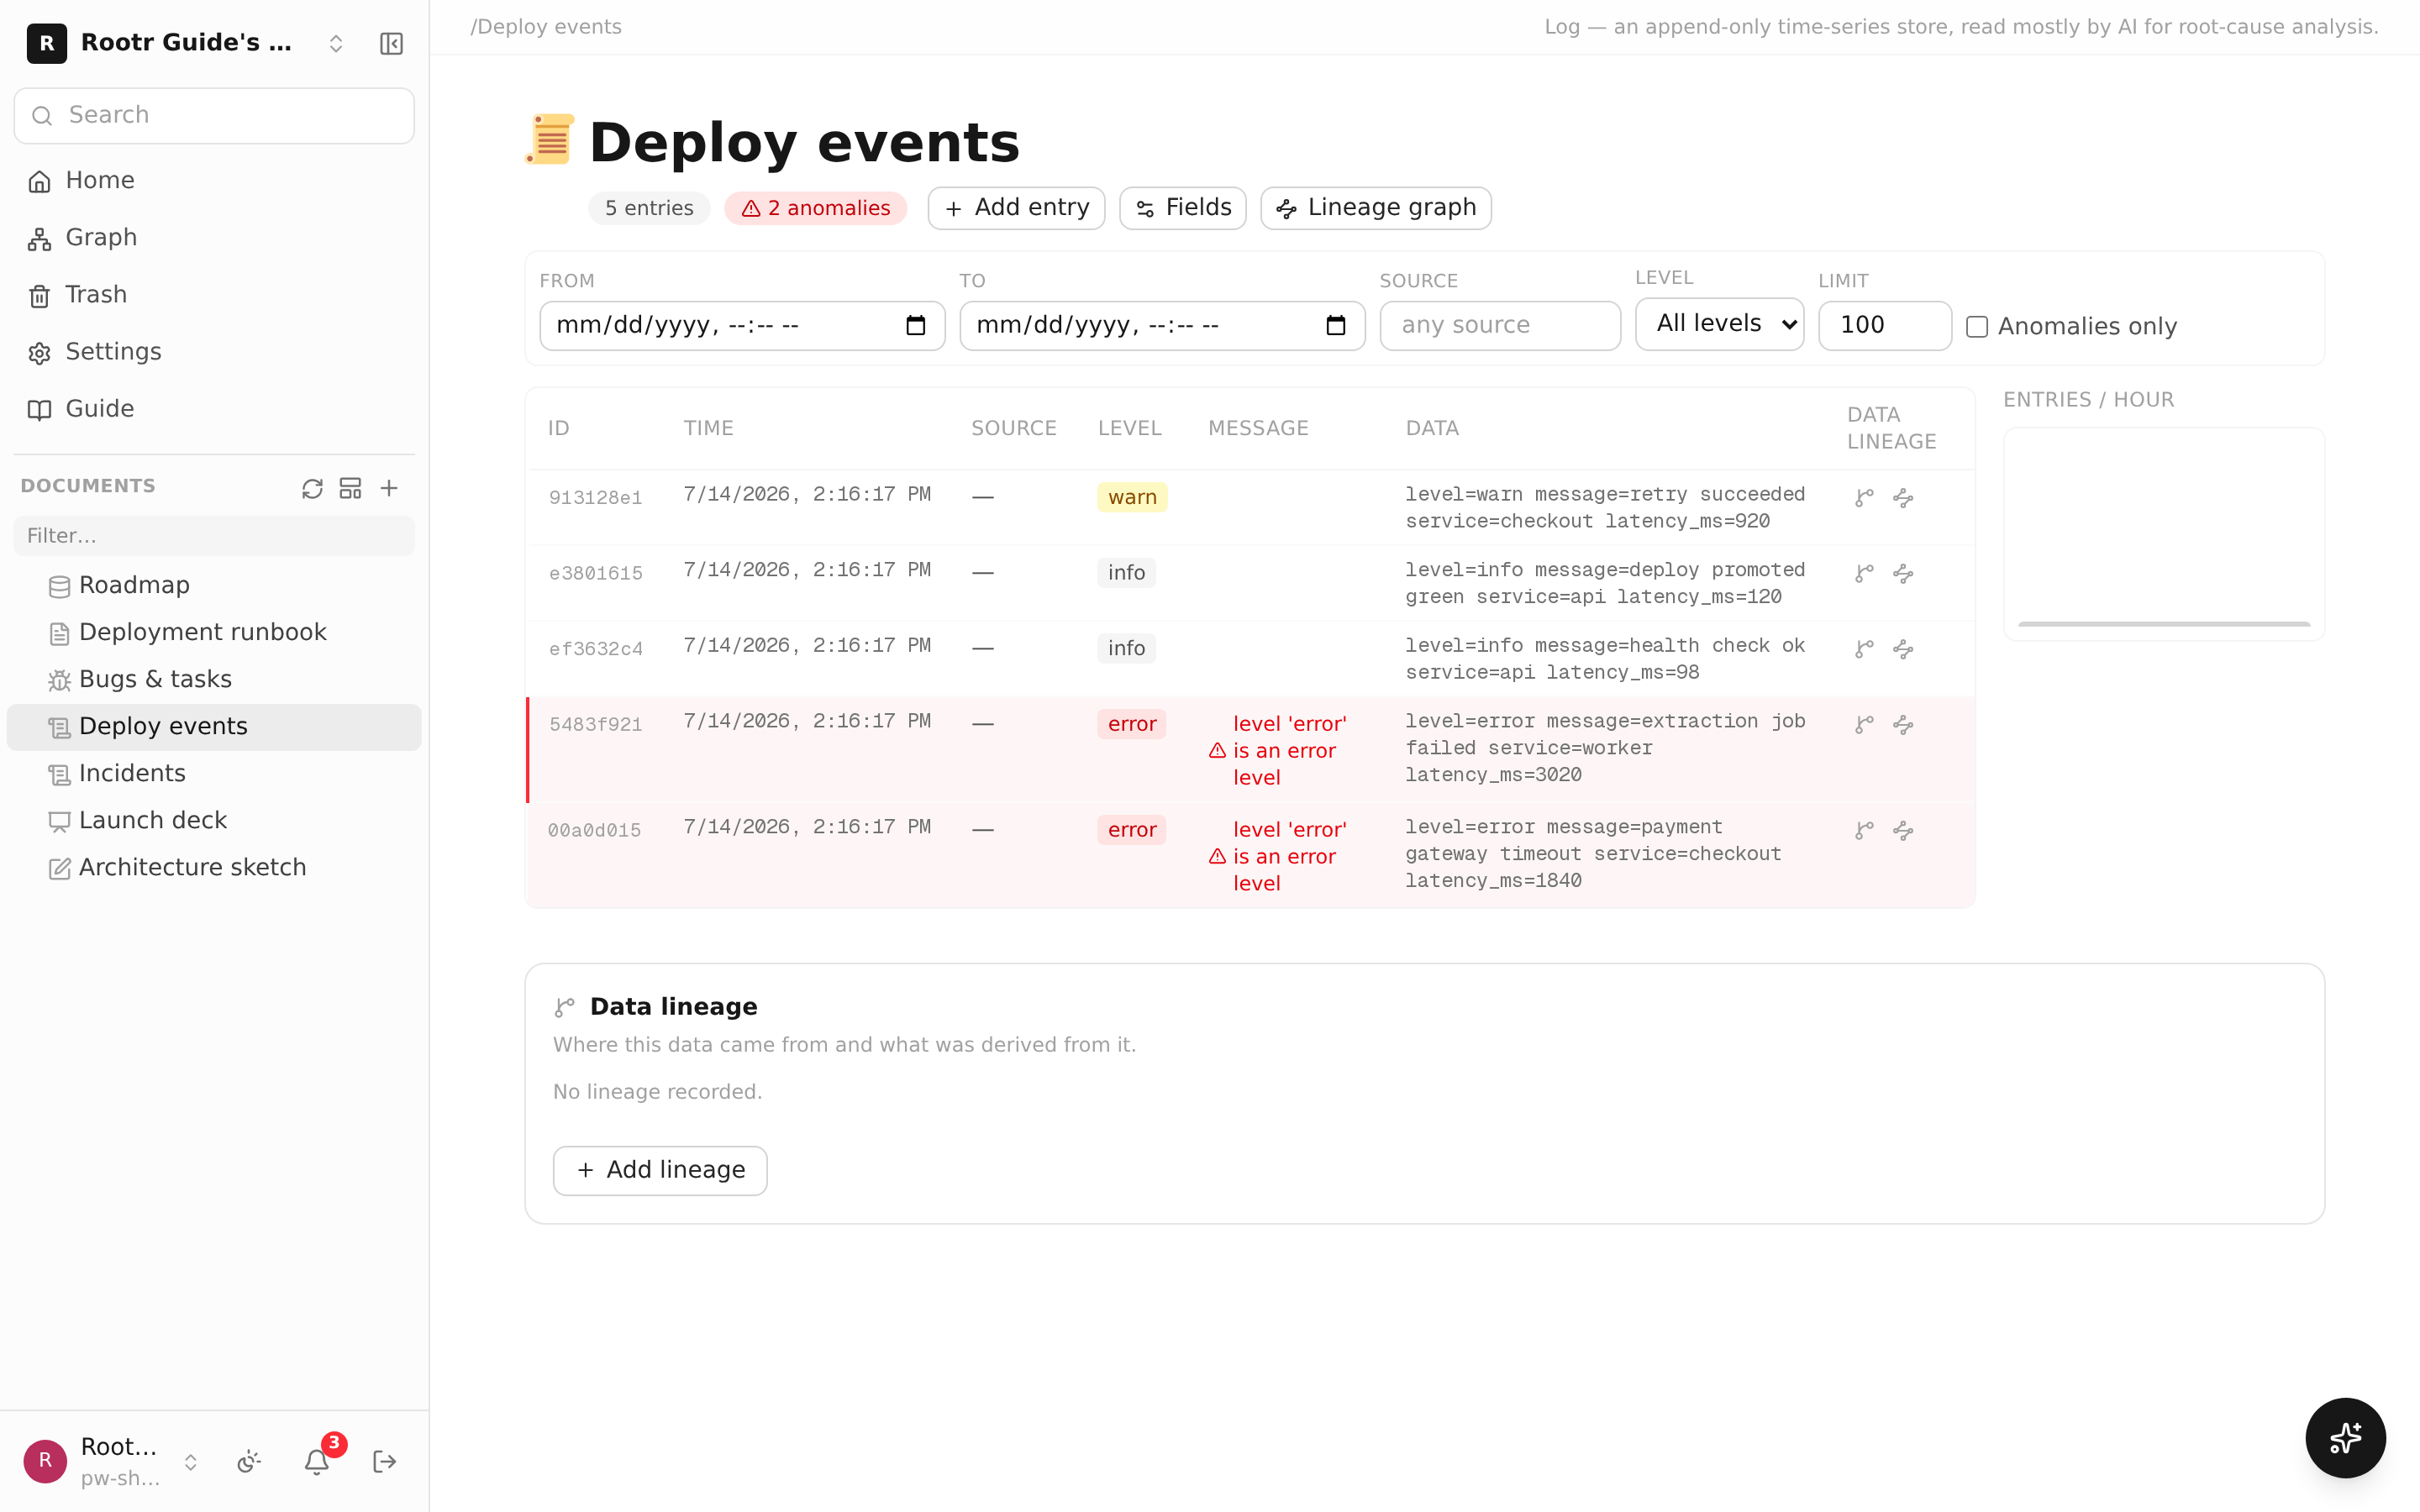
A LOG (data logbook) screen. A record table filled with level, message, and data values.
⑤Databases (tables), end to end
Anything you manage as a list — tasks, requirements, applications — belongs in a table, not a document. Type each column once, then view the same rows six ways.
A Rootr table is a spreadsheet and a Notion database in one. Give each column a type and every cell gets the right editor — a date picker, a status pill, a member picker — and wrong values simply cannot be entered. Create one from the + next to "Documents" in the sidebar → New database.
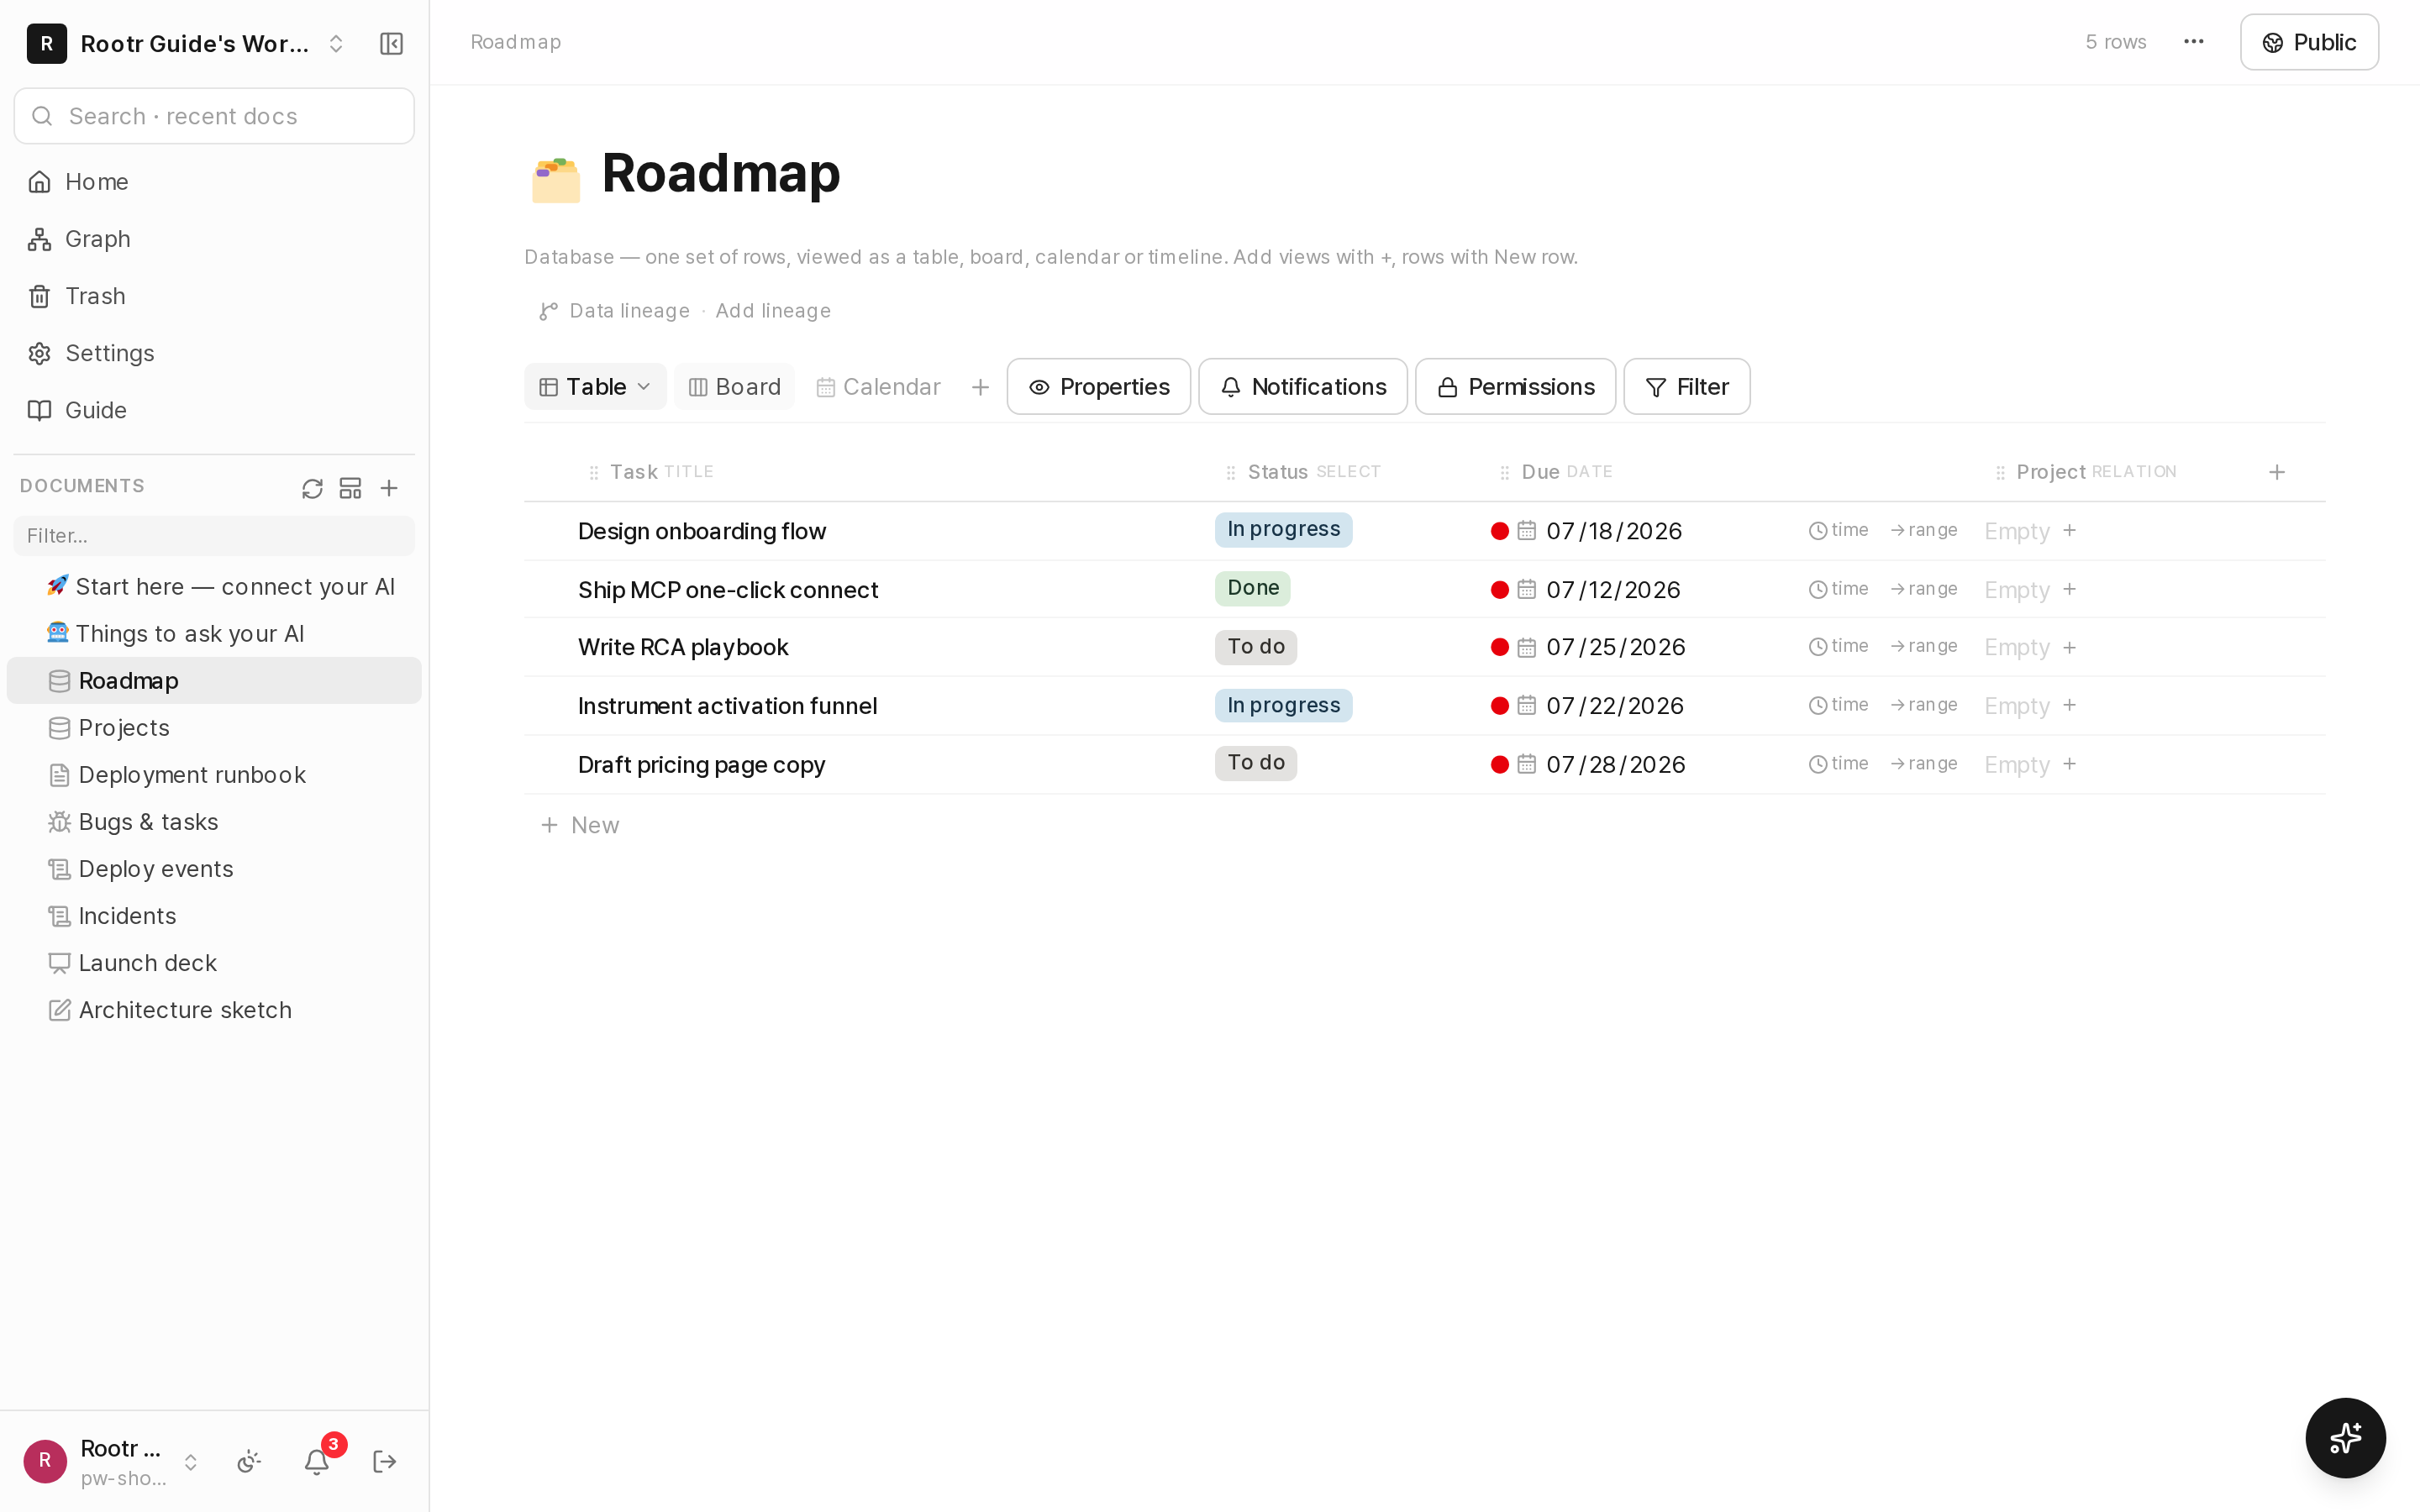
A table in table view, with title, status, assignee and due-date columns filled in.
Adding a column — twenty types to pick from
The + at the far right of the header row opens the new-column dialog in the middle of the screen. Pick a type on the left; fill in only what that type needs on the right. There are twenty types, so a search box filters them, and each carries a one-line description. On a phone the dialog rises from the bottom as a sheet and moves to a settings step once you pick a type.
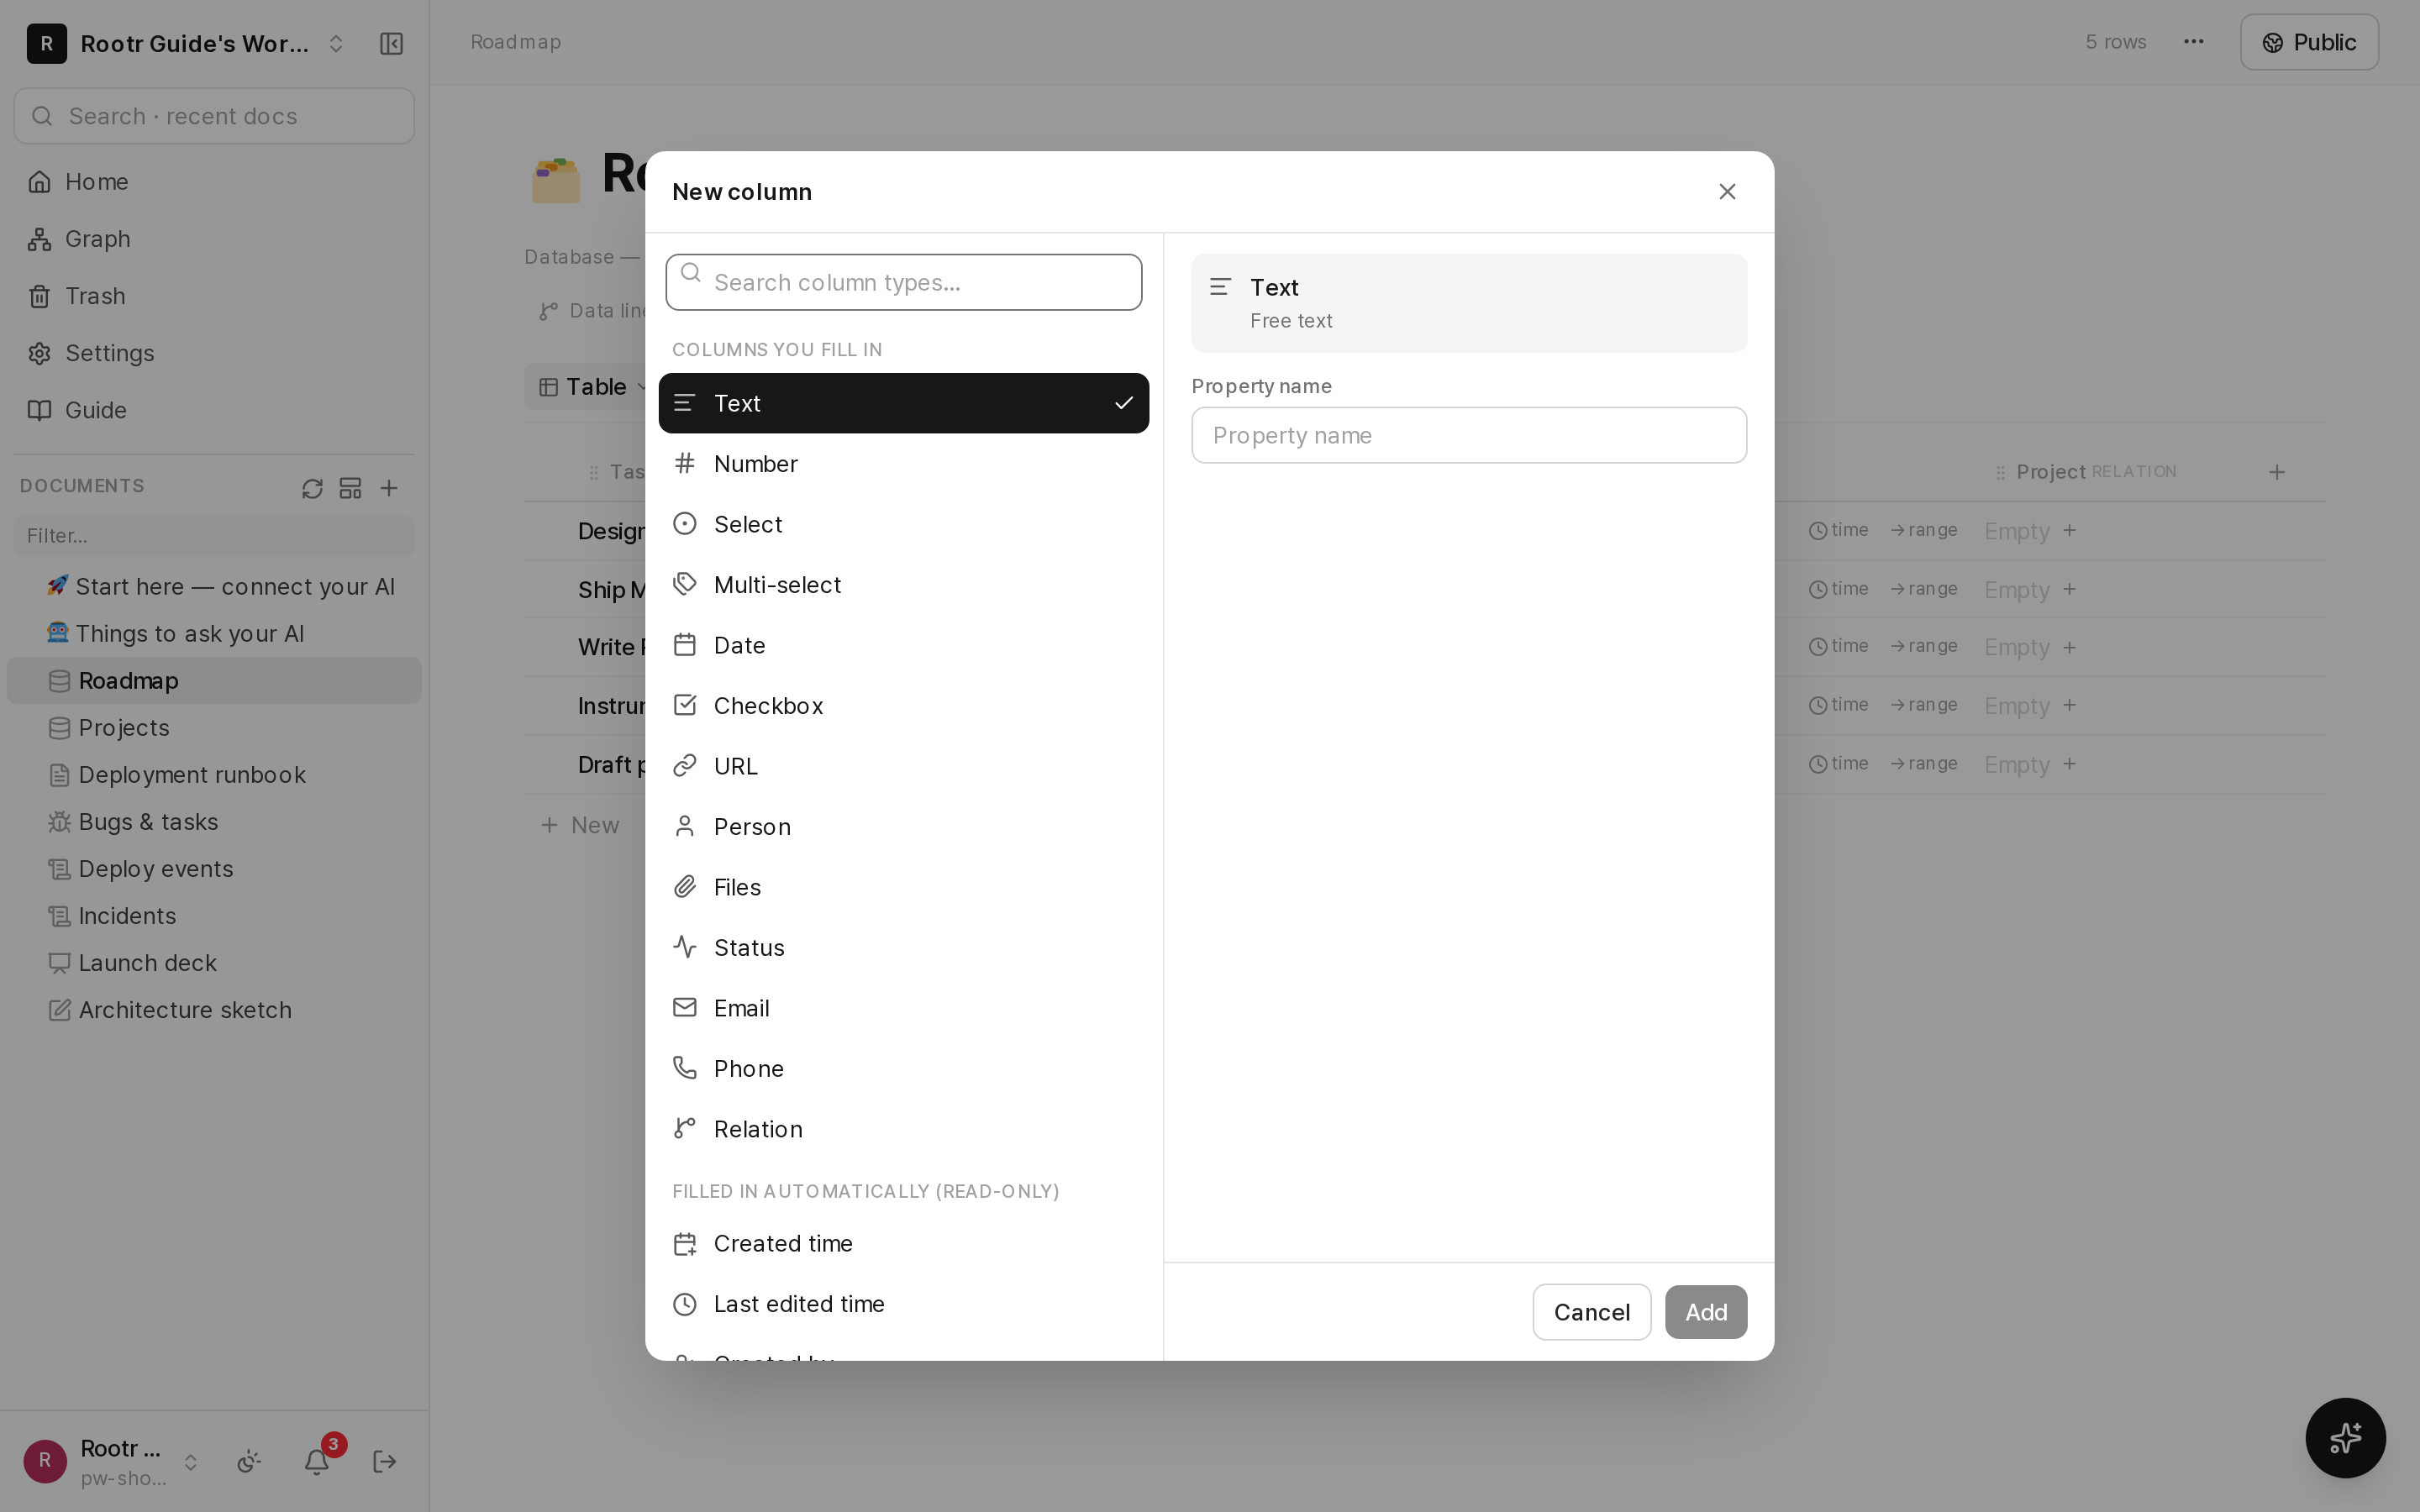
The new-column dialog: type list with icons and descriptions on the left, name and settings on the right.
Types come in two groups. You fill in the first group; the second is filled in by the server and cannot be edited, which is exactly why it never drifts.
| You fill in | What it holds |
|---|---|
| Text | Free text |
| Number | Values you can total or average |
| Select / Multi-select | One or several of a fixed set, shown as colored pills |
| Status | Auto-grouped into to-do / in progress / done (board columns use these groups) |
| Date | A date, optionally with time, optionally a range |
| Checkbox | On or off |
| URL · Email · Phone | Click to open / send mail / call |
| Person | Workspace members — holds several people (meeting attendees, shared owners). Newly added people get notified |
| Files | Attached images and documents |
| Relation | Links to rows in another table |
| Filled in by the server | What it holds |
|---|---|
| Formula | Computed from other columns — e.g. {qty} * {price} |
| Rollup | Counted or summed across related rows |
| Created / Last edited time | When the row was created and last changed |
| Created by / Last edited by | Who created and last changed it |
| ID | A never-reused number — e.g. TASK-42 |
IDs are never reused. The TASK-42 someone mentioned yesterday must not point at a different row today.
Formulas — nothing to memorize
Pick the formula type and the available functions appear under the input with a description and an example. Start typing a name and the list narrows; click one and the parenthesis is inserted for you. Type { and this table’s own column names appear, so you never have to transcribe them. Unknown functions and unknown column names are flagged before you hit save.
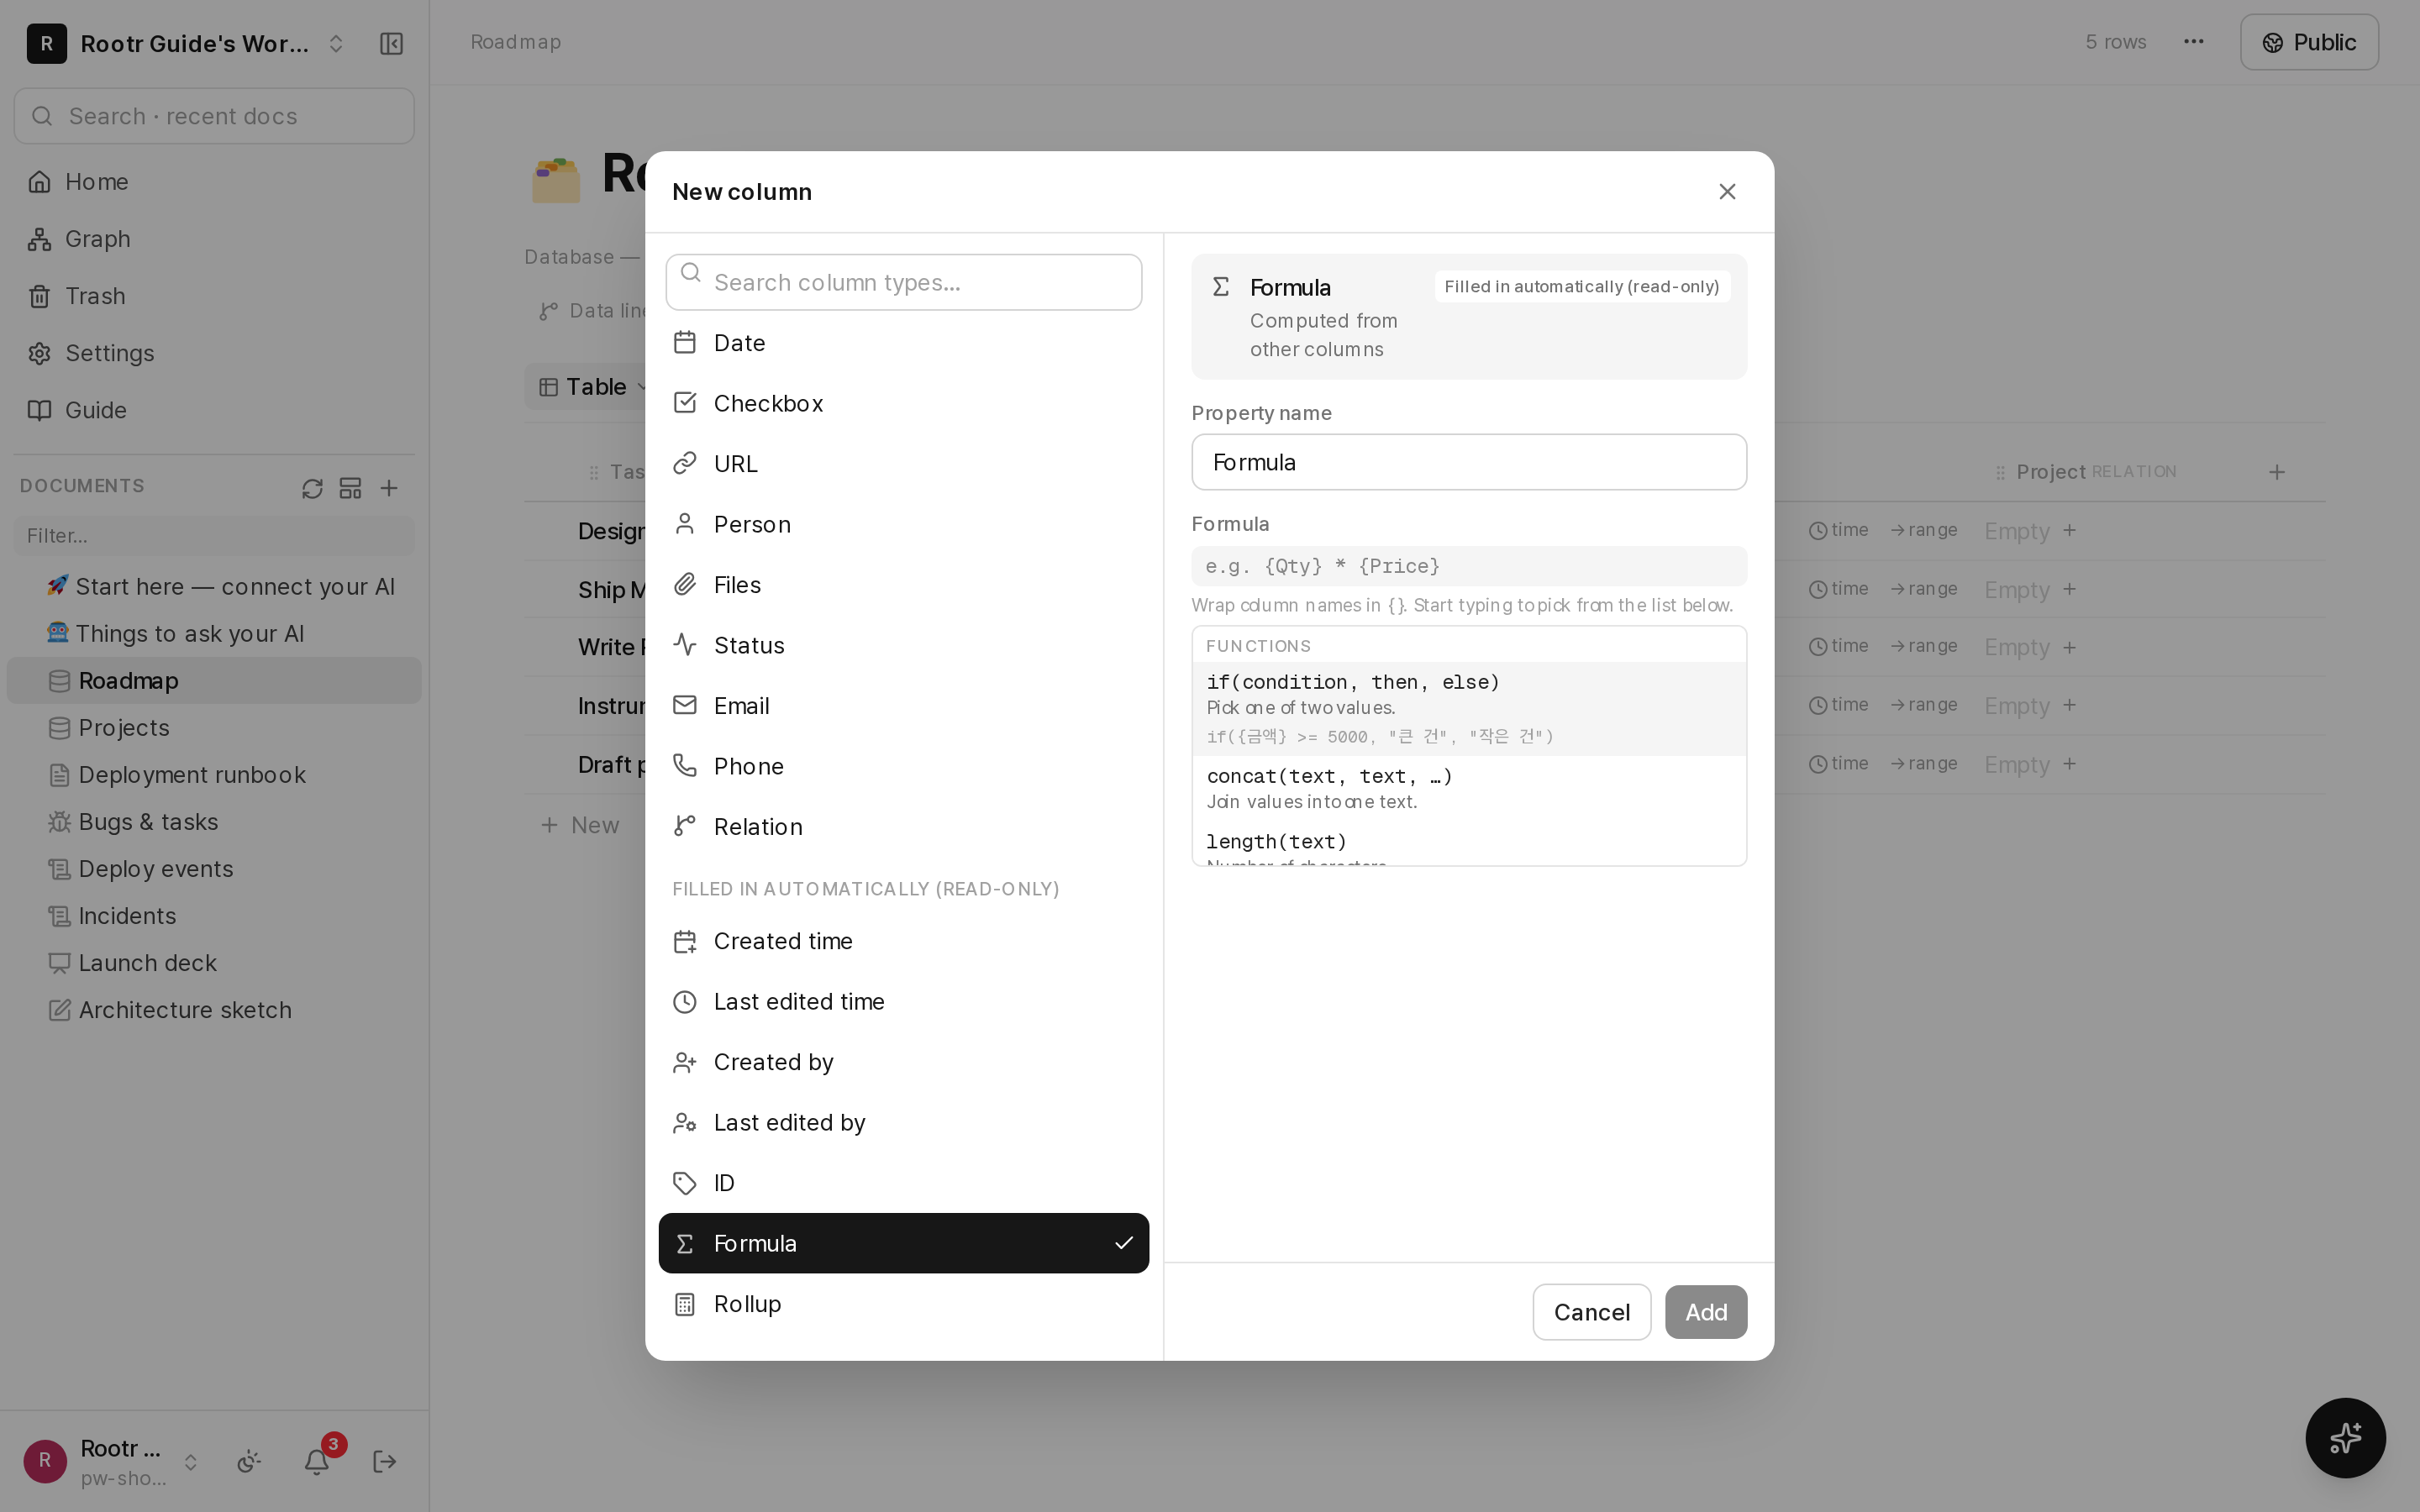
Creating a formula column, with the function list open below the input.
| Function | What it does | Example |
|---|---|---|
| if | Pick one of two values | if({amount} >= 5000, "large", "small") |
| concat | Join values into one text | concat({name}, " · ", {team}) |
| round · floor · ceil | Round, round down, round up | round({price} * 1.1, 0) |
| min · max | Smallest / largest value | max({r1}, {r2}, {r3}) |
| dateBetween · now | Days between two dates · current time | dateBetween({due}, now()) |
| empty · contains · length | Blank? · contains? · character count | if(empty({owner}), "unassigned", {owner}) |
Formulas stay live: change an input column and the result follows immediately. Tables imported from Notion carry the formula definition, not a frozen number, so rows added after the import compute too.
Relations and rollups
A relation column points at rows in another table — give each task a "Project" relation and every task knows which project it belongs to. Then a rollup column on the project table gathers the linked tasks: count them, total an amount, average a score, or show the percentage checked. Edit a linked row and the rollup follows.
A rollup needs a relation first. Pick rollup on a table without one and Rootr says so and offers to create the relation right there.
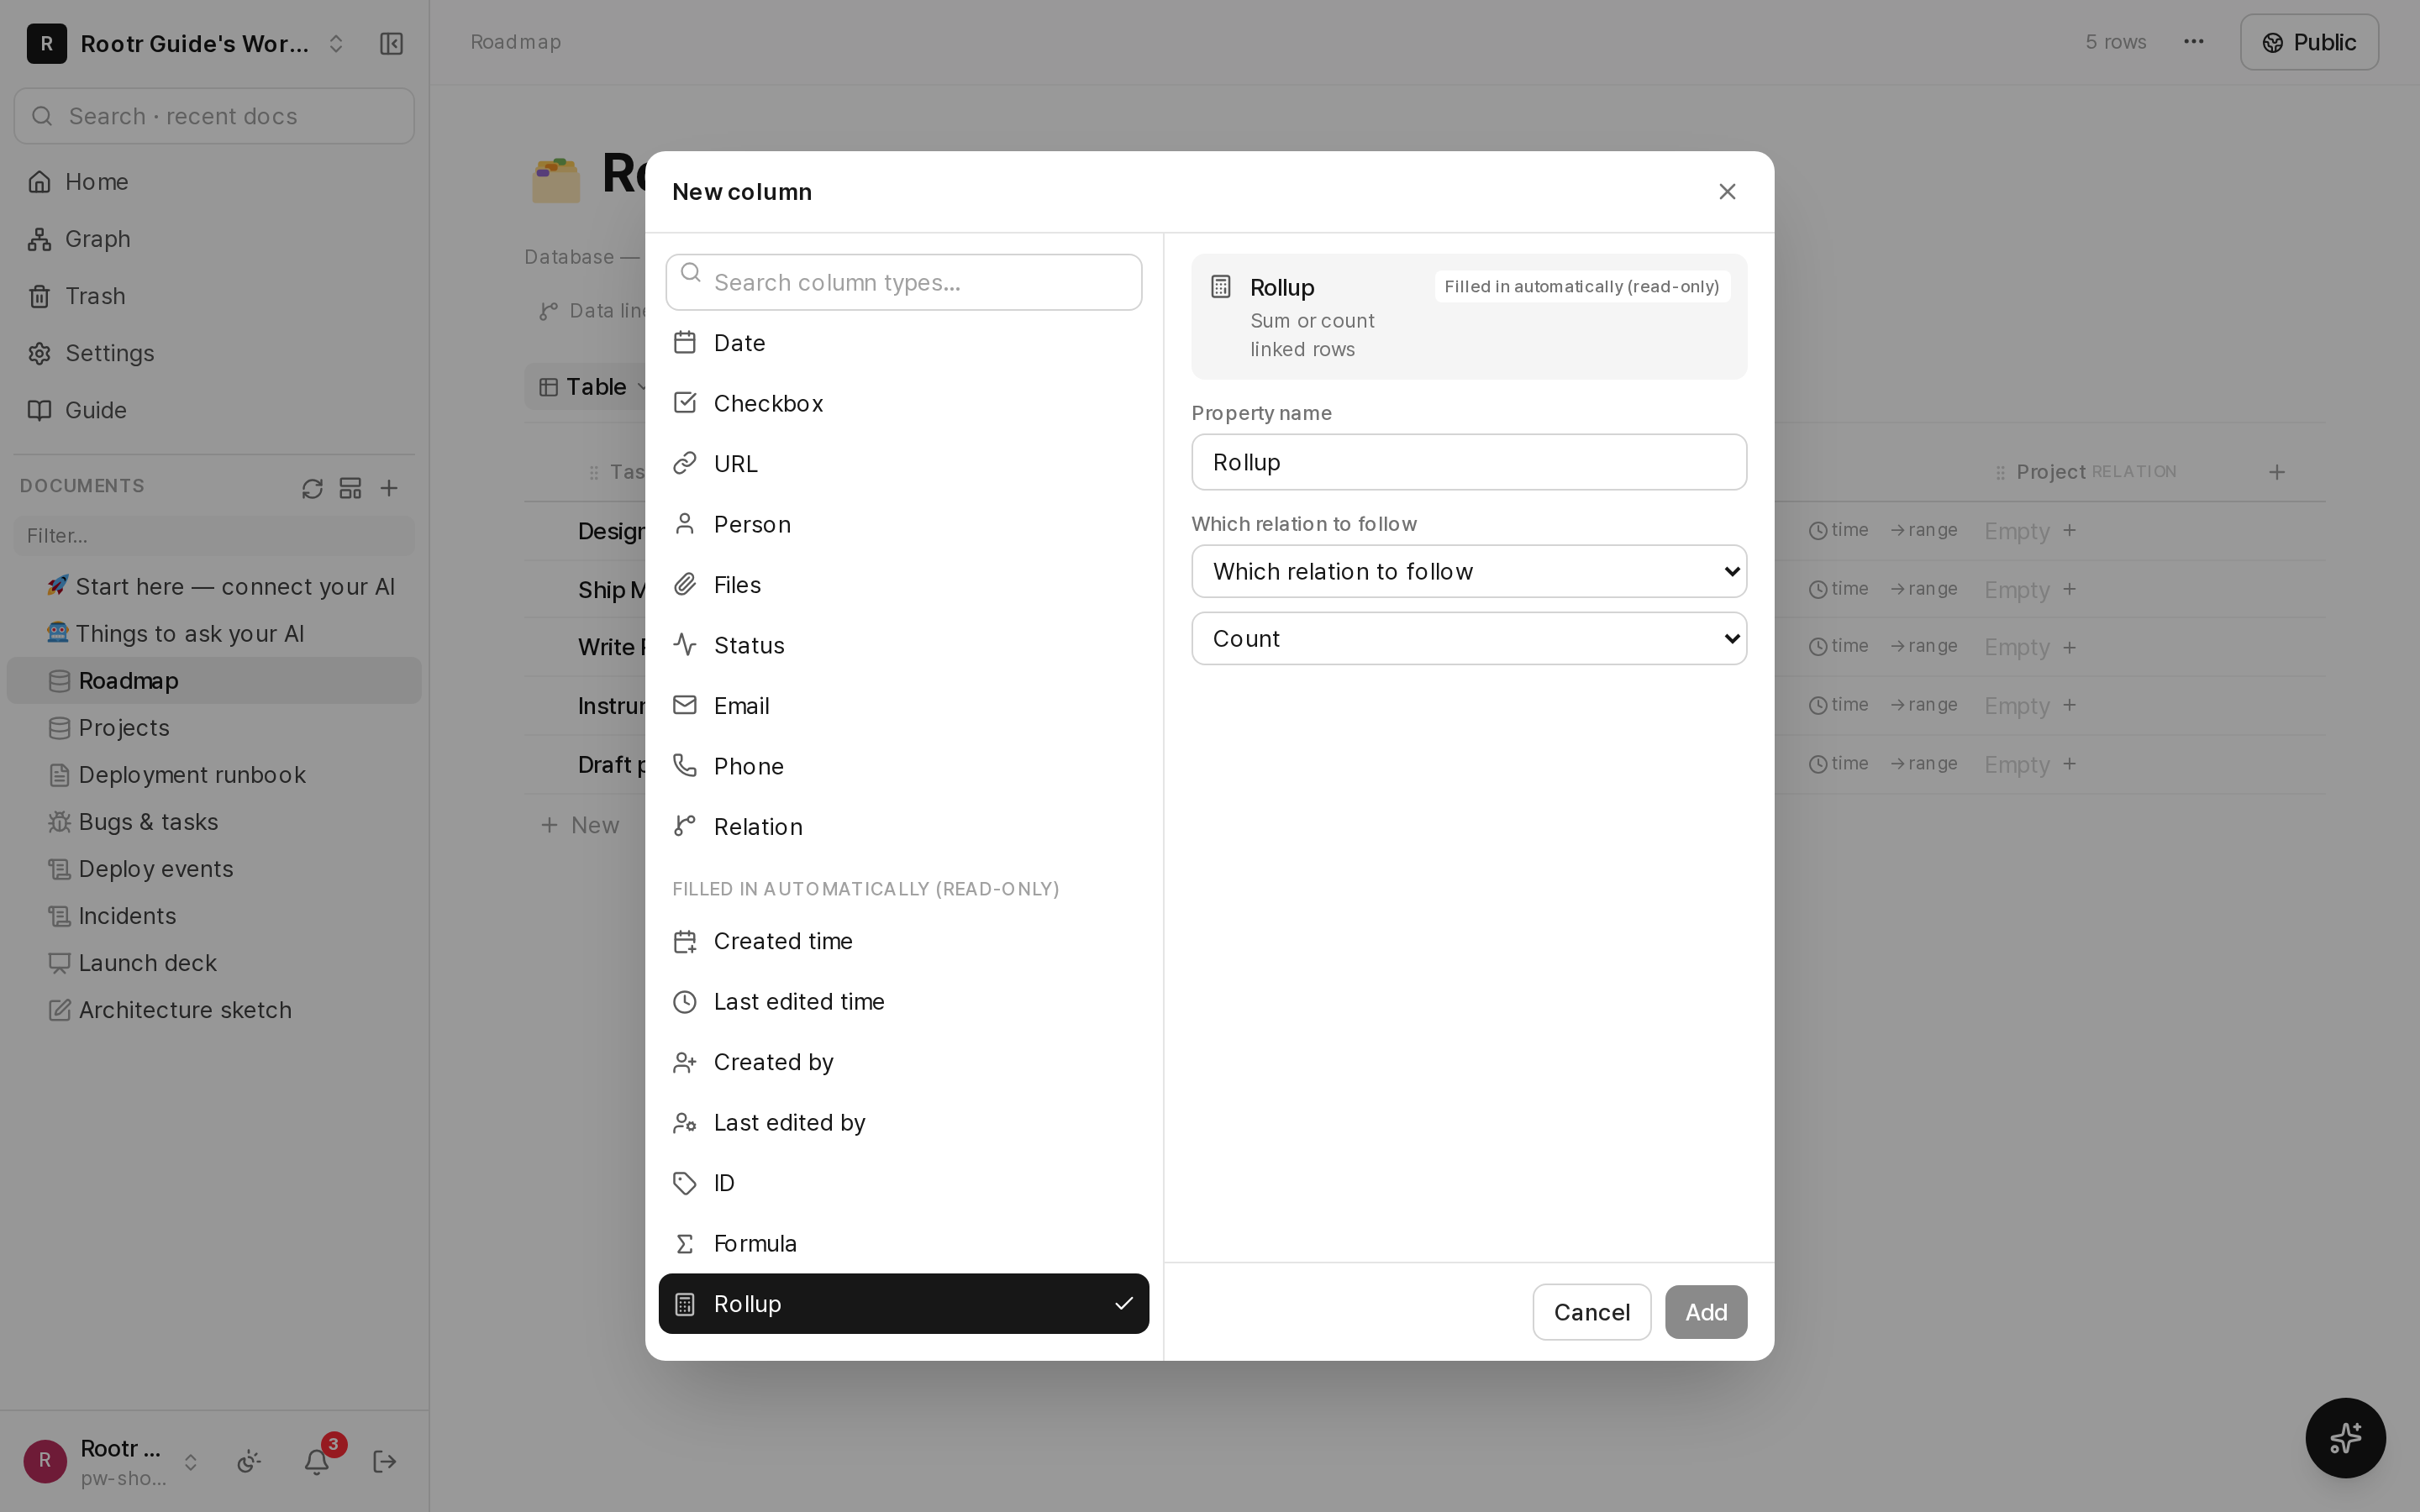
Creating a rollup column: choosing which relation to follow and how to aggregate.
Six views over the same rows
Add a view with the + next to the view tabs. Views never copy data — they show the same rows differently, so an edit anywhere lands everywhere.
| View | Use it when |
|---|---|
| Table | Scanning and editing values quickly. The default |
| Board (kanban) | Dragging cards between statuses |
| List | Skimming by title |
| Gallery | Browsing items that have images |
| Calendar | Placing rows on a month grid by a date column |
| Timeline | Seeing start-to-end ranges as bars |
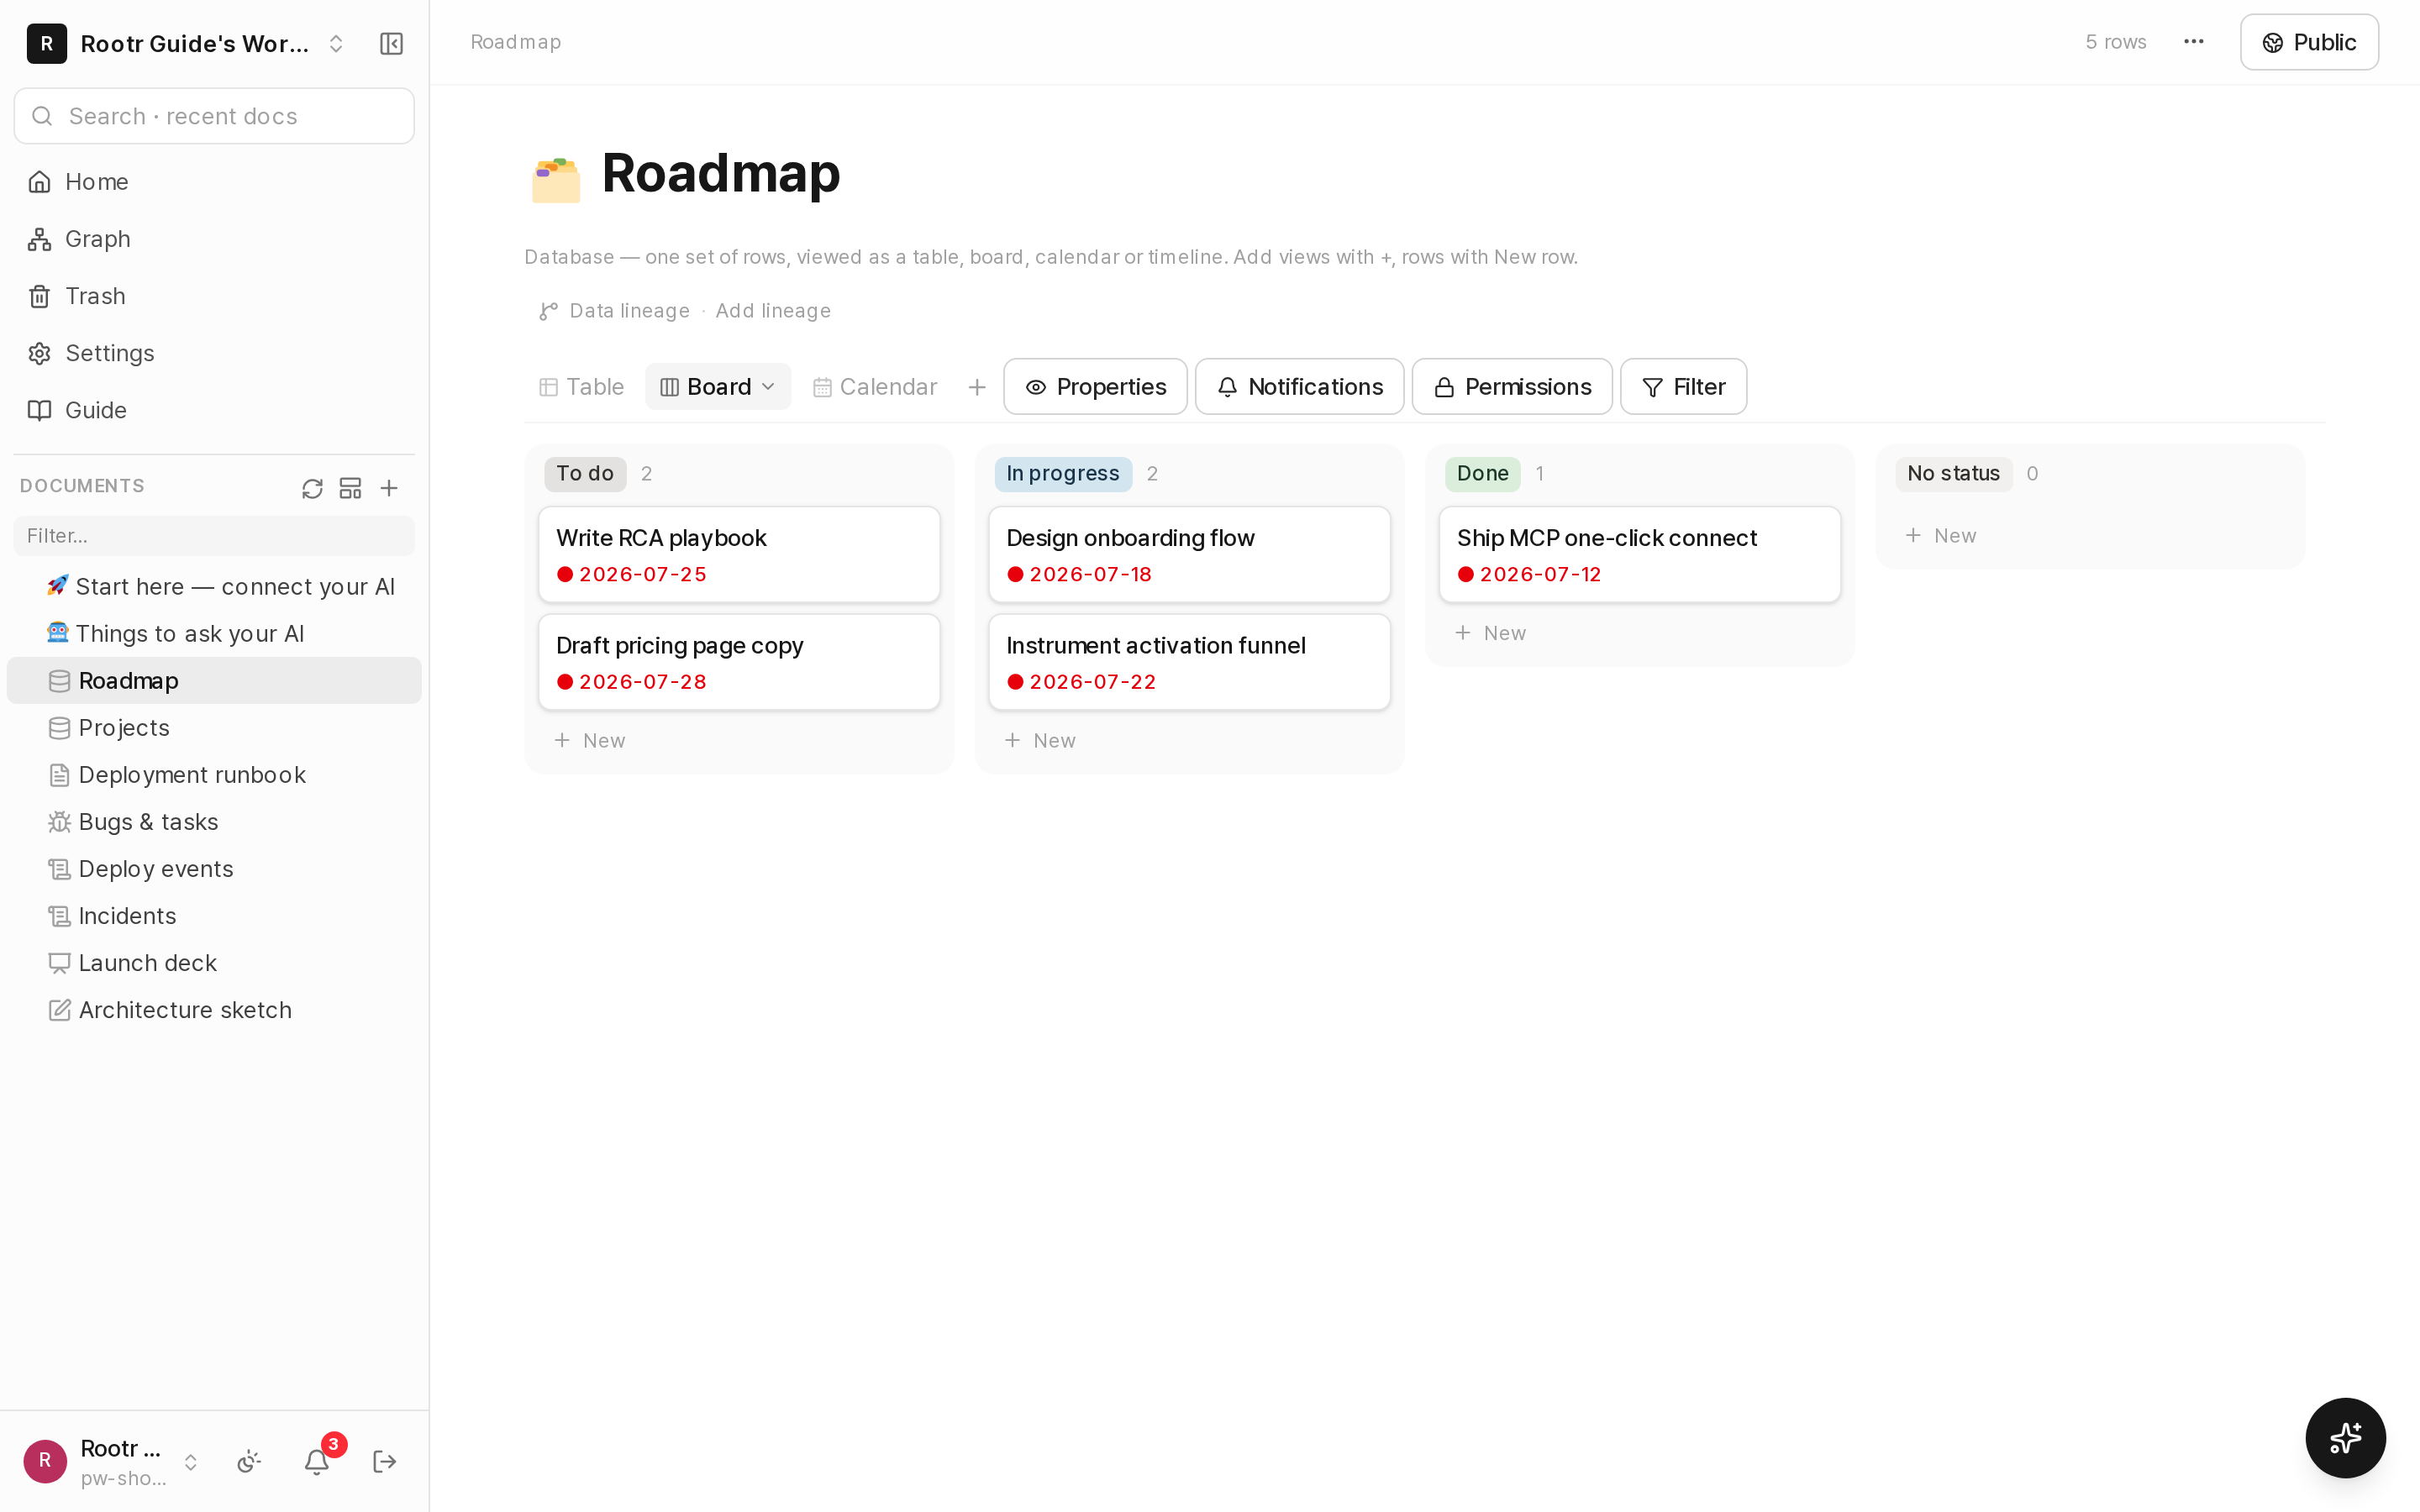
Board view with cards in to-do, in-progress and done columns.
Dragging a card to another column saves that status immediately. Turn on grouped mode and many options collapse into the three stages, which keeps a wide board readable. The choice is remembered per table.
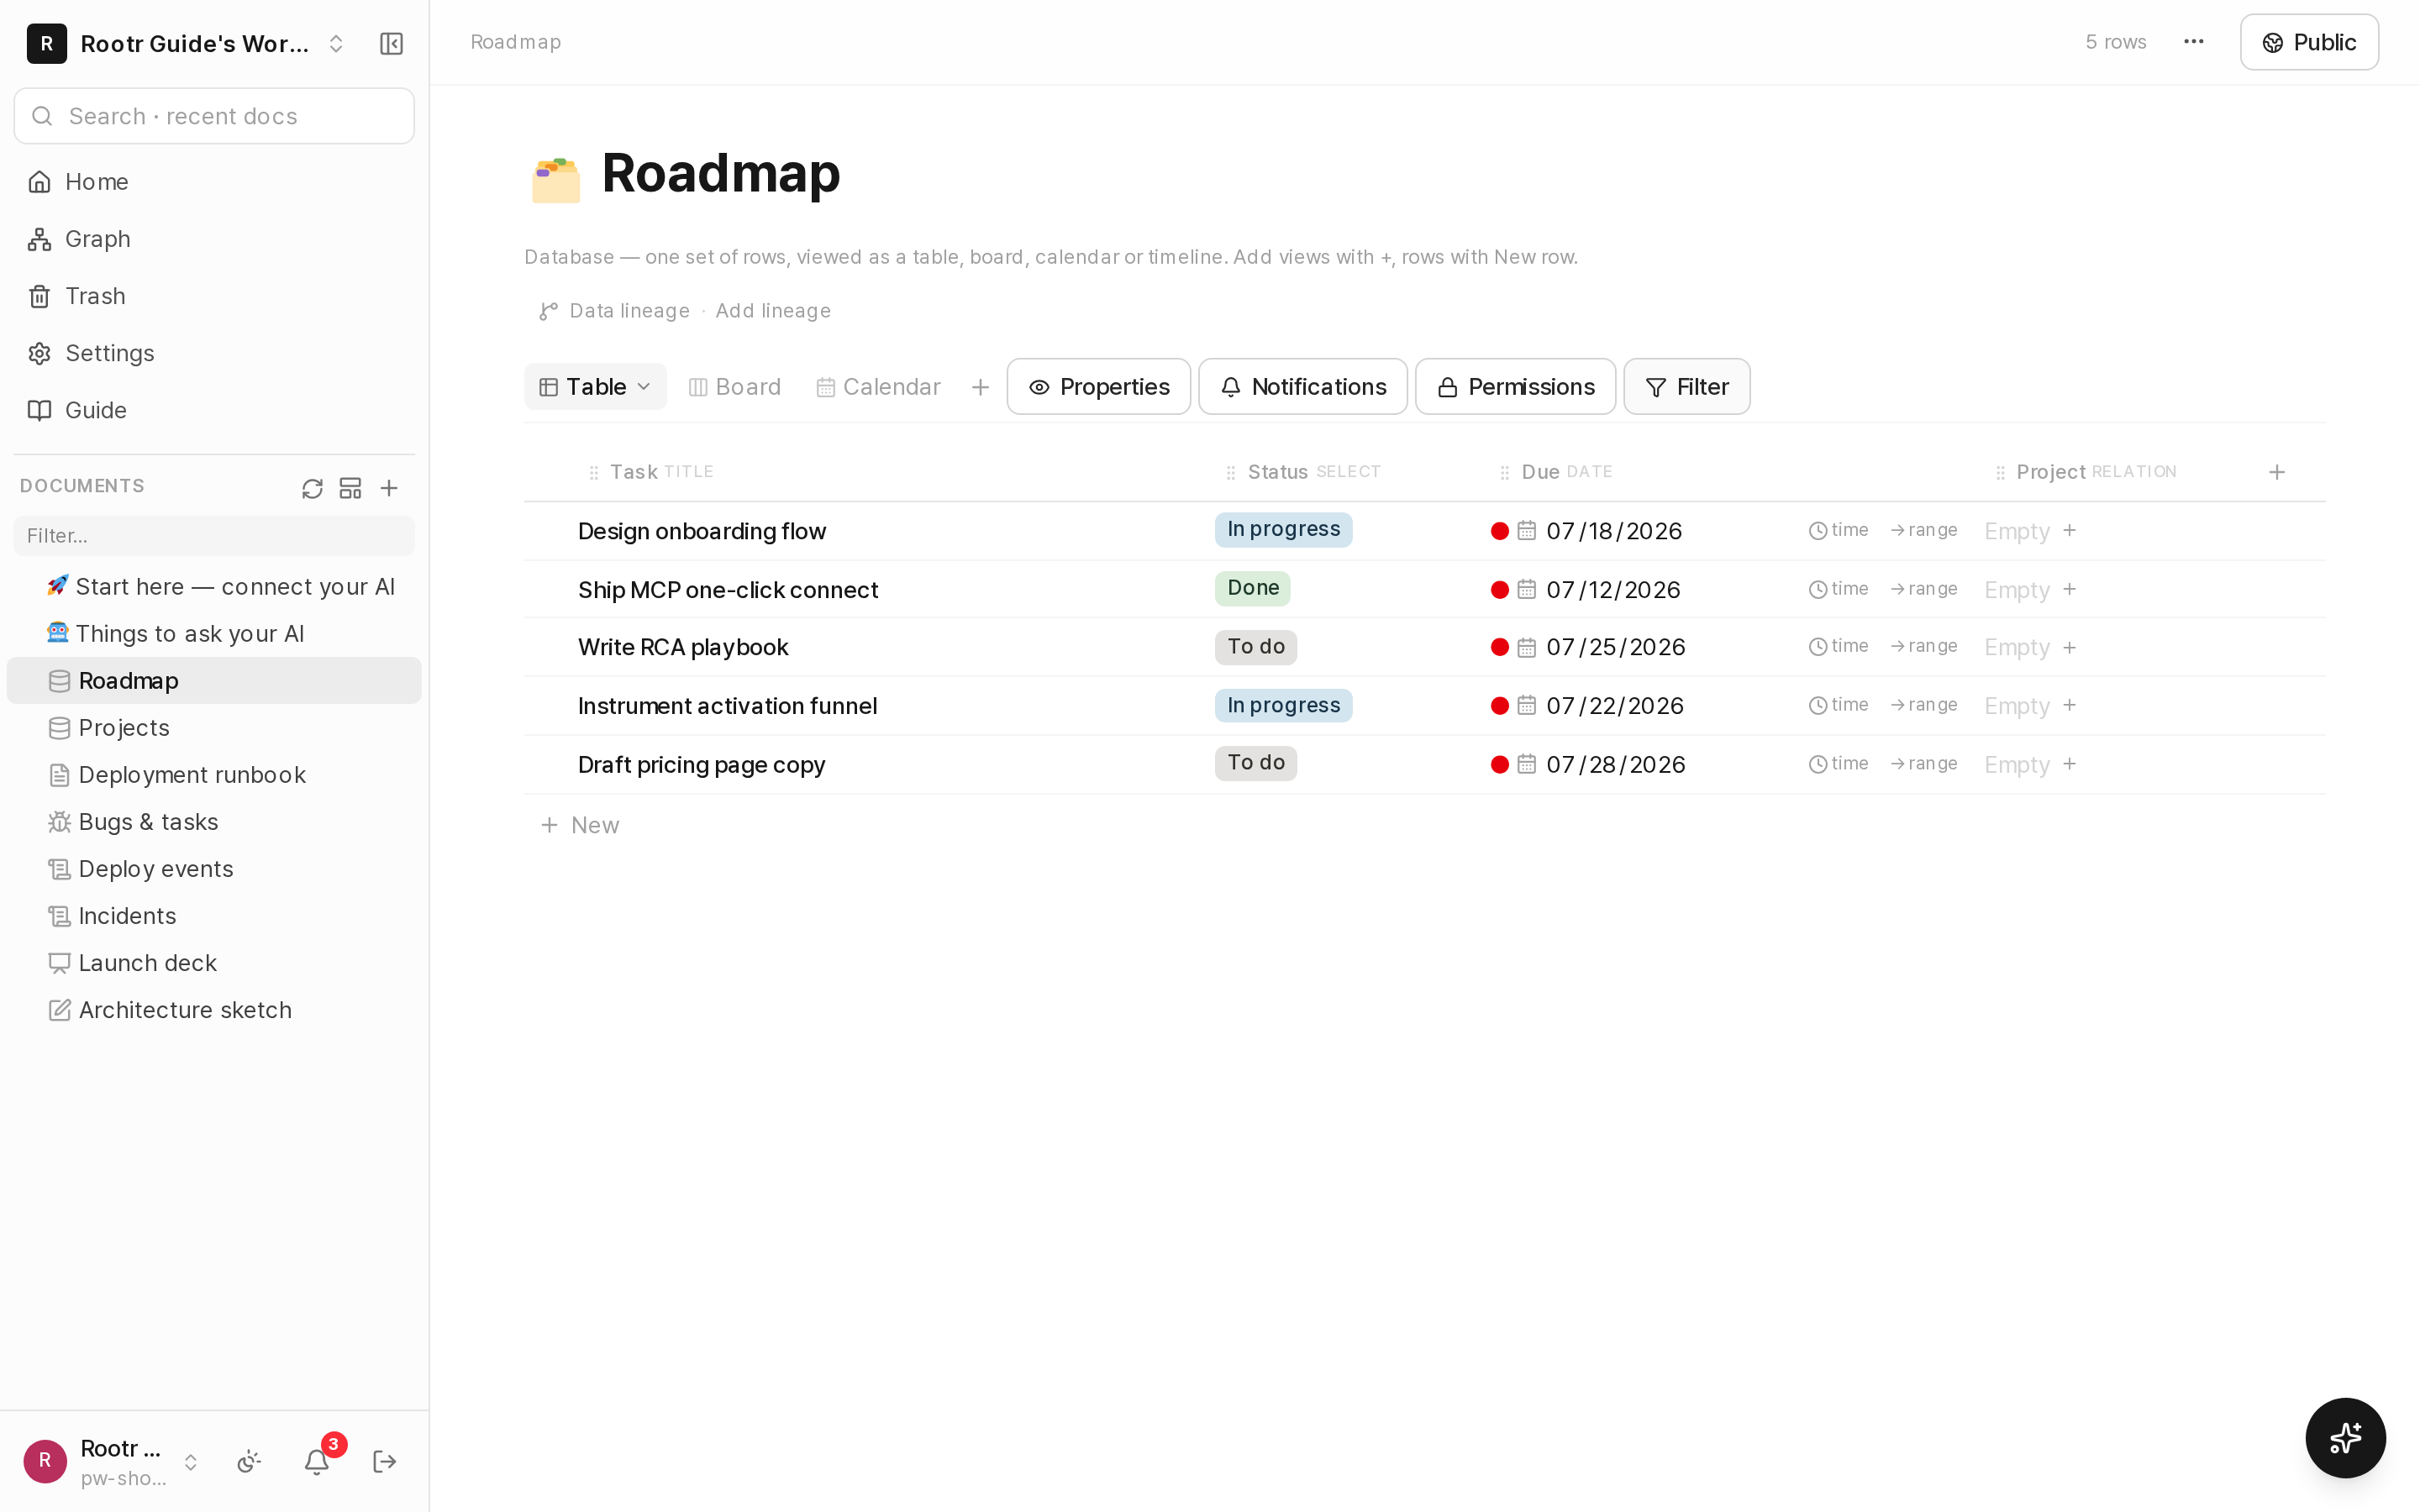
Each view keeps its own filters, sort and visible columns. Filters narrow the rows (the button shows how many are active), the properties menu hides columns from this view only — values are never deleted — and clicking a header sorts. The active view is kept in the URL, so a refresh returns to it and a shared link opens it.
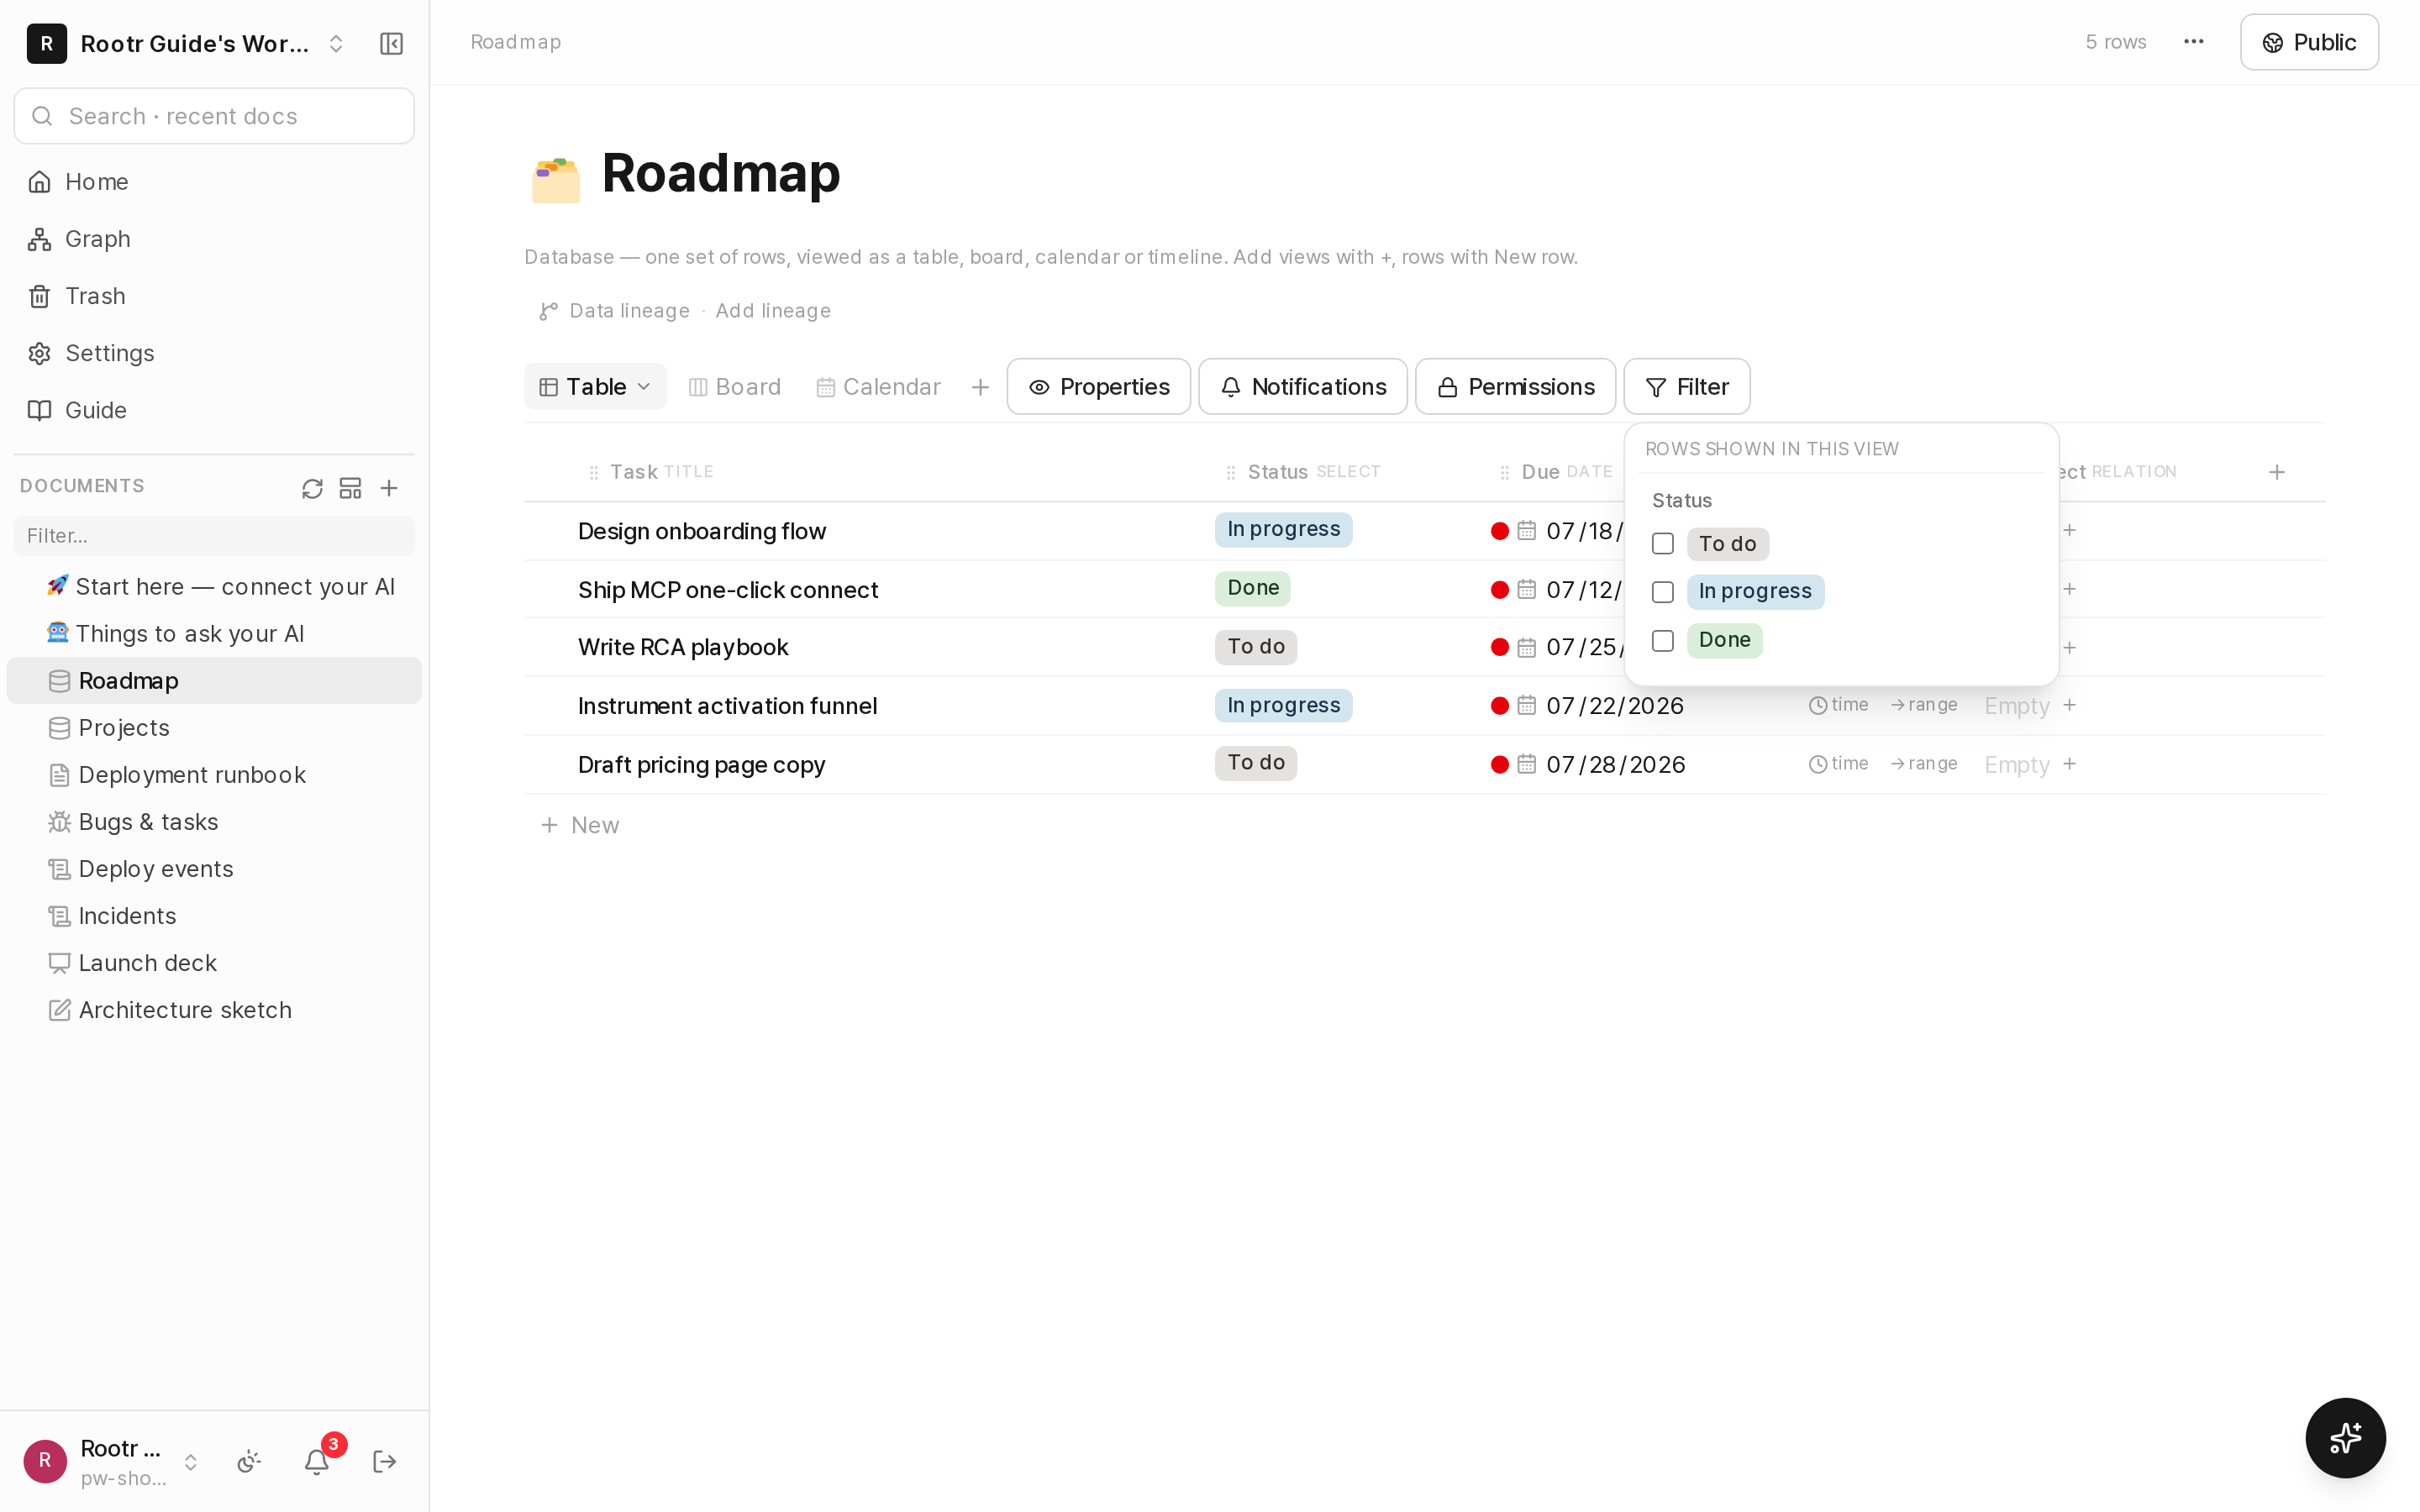
The view toolbar with the filter and properties menus open.
A calendar view picks its span at the top right — week, month or year. Week shows the seven days; month is the familiar grid; year lays out all twelve months at once, shaded darker where more rows fall on a day, so you can see at a glance when the year gets busy. Clicking a date in the year view drops into that month. The choice is saved on the view, so whoever opens your link sees the same span.
Working with cells — like a spreadsheet
Click a cell and it is selected on its own. From there it behaves like Excel — arrows move, Tab goes right, Enter goes down, Home/End jump to the ends of the row, Page Up/Down move a screen at a time. Hold Shift with an arrow to extend the range. Pressing Enter or just typing starts editing; Esc stops editing and returns you to cell selection. Delete clears the selected range.
Copy and paste work too. Select a range, Ctrl+C (Ctrl+X to cut), then Ctrl+V where you want it. It interchanges with Excel, Google Sheets and Notion — paste a copied block and it lands cell by cell, and if it has more lines than the table has rows, the missing rows are created. Pasting a value a select column has never seen adds it as a new choice, and number columns accept what people actually copy: 1,234, $1,234, 12%.
It works the other way as well — copy a range here and paste it into Excel and the cells stay cells. Server-filled columns (formula, rollup, unique id) can be copied but not pasted into: those values are computed, not chosen.
Buttons — the setup you retype every time, in one press
If every new item means filling in status = new, owner = me, due = +7 days by hand, make that a button. Under the view tabs, + Add button takes a name, an emoji and a list of steps, and pressing it runs them in order.
| Step | What it does |
|---|---|
| Add a row | Creates a row, optionally pre-filled |
| Set values | Writes onto the row just created — or onto the rows you ticked in the table |
| Let AI fill a cell | AI writes one cell. Quote the row in your instruction with {Title} and its value is spliced in |
| Open the new row | Opens the detail of the row it just made |
Steps run top to bottom, and each one receives the row the step before it created. That is why "add a row → have AI write its summary → open it" is a single press. Values accept @today, @today+7 and @me, filled in at the moment the button is pressed.
A button grants no permission — it runs as whoever presses it. A button that writes a manager-only column stops there for someone who may not edit it. Creating and editing buttons needs manage rights; pressing one only needs edit. If the AI cannot fill a cell, the remaining steps still run.
Row comments — talking about one row
Open a row and the comments sit right above the body. They work even on a row with no detail document yet — you do not have to create a document just to say something. Mention someone with @ and they get a notification; clicking it opens that row with your comment highlighted.
Row detail — a document under every row
Open a row and a panel slides in from the right: column values on top, a body note underneath. That note is the same block editor as a normal document, so it takes lists, tables and images, and it joins the knowledge graph. Agents can write it too when they create or update a row.
Row detail panel: values on top, body-note editor underneath.
The detail does not have to be a plain document. Open a row that has nothing attached yet and the right-hand panel offers eight choices — document, signed document, spreadsheet, whiteboard, deck, recording, form, issue tracker — and one click creates it. Each row can be a different one, so one meetings table can hold recordings of the meetings alongside circulars that went out for signature. Documents are written right there in the panel; the rest open in their own screen.
You can also attach something you already wrote — "Link an existing page" in the same panel, found by name. Do not copy and paste it in. A linked page stays where it is and the row just points at it, so deleting the row later leaves the page alone. To detach, use "Unlink" in the row menu — that does not delete the page either.
Ask your AI for "a meetings table where every row is a recording" and the table gets a default. In such a table the default choice is marked "default" in that panel — and you can still pick something else for one row.
Select many, change many, delete many
The box at the left of a row selects it; the box in the header row selects every row currently visible (only the filtered ones, if a filter is on). Shift-click extends the selection from the last row you picked.
A bar appears at the bottom showing how many you picked, plus Change date and Delete. If the table has a date column, choosing one date moves every selected row to it. Delete asks once and is all-or-nothing — if even one row is already signed, nothing is deleted and you are told which row blocked it. A batch never half-succeeds.
Three locks Notion does not have
Open the padlock "Permissions" button above the table. None of the three applies to managers, and a table you never configured behaves exactly as before. Each is enforced on the server, not just hidden in the UI — calling the API directly does not get around them.
- Only managers change columns and views — editors do not even see the add-column or add-view buttons. Nobody deletes a column someone else built.
- See only your own rows — for application forms and report boxes where submissions must stay private. Other people’s rows never appear in the list.
- Manager-only columns — lock just the approval flag or the final score. Locked columns show a padlock in the header and cannot be typed into.
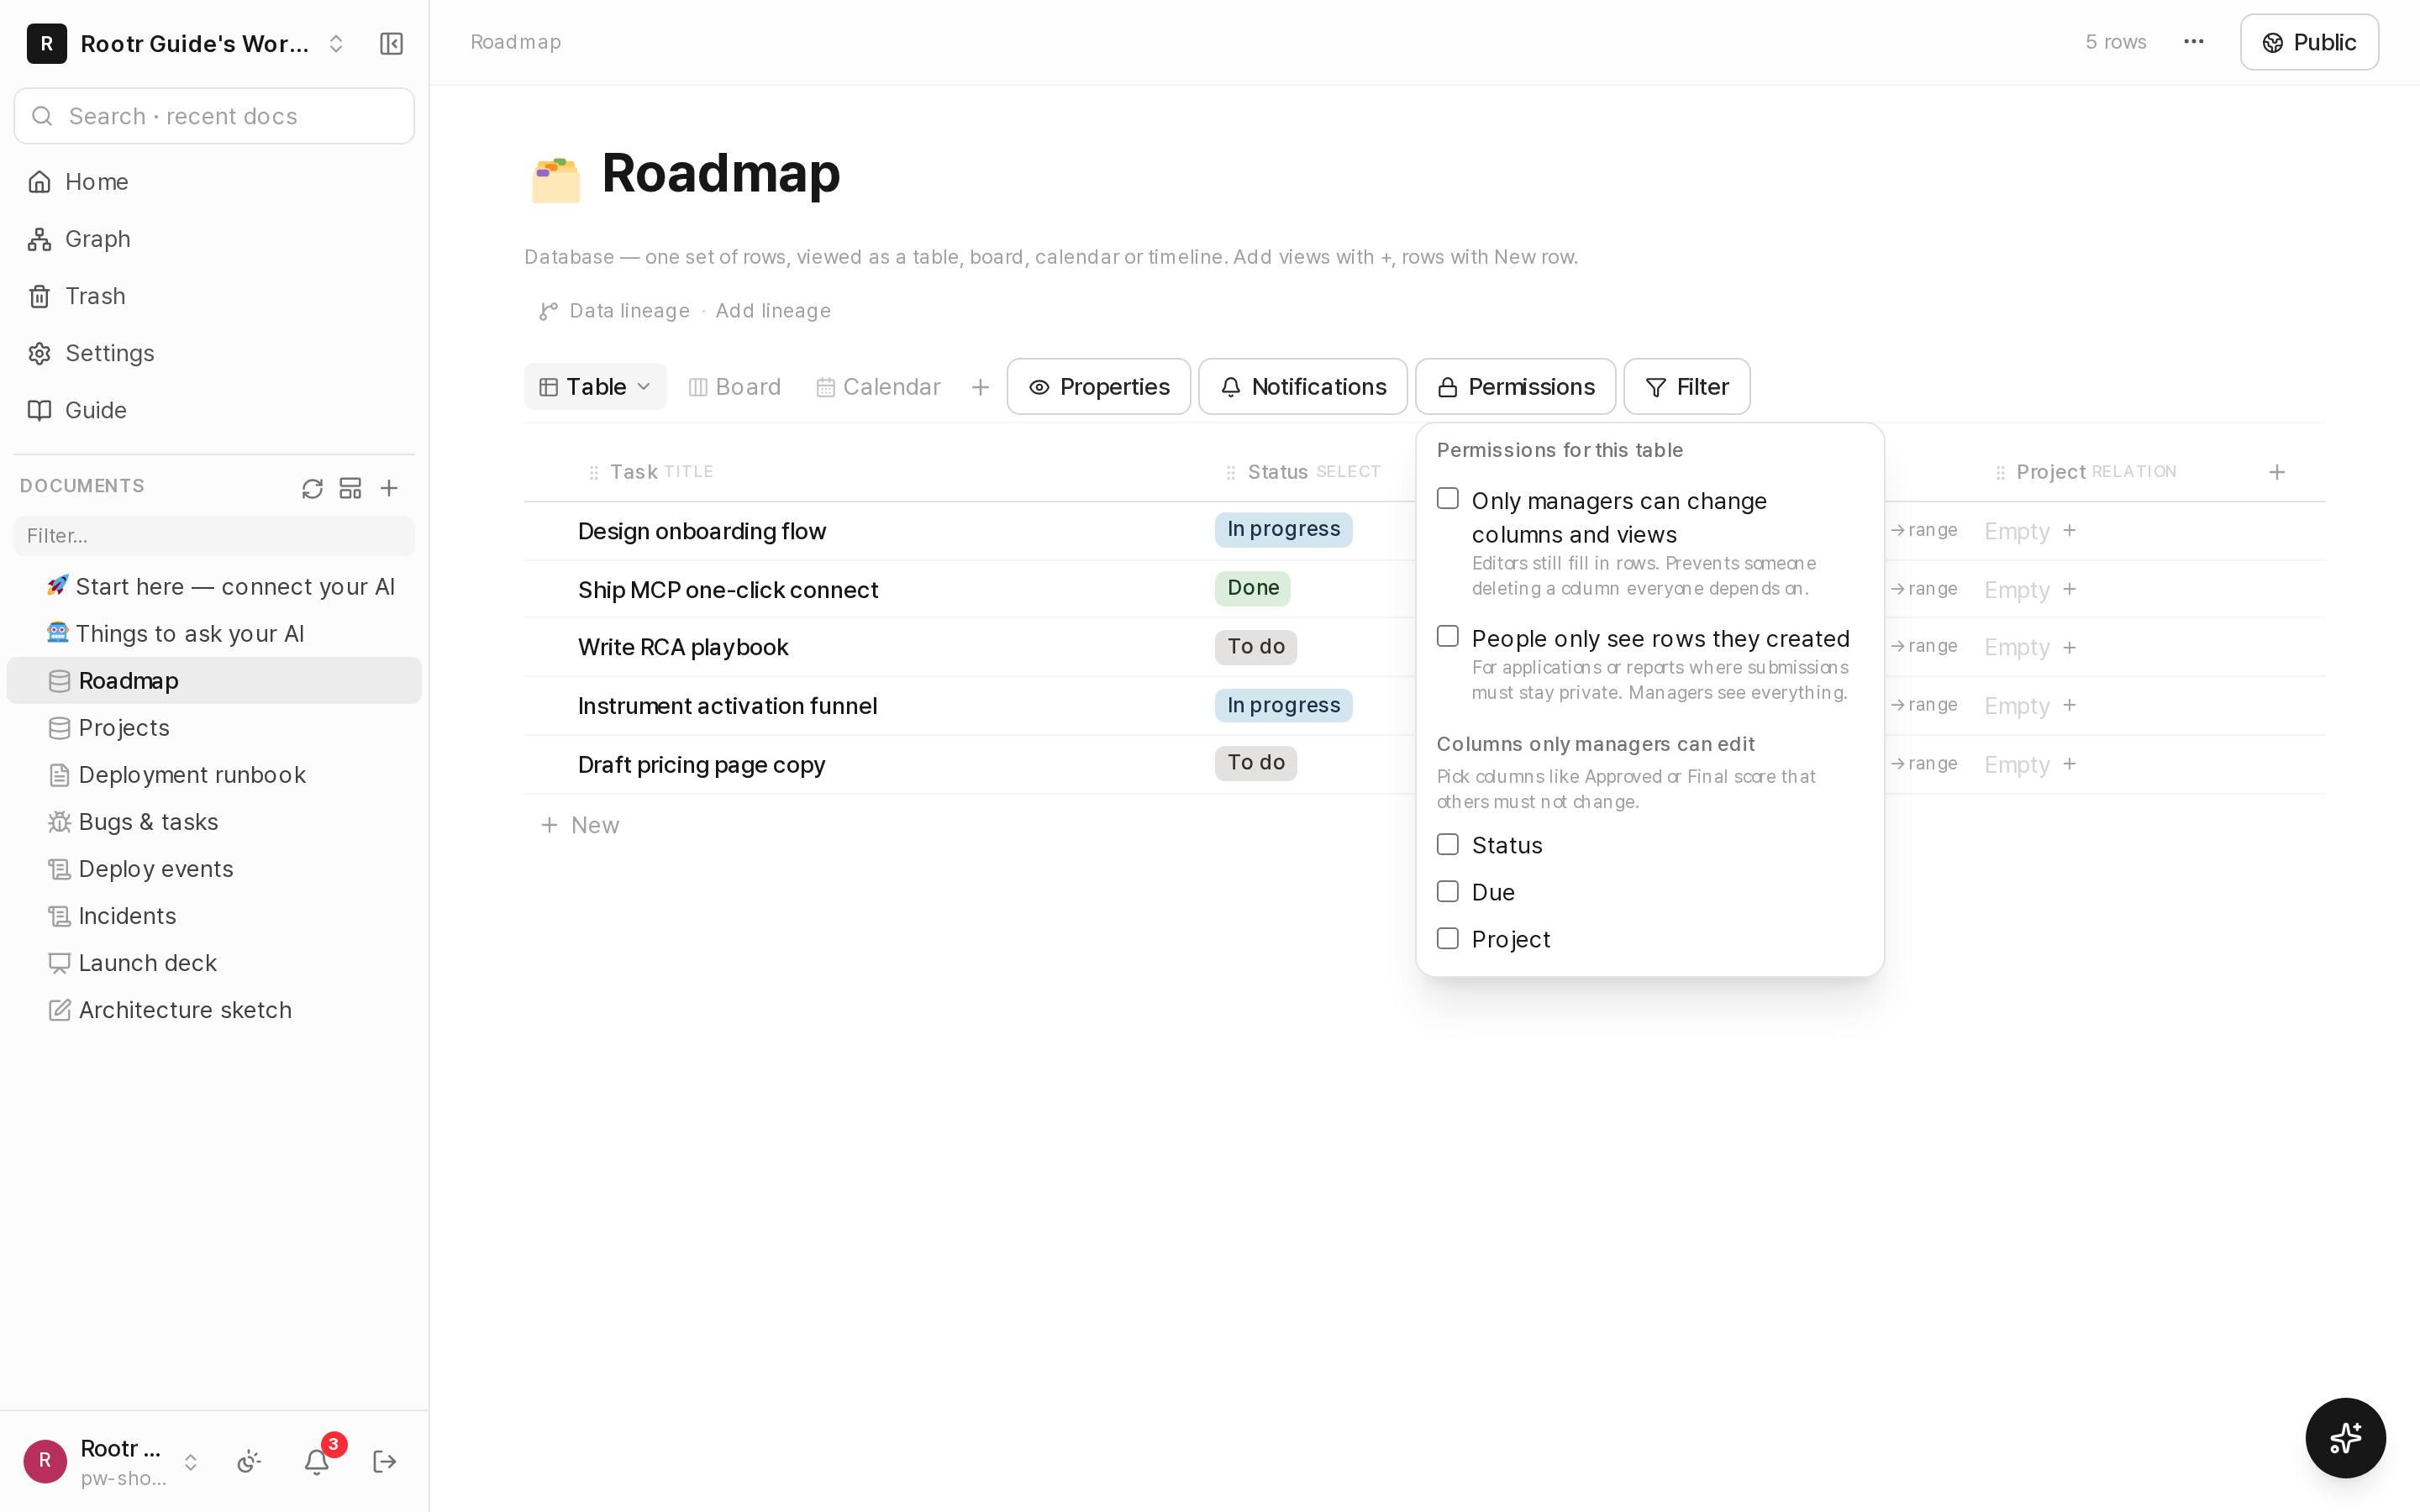
Table permissions dialog: schema lock, own-rows-only, and manager-only columns.
Notifications — tell the right people (Notion cannot)
The bell-shaped "Notifications" button above the table holds the rules. When a row is added, changed or deleted, the people you named get notified. In Notion each person has to turn on watching for themselves, which means the owner of the work has to think to open that table first — no good for application forms, report boxes or incident logs where the responsible person is fixed.
- Who — any workspace members, as many as you like.
- When — row added, row changed, row deleted.
- Only when — pick a column and a condition: status equals urgent, title contains outage, owner changed.
People switch notifications off when everything pings them, which is why the filter ships with the feature. Your own edits never notify you, and matching several rules still sends one notification. Only managers can change the rules.
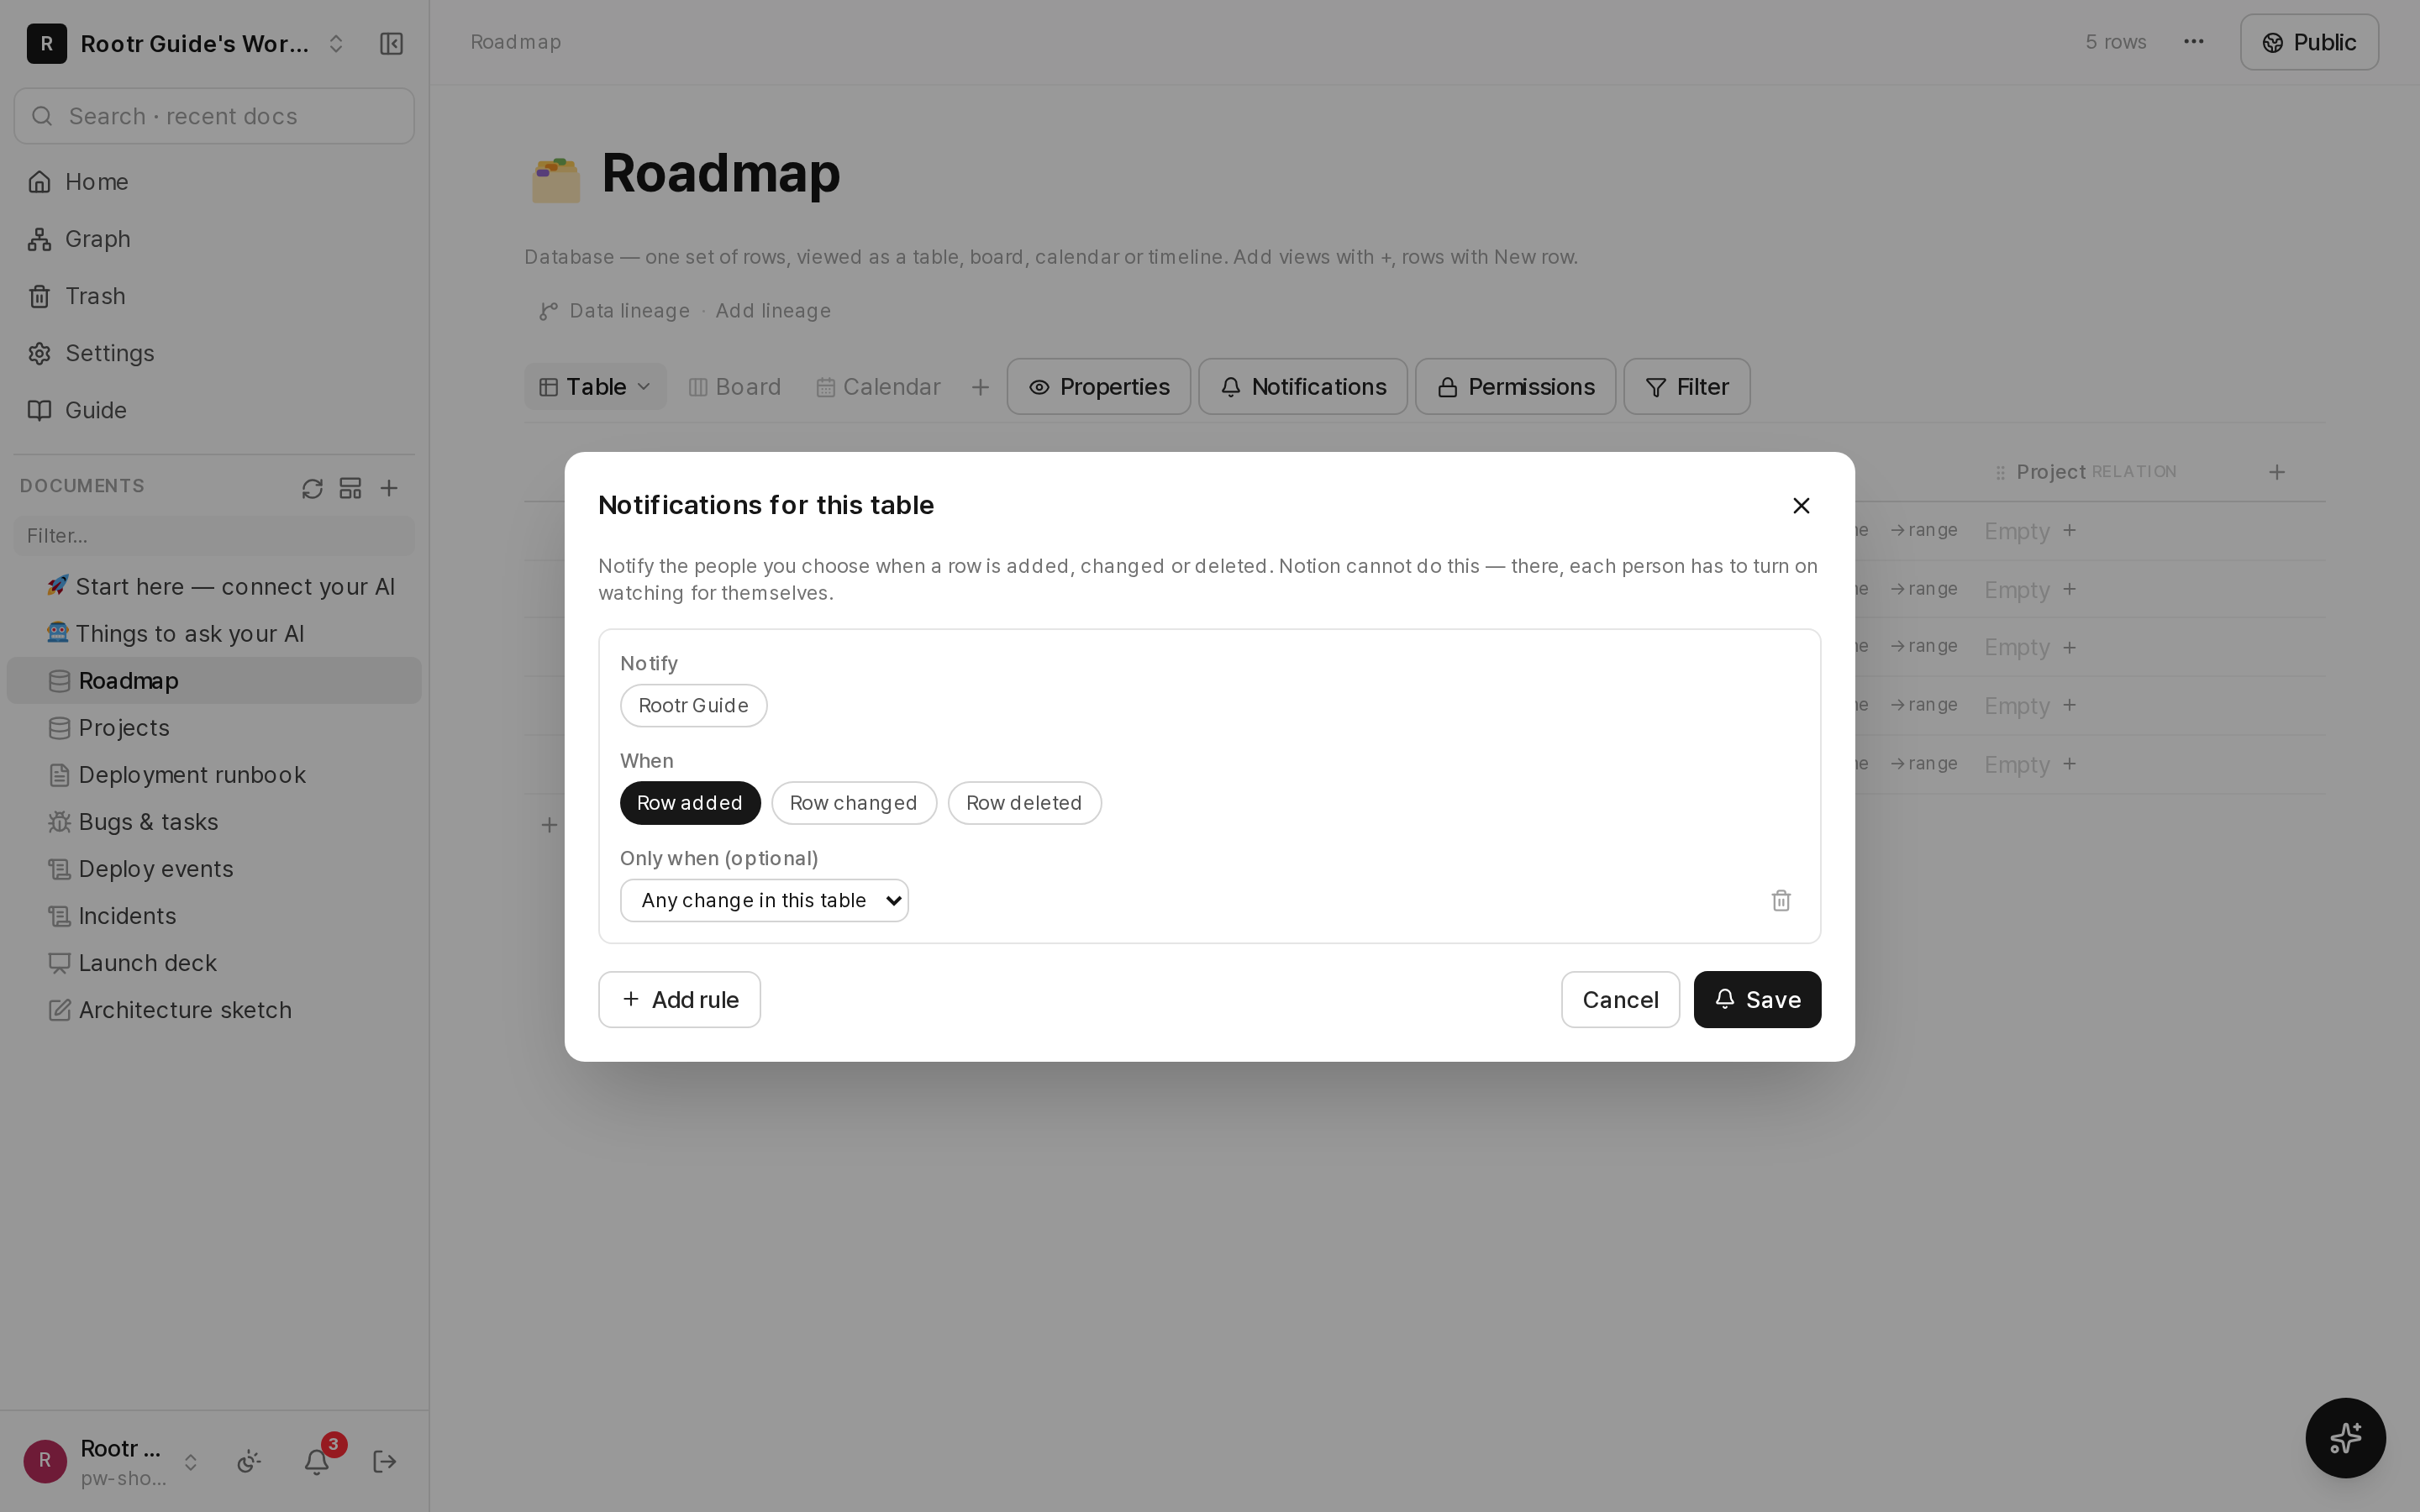
Table notification rules: who to notify, when, and the optional filter.
Working together
- Live updates — when two people have the same table open, one person’s edit shows up on the other screen without a refresh. So do new rows, deleted rows and new columns.
- Simultaneous edits are safe — one person changing the assignee while another changes the status keeps both changes.
- Assignment notifications — filling a person column pings that member.
Other ways to work with a table
- Reorder columns by dragging a header, or from the header menu. The title column moves too.
- Collect through a form — point a FORM at this table and outside submissions arrive as rows.
- Ask an agent — "add a row", "move it to done" (chapter ①). Buttons too: "put a triage button on this table", "press the triage button".
- Export to.xlsx.
⑥Permissions · sharing · public publishing
Decide easily, at the folder level, who can see what — and if you need to, publish a specific document to the internet.
When you use it as a team, the most important thing is "who can see how much." Rootr handles this very simply.
Roles (permission tiers)
- Owner: manages everything in the workspace. Admin: manages members and settings. Member: creates and edits documents. Viewer: can only view.
- Permissions are inherited automatically from a folder to the documents inside it. In other words, set permissions once on a folder and they apply to everything within it. You can also make a specific document an exception and set it separately.
Private · shared · public
- Private nodes: turn on the "Invited people only" switch and you can hide a document/folder you created so that only you (and the people you invited) can see it.
- Invite by share link: send a link to invite people from outside the workspace.
- Public publishing: you can make a specific document viewable by anyone at an internet address (
/p/document-name). Outsiders can propose edits to a public document ("how about changing it this way?"), and the owner can accept (merge) or reject those proposals — just like collaboration on documents (Git).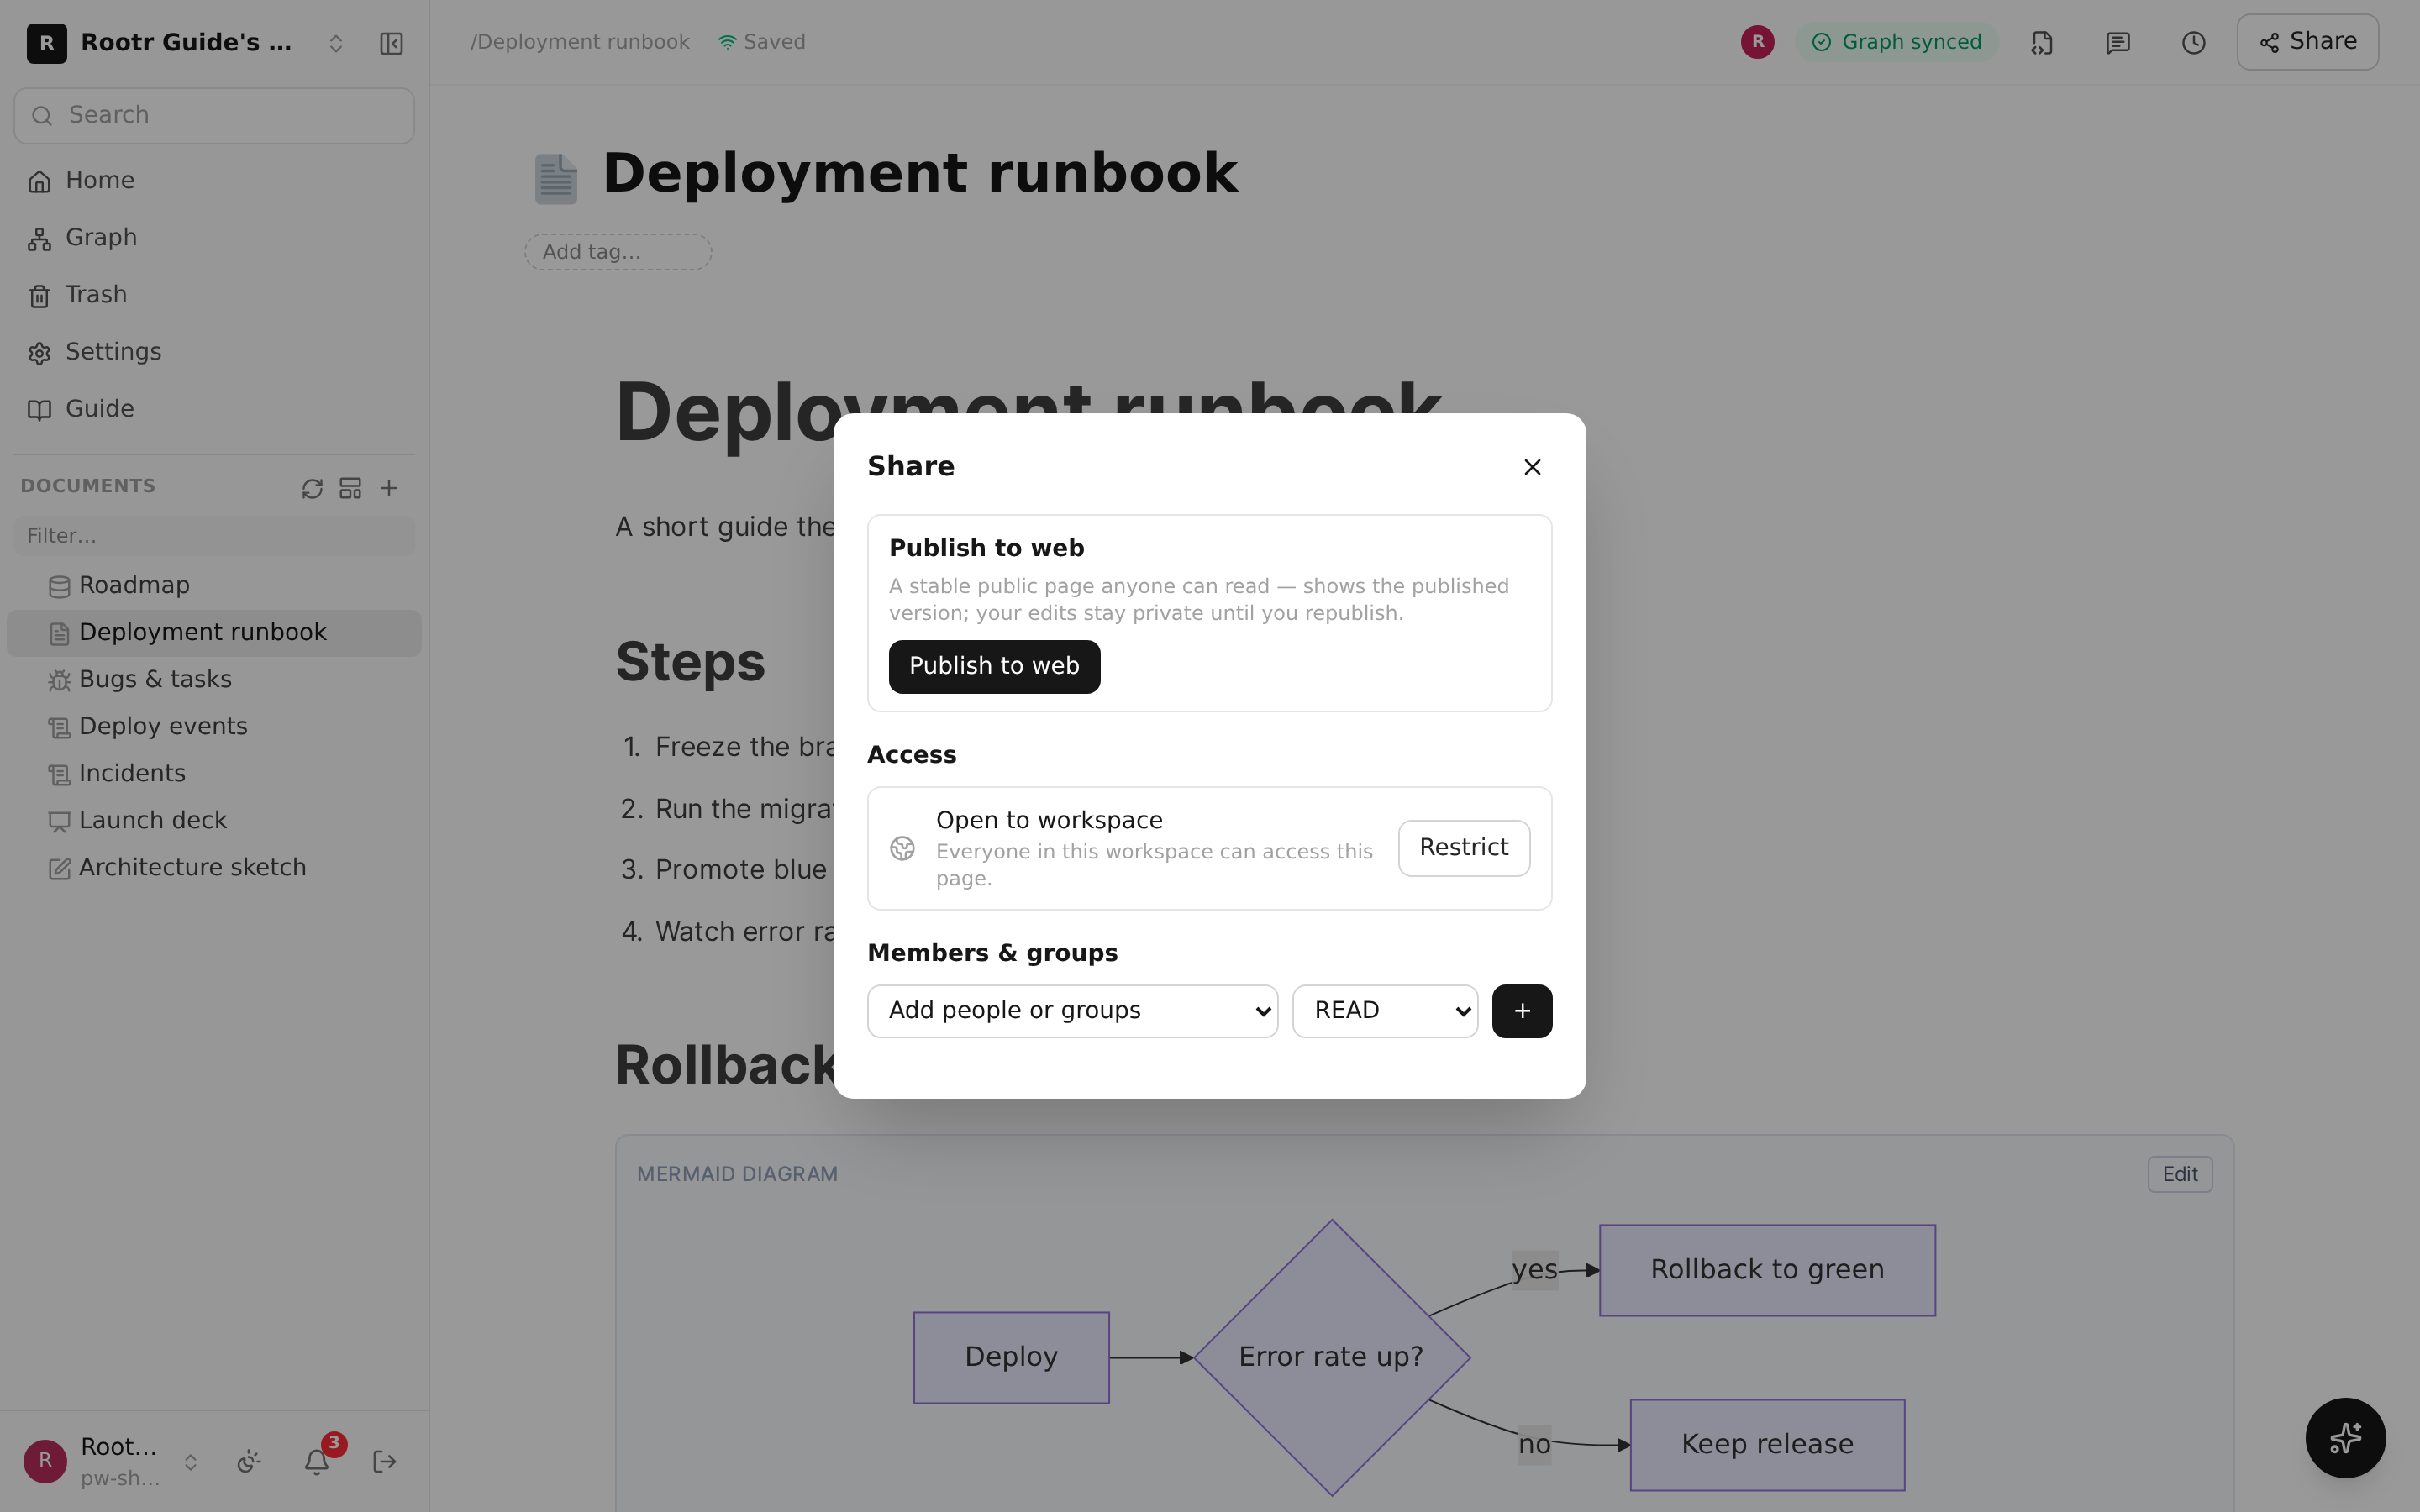
The share window, the "Invited people only" private switch, and the public publishing screen.
Not just documents — publish anything
Tables, spreadsheets, whiteboards, forms, issue trackers, logs, CRM and recordings can go public too (only folders cannot). Publish a table and visitors can search it and press "clone" to take it into their own workspace — as a real table, columns, views (kanban included) and rows intact.
You choose whether sub-pages go with it. Turn it on and everything underneath — grandchildren included — gets its own URL and is listed on the parent page. Turn it off and only the pages that went out because of it close; anything you published separately stays. Closing the parent, moving a sub-page out, or deleting the parent do the same. Moving something INTO a published page does not publish it.
Some things never go out: a table's person, attachment and relation columns, the documents attached to its rows, form responses, recording audio, CRM contacts and deal amounts, and signer names on a signed document. Past 500 rows the page shows what it can and says how many of how many.
A published table is not stuck looking like a table — nine ways to show it
Publish a table and you choose how it is shown. The data is unchanged; only the presentation differs. Table (every column as-is) · Cards (a grid you skim) · Gallery (big tiles — colour stands in when there is no photo) · List (reads like articles: big title, one-line summary) · Board (kanban by status) · Timeline (a vertical run in date order) · Calendar (a month grid) · Summary (count bars plus sum, average and max) · Ranking (largest numbers first).
Each view needs a certain column — calendar and timeline need a date, board needs a select/status, ranking needs a number. On a table without it the option is dimmed and says why. You never pick a view and land on an empty page.
There are six moods too — Clean, Paper, Dark, Vivid, Bento, Brutal. Background, cards, corners and type all move together, so the same table reads as a completely different page. Layout and mood are stored separately, so changing the colour leaves the layout alone. You pick both under Share → Publish to web.
Publishing to the web — what you can set
Share → Publish to web gives the document a stable address. The public page serves the content as of the moment you published — later edits stay private until you press "Republish", so you can keep polishing a draft without it leaking.
| Setting | What it controls |
|---|---|
| Allow duplicate | Whether visitors can copy the page into their own workspace. Turn it off for quotes and draft contracts |
| Allow comments | Whether visitors can comment. Off by default |
| Allow change proposals | Whether outsiders can propose edits (sign-in required) |
| Password lock | Only people who know the link and the password can read it. Team plan and up |
| Link expiry | The page closes itself once the period passes |
| Hide from search engines | Drops the page from search results. Team plan and up |
| Design (skin) | Sixteen skins — classic, magazine, e-book … plus cover, table of contents, body width and paged mode |
Setting a password turns search exposure off automatically, and it cannot be turned back on while the page stays locked: a lock screen in search results still reveals that the document exists, title and all. Remove the password and the choice is yours again.
A locked page never sends its body to the browser at all — hiding it in the UI would leak everything to anyone who called the address directly. Change the password and anyone already inside is locked out again.
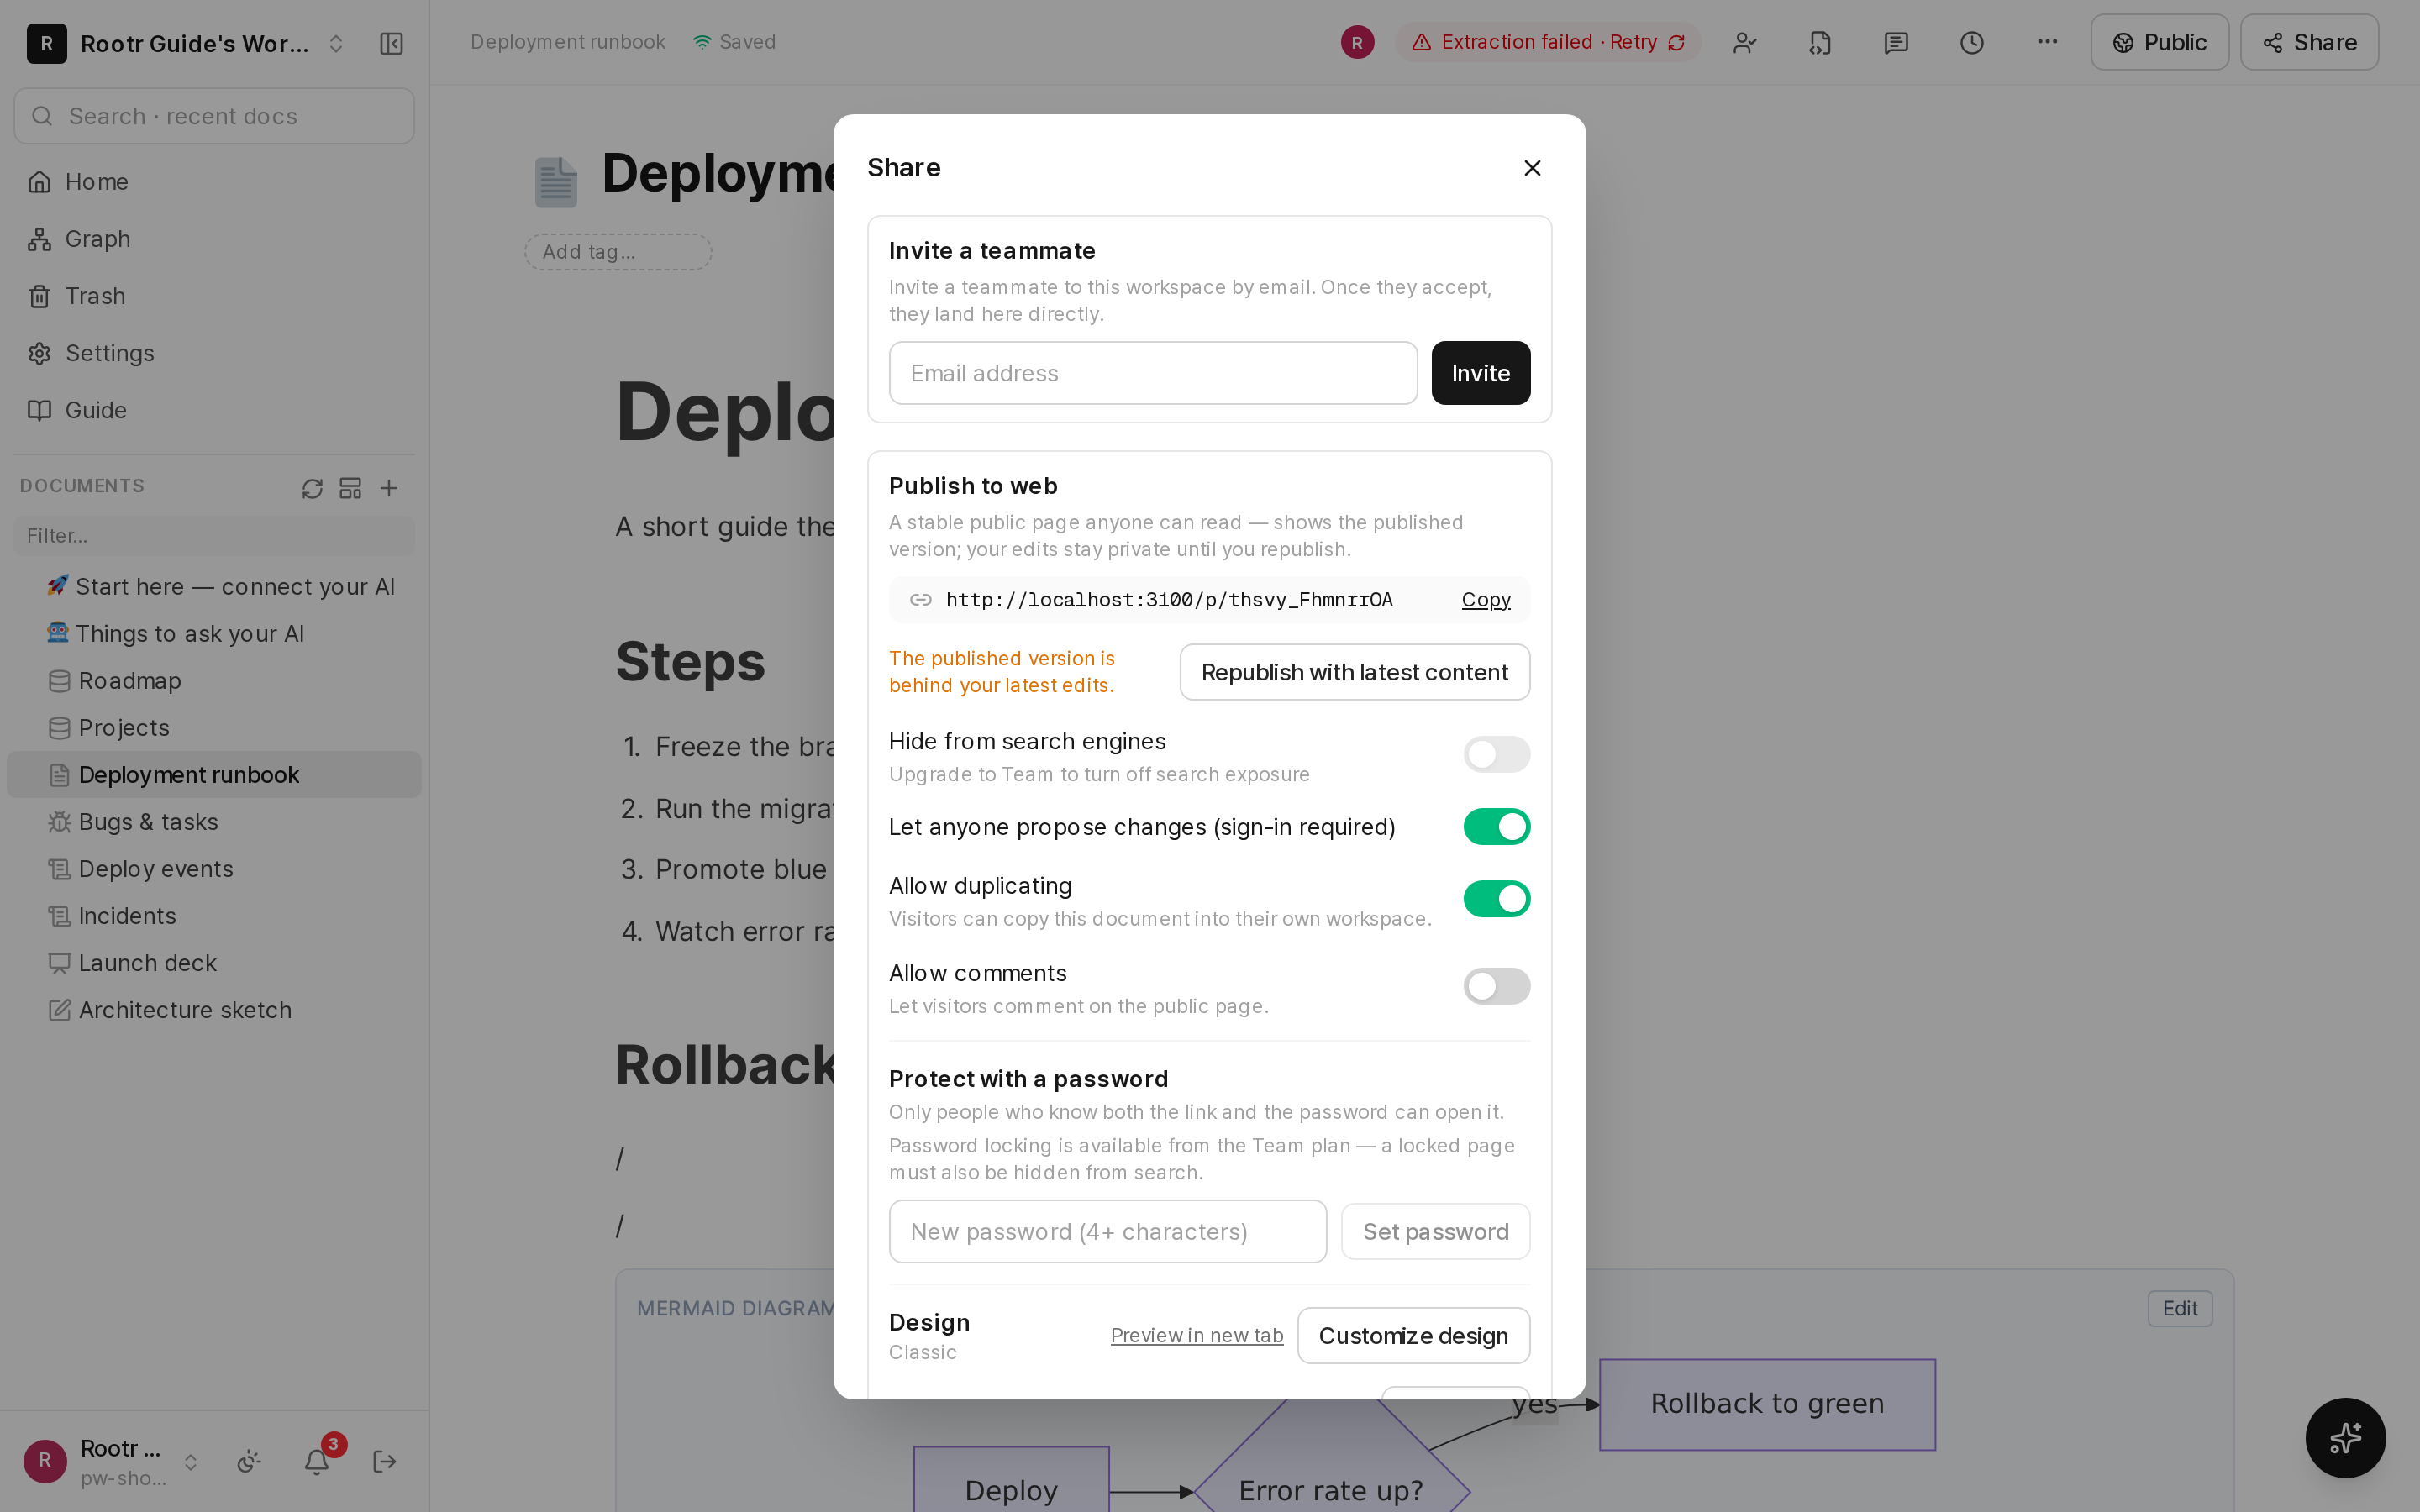
The public settings: password lock, allow duplicate, allow comments.
Change proposals — Git-style collaboration for documents
With proposals allowed, the public page grows a "Propose a change" action. An outsider edits and submits; the owner gets a notification and reviews it under "Review N proposals" in the share window, then merges or rejects (rejection reasons reach the author).
Merging combines, it does not overwrite. Rootr takes the version the proposer was looking at as the base and lays only their changes on top of the current document, so anything the owner changed meanwhile survives. Only when both sides touched the same lines does it stop and say "N conflicts" first.
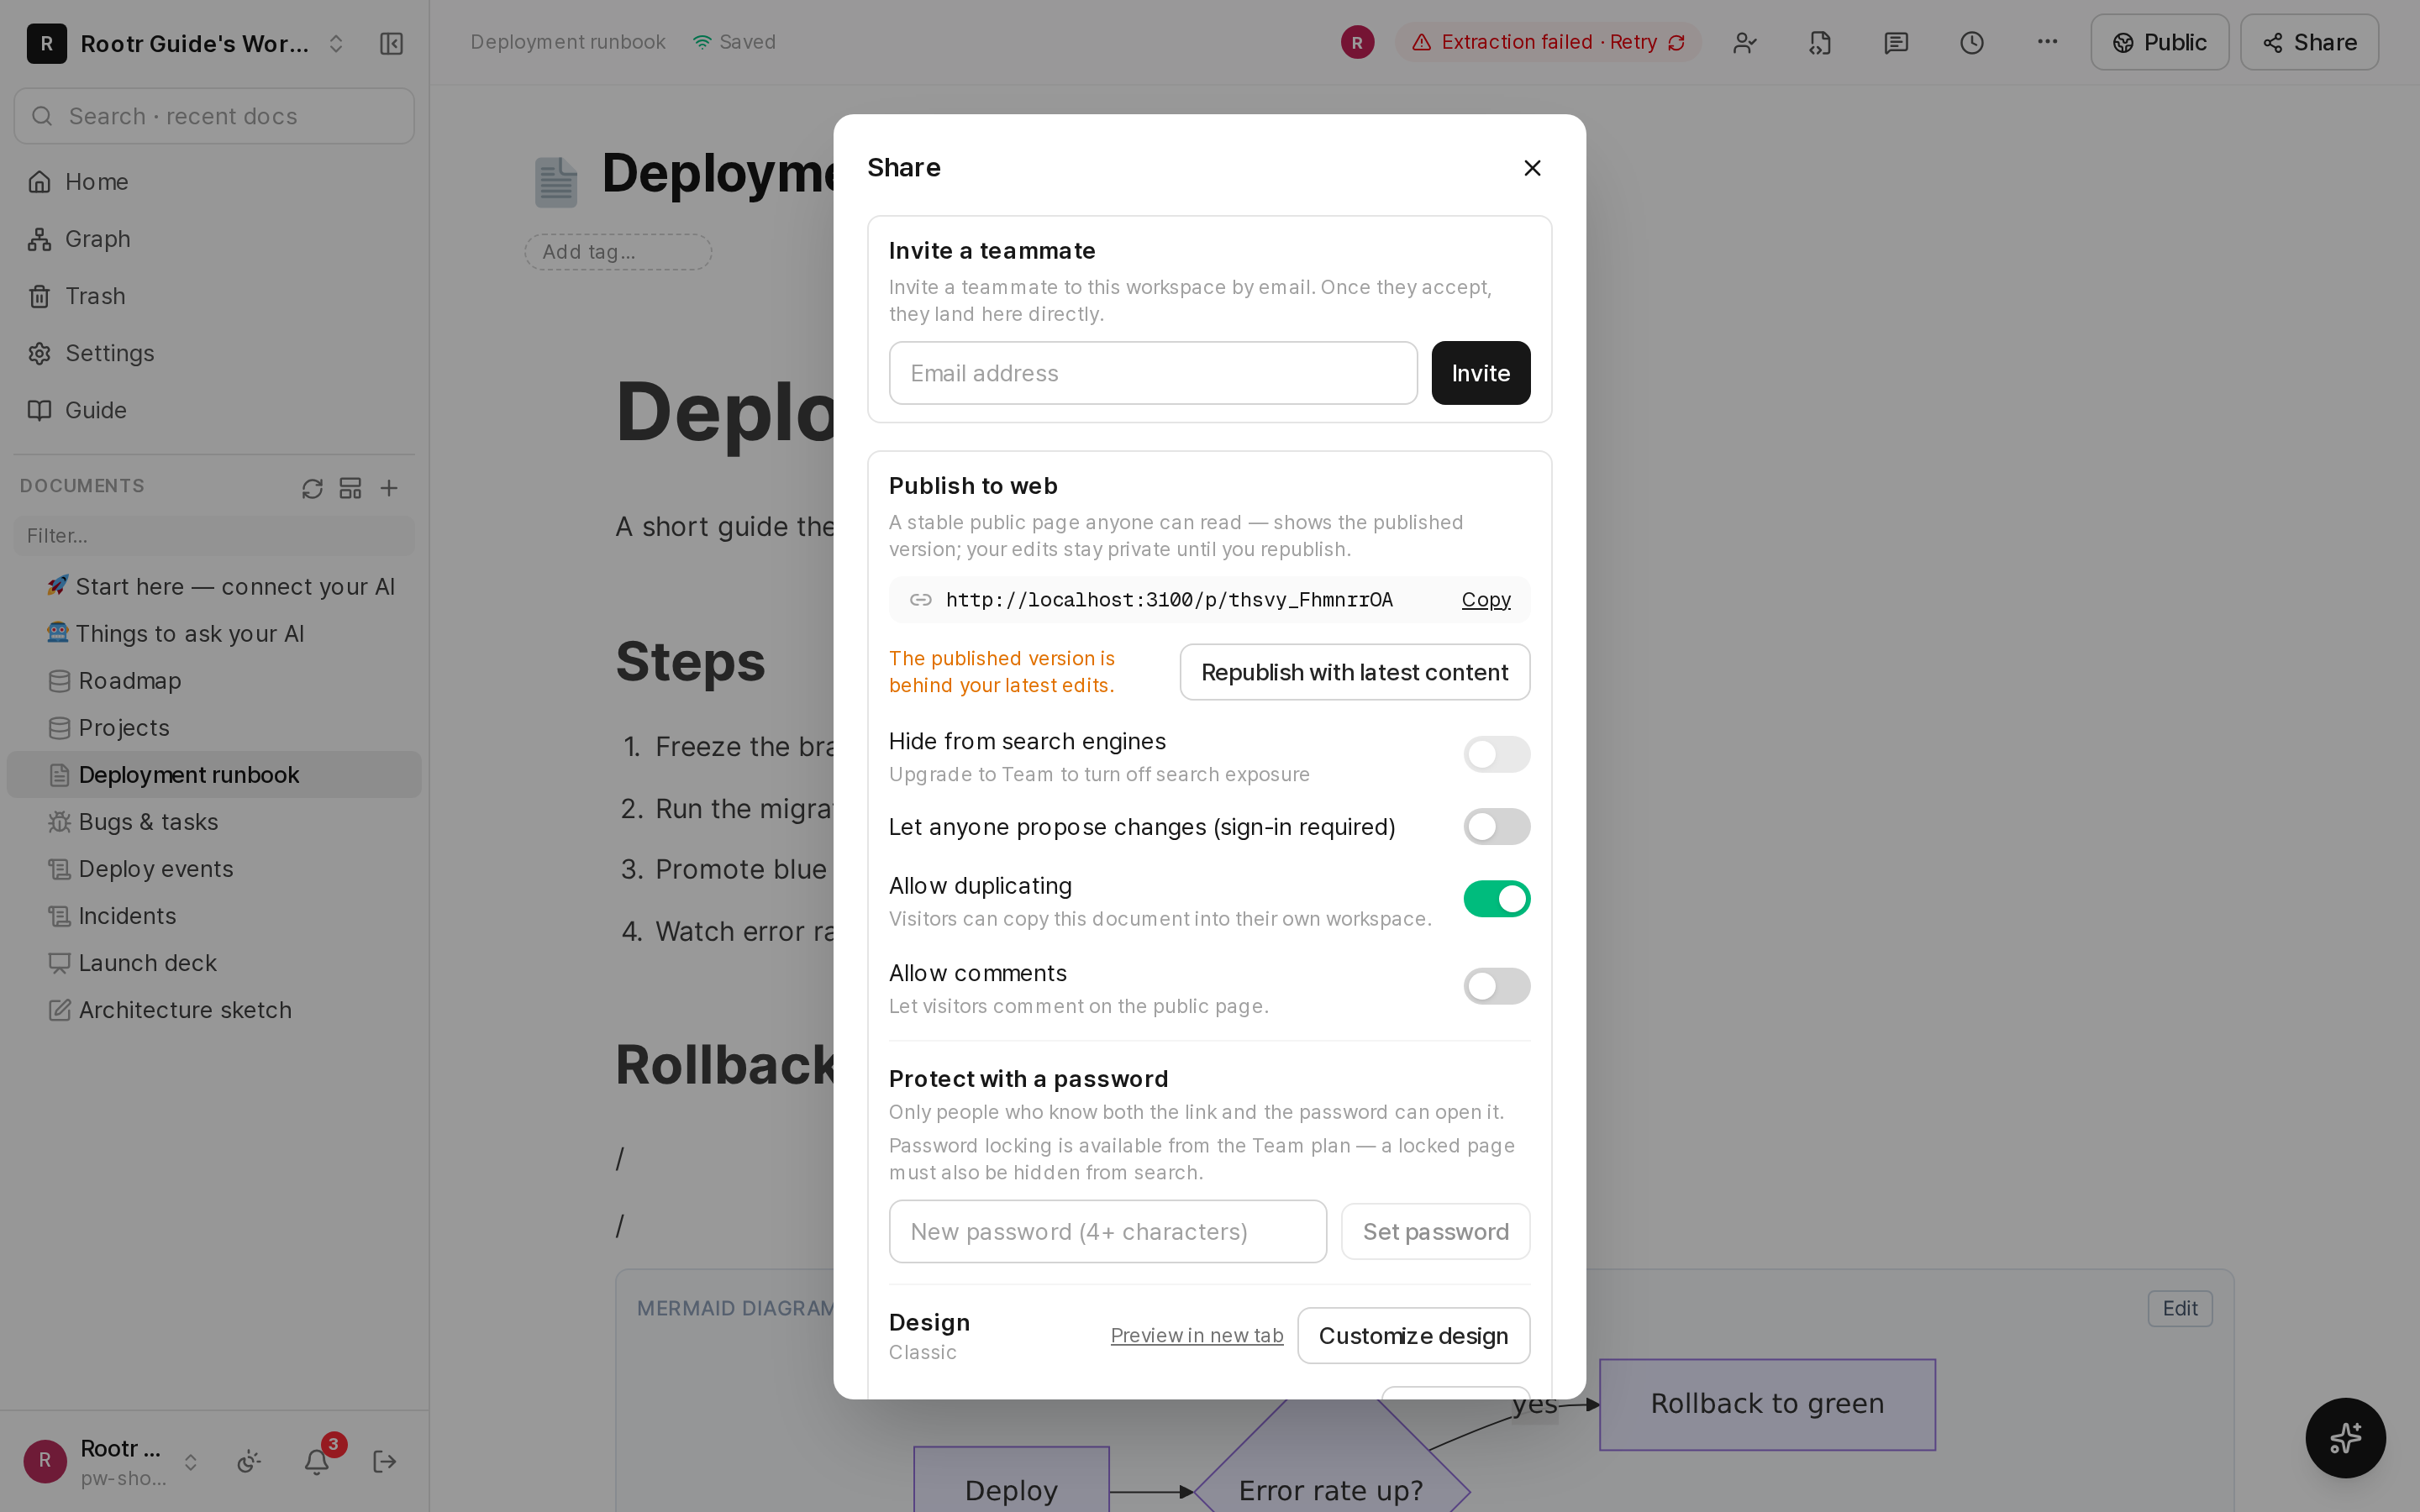
The proposal review screen, showing what changes with merge and reject actions.
AI & data
⑦The knowledge graph and asking AI (RCA)
Just by saving documents, scattered information becomes a connected "knowledge graph," and when you ask "why?" on top of it, you get an answer backed by evidence.
What is a knowledge graph?
When you save a document, Rootr automatically extracts the "important things" and "relationships" inside it in the background. For example, it finds people, teams, services, systems, incidents, and decisions, and creates connections like "this incident happened in that service." A map connected this way, with dots (things) and lines (relationships), is called a "knowledge graph," or in plain terms a "knowledge map." Several scattered documents become one connected picture.
Things mentioned across different documents get connected into one knowledge map — so you can trace around "payment failure" to find the cause.
- Mini-map: open a single document and you can immediately see, as a small map, the things that document mentions.
- Exploring the whole map: on the graph screen you can search for a specific thing, see what is connected around it, and follow what paths exist between two things.
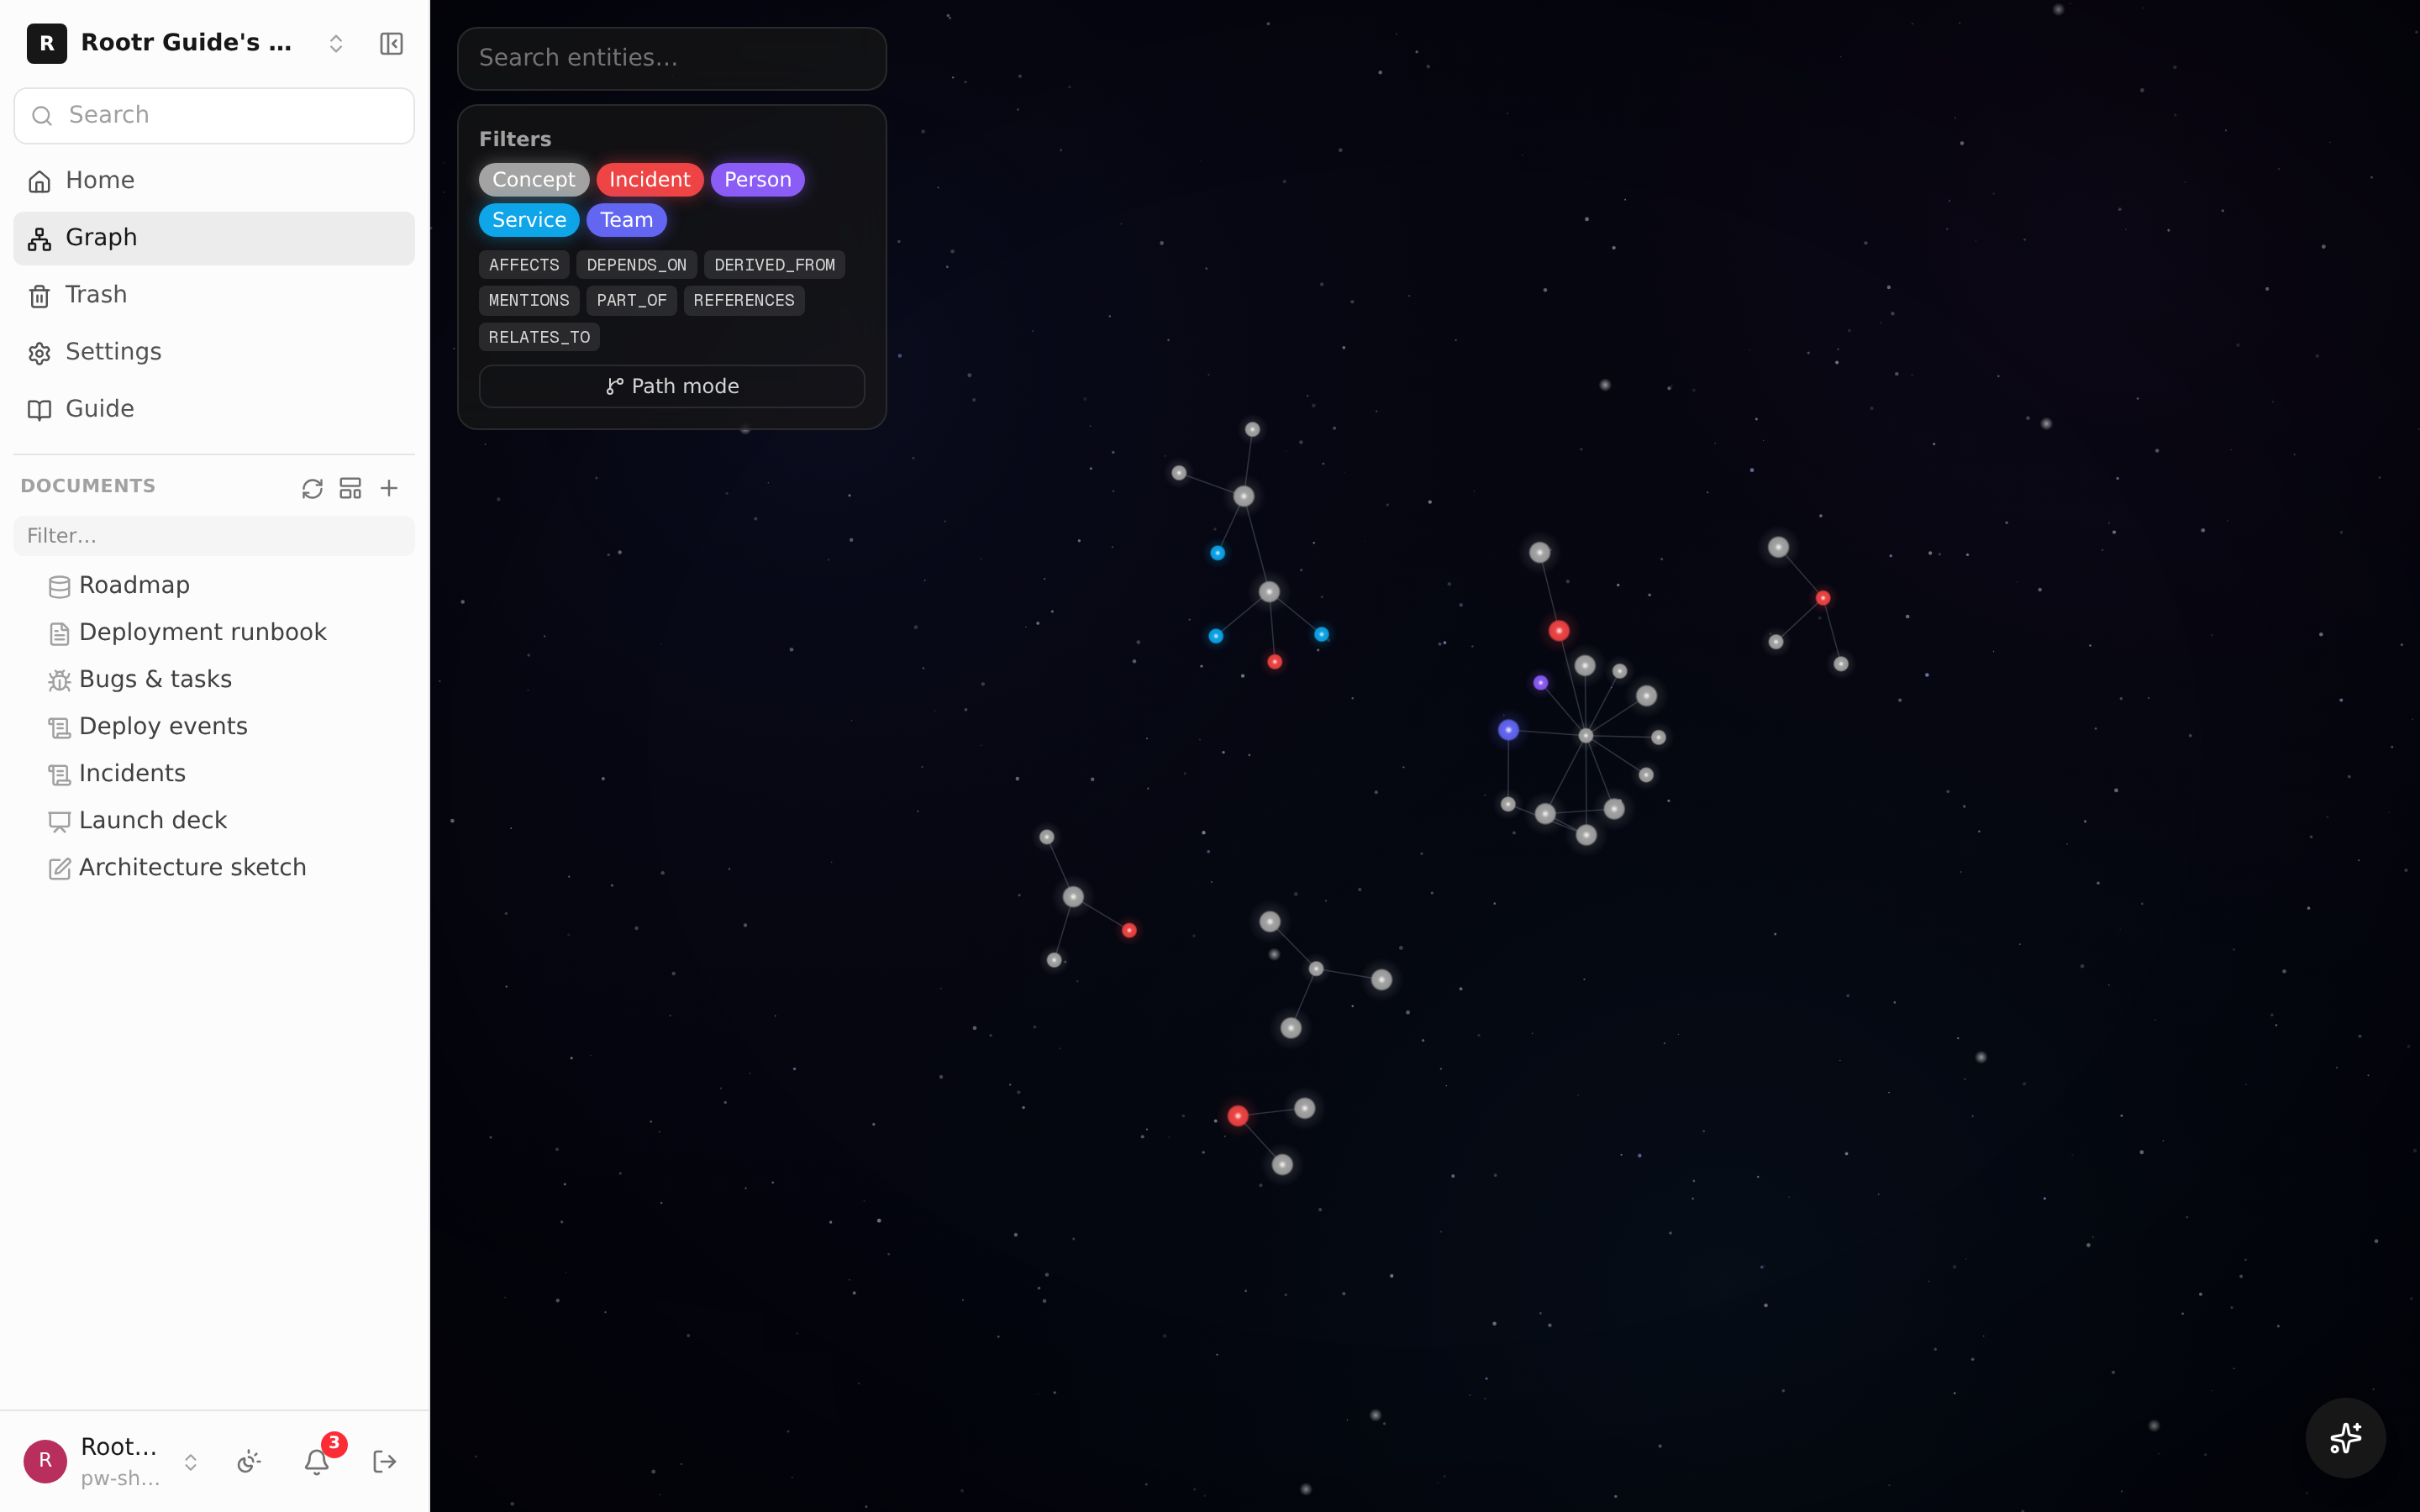
The knowledge-graph exploration screen. Things are connected as dots and relationships as lines.
Ask — asking "why?" (root-cause analysis)
When you ask the Ask feature a question in everyday language (for example, "why has payment kept failing since last week?"), Rootr searches both the knowledge graph and your documents and gives you an answer with the evidence attached (which sentence of which document it came from). It is especially strong at root-cause analysis (RCA) — tracing "what the cause is." You can ask the same question through the CLI or API ask you learned about earlier.
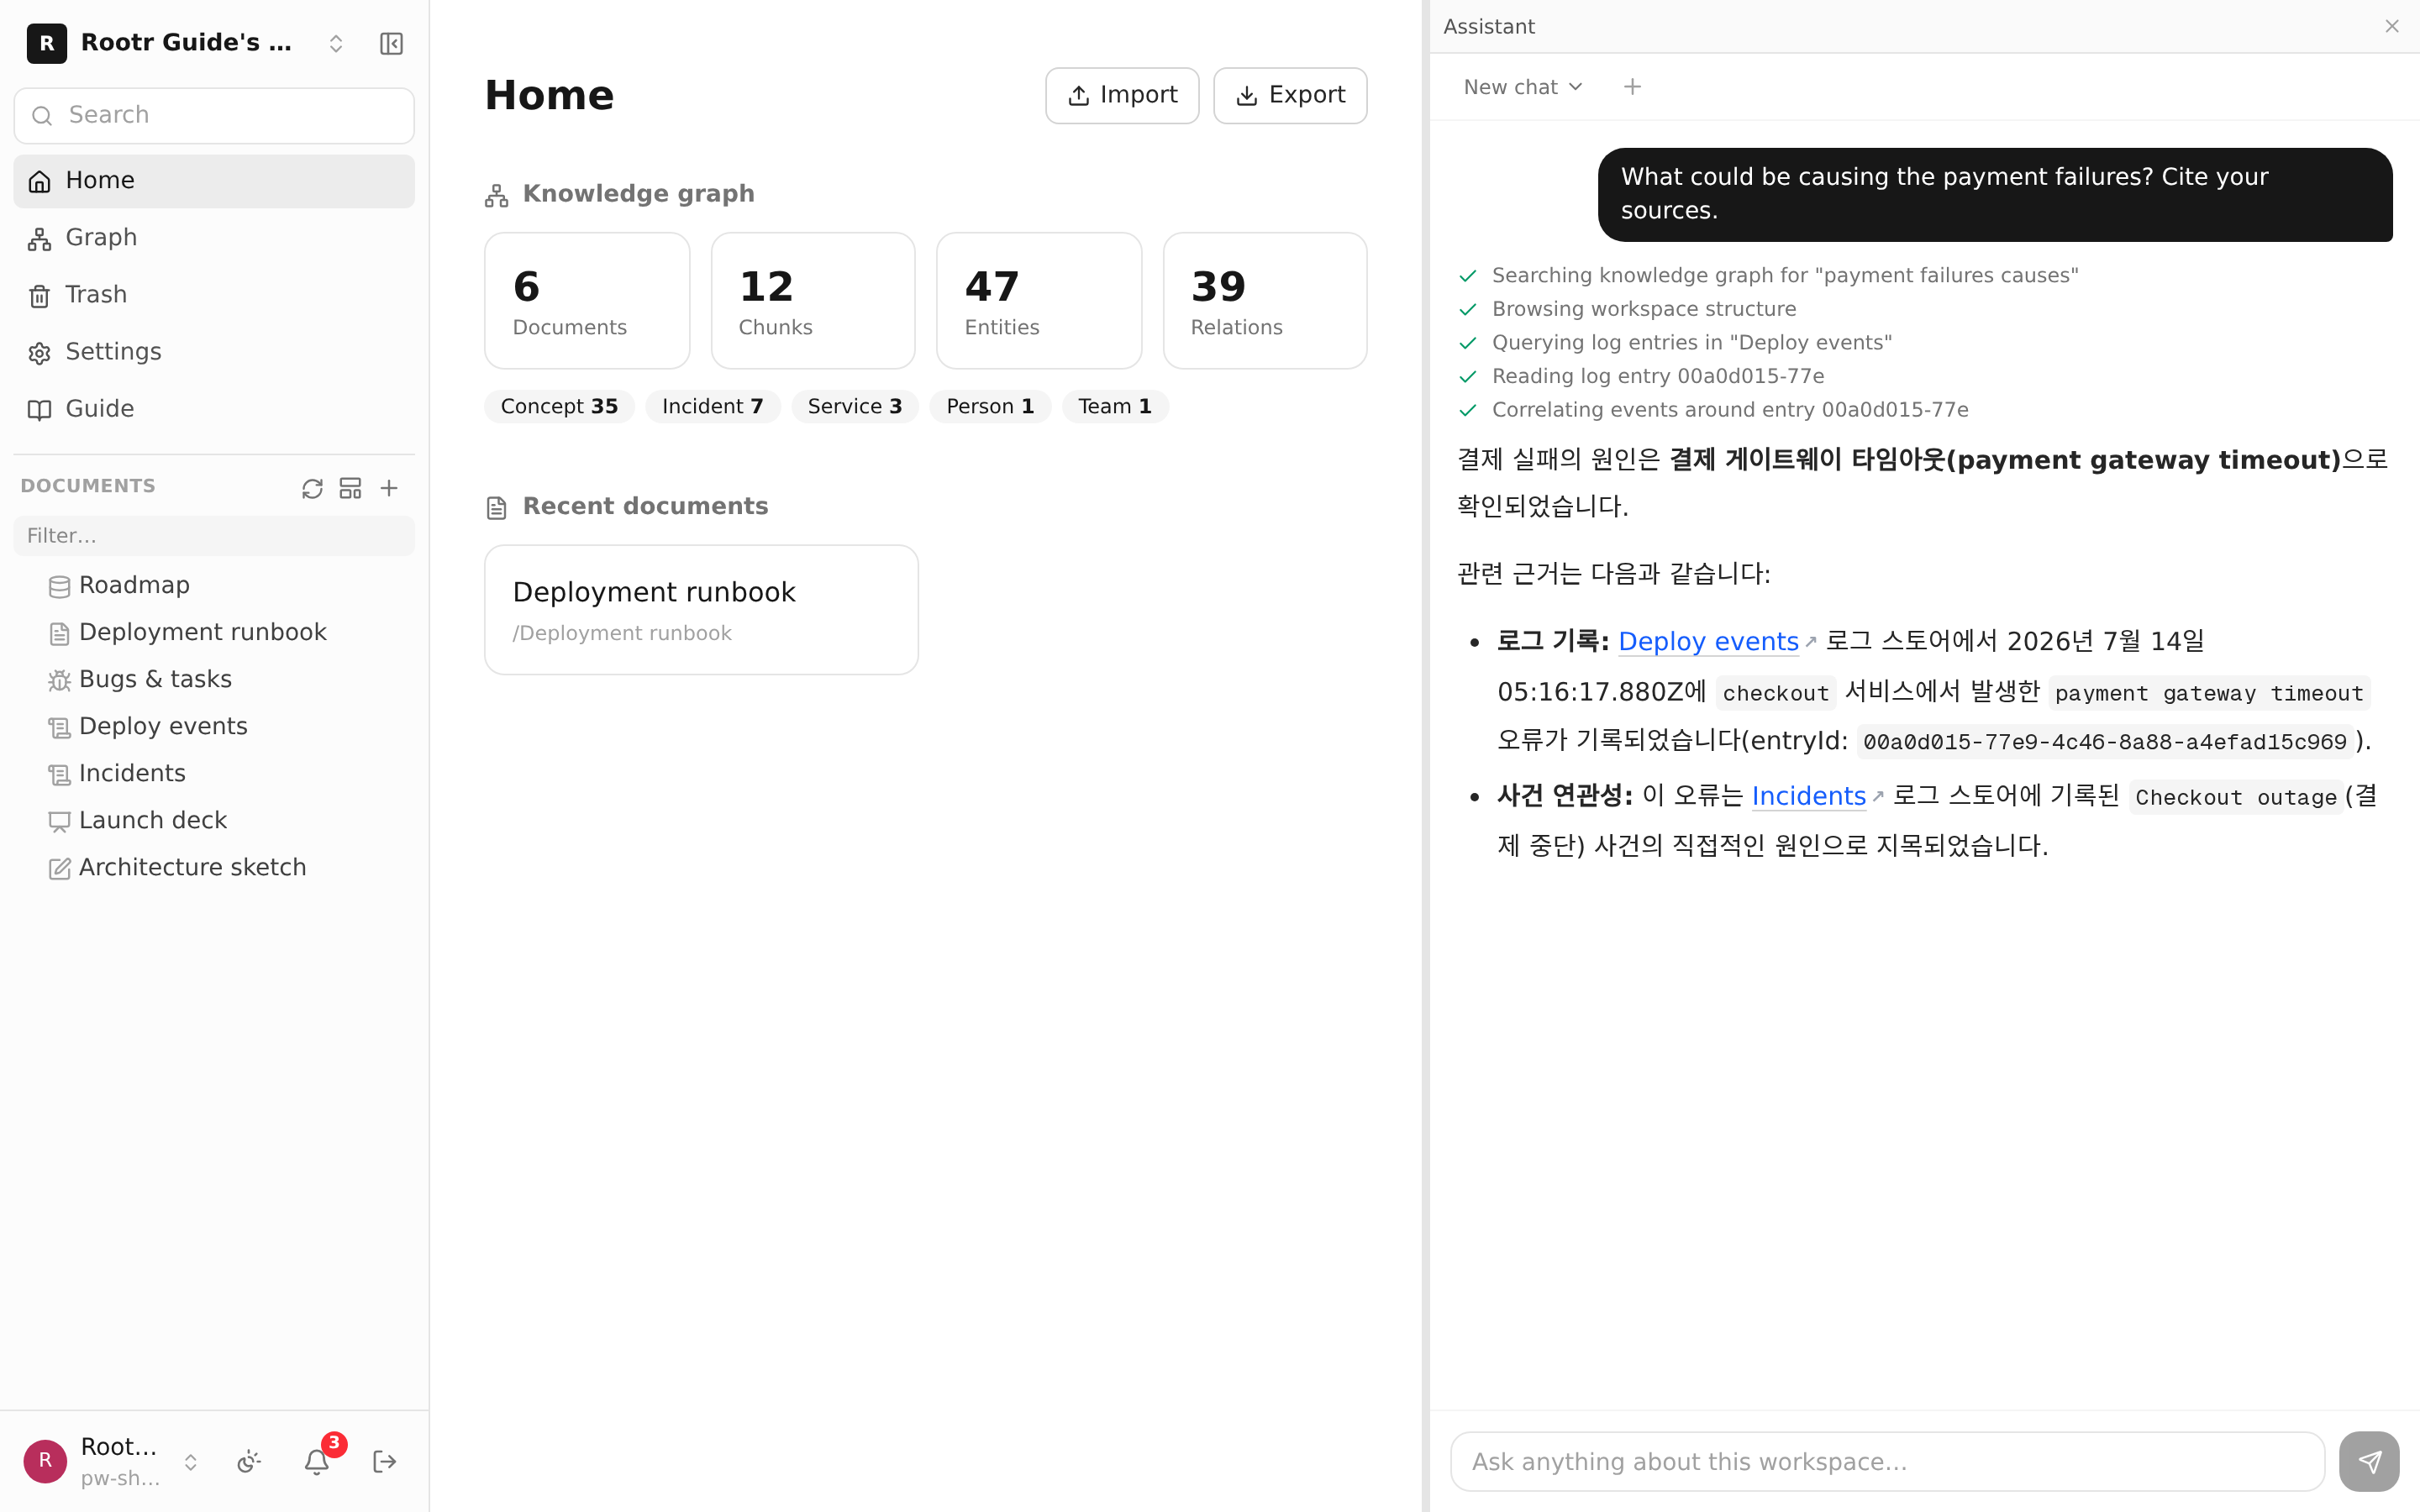
The Ask panel showing an answer to a natural-language question with evidence (sources) attached.
Giving the AI a memory
An AI forgets everything when the conversation ends. You end up re-explaining the same things, and what your colleague's AI learned the hard way, yours repeats. Rootr's Memory keeps those facts in the workspace — tell it once and it survives into the next conversation, and into your teammates' AI too.
- Everyone shares it: memories belong to the whole workspace. Keep personal notes in the AI's own memory and put only what the team should know here.
- Who reads it: memories are read and written by AI agents connected over MCP (set it up from "Set up MCP" on the Memory screen). The in-app chat does not use them.
- How to save: just tell the AI "remember this". One line is enough — a team convention, why something was decided, a trap you hit once.
- How to see it: the "Memory" item in the left menu lists what has piled up — fix anything wrong in place, or retire what stopped being true. "Open as table" is the bigger road for when you need permissions or version history.
- It tells you when it goes stale: if the document a memory points at changes, that memory gets a "needs checking" mark. It does not mean the memory is wrong — it means look at it once.
One rule of thumb — write long things as documents and leave only a line in memory. Push whole stories into memory and it becomes a pile of short documents, useful for nothing. A document makes you understand; a memory keeps you from repeating a mistake.
⑧Data records and lineage (LOG)
Pile up records of numbers and events, and "where this result came from" is connected automatically, like a picture.
What is a LOG (data logbook)?
A LOG is a special table that holds records piling up over time. What sets it apart from an ordinary table is that you set "the format of each column" before you put anything in — this column is text, this one is a number, this one is a severity (info/warning/error), this one is a timestamp, and so on. It then filters out odd values that come in and automatically flags values that differ greatly from the norm (outliers). It is great for recording things like server response times, incident events, or job-processing counts.
What is "lineage"?
Lineage (data lineage) is the connection of "where this data came from, and what came from it here." Picture a family tree and it becomes easy. When you use a "relation"-format column in a LOG, one record points to another, and the moment it does, a lineage line is drawn automatically between the two. That way you can later trace, as a picture, "what earlier event was the cause of this incident?"
Link records with a "relation" column and the lineage runs automatically from the causing event to the final result.
- How to put data in: it supports on-screen entry, file upload (CSV/Excel), and even real-time sending from a program or sensor.
- Automatic connection: put a value in a relation column and a lineage line appears on its own. There is nothing to manage separately.
- Statistics: you can see summaries like count, average, and maximum, by time and by item.
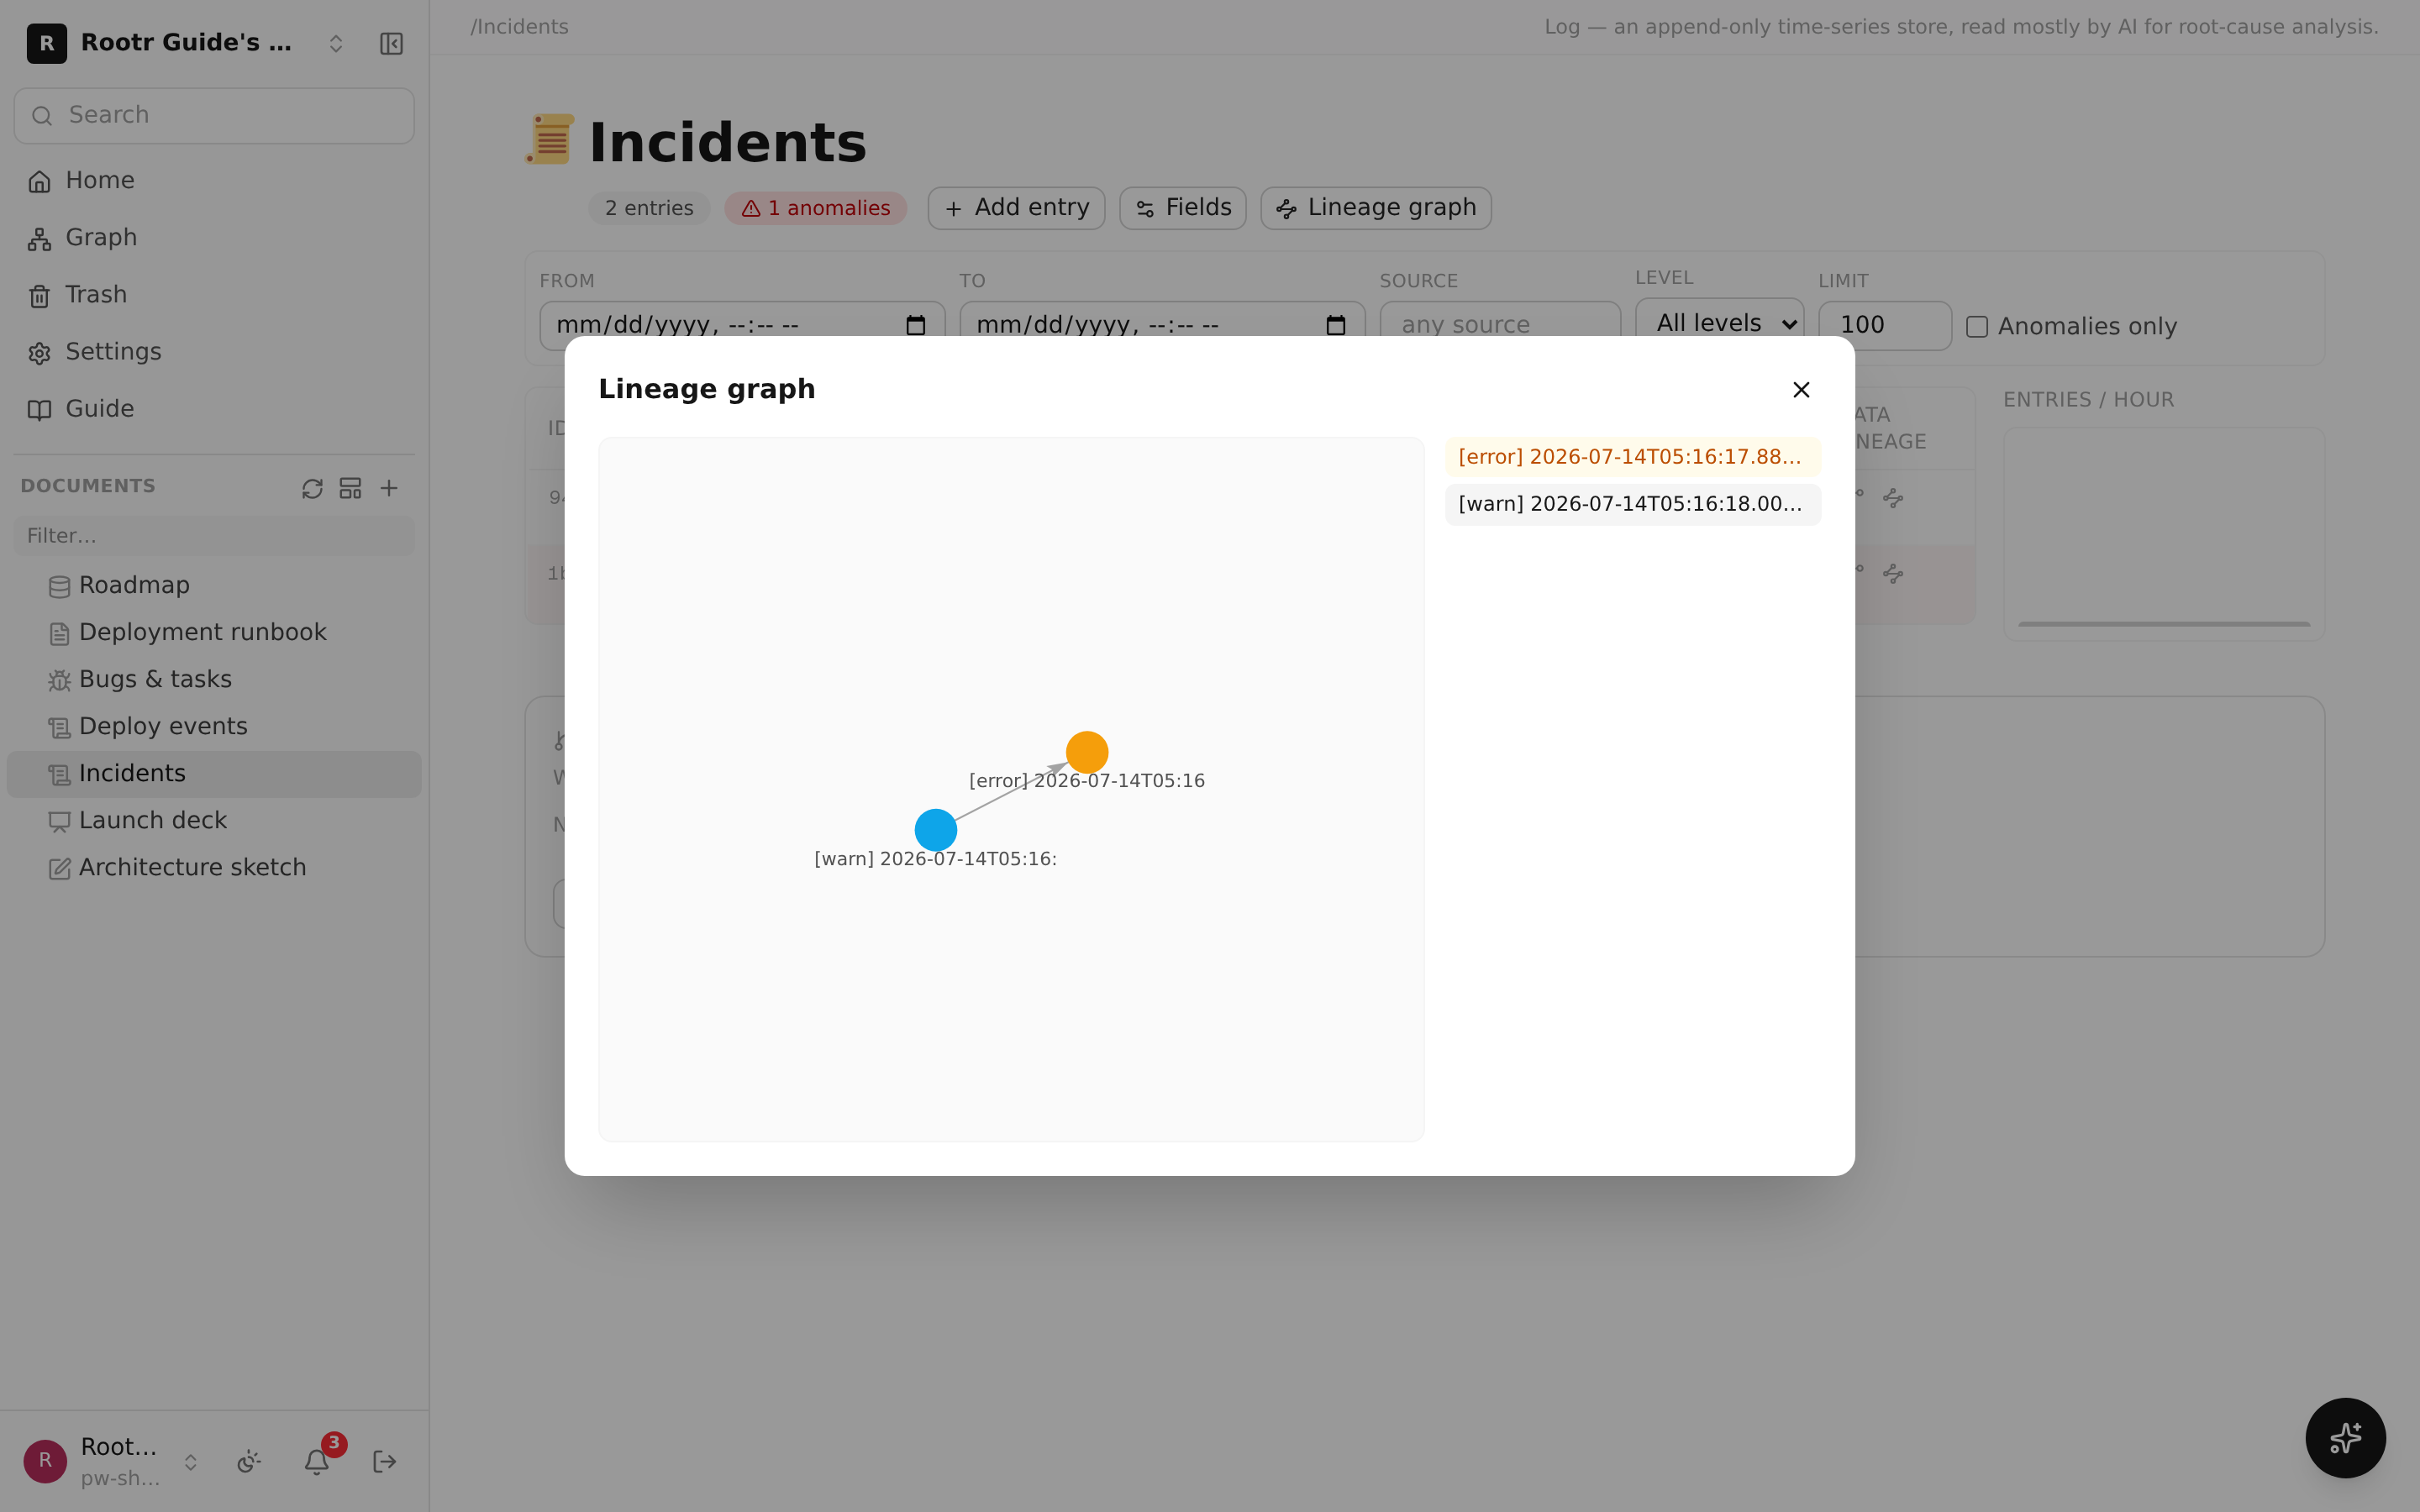
A data-lineage graph created by a LOG's relation columns. Arrows run from one record to another.
Automation & admin
⑨Automation (change notifications · CLI · issues)
You can make the next task roll forward automatically whenever something changes.
What is a webhook (change notification)?
A webhook is a feature that "automatically tells another program you have designated whenever something happens in Rootr." For example, "when a document in this folder changes, send a notification to our team chat." It lets things react to change without a person constantly watching.
- Narrowing the scope: instead of the whole workspace, you can limit it to a specific folder or document, or filter by tag (label) so you are only notified about what you want (a parent folder's tags apply inside it too).
- What changed: it is categorized as document / comment / system, and it sends only "the part that changed (the diff)" rather than the entire content, which is safer.
- Signing key: a key that verifies the notification really came from Rootr is issued once, at creation time. Store it on your receiving server.
The issue tracker also updates the screen in real time (SSE) and can connect to outside systems in both directions. If you set the CLI/AI connections you learned earlier to run automatically at set times, you can build automatic flows too, like "when a document changes → the AI appends a summary."
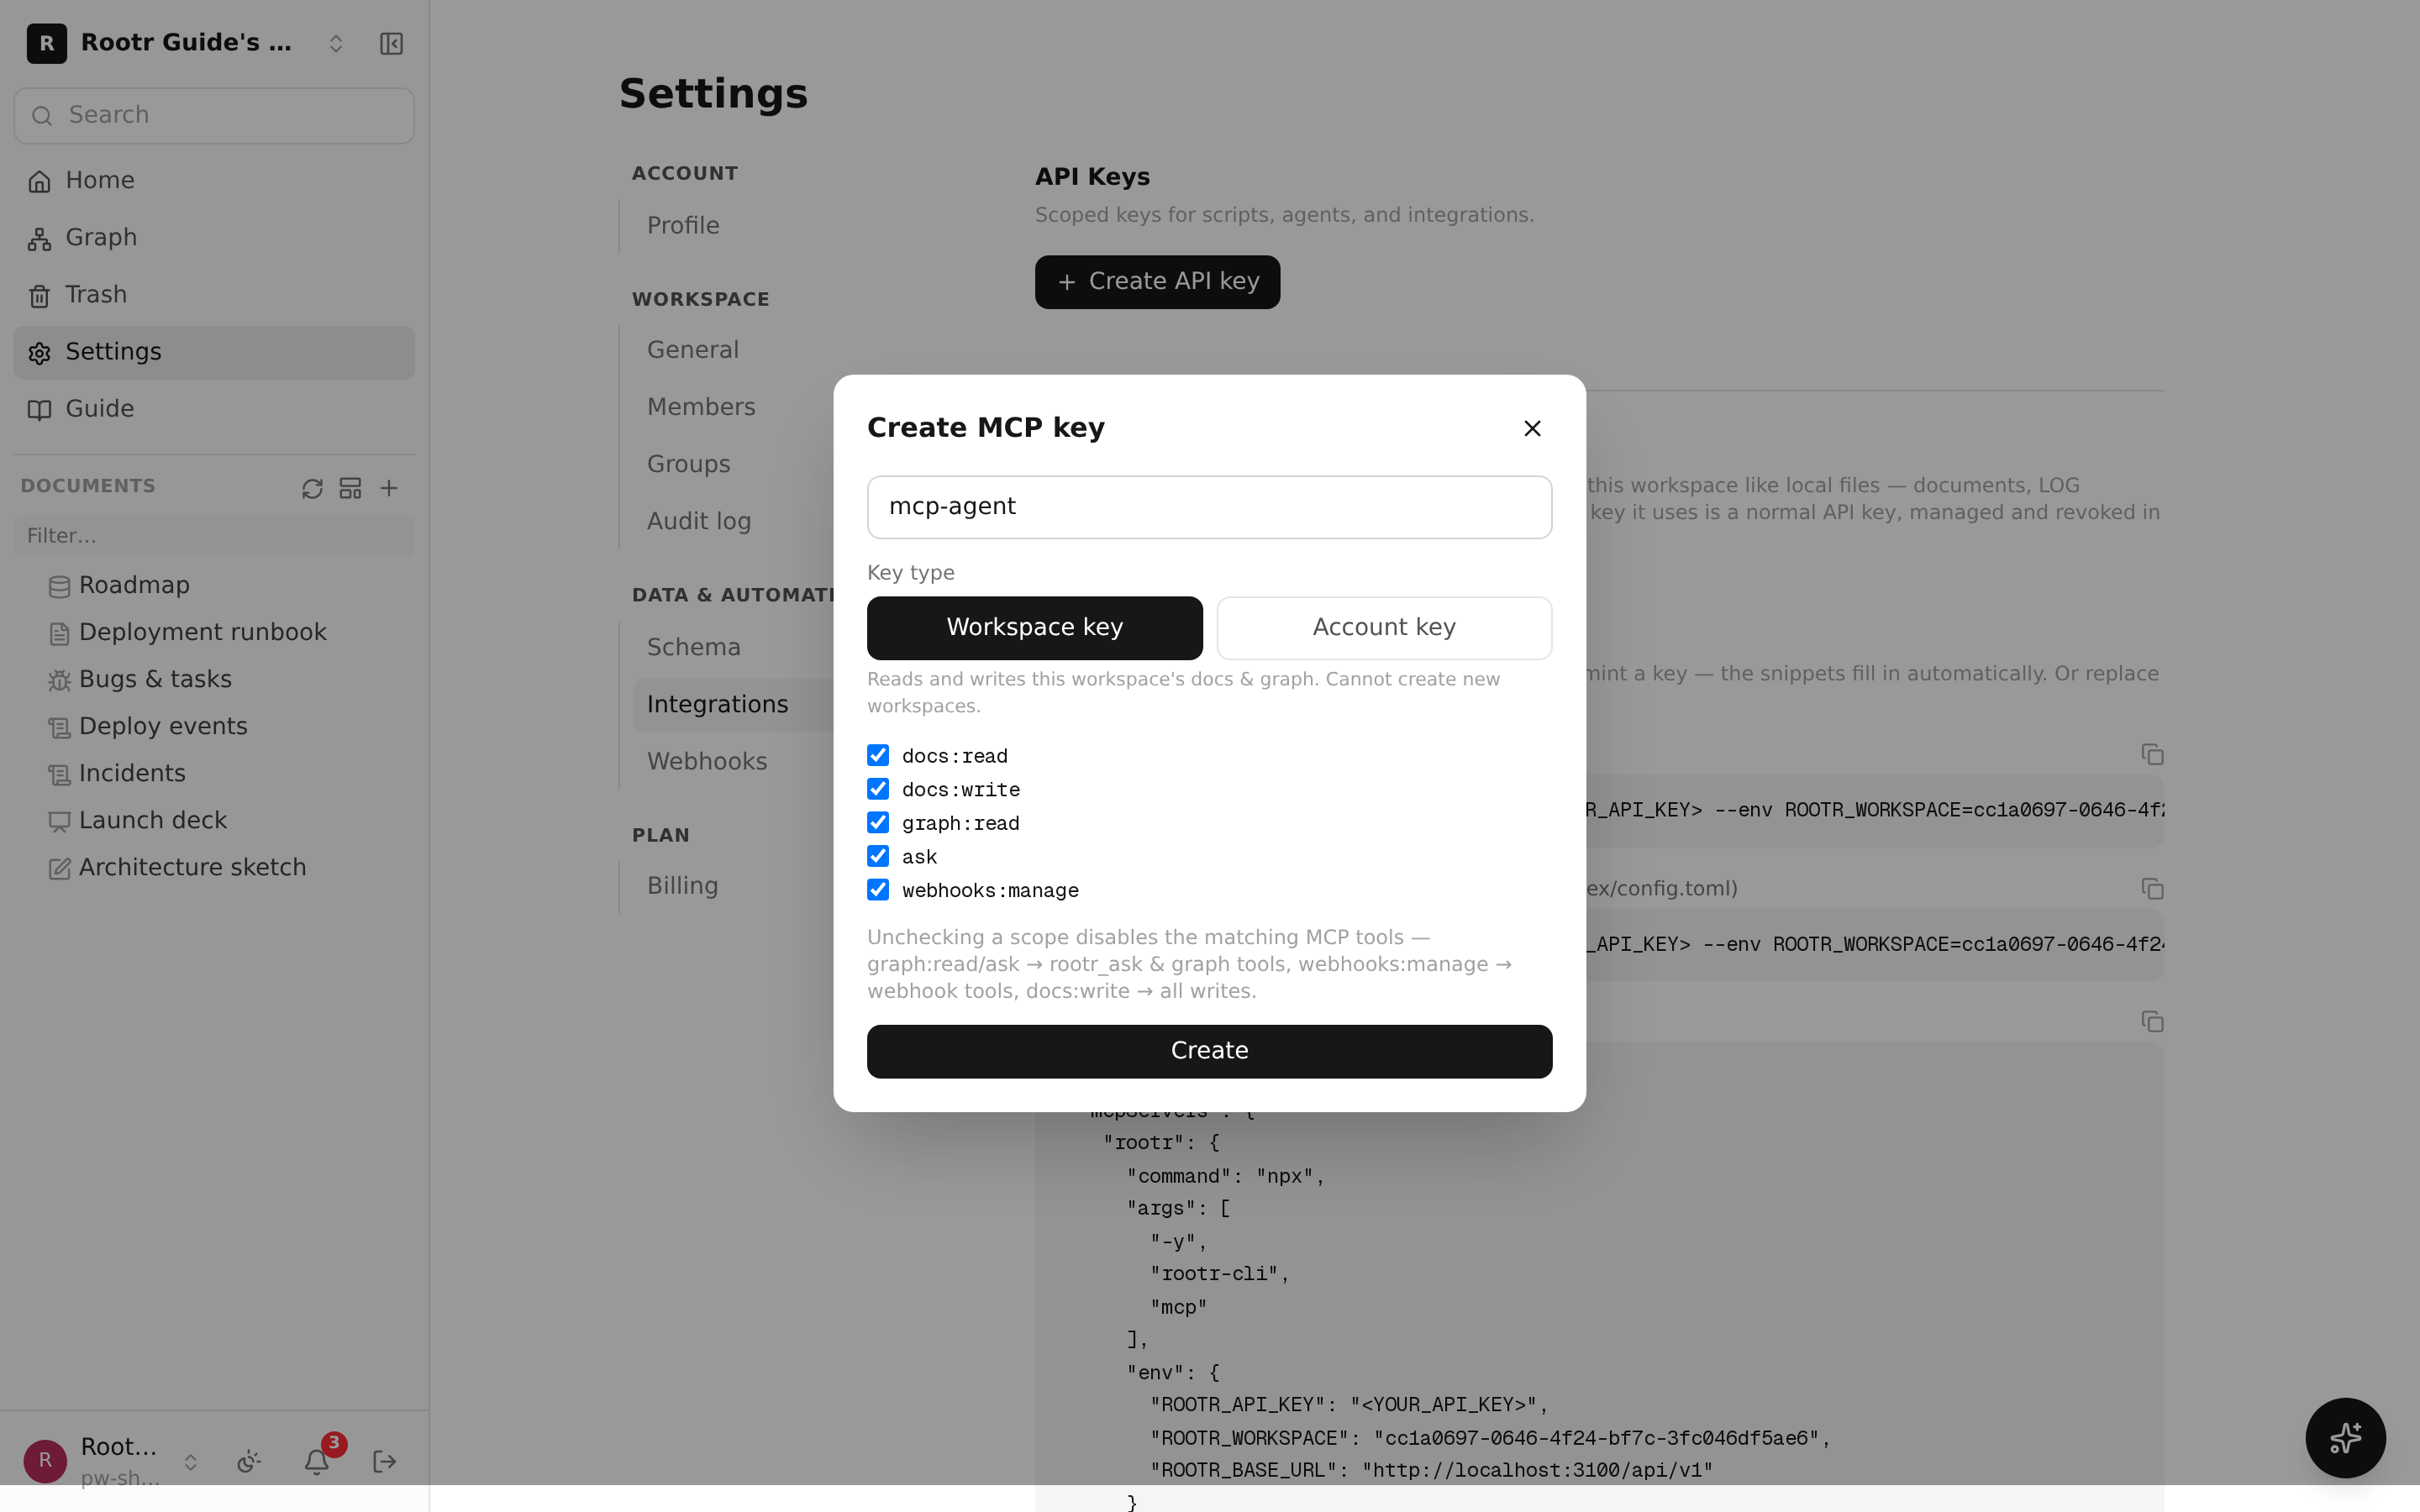
The webhook (change notification) creation screen. You choose the scope, tag filter, and the events to send.
⑩Account · workspaces · plans
Move between several accounts, raise your plan to match your team's size, and bring in your existing material.
- Using several accounts at once: like a company account and a personal account, you can be logged in to several accounts together and switch between them with a click.
- Plans: a mix of number of people (seats) · storage space · AI usage. AI features can be used up to a set amount of "graph credits" per plan. Check the exact prices and what is included on the Plans page. You can start free for up to 3 people.
- Import: you can bring documents that were elsewhere into a workspace. Notion (an exported ZIP or an integration token) and Confluence Cloud (site address, account email, API token) are supported, and the folder structure, attachments, and links between documents all come across. The token is used for that one import and is never stored.
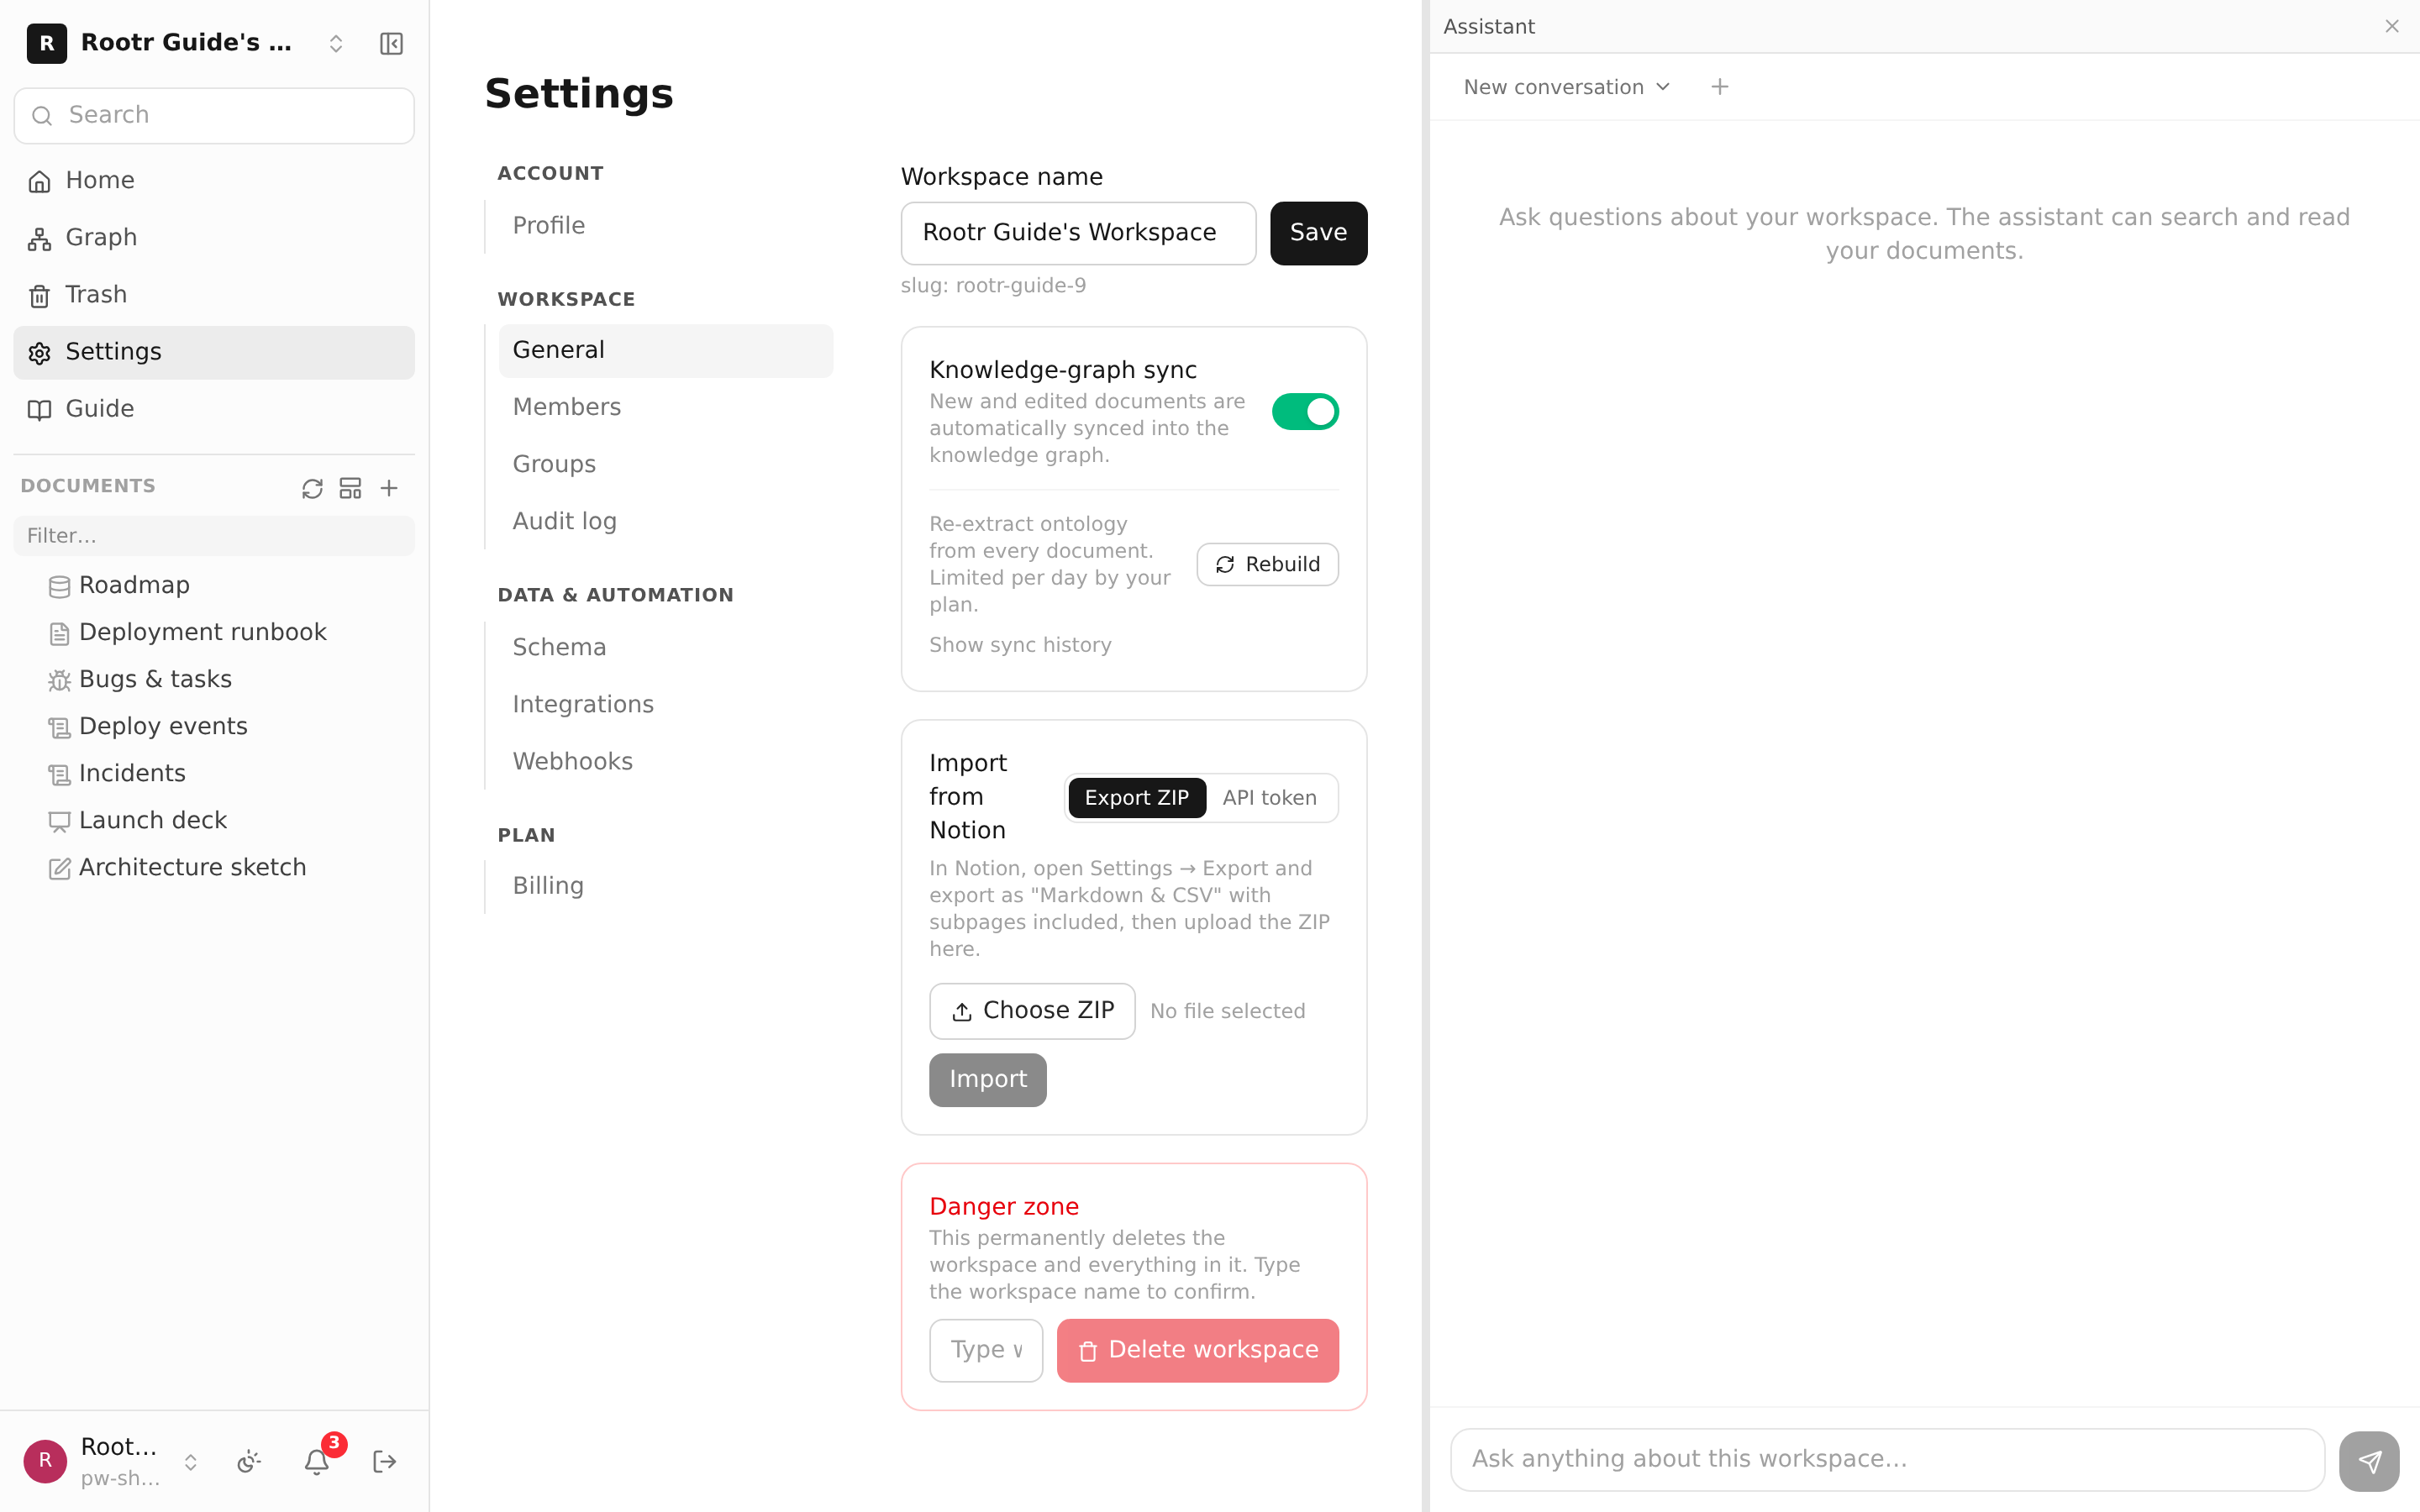
The settings screen for account switching, plans, and import.
⑪Reference (detailed material for developers)
The exact specification you need for connecting by program, and the error guide to look at when you get stuck.
This is a collection of reference material for people building their own programs. If you only use Rootr through the screen, you can skip this chapter.
- Full REST API specification: a document listing every request you can make in a machine-readable format —
/api/api-docs-json. - GraphQL schema: the full structure of another way to query —
/api/graphql/sdl. - Details of the 152 AI tools: the manual (README) for
rootr-clidescribes in detail what each tool does.
Common errors and how to fix them
| Number | Meaning | Do this |
|---|---|---|
| 401 / 403 | The key is missing, or permissions are insufficient | Check that the API key is correct and that the key has the permission (scope) it needs turned on |
| 409 | The sentence to "find and replace" is missing, or there are several so it is ambiguous | Specify the sentence to change more precisely (uniquely), or re-read the document and try again |
| 412 | The document changed while you were reading it | Re-read the document to bring it up to date, then try again |
When a connection does not work, it is usually solved in chapter ①'s "Keys and permissions." Check that first.
Telling us what is broken or awkward
If something is broken or gets in your way, send it from wherever you are. No login and no API key are needed — it goes through even when your key is wrong. It never counts against your usage limit and spends no credits.
# From the command line
rootr feedback "The attach button on a published form does nothing" --kind bug --email me@example.com
# From a program (works with no key)
curl -X POST https://rootr.io/api/v1/feedback -H 'Content-Type: application/json' \
-d '{"body":"What you were doing, and what happened instead","kind":"BUG"}'
If you use Rootr through an AI agent you do not have to ask it to do this — connected agents are already told to report problems on their own, so when a tool behaves differently from its description or forces a workaround, the agent sends a report itself (rootr_send_feedback). Pick a kind — bug, friction, idea or praise — and identical reports sent within 10 minutes are merged into one.