BrowserStack
官方將 BrowserStack 測試平台的完整功能帶入您的 AI 工具,讓團隊中的每位開發者和測試人員都能更快速、更輕鬆地進行測試。
你可以用 BrowserStack MCP 做什麼?
- 在真实裝置上手動測試應用程式 — 要求在某個特定裝置(如 iPhone 15 Pro Max)上開啟你的應用程式,或透過
runAppLiveSession偵錯 Android 14 上的當機問題。 - 跨瀏覽器網站測試 — 在任何瀏覽器/作業系統組合上為本機或公開網站啟動即時工作階段,例如「在最新版 Chrome 上開啟 browserstack.com」,使用
runBrowserLiveSession。 - 自動化測試執行與偵錯 — 在 BrowserStack 基礎架構上執行 Selenium、Playwright 或 Appium 測試套件,然後透過
getFailureLogs和fetchRCA取得失敗日誌與根本原因分析。 - 測試案例與執行管理 — 建立專案、資料夾、測試案例與測試執行,然後使用自然語言透過
createTestCase和addTestResult更新結果。 - 無障礙掃描與 AI 修正建議 — 掃描本機或正式環境網站以找出 WCAG 問題,並透過
startAccessibilityScan和fetchAccessibilityIssues取得建議修正。 - AI 驅動的測試生成與自我修復 — 從 PRD 生成測試案例、將手動測試轉換為低程式碼自動化,並使用
createLCASteps和fetchSelfHealedSelectors修復不穩定的選擇器。
文件
BrowserStack MCP Server



Comprehensive Test Platform
管理測試案例、執行手動或自動化測試、除錯問題,甚至直接修復程式碼——全部可在 Cursor、Claude 或任何支援 MCP 的用戶端中,使用純英文完成。
從任何地方進行測試:
輕鬆將 BrowserStack 測試平台連接到您喜愛的 AI 工具,例如 IDE、LLM 或代理型工作流程。
使用自然語言進行測試:
使用純英文提示詞管理、執行、除錯測試,甚至修復程式碼。
減少上下文切換:
保持專注——將所有專案上下文集中在一處,直接從您的 IDE 或 LLM 觸發操作。
⚡️ 一鍵 MCP 設定
點擊下方按鈕,在您對應的 IDE 中安裝 MCP:


注意: 託管的遠端 MCP 伺服器(
mcp.browserstack.com)現在已完全無狀態,並透過 Streamable HTTP 運作——任何 Streamable-HTTP 用戶端(Claude、Cursor、VS Code、ChatGPT)皆可直接連線,無需任何設定變更。
注意:請確保您使用的 Node 版本 >= 18.0
- 使用
node --version檢查您的 Node 版本。建議版本:v22.15.0(LTS) - 升級 Node 的方法:
-
- 在 macOS 上
(Homebrew) - brew update && brew upgrade node or if using (nvm) - nvm install 22.15.0 && nvm use 22.15.0 && nvm alias default 22.15.0
- 在 macOS 上
-
- 在 Windows 上
(nvm-windows) : nvm install 22.15.0 && nvm use 22.15.0
- 在 Windows 上
- 👉 或直接下載 Node.js LTS 安裝程式
.
💡 使用範例
📱 手動應用程式測試
在最新作業系統版本的真實裝置上測試行動應用程式。無需繁瑣設定即可重現錯誤並除錯崩潰問題。 以下是一些範例提示詞,供您在 BrowserStack 龐大的真實裝置雲端上使用您的行動應用程式:
# Open app on specific device
"open my app on a iPhone 15 Pro Max"

# Debug app crashes
"My app crashed on Android 14 device, can you help me debug?"
- 與模擬器不同,您可以在真實裝置上測試應用程式的實際效能。透過進階的 App-Profiling 功能,您可以即時除錯崩潰和效能問題。
- 從我們的 裝置矩陣 存取所有主要裝置和作業系統版本。我們有嚴格的 SLA,確保在 上市當天 於全球資料中心提供最新發佈的裝置。
🌐 手動網頁測試
與應用程式測試類似,您可以使用以下提示詞在 BrowserStack 龐大的真實瀏覽器和裝置雲端上測試您的網站。您的電腦上沒有安裝 Edge 瀏覽器嗎?我們已經為您準備好了!
# Test your websites
"open my website hosted on localhost:3001 on Edge"
"open browserstack.com on latest version of Chrome"
- 在不同瀏覽器和裝置上測試網站。我們支援每個主要瀏覽器,涵蓋每個主要作業系統。
- 無縫測試您本機電腦上託管的網站,無需部署到遠端伺服器!
🧪 自動化測試(Playwright、Selenium、A11y 等)
直接在您的 IDE 或 LLM 中自動分析、診斷,甚至修復損壞的測試腳本。立即取得日誌、識別根本原因,並套用具上下文感知的修復。不再需要反覆除錯。 以下是一些範例提示詞,用於在 BrowserStack 的測試平台上執行/除錯/修復您的自動化測試。
注意: 當取得測試的根本原因分析(RCA)時,伺服器僅將建議的修復作為提案回傳。它絕不會自動套用程式碼變更——您的助理必須呈現建議,並在編輯任何檔案前等待您的明確核准。
#Port test suite to BrowserStack
"Setup test suite to run on BrowserStack infra"

#Run tests on BrowserStack
“Run my tests on BrowserStack”

#AI powered debugging of test failures
"My App Automate tests have failed, can you help me fix the new failures?"
- 利用我們業界領先的測試可觀測性功能,修復您的 CI/CD 管線回報的測試失敗。更多資訊請參閱此處。
- 在 BrowserStack 的測試平台上執行以 Jest、Playwright、Selenium 等撰寫的測試。
🌐 無障礙性
透過自動化的本機 a11y 掃描,及早發現無障礙問題。取得一鍵式、AI 建議的修復方案。無需翻閱文件,無需 CI 意外。使用我們的無障礙測試工具確保符合 WCAG 和 ADA 規範。
#Scan accessibility issues while development
"Scan & help fix accessibility issues for my website running locally on localhost:3000"

#Scan accessibility issues on production site
“Run accessibility scan & identify issues on my website - www.bstackdemo.com”
📋 測試管理
使用自然語言建立和管理測試案例、建立測試計畫並觸發測試執行。以下是一些範例提示詞,用於透過 MCP 伺服器運用 BrowserStack 的測試管理功能。
# Create project & folder structure
"create new Test management project named My Demo Project with two sub folders - Login & Checkout"

# Add test cases
"add invalid login test case in Test Management project named My Demo Project"

# List added test cases
"list high priority Login test cases from Test Management project - My Demo Project"

# Create test run
"create a test run for Login tests from Test Management project - My Demo Project"

# Update test results
"update test results as passed for Login tests test run from My Demo Project"
🧪 存取 BrowserStack AI 代理
從 PRD 產生測試案例、將手動測試轉換為低程式碼自動化,並自動修復不穩定的腳本——這一切均由 BrowserStack 的 AI 代理驅動,並無縫整合到您的工作流程中。以下是一些範例提示詞,用於存取 BrowserStack AI 代理:
#Test case generator agent
"With Browserstack AI, create relevant test cases for my PRD located at /usr/file/location"


#Low code authoring agent
“With Browserstack AI, automate my manual test case X, added in Test Management”


#Self healing agent
“Help fix flaky tests in my test script with Browserstack AI self healing”
🛠️ 安裝
📋 MCP 設定的先決條件
注意:請確保您使用的 Node 版本 >= 18.0
- 使用
node --version檢查您的 Node 版本。建議版本:v22.15.0(LTS)
一鍵 MCP 設定
點擊下方按鈕,在您對應的 IDE 中安裝 MCP:
設定 MCP 伺服器的替代方式
-
建立 BrowserStack 帳戶
-
如果您還沒有帳戶,請註冊 BrowserStack。
-
ℹ️ 如果您有開源專案,我們可以為您提供免費方案。
-
擁有帳戶(並購買了適當的方案)後,請從帳戶設定記下您的
username和access_key。
-
-
注意:請確保您使用的 Node 版本 >=
18.0- 使用
node --version檢查您的 Node 版本。建議版本:v22.15.0(LTS)
- 使用
-
安裝 MCP 伺服器
-
VSCode(Copilot - Agent 模式):
.vscode/mcp.json:-
尋找或建立設定檔: 在您專案的根目錄中,尋找名為 .vscode 的資料夾。此資料夾通常為隱藏狀態,因此您需要依照展開說明尋找它。
-
如果此資料夾不存在,請建立它。
-
在 .vscode 資料夾內,建立一個名為 mcp.json 的新檔案。
-
新增設定:開啟 mcp.json 檔案,然後新增以下 JSON 內容。
-
將 username 和 <access_key> 替換為您的 BrowserStack 憑證。
-
{ "servers": { "browserstack": { "command": "npx", "args": ["-y", "@browserstack/mcp-server@latest"], "env": { "BROWSERSTACK_USERNAME": "<username>", "BROWSERSTACK_ACCESS_KEY": "<access_key>" } } } }- 在 VSCode 中,請務必點擊 MCP 伺服器中的
Start按鈕來啟動伺服器。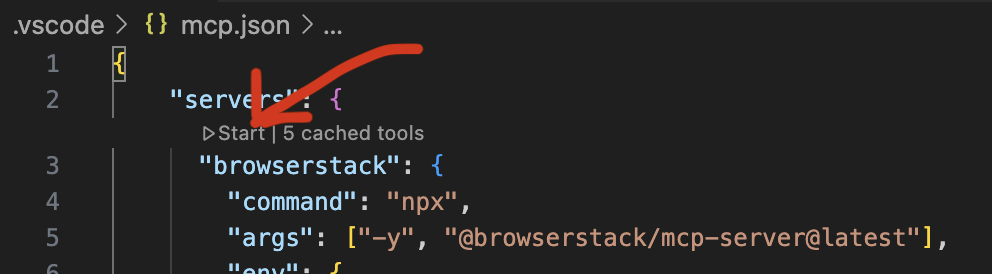
**在 VSCode Copilot 上設定 MCP 的替代方式
- 點擊齒輪圖示以選擇工具
2. 工具選單會出現在頂部中央,向下捲動選單頂部,然後點擊「新增 MCP 伺服器」 3. 選擇 NPM 套件選項(從 NPM 套件安裝)——清單中的第 3 個
 4. 輸入 NPM 套件名稱(@browserstack/mcp-server)
 5. 輸入 BrowserStack 使用者名稱和存取金鑰
- 對於 Cursor:
.cursor/mcp.json:
{ "mcpServers": { "browserstack": { "command": "npx", "args": ["-y", "@browserstack/mcp-server@latest"], "env": { "BROWSERSTACK_USERNAME": "<username>", "BROWSERSTACK_ACCESS_KEY": "<access_key>" } } } }- Claude Desktop:
~/claude_desktop_config.json:
{ "mcpServers": { "browserstack": { "command": "npx", "args": ["-y", "@browserstack/mcp-server@latest"], "env": { "BROWSERSTACK_USERNAME": "<username>", "BROWSERSTACK_ACCESS_KEY": "<access_key>" } } } }- Cline
-
點擊導覽列中的「MCP 伺服器」圖示 選擇「已安裝」標籤。點擊面板底部的「設定 MCP 伺服器」按鈕。
{
  "mcpServers": {
    "browserstack": {
      "command": "npx",
      "args": ["-y", "@browserstack/mcp-server@latest"],
      "env": {
        "BROWSERSTACK_USERNAME": "<username>",
        "BROWSERSTACK_ACCESS_KEY": "<access_key>"
      }
    }
  }
}
檔案與應用程式上傳: 上傳本機檔案/應用程式的工具(
uploadProductRequirementFile、takeAppScreenshot、runAppTestsOnBrowserStack、runAppLiveSession)需要將MCP_UPLOAD_BASE_DIR環境變數設定為包含這些檔案的目錄;上傳僅限於該目錄。
💡 BrowserStack MCP 工具清單
截至目前,我們支援 46 個工具。
遠端 MCP 注意事項: 標記為 (在遠端 MCP 中不可用) 的工具依賴本機檔案/程序狀態,因此在多租戶遠端 MCP 伺服器中已停用。它們可在本機(npx)設定中使用。
🧾 測試管理
createProjectOrFolder— 建立測試管理專案和/或資料夾以組織測試案例。回傳資料夾 ID、專案 ID 和測試管理連結,用於存取 TM 專案儀表板。 提示詞範例
Create a new Test Management project named 'Shopping App' with two folders - Login and Checkout
createTestCase— 在特定專案/資料夾下新增手動測試案例(使用專案識別碼,如 PR-xxxxx 和資料夾 ID)。 提示詞範例
Add a test case named 'Invalid Login Scenario' to the Login folder in the 'Shopping App' project with PR-53617, Folder ID: 117869
updateTestCase— 更新現有的測試案例。可以變更任何欄位子集(名稱、優先順序、狀態、步驟、標籤等);僅修改提供的欄位。 提示詞範例
Update test case TC-482 in the 'Shopping App' project and set its priority to high
listTestCases— 列出專案的測試案例,可選擇限定在特定資料夾內(支援 case_type、priority 等篩選條件和分頁)。 提示詞範例
List all high-priority test cases in the 'Shopping App' project with project_identifier: PR-59457
listFolders— 列出測試管理專案中的資料夾(回傳每個資料夾的 ID、名稱、案例數和子資料夾數)。傳入 parent_id 以列出子資料夾。 提示詞範例
List all folders in the 'Shopping App' project with project_identifier: PR-59457
listTestCaseTemplates— 列出測試案例範本及其數值 template_id,用於搭配createTestCase套用自訂範本。 提示詞範例
List the available test case templates in the 'Shopping App' project
createTestRun— 為專案中選定的測試案例建立測試執行(套件)。 提示詞範例
Create a test run for the Login folder in the 'Shopping App' project and name it 'Release v1.0 Login Flow'
listTestRuns— 列出專案的測試執行(依日期、指派對象、狀態篩選)。 提示詞範例
List all test runs from the 'Shopping App' project that were executed last week and are currently marked in-progress
updateTestRun— 更新測試執行的名稱/狀態和/或向其新增測試案例。 提示詞範例
Update test run ID 1043 in the 'Shopping App' project and mark it as complete with the note 'Regression cycle done'
addTestResult— 在執行中為測試案例新增手動執行結果(通過/失敗/封鎖/跳過)。 提示詞範例
Mark the test case 'Invalid Login Scenario' as passed in test run ID 1043 of the 'Shopping App' project
createTestCasesFromFile— 使用測試案例產生器 AI 代理從上傳的檔案批次產生測試案例。 (在遠端 MCP 中不可用) 提示詞範例
Upload test cases from '/Users/xyz/testcases.pdf' to the 'Shopping App' project in Test Management
listTestPlans— 列出專案中的測試計畫(TP-*),包含名稱、狀態、日期以及進行中/已關閉的執行數。支援分頁。 提示詞範例
List all test plans in the 'Shopping App' project with project_identifier: PR-59457
getTestPlan— 依識別碼(TP-*)取得測試計畫,包含其中繼資料、關聯的測試執行、總測試案例數和狀態摘要。 提示詞範例
Get the details of test plan TP-120 in the 'Shopping App' project
listSubTestPlans— 列出父測試計畫(TP-)下的子測試計畫(STP-)。支援分頁。 提示詞範例
List sub-test-plans under test plan TP-120 in the 'Shopping App' project
getSubTestPlan— 取得父計畫下的子測試計畫(STP-*),包含其中繼資料和關聯的測試執行。 提示詞範例
Get sub-test-plan STP-45 under test plan TP-120 in the 'Shopping App' project
⚙️ BrowserStack SDK 設定 / 自動化測試
setupBrowserStackAutomateTests— 整合 BrowserStack SDK 並在 BrowserStack 上執行網頁測試。如需視覺測試/Percy,請使用專用的 Percy 工具。 提示詞範例
Run my Selenium-JUnit5 tests written in Java on Chrome and Firefox.
fetchAutomationScreenshots— 取得指定 Automate/App Automate 工作階段期間擷取的螢幕截圖。 提示詞範例
Get screenshots from Automate session ID abc123xyz for my desktop test run
listSessions— 列出 Automate/App Automate 建置中的工作階段。每筆記錄包含sessionId、name、status、os、osVersion、browser、device、browserUrl(儀表板連結)和videoUrl,並提供可選的limit/offset分頁和用戶端status篩選。接受儀表板 URL 中的雜湊建置 ID,或getBuildId/listBuildId回傳的可觀測性建置 ID——可觀測性 ID 會透過建置的工作階段自動解析為雜湊 ID。回傳的sessionId值可與getFailureLogs、fetchAutomationScreenshots和fetchSelfHealedSelectors搭配使用。 提示詞範例
List sessions for Automate hashed build ID <hashed build id>
🔍 可觀測性
getFailureLogs— 擷取 Automate/App Automate 工作階段的錯誤日誌。App Automate 日誌端點是以建置為範圍,因此需要雜湊後的建置 ID — 如果您有,請傳入;否則會自動從工作階段解析。 提示範例
Get the Appium logs for App Automate session ID <session id>
fetchBuildInsights— 透過結合建置詳細資料與品質門檻結果,取得 BrowserStack 建置的洞察資訊。包含hashed_id(listSessions接受的雜湊建置 ID)與session_type,當建置在 Automate / App Automate 上執行時,會透過該建置的工作階段解析。 提示範例
Get the build insights for build UUID <your-build-uuid> on BrowserStack
📱 App Live
runAppLiveSession— 在雲端真實裝置上啟動手動應用程式測試工作階段。 提示範例
Open my app on iPhone 15 Pro Max with iOS 17. App path is /Users/xyz/app.ipa
💻 Live
runBrowserLiveSession— 在桌上型或行動瀏覽器上啟動網站測試的 Live 工作階段。 提示範例
Open www.google.com on the latest version of Microsoft Edge on Windows 11
📲 App Automate
takeAppScreenshot— 在指定裝置上啟動應用程式,並擷取快速驗證截圖,以確認應用程式已成功啟動。 提示範例
Take a screenshot of my app on Google Pixel 6 with Android 12 while testing on App Automate. App file path: /Users/xyz/app-debug.apk
runAppTestsOnBrowserStack— 透過直接上傳已編譯的 .apk/.ipa 測試檔案,執行預先建置的原生行動測試套件(Espresso/XCUITest)。 提示範例
Run Espresso tests from /tests/checkout.zip on Galaxy S21 and Pixel 6 with Android 12. App path is /apps/beta-release.apk under project 'Checkout Flow'
setupBrowserStackAppAutomateTests— 為基於 Appium 的行動應用程式測試設定 BrowserStack App Automate SDK 整合。 提示範例
Set up my Appium test suite to run on BrowserStack App Automate
♿ 無障礙
accessibilityExpert— 詢問 A11y 專家(WCAG 2.0/2.1/2.2、行動/網頁可用性、最佳實務)。 提示範例
What WCAG guidelines apply to form field error messages on mobile web?
startAccessibilityScan— 啟動網頁無障礙掃描,並擷取本機 CSV 報告路徑。 提示範例
Run accessibility scan for "www.example.com"
createAccessibilityAuthConfig— 為登入後的無障礙掃描建立驗證設定(表單式或基本驗證)。 提示範例
Create a basic-auth accessibility config named 'site-login' for https://www.example.com with username testuser and password <password>
getAccessibilityAuthConfig— 依 ID 擷取現有的無障礙驗證設定。 提示範例
Get accessibility auth config with ID <config-id>
fetchAccessibilityIssues— 從已完成的掃描中擷取無障礙問題,支援分頁。 提示範例
Fetch the accessibility issues for scan ID <scan-id> and scan run ID <scan-run-id>
🎨 Percy 視覺測試
percyVisualTestIntegrationAgent— 將 Percy 視覺測試整合到新專案中,並透過逐步模擬示範視覺變更偵測。 提示範例
Integrate Percy for this project
expandPercyVisualTesting— 為現有專案設定或擴充 Percy 視覺測試涵蓋範圍(Percy Web Standalone 與 Percy Automate)。 提示範例
Expand Percy coverage for this project
addPercySnapshotCommands— 將 Percy 截圖指令新增至指定的測試檔案。(不適用於 Remote MCP) 提示範例
Add Percy snapshot commands to my Cypress test files
listTestFiles— 列出指定目錄集合的所有測試檔案。(不適用於 Remote MCP) 提示範例
List the test files under my ./tests directory
runPercyScan— 執行 Percy 視覺測試掃描。(不適用於 Remote MCP) 提示範例
Run this Percy build
fetchPercyChanges— 擷取並摘要 Percy AI 在最新與先前建置之間偵測到的視覺變更。 提示範例
Summarize the visual changes Percy detected in my latest build
managePercyBuildApproval— 核准或拒絕 Percy 建置。 提示範例
Approve the latest Percy build
🤖 BrowserStack AI 代理程式
uploadProductRequirementFile— 上傳 PRD/截圖/PDF 並取得檔案對應 ID(與createTestCasesFromFile搭配使用)。(不適用於 Remote MCP) 提示範例
Upload PRD from /Users/xyz/Desktop/login-flow.pdf and use BrowserStack AI to generate test cases
createLCASteps— 從 Test Management 中的手動測試案例產生 Low Code Automation(LCA)步驟。 提示範例
Convert the manual test case 'Add to Cart' in the 'Shopping App' project into LCA steps
fetchSelfHealedSelectors— 擷取 AI 自我修復的選取器(以及測試原始碼),以修復因 DOM 變更而導致的不穩定測試。 提示範例
Fetch and fix flaky test selectors in Automate session ID session_9482 using MCP
prepareSelfHealingPlan— 建立自我修復編輯計畫,將定位器配對與測試原始碼捆綁,供您的 LLM 套用。本身不會修改檔案。 提示範例
Prepare a self-healing plan from the self-healed selectors for my build
fetchRCA— 為失敗的 Automate/App-Automate 測試(依數值測試 ID)擷取 AI 根本原因分析。僅建議修正;絕不會自動套用。 提示範例
Fetch the root cause analysis for failed test IDs 101 and 102 on BrowserStack
getBuildId— 取得指定專案與建置名稱的 BrowserStack 建置 ID,範圍限定於您的建置。 提示範例
Get the build ID for build 'nightly-regression' in project 'Checkout Flow'
listBuildId— 取得專案與建置名稱的最新建置 ID,涵蓋所有使用者(無使用者篩選)。 提示範例
Get the latest build ID for build 'nightly-regression' in project 'Checkout Flow'
listTestIds— 列出 BrowserStack 建置(Automate 或 App Automate)中的測試,包含每個測試的status與session_id,可選擇依狀態(通過/失敗/待處理/略過)篩選。session_id直接提供給getFailureLogs與fetchAutomationScreenshots使用。 提示範例
List the failed test IDs from build UUID <your-build-uuid> on BrowserStack
askBrowserStackAI(Alpha,限量供應) — 以自然語言將多步驟任務交給 BrowserStack 的代理程式;它會決定要呼叫哪些功能,並回傳答案及其採取的步驟。涵蓋 Test Management 與 Test Reporting & Analytics。任何會變更資料的操作都會在您的用戶端中暫停等待確認;刪除操作則直接拒絕。需要帳戶已註冊 — 否則會回傳權限錯誤且不會執行任何操作。 提示範例
Find all payment test cases in project Shopping App and add the 'regression' tag to them
🚀 Remote MCP 伺服器
Remote MCP 具備 MCP 伺服器的所有功能,無需複雜的設定或本機安裝。
主要優點:
-
✅ 可在企業網路中順暢運作,無需擔心防火牆、二進位檔案或無法進行本機安裝的情況。
-
✅ 安全的 OAuth 整合 – 無需分享密碼或手動處理憑證。
限制:
- ❌ 不支援 Local Testing(無法測試位於 VPN、防火牆或 localhost 後方的應用程式)。如果您需要進行 Local Testing,則必須使用 BrowserStack Local MCP 伺服器。
- ❌ 延遲可能略高,但差異不大 — 在正常使用中通常不會注意到。
安裝步驟:
-
在 VSCode(Copilot - Agent Mode)中:
.vscode/mcp.json:-
尋找或建立設定檔:
-
在專案的根目錄中,尋找名為 .vscode 的資料夾。此資料夾通常為隱藏狀態,因此您需要依照展開說明中的方式尋找。
-
如果此資料夾不存在,請建立它。
-
在 .vscode 資料夾內,建立名為 mcp.json 的新檔案。
-
若要設定 Remote BrowserStack MCP 而非本機 BrowserStack MCP,您可以新增以下 JSON 內容:

設定 Remote MCP 的替代方式
-
步驟 1. 按一下齒輪圖示以選取工具。
-
步驟 2. 頂端中央會出現工具選單,在頂端選單中向下捲動,然後按一下「新增 MCP 伺服器」。
-
步驟 3. 按一下「HTTP」選項。

-
步驟 4. 貼上 Remote MCP 伺服器 URL:https://mcp.browserstack.com/mcp

-
步驟 5. 將伺服器 ID 設為:browserstack

-
步驟 6. 在 VSCode 中按一下「啟動 MCP 伺服器」,然後按一下「允許」。


-
🤝 建議的 MCP 用戶端
- 對於自動化測試 + 除錯使用案例,我們建議使用 Github Copilot 或 Cursor。
- 對於手動測試使用案例(Live Testing),我們建議使用 Claude Desktop。
⚠️ 重要注意事項
- BrowserStack MCP 伺服器正在積極開發中,目前支援 MCP 規格的子集。更多功能將很快新增。
- 工具呼叫依賴於 MCP 用戶端,而 MCP 用戶端又依賴於 LLM,因此可能存在一些非確定性行為,導致非預期的結果。如果您有任何建議或意見回饋,請開啟 issue 進行討論。
📝 貢獻
我們歡迎貢獻!請開啟 issue 討論您想要進行的任何變更。 👉 按一下此處檢視我們的貢獻指南
📞 支援
如需支援,請:
- 如果您遇到與 MCP 伺服器相關的任何問題,請在我們的 GitHub 儲存庫 中開啟 issue。
- 如有任何其他疑問,請聯絡我們的 支援團隊。
🚀 更多功能即將推出
敬請期待令人興奮的更新!有任何建議嗎?請開啟 issue 進行討論。