Ai Notify MCP Server
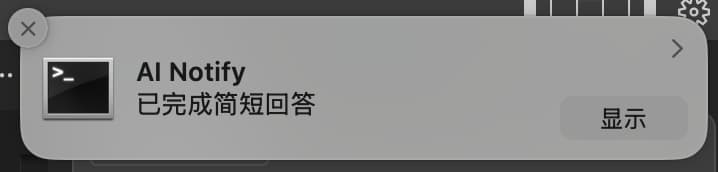
Receive system notifications in your code editor when an AI response is complete.
Documentation
Ai Notify MCP
![]()
🎯 为支持 MCP 协议的 AI 代码编辑器设计的智能通知服务器,当 AI 完成回答时自动发送系统通知,提升编程体验。
📑 目录
✨ 功能特性
🔔 跨平台通知支持
| 平台 | 通知方式 | 图标支持 | 音效支持 |
|---|---|---|---|
| macOS | 系统通知中心 | ✅ | ✅ |
| Windows | Windows 通知系统 | ✅ | ✅ |
| Linux | libnotify | ✅ | ✅ |
🎨 高度自定义
- 智能标题:自动显示当前项目名称
- 灵活内容:支持自定义通知消息
- 图标定制:支持自定义通知图标
- 音效控制:可开启/关闭提示音
🤖 智能触发
- 自动通知:AI 回答完成时自动触发
- 手动控制:支持程序化调用通知
📦 安装配置
系统要求
| 环境 | 要求 |
|---|---|
| Node.js | ≥ 14.0.0 |
| npm | ≥ 6.0.0 |
| Linux 额外要求 | libnotify |
Linux 用户安装 libnotify
点击展开各发行版安装命令
# Ubuntu/Debian
sudo apt-get install libnotify-bin

# CentOS/RHEL/Fedora
sudo dnf install libnotify  # 或 yum install libnotify

# Arch Linux
sudo pacman -S libnotify

# openSUSE
sudo zypper install libnotify-tools
详细安装步骤
1️⃣ 克隆项目
git clone https://github.com/zhiyingzzhou/ai-notify-mcp.git
cd ai-notify-mcp
2️⃣ 安装依赖并构建
npm install
npm run build
3️⃣ 配置编辑器
编辑你的 MCP 配置文件,添加以下配置:
{
  "mcpServers": {
    "ai-notify": {
      "command": "node",
      "args": ["/绝对路径/ai-notify-mcp/dist/index.js"],
      "autoRun": true
    }
  }
}
💡 提示:请将路径替换为你的实际安装路径
4️⃣ 配置 AI 助手规则
在 Cursor Settings → Rules → User Rules 中添加:
When responding to user requests, use the ai-notify MCP tool (auto_notify_completion) only as the final step after you have fully completed your answer. Never call this tool during thinking phases, tool calls, or before your answer is complete. The notification should only be triggered when the entire response is ready for the user.
5️⃣ 开启 Auto-Run 模式
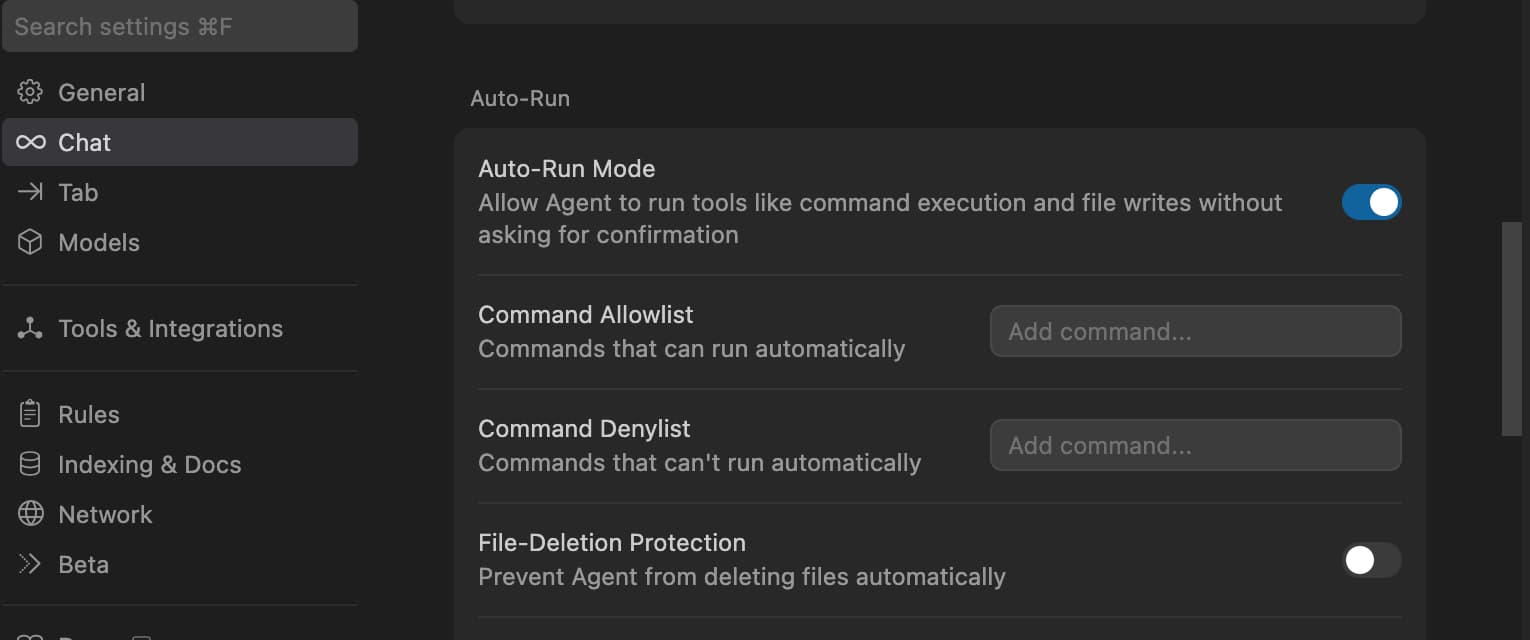
配置步骤:
- 打开
Cursor Settings→Features→Chat - 勾选
Enable auto-run mode - 重启 Cursor
🛠 使用说明
📋 可用工具
该 MCP 服务提供以下两个工具供 AI 调用:
🔧 show_completion_notification
功能:手动触发通知,支持自定义参数
| 参数 | 类型 | 默认值 | 说明 |
|---|---|---|---|
title | string | "AI Assistant" | 通知标题 |
message | string | "已完成回答" | 通知内容 |
sound | boolean | true | 是否播放提示音 |
🤖 auto_notify_completion
功能:自动通知工具,在 AI 回答完成后自动调用
| 参数 | 类型 | 默认值 | 说明 |
|---|---|---|---|
responseLength | number | 0 | 回答长度(用于内部统计) |
⚙️ 通知配置
你可以通过配置文件自定义通知行为:
{
  "notification": {
    "sound": true,
    "icon": "./assets/icon.png",
    "defaultTitle": "Cursor AI",
    "defaultMessage": "回答完成"
  }
}
配置选项说明:
| 配置项 | 类型 | 默认值 | 说明 |
|---|---|---|---|
sound | boolean | true | 是否播放通知音效 |
icon | string | - | 自定义通知图标路径 |
defaultTitle | string | "AI Assistant" | 默认通知标题 |
defaultMessage | string | "已完成回答" | 默认通知消息 |
🎨 图标规格建议
| 平台 | 推荐尺寸 | 支持格式 | 备注 |
|---|---|---|---|
| macOS | 128×128px | PNG, ICNS | 支持透明背景 |
| Windows | 256×256px | PNG, ICO | 建议多尺寸 ICO |
| Linux | 128×128px | PNG, SVG | 推荐 SVG 矢量图 |
🔧 开发指南
开发环境
# 开发模式(热重载)
npm run dev

# 构建项目
npm run build

# 启动服务
npm start

# 类型检查
npm run type-check
项目结构
ai-notify-mcp/
├── 📁 src/
│   └── 📄 index.ts          # 主入口文件
├── 📁 dist/                 # 构建输出
├── 📁 assets/               # 资源文件
│   ├── 🖼️ icon.png          # 默认图标
│   └── 🖼️ cursor-auto-run.jpg # 配置截图
├── 📄 package.json          # 项目配置
├── 📄 tsconfig.json         # TypeScript 配置
└── 📄 README.md            # 项目文档
扩展开发
// 自定义通知处理器示例
import { NotificationHandler } from './types';

const customHandler: NotificationHandler = {
  async show(options) {
    // 你的自定义逻辑
    console.log(`显示通知: ${options.title}`);
  }
};
🔍 故障排除
🔧 常见问题
❌ Q: 通知没有显示怎么办?
🔍 检查清单:
- ✅ 确认 Auto-Run 模式已开启
- ✅ 检查 MCP 配置路径是否正确
- ✅ 确认服务已成功启动
- ✅ 检查系统通知权限设置
- ✅ 验证 AI 助手规则是否正确配置
🛠 调试命令:
# 检查进程是否运行
ps aux | grep "ai-notify"

# 手动测试通知
node dist/index.js test

# 查看 MCP 服务状态
curl -X POST http://localhost:3000/test
🐧 Q: Linux 下通知不工作?
💡 解决方案:
# 1. 安装必要依赖
sudo apt-get install libnotify-bin

# 2. 测试系统通知
notify-send "测试" "通知功能正常"

# 3. 检查 D-Bus 服务
systemctl --user status dbus

# 4. 检查通知守护进程
ps aux | grep notification
🔧 常见 Linux 发行版配置:
| 发行版 | 安装命令 | 备注 |
|---|---|---|
| Ubuntu/Debian | sudo apt install libnotify-bin | 通常预装 |
| CentOS/RHEL | sudo dnf install libnotify | 可能需要 EPEL 源 |
| Arch Linux | sudo pacman -S libnotify | 轻量化安装 |
🖼️ Q: 图标不显示?
🎨 解决步骤:
-
确认图标文件存在
ls -la ./assets/icon.png -
检查图标文件格式和尺寸
file ./assets/icon.png identify ./assets/icon.png # 需要 ImageMagick -
使用绝对路径
{ "notification": { "icon": "/Users/username/ai-notify-mcp/assets/icon.png" } } -
检查文件权限
chmod 644 ./assets/icon.png
⚙️ Q: MCP 服务器无法启动?
🔍 诊断步骤:
-
检查 Node.js 版本
node --version # 应该 ≥ 14.0.0 -
验证构建输出
ls -la dist/ cat dist/index.js | head -10 -
手动启动测试
node dist/index.js --test -
检查端口占用
lsof -i :3000 # 默认端口
📊 调试模式
启用详细日志查看运行状态:
# 启用所有调试信息
DEBUG=* npm start

# 仅查看通知相关日志
DEBUG=mcp:notification npm start

# 保存日志到文件
DEBUG=mcp:notification npm start 2>&1 | tee debug.log
🆘 获得帮助
如果以上方法都无法解决问题,请:
-
收集系统信息
echo "OS: $(uname -a)" echo "Node: $(node --version)" echo "npm: $(npm --version)" -
创建详细的 Issue,包含:
- 系统信息
- 错误日志
- 配置文件
- 重现步骤
🤝 贡献指南
我们欢迎各种形式的贡献!让我们一起让这个项目变得更好 🚀
🎯 贡献方式
| 类型 | 说明 | 链接 |
|---|---|---|
| 🐛 Bug 报告 | 发现问题请及时反馈 | 创建 Issue |
| 💡 功能建议 | 提出新功能想法 | Feature Request |
| 📝 文档改进 | 完善说明文档 | 编辑 README 或添加示例 |
| 🔧 代码贡献 | 提交新功能或修复 | Fork → 开发 → Pull Request |
🔄 开发流程
1️⃣ 准备环境
# Fork 并克隆项目
git clone https://github.com/your-username/ai-notify-mcp.git
cd ai-notify-mcp

# 安装依赖
npm install
2️⃣ 创建功能分支
git checkout -b feature/amazing-feature
# 或者修复分支
git checkout -b fix/issue-123
3️⃣ 开发和测试
npm run dev      # 开发模式(热重载)
npm run test     # 运行测试
npm run lint     # 代码检查
npm run build    # 构建验证
4️⃣ 提交更改
# 使用约定式提交
git commit -m "feat: add amazing feature"
git commit -m "fix: resolve notification issue"
git commit -m "docs: update installation guide"

git push origin feature/amazing-feature
5️⃣ 创建 Pull Request
📋 代码规范
| 规范 | 要求 | 工具 |
|---|---|---|
| 语言 | TypeScript | TSC |
| 代码风格 | ESLint 规则 | ESLint + Prettier |
| 提交信息 | 约定式提交 | commitlint |
| 测试覆盖 | 新功能需要测试 | Jest |
| 文档 | 重要变更需要文档 | Markdown |
💡 开发建议
- 🔍 提交前:确保所有测试通过
- 📚 文档:为复杂功能添加说明
- 🧪 测试:编写单元测试和集成测试
- 🎨 代码:保持代码简洁易读
- 💬 沟通:有疑问及时在 Issue 中讨论
📄 许可证
本项目采用 MIT License 许可证。
🙏 致谢
感谢所有让这个项目成为可能的人和组织:
- 🏛️ MCP 协议团队 - 提供优秀的协议标准
- 🌍 开源社区 - 提供宝贵的反馈和贡献
- 👥 所有贡献者 - 让这个项目变得更好
- 💻 编辑器开发团队 - 支持 MCP 协议的实现
📞 支持与反馈
遇到问题或有建议?我们很乐意听到你的声音!
| 渠道 | 链接 | 适用场景 |
|---|---|---|
| 🐛 GitHub Issues | 提交问题 | Bug 报告和功能请求 |
| 📧 邮件联系 | [email protected] | 直接联系项目维护者 |

