ZenML MCP Server
officialInteract with your MLOps and LLMOps pipelines through your ZenML MCP server
Documentation
MCP Server for ZenML
This project implements a Model Context Protocol (MCP) server for interacting with the ZenML API.
What is MCP?
The Model Context Protocol (MCP) is an open protocol that standardizes how applications provide context to Large Language Models (LLMs). It acts like a "USB-C port for AI applications" - providing a standardized way to connect AI models to different data sources and tools.
MCP follows a client-server architecture where:
- MCP Hosts: Programs like Claude Desktop or IDEs that want to access data through MCP
- MCP Clients: Protocol clients that maintain 1:1 connections with servers
- MCP Servers: Lightweight programs that expose specific capabilities through the standardized protocol
- Local Data Sources: Your computer's files, databases, and services that MCP servers can securely access
- Remote Services: External systems available over the internet that MCP servers can connect to
What is ZenML?
ZenML is an open-source platform for building and managing ML and AI pipelines. It provides a unified interface for managing data, models, and experiments.
For more information, see the ZenML website and our documentation.
Features
The server provides MCP tools to access core read functionality from the ZenML server, providing a way to get live information about:
Core Entities
- Users - user accounts and permissions
- Stacks - infrastructure configurations
- Stack Components - individual stack building blocks
- Flavors - available component types
- Service Connectors - cloud authentication
Pipeline Execution
- Pipelines - pipeline definitions
- Pipeline Runs - execution history and status
- Pipeline Steps - individual step details, code, and logs
- Schedules - automated run schedules
- Artifacts - metadata about data artifacts (not the data itself)
Deployment & Serving
- Snapshots - frozen pipeline configurations (the "what to run/serve" artifact)
- Deployments - runtime serving instances with status, URL, and logs
- Services - model serving endpoints
Organization & Discovery
- Projects - organizational containers for ZenML resources
- Tags - cross-cutting metadata labels for discovery
- Builds - pipeline build artifacts with image and code info
Models
- Models - ML model registry entries
- Model Versions - versioned model artifacts
Deprecated (migration recommended)
Pipeline run templates→ use Snapshots instead (see Migration Guide)
The server also allows you to trigger new pipeline runs using snapshots (preferred) or run templates (deprecated).
Note: We're continuously improving this integration based on user feedback. Please join our Slack community to share your experience and help us make it even better!
Available Tools
The MCP server exposes the following tools, grouped by category:
Pipeline Execution (New in v1.2)
| Tool | Description |
|---|---|
get_snapshot | Get a frozen pipeline configuration by name/ID |
list_snapshots | List snapshots with filters (runnable, deployable, deployed, tag) |
get_deployment | Get a deployment's runtime status and URL |
list_deployments | List deployments with filters (status, pipeline, tag) |
get_deployment_logs | Get bounded logs from a deployment (tail=100 default, max 1000) |
trigger_pipeline | Trigger a pipeline run (prefer snapshot_name_or_id parameter) |
Organization (New in v1.2)
| Tool | Description |
|---|---|
get_active_project | Get the currently active project |
get_project | Get project details by name/ID |
list_projects | List all projects |
get_tag | Get tag details (exclusive, colors) |
list_tags | List tags with filters (resource_type) |
get_build | Get build details (image, code embedding) |
list_builds | List builds with filters (is_local, contains_code) |
Core Entities
| Tool | Description |
|---|---|
get_user, list_users, get_active_user | User management |
get_stack, list_stacks | Stack configurations |
get_stack_component, list_stack_components | Stack components |
get_flavor, list_flavors | Component flavors |
get_service_connector, list_service_connectors | Cloud connectors |
get_pipeline_run, list_pipeline_runs | Pipeline runs |
get_run_step, list_run_steps | Step details |
get_step_logs, get_step_code | Step logs and source code |
list_pipelines, get_pipeline_details | Pipeline definitions |
get_schedule, list_schedules | Schedules |
list_artifacts | Artifact metadata |
list_secrets | Secret names (not values) |
get_service, list_services | Model services |
get_model, list_models | Model registry |
get_model_version, list_model_versions | Model versions |
Interactive Apps (Experimental)
| Tool | Description |
|---|---|
open_pipeline_run_dashboard | Open interactive pipeline runs dashboard (MCP App) |
open_run_activity_chart | Open 30-day run activity bar chart (MCP App) |
Analysis Tools
| Tool | Description |
|---|---|
stack_components_analysis | Analyze stack component usage |
recent_runs_analysis | Analyze recent pipeline runs |
most_recent_runs | Get N most recent runs |
Diagnostics
| Tool | Description |
|---|---|
diagnose_zenml_setup | Diagnose server setup (env vars, SDK, connectivity, auth). Works even when misconfigured. |
Deprecated Tools
| Tool | Replacement |
|---|---|
get_run_template | Use get_snapshot instead |
list_run_templates | Use list_snapshots instead |
trigger_pipeline(template_id=...) | Use trigger_pipeline(snapshot_name_or_id=...) |
Migration: Run Templates → Snapshots
Why the change? ZenML evolved its "runnable pipeline artifact" concept. Run Templates are now deprecated wrappers that internally just point to Snapshots. New code should use Snapshots directly.
Quick Migration Guide
| Old Pattern (Templates) | New Pattern (Snapshots) |
|---|---|
list_run_templates() | list_snapshots(runnable=True, named_only=True) |
get_run_template(name) | get_snapshot(name, include_config_schema=True) |
trigger_pipeline(template_id=...) | trigger_pipeline(snapshot_name_or_id=...) |
Example Workflow (Snapshot-First)
1. Discover project context:
   → get_active_project()

2. Find runnable snapshots:
   → list_snapshots(runnable=True, named_only=True)

3. Trigger a run:
   → trigger_pipeline(pipeline_name_or_id="my-pipeline", snapshot_name_or_id="my-snapshot")

4. Check deployments:
   → list_deployments(status="running")
   → get_deployment_logs(name_id_or_prefix="my-deployment", tail=100)
Note: get_deployment_logs returns bounded output (default 100 lines, max 1000, capped at 100KB) and requires the appropriate deployer integration to be installed.
Quick Setup via Dashboard (Recommended)
The easiest way to set up the ZenML MCP Server is through your ZenML dashboard's MCP Settings page.
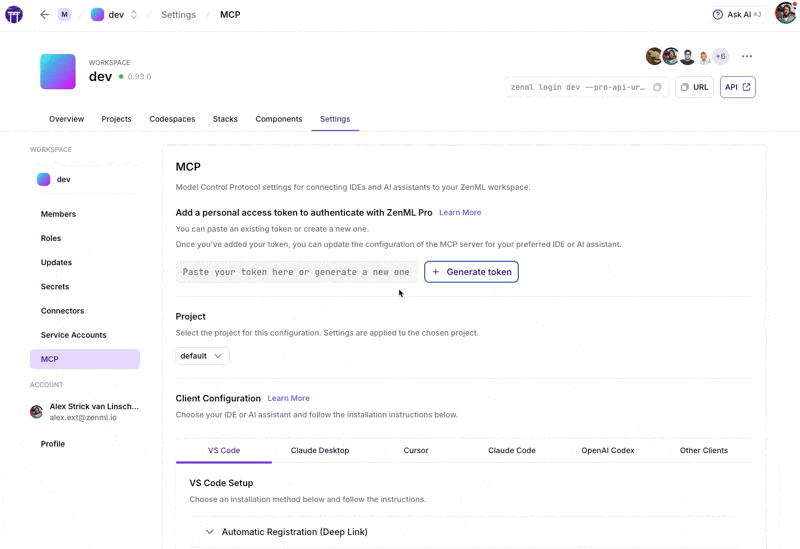
Navigate to Settings → MCP in your ZenML dashboard to get:
- Pre-configured snippets for your specific server URL and credentials
- One-click installation via deep links for supported IDEs
- Copy-paste configurations for VS Code, Claude Desktop, Cursor, Claude Code, OpenAI Codex, and more
- Docker and uv options based on your preference
ZenML Pro Users
The MCP Settings page lets you generate a Personal Access Token (PAT) with a single click. The token is automatically included in all generated configuration snippets.
ZenML OSS Users
- First create a service account token via Settings → Service Accounts
- Paste the token into the MCP Settings page
- Copy the generated configuration for your IDE
Prefer manual setup? See the detailed instructions below.
MCP Apps (Experimental)
What are MCP Apps? MCP Apps are interactive HTML UIs that MCP servers can serve directly into AI clients. They render in sandboxed iframes and can call server tools bidirectionally. See the official announcement for full details.
This server includes two experimental MCP Apps:
| App | Tool | Description |
|---|---|---|
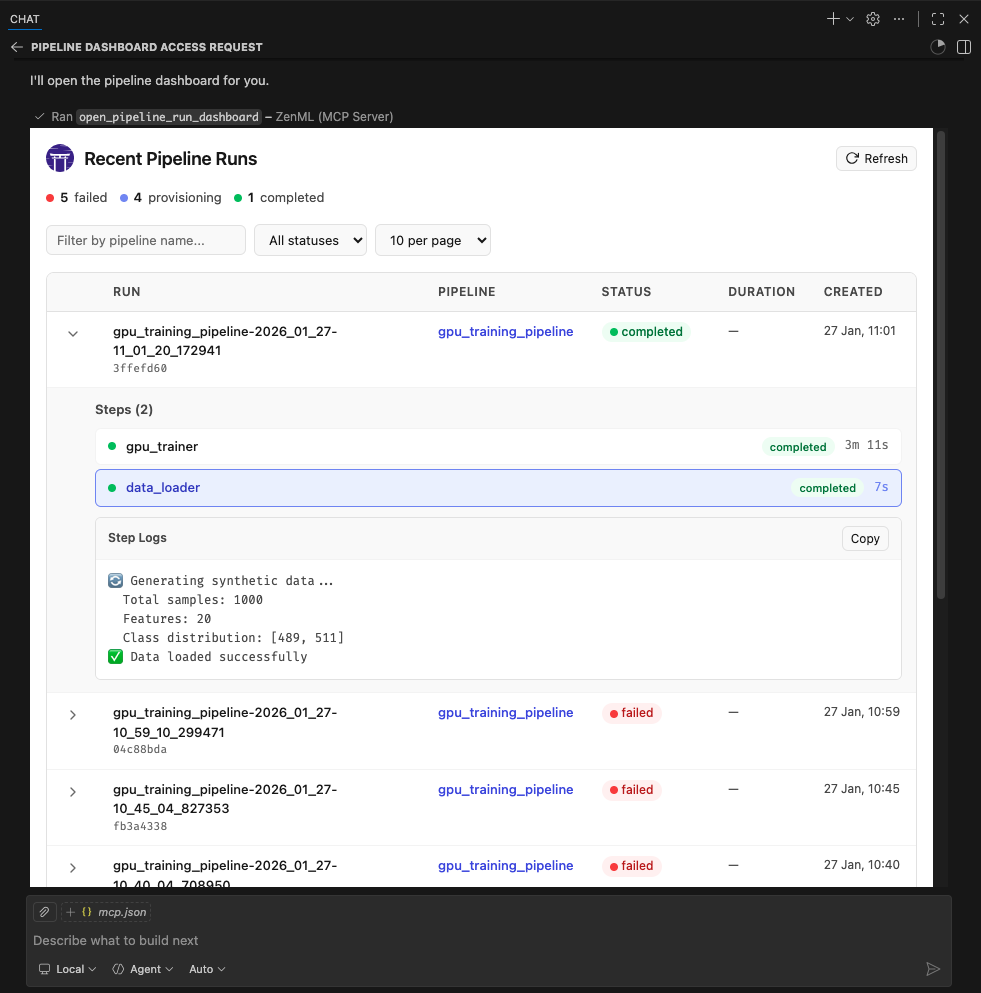
| Pipeline Runs Dashboard | open_pipeline_run_dashboard | Interactive table of recent pipeline runs with status, step details, and logs |
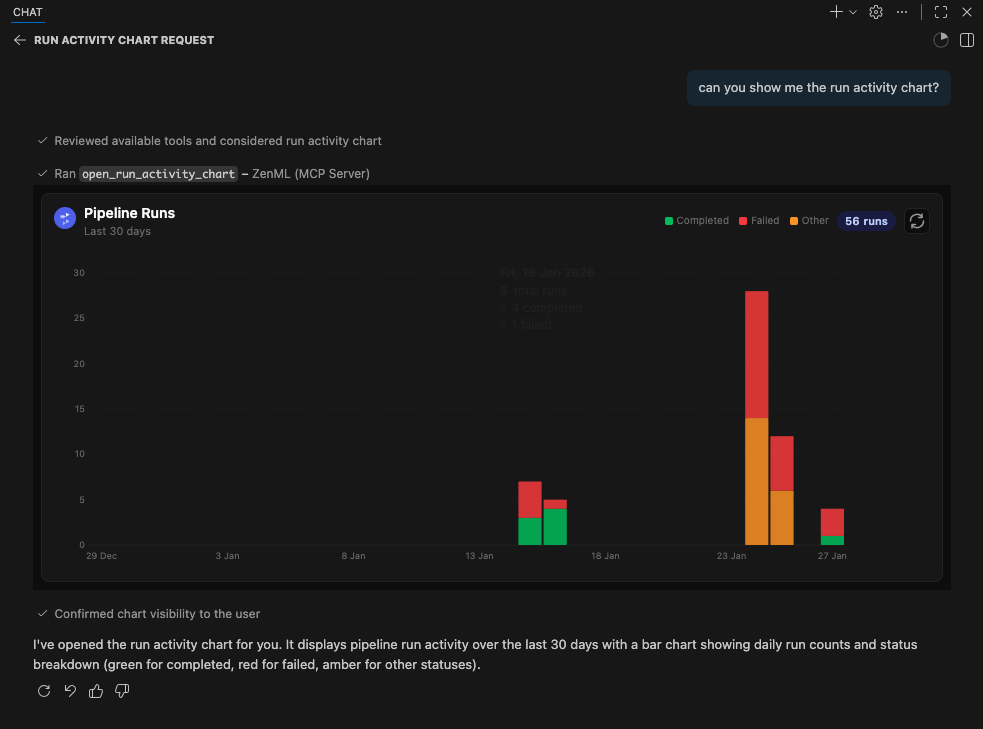
| Run Activity Chart | open_run_activity_chart | Bar chart of pipeline run activity over the last 30 days with status breakdown |
These apps are included as proof-of-concept examples. We welcome feedback and contributions for more MCP Apps. It is still early days for this new feature so we'll have to see how it evolves. We expect to support it more fully in the future.
Supported Clients
MCP Apps require Streamable HTTP transport (not stdio). The following clients currently support MCP Apps:
- ✅ VS Code (Insiders Edition)
- ✅ Goose
- ✅ ChatGPT (launching soon)
- ⚠️ Claude Desktop -- as of late January 2026, doesn't yet render Apps.
- ⚠️ Claude.ai (web) — as of late January 2026, doesn't yet render Apps.
Note: We were unable to test thoroughly with Claude Desktop or Claude.ai at the time of writing. If you encounter issues, please report them.
Running MCP Apps with Docker
MCP Apps require Streamable HTTP transport and a publicly reachable URL (for cloud-hosted clients like Claude.ai). The simplest setup uses Docker + Cloudflare tunnel:
1. Build and run the Docker container:
docker build -t mcp-zenml:apps .

docker run --rm -d --name mcp-zenml-apps -p 8001:8001 \
  -e ZENML_STORE_URL="https://your-zenml-server.example.com" \
  -e ZENML_STORE_API_KEY="your-api-key" \
  -e ZENML_ACTIVE_PROJECT_ID="your-project-id" \
  mcp-zenml:apps --transport streamable-http --host 0.0.0.0 --port 8001 \
  --disable-dns-rebinding-protection
2. Start a Cloudflare tunnel (for cloud clients):
npx cloudflared tunnel --url http://localhost:8001
This prints a public URL like https://random-words.trycloudflare.com.
3. Connect your client:
- In Claude Desktop or other clients, add the MCP server with URL:
https://random-words.trycloudflare.com/mcpe.g.:
{
	"servers": {
		"ZenML": {
			"url": "https://USE-YOUR-OWN-URL.trycloudflare.com/mcp",
			"type": "http"
		}
	},
	"inputs": []
}
- Ask the AI to "open the pipeline runs dashboard" or "show the run activity chart"
Important notes:
ZENML_ACTIVE_PROJECT_IDis required — without it, pipeline run tools will fail with "No project is currently set as active"- The
--disable-dns-rebinding-protectionflag is needed when running behind reverse proxies (cloudflared, ngrok) — it's safe when the proxy handles security - The tunnel URL changes on each restart — update your client integration accordingly
Testing & Quality Assurance
This project includes automated testing to ensure the MCP server remains functional:
- 🔄 Automated Smoke Tests: A comprehensive smoke test runs every 3 days via GitHub Actions
- 🚨 Issue Creation: Failed tests automatically create GitHub issues with detailed debugging information
- ⚡ Fast CI: Uses UV with caching for quick dependency installation and testing
- 🧪 Manual Testing: You can run the smoke test locally using
uv run scripts/test_mcp_server.py server/zenml_server.py
The automated tests verify:
- MCP protocol connection and handshake
- Server initialization and tool discovery
- Basic tool functionality (when ZenML server is accessible)
- Resource and prompt enumeration
diagnose_zenml_setupreturns structured diagnostics even in constrained environments
Debugging with MCP Inspector
For interactive debugging, use the MCP Inspector — a web-based tool that lets you test MCP tools in real-time:
# Using .env.local (recommended for development)
cp .env.local.example .env.local  # Then edit with your credentials
source .env.local && npx @modelcontextprotocol/inspector \
  -e ZENML_STORE_URL=$ZENML_STORE_URL \
  -e ZENML_STORE_API_KEY=$ZENML_STORE_API_KEY \
  -- uv run server/zenml_server.py
This opens a web UI with your credentials pre-filled — just click Connect and use the Tools tab to test any tool interactively.
See CLAUDE.md for more detailed debugging instructions.
Privacy & Analytics
The ZenML MCP Server collects anonymous usage analytics to help us improve the product.
We track:
- Which tools are used and how often
- Error rates and types (error type only, no messages)
- Basic environment info (OS, Python version, and whether running in Docker/CI)
- Session duration and tool usage patterns
We do NOT collect:
- Your ZenML server URL or API key
- Pipeline names, model names, or any business data
- Error messages or stack traces
- Any personally identifiable information
To disable analytics:
# Option 1
export ZENML_MCP_ANALYTICS_ENABLED=false

# Option 2
export ZENML_MCP_DISABLE_ANALYTICS=true
For debugging/testing (logs events to stderr instead of sending):
export ZENML_MCP_ANALYTICS_DEV=true
For Docker users: You can set ZENML_MCP_ANALYTICS_ID (must be a valid UUID) to maintain a consistent anonymous ID across container restarts. If you don't set it and the container filesystem can't persist the analytics ID file, the server falls back to a deterministic anonymous UUID derived from a hash of ZENML_STORE_URL (the URL itself is never sent as an event property).
Additional analytics options:
ZENML_MCP_ANALYTICS_SHUTDOWN_TIMEOUT_S— max time (seconds) to flush analytics synchronously during shutdown (default: 1.0)
Note on shutdown tracking: Shutdown events are sent synchronously with a bounded timeout for best delivery reliability. However, if a container is killed with SIGKILL (e.g., docker kill), shutdown handlers cannot fire — this is a Docker/OS limitation, not a bug.
Startup Validation
You can enable a lightweight startup diagnostic check:
# Print warnings but start normally
uv run server/zenml_server.py --startup-validation warn

# Exit non-zero if required setup is missing (useful in Docker/CI)
uv run server/zenml_server.py --startup-validation strict
You can also set this via environment variable: ZENML_MCP_STARTUP_VALIDATION=warn.
The diagnose_zenml_setup tool is also available as an MCP tool for runtime troubleshooting — it works even when the ZenML SDK is not installed or environment variables are missing.
Manual Setup
Prerequisites
You will need to have access to a deployed ZenML server. If you don't have one, you can sign up for a free trial at ZenML Pro and we'll manage the deployment for you.
Tip: Once you have a ZenML server, check out the MCP Settings page in your dashboard for the easiest setup experience.
Compatibility: This MCP server is tested with and recommended for ZenML >= 0.93.0. If you are running an older ZenML version, please use an earlier release of this MCP server.
You will also (probably) need to have uv installed locally. For more information, see
the uv documentation.
We recommend installation via their installer script or via brew if using a
Mac. (Technically you don't need it, but it makes installation and setup easy.)
You will also need to clone this repository somewhere locally:
git clone https://github.com/zenml-io/mcp-zenml.git
Your MCP config file
The MCP config file is a JSON file that tells the MCP client how to connect to your MCP server. Different MCP clients will use or specify this differently. Two commonly-used MCP clients are Claude Desktop and Cursor, for which we provide installation instructions below.
You will need to specify your ZenML MCP server in the following format:
{
    "mcpServers": {
        "zenml": {
            "command": "/usr/local/bin/uv",
            "args": ["run", "path/to/server/zenml_server.py"],
            "env": {
                "LOGLEVEL": "WARNING",
                "NO_COLOR": "1",
                "ZENML_LOGGING_COLORS_DISABLED": "true",
                "ZENML_LOGGING_VERBOSITY": "WARN",
                "ZENML_ENABLE_RICH_TRACEBACK": "false",
                "PYTHONUNBUFFERED": "1",
                "PYTHONIOENCODING": "UTF-8",
                "ZENML_STORE_URL": "https://your-zenml-server-goes-here.com",
                "ZENML_STORE_API_KEY": "your-api-key-here"
            }
        }
    }
}
There are four dummy values that you will need to replace:
- the path to your locally installed
uv(the path listed above is where it would be on a Mac if you installed it viabrew) - the path to the
zenml_server.pyfile (this is the file that will be run when you connect to the MCP server). This file is located inside this repository at the root. You will need to specify the exact full path to this file. - the ZenML server URL (this is the URL of your ZenML server. You can find this
in the ZenML Cloud UI). It will look something like
https://d534d987a-zenml.cloudinfra.zenml.io. - the ZenML server API key (this is the API key for your ZenML server. You can find this in the ZenML Cloud UI or read these docs on how to create one. For the purposes of the ZenML MCP server we recommend using a service account.)
You are free to change the way you run the MCP server Python file, but using
uv will probably be the easiest option since it handles the environment and
dependency installation for you.
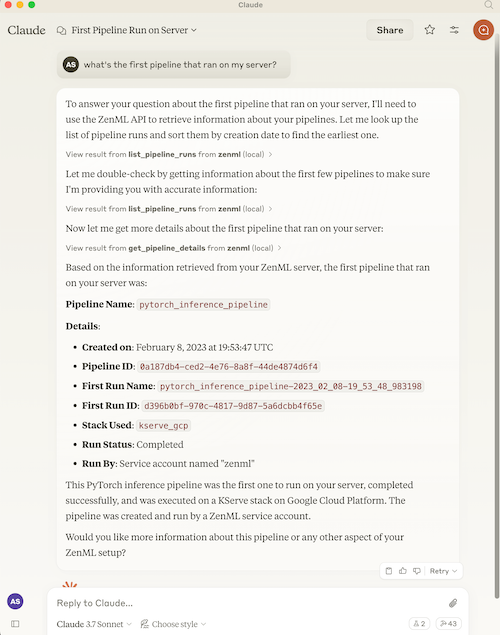
Installation for use with Claude Desktop
Quick alternative: Use the MCP Settings page in your ZenML dashboard (Settings → MCP) to get pre-configured installation instructions and deep links for Claude Desktop.
You will need to have the latest version of Claude Desktop installed.
You can simply open the Settings menu and drag the mcp-zenml.mcpb file from the
root of this repository onto the menu and it will guide you through the
installation and setup process. You'll need to add your ZenML server URL and API key.
Note: MCP bundles (.mcpb) replace the older Desktop Extensions (.dxt) format; existing .dxt files still work in Claude Desktop.
Optional: Improving ZenML Tool Output Display
For a better experience with ZenML tool results, you can configure Claude to display the JSON responses in a more readable format. In Claude Desktop, go to Settings → Profile, and in the "What personal preferences should Claude consider in responses?" section, add something like the following (or use these exact words!):
When using zenml tools which return JSON strings and you're asked a question, you might want to consider using markdown tables to summarize the results or make them easier to view!
This will encourage Claude to format ZenML tool outputs as markdown tables, making the information much easier to read and understand.
Installation for use with Cursor
Quick alternative: The MCP Settings page in your ZenML dashboard (Settings → MCP) can generate the exact
mcp.jsoncontent with your credentials pre-filled.
You will need to have Cursor installed.
Cursor works slightly differently to Claude Desktop in that you specify the config file on a per-repository basis. This means that if you want to use the ZenML MCP server in multiple repos, you will need to specify the config file in each of them.
To set it up for a single repository, you will need to:
- create a
.cursorfolder in the root of your repository - inside it, create a
mcp.jsonfile with the content above - go into your Cursor settings and click on the ZenML server to 'enable' it.
In our experience, sometimes it shows a red error indicator even though it is working. You can try it out by chatting in the Cursor chat window. It will let you know if is able to access the ZenML tools or not.
Docker Image
You can run the server as a Docker container. The process communicates over stdio, so it will wait for an MCP client connection. Pass your ZenML credentials via environment variables.
Prebuilt Images (Docker Hub)
Pull the latest multi-arch image:
docker pull zenmldocker/mcp-zenml:latest
Versioned releases are tagged as X.Y.Z:
docker pull zenmldocker/mcp-zenml:1.0.8
Run with your ZenML credentials (stdio mode):
docker run -i --rm \
  -e ZENML_STORE_URL="https://your-zenml-server.example.com" \
  -e ZENML_STORE_API_KEY="your-api-key" \
  zenmldocker/mcp-zenml:latest
Canonical MCP config using Docker
{
  "mcpServers": {
    "zenml": {
      "command": "docker",
      "args": [
        "run", "-i", "--rm",
        "-e", "ZENML_STORE_URL=https://...",
        "-e", "ZENML_STORE_API_KEY=ZENKEY_...",
        "-e", "ZENML_ACTIVE_PROJECT_ID=...",
        "-e", "LOGLEVEL=WARNING",
        "-e", "NO_COLOR=1",
        "-e", "ZENML_LOGGING_COLORS_DISABLED=true",
        "-e", "ZENML_LOGGING_VERBOSITY=WARN",
        "-e", "ZENML_ENABLE_RICH_TRACEBACK=false",
        "-e", "PYTHONUNBUFFERED=1",
        "-e", "PYTHONIOENCODING=UTF-8",
        "zenmldocker/mcp-zenml:latest"
      ]
    }
  }
}
Build Locally
From the repository root:
docker build -t zenmldocker/mcp-zenml:local .
Run the locally built image:
docker run -i --rm \
  -e ZENML_STORE_URL="https://your-zenml-server.example.com" \
  -e ZENML_STORE_API_KEY="your-api-key" \
  zenmldocker/mcp-zenml:local
MCP Bundles (.mcpb)
This project uses MCP Bundles (.mcpb) — the successor to Anthropic's Desktop Extensions (DXT). MCP Bundles package an entire MCP server (including dependencies) into a single file with user-friendly configuration.
Note on rename: MCP Bundles replace the older .dxt format. Claude Desktop remains backward‑compatible with existing .dxt files, but we now ship mcp-zenml.mcpb and recommend using it going forward.
The mcp-zenml.mcpb file in the repository root contains everything needed to run the ZenML MCP server, eliminating the need for complex manual installation steps. This makes powerful ZenML integrations accessible to users without requiring technical setup expertise.
When you drag and drop the .mcpb file into Claude Desktop's settings, it automatically handles:
- Runtime dependency installation
- Secure configuration management
- Cross-platform compatibility
- User-friendly setup process
For more information, see Anthropic's announcement of Desktop Extensions (DXT) and related MCP bundle packaging guidance in their documentation: https://www.anthropic.com/engineering/desktop-extensions
Published on the Anthropic MCP Registry
This MCP server is published to the official Anthropic MCP Registry and is discoverable by compatible hosts. On each tagged release, our CI updates the registry entry via the registry’s mcp-publisher CLI using GitHub OIDC, so you can install or discover the ZenML MCP Server directly wherever the registry is supported (e.g., Claude Desktop’s Extensions catalog).
- Always up to date: the registry entry is refreshed with every release from the tagged commit’s
manifest.jsonandserver.json. - Alternate install paths: you can still install locally via the packaged
.mcpbbundle (see above) or run the Docker image.
Learn more about the registry here:
- Anthropic MCP Registry (community repo): https://github.com/modelcontextprotocol/registry