Revit MCP Python
A pyRevit-based MCP server for Autodesk Revit, enabling connection to any MCP-compatible client.
Documentation
MCP server for Revit - Python
A pyRevit-oriented implementation of the Model Context Protocol (MCP) for Autodesk Revit
How?
- This minimal implementation leverages the Routes module inside pyRevit to create a bridge between Revit and Large Language Models (LLMs).
- It provides a straightforward template to get started quickly, letting you prototype and iterate tools to give LLMs access to your Revit models.
- These tools are designed to be expanded for your specific use cases. You're very welcome to fork the repo and make your own contributions.
- Note: The pyRevit Routes API is currently in draft form and subject to change. It lacks built-in authentication mechanisms, so you'll need to implement your own security measures for production use.
Batteries Included
This repo is aimed at:
- Beginners to the Revit API
- Python specialists who aren't versed in C#
- Anyone wanting to prototype and iterate quickly with LLMs and Revit
It contains:
- A complete Routes implementation for pyRevit
- A minimal MCP server script to connect to any MCP-compatible client
- Several test commands to get you started right away
Key Architecture Components
The system runs as two separate servers working together in a chain:
Claude / LLM Client
       |
       |  MCP Protocol (stdio or HTTP)
       v
  main.py  (MCP Server)
       |
       |  HTTP requests (localhost:48884)
       v
  pyRevit Routes  (REST API running inside Revit)
       |
       |  Revit API calls
       v
  Revit Application
main.py is the MCP server. It speaks the MCP protocol so that Claude (or any MCP-compatible client) can call tools. When a tool is called, main.py translates it into an HTTP request and forwards it to Revit.
pyRevit Routes is a lightweight REST API that runs inside the Revit process. It receives those HTTP requests, executes Revit API code (since it has direct access to the running instance), and returns JSON responses.
They never conflict because they serve different roles, speak different protocols, and listen on different ports.
Note: The Launch & Document tools (
launch_revit,list_revit_installations) are the exception — they run entirely on the MCP side, usingsubprocessto start Revit and then polling the pyRevit Routes health endpoint until the bridge is ready.
- MCP Server (
main.py):
- Built with FastMCP
- Handles HTTP communication with Revit Routes API
- Registers tools from modular tool system
- Provides helper functions for GET/POST/Image requests
- pyRevit Extension (
revit-mcp-python.extension/):
- Contains the Routes API that runs inside Revit
- Modular route registration in
startup.py - Individual route modules in
revit_mcp/directory
- Tool Registration System (
tools/):
- Modular tool organization by functionality
- Central registration through
tools/__init__.py - Each module registers its own tools with the MCP server
Supported Tools
Current Implementation Status
| Tool Name | Status | Category | Description |
|---|---|---|---|
get_revit_status | ✅ Implemented | Status & Connectivity | Check if the Revit-MCP API is active and responding |
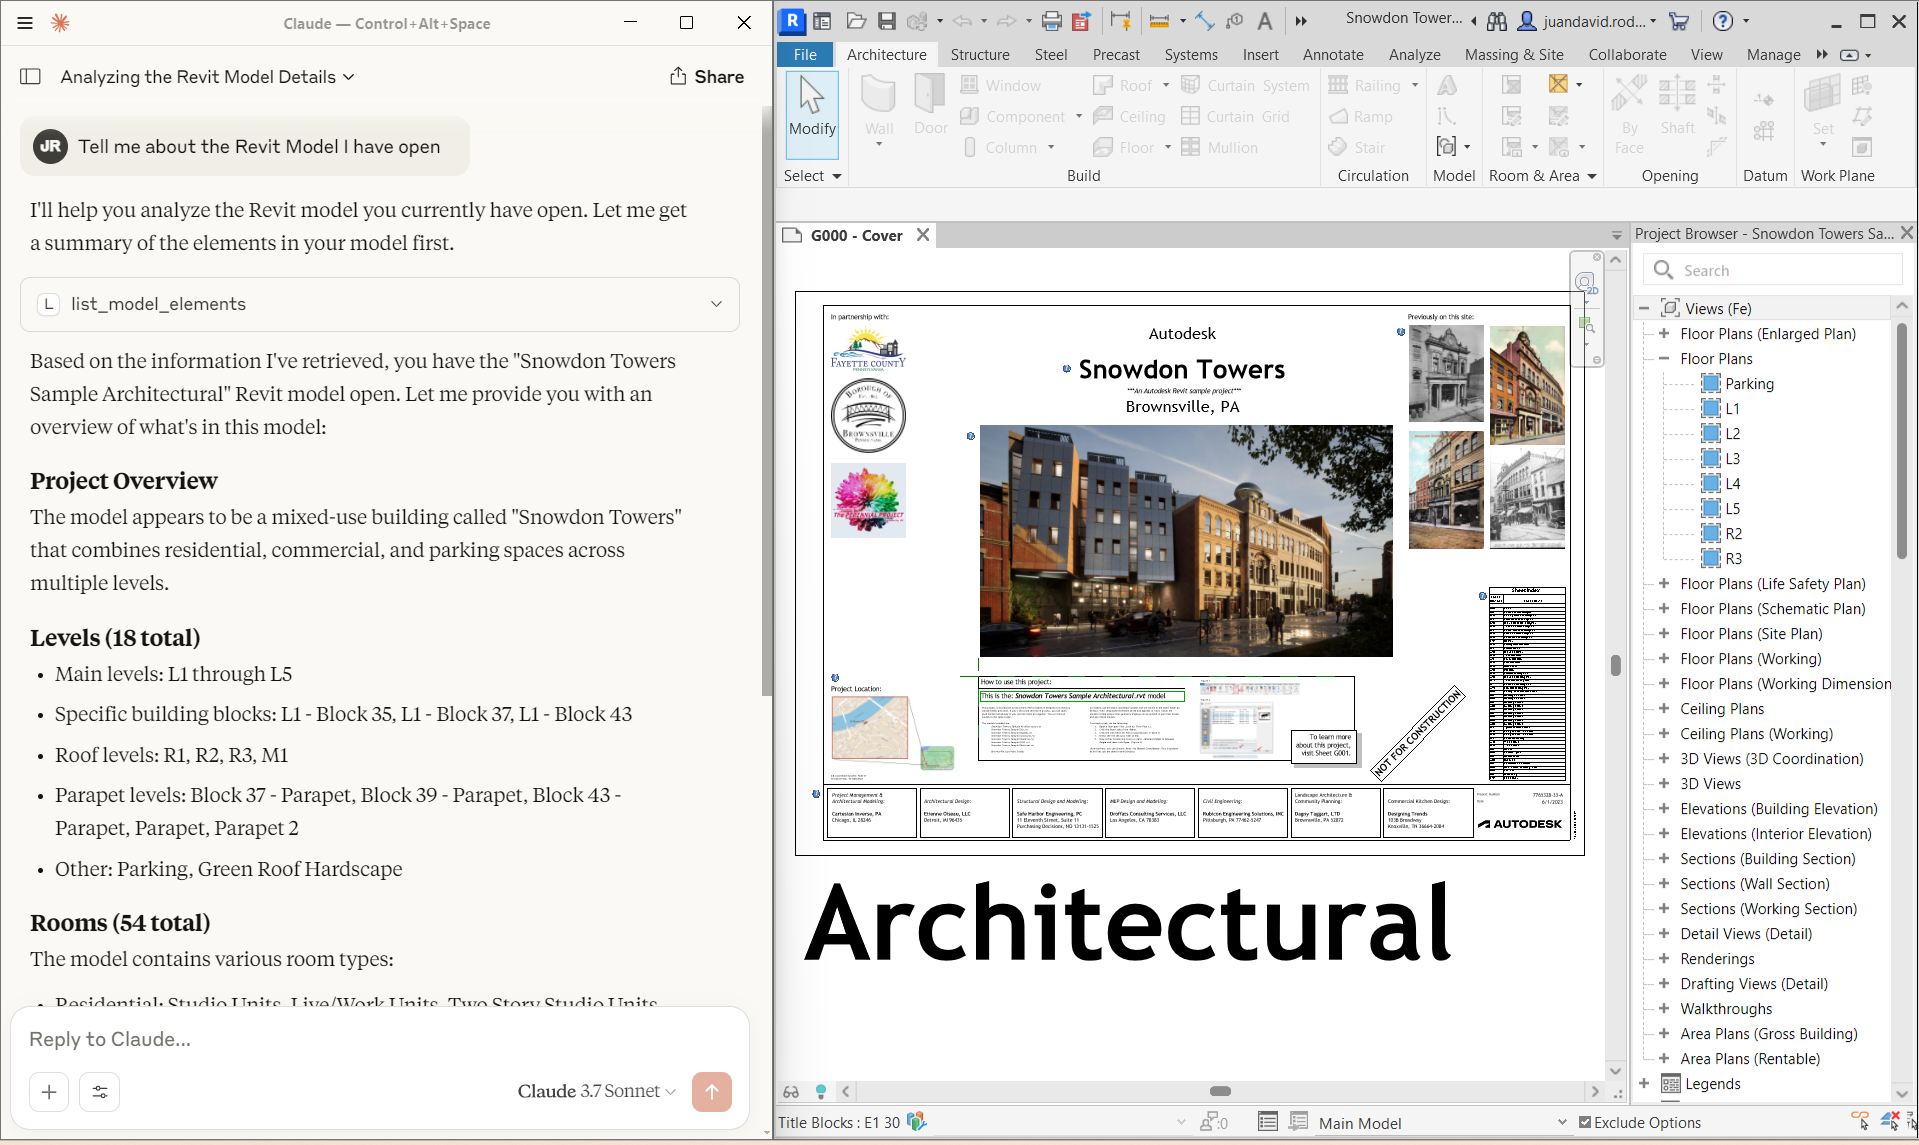
get_revit_model_info | ✅ Implemented | Model Information | Get comprehensive information about the current Revit model |
list_levels | ✅ Implemented | Model Information | Get all levels with elevation information |
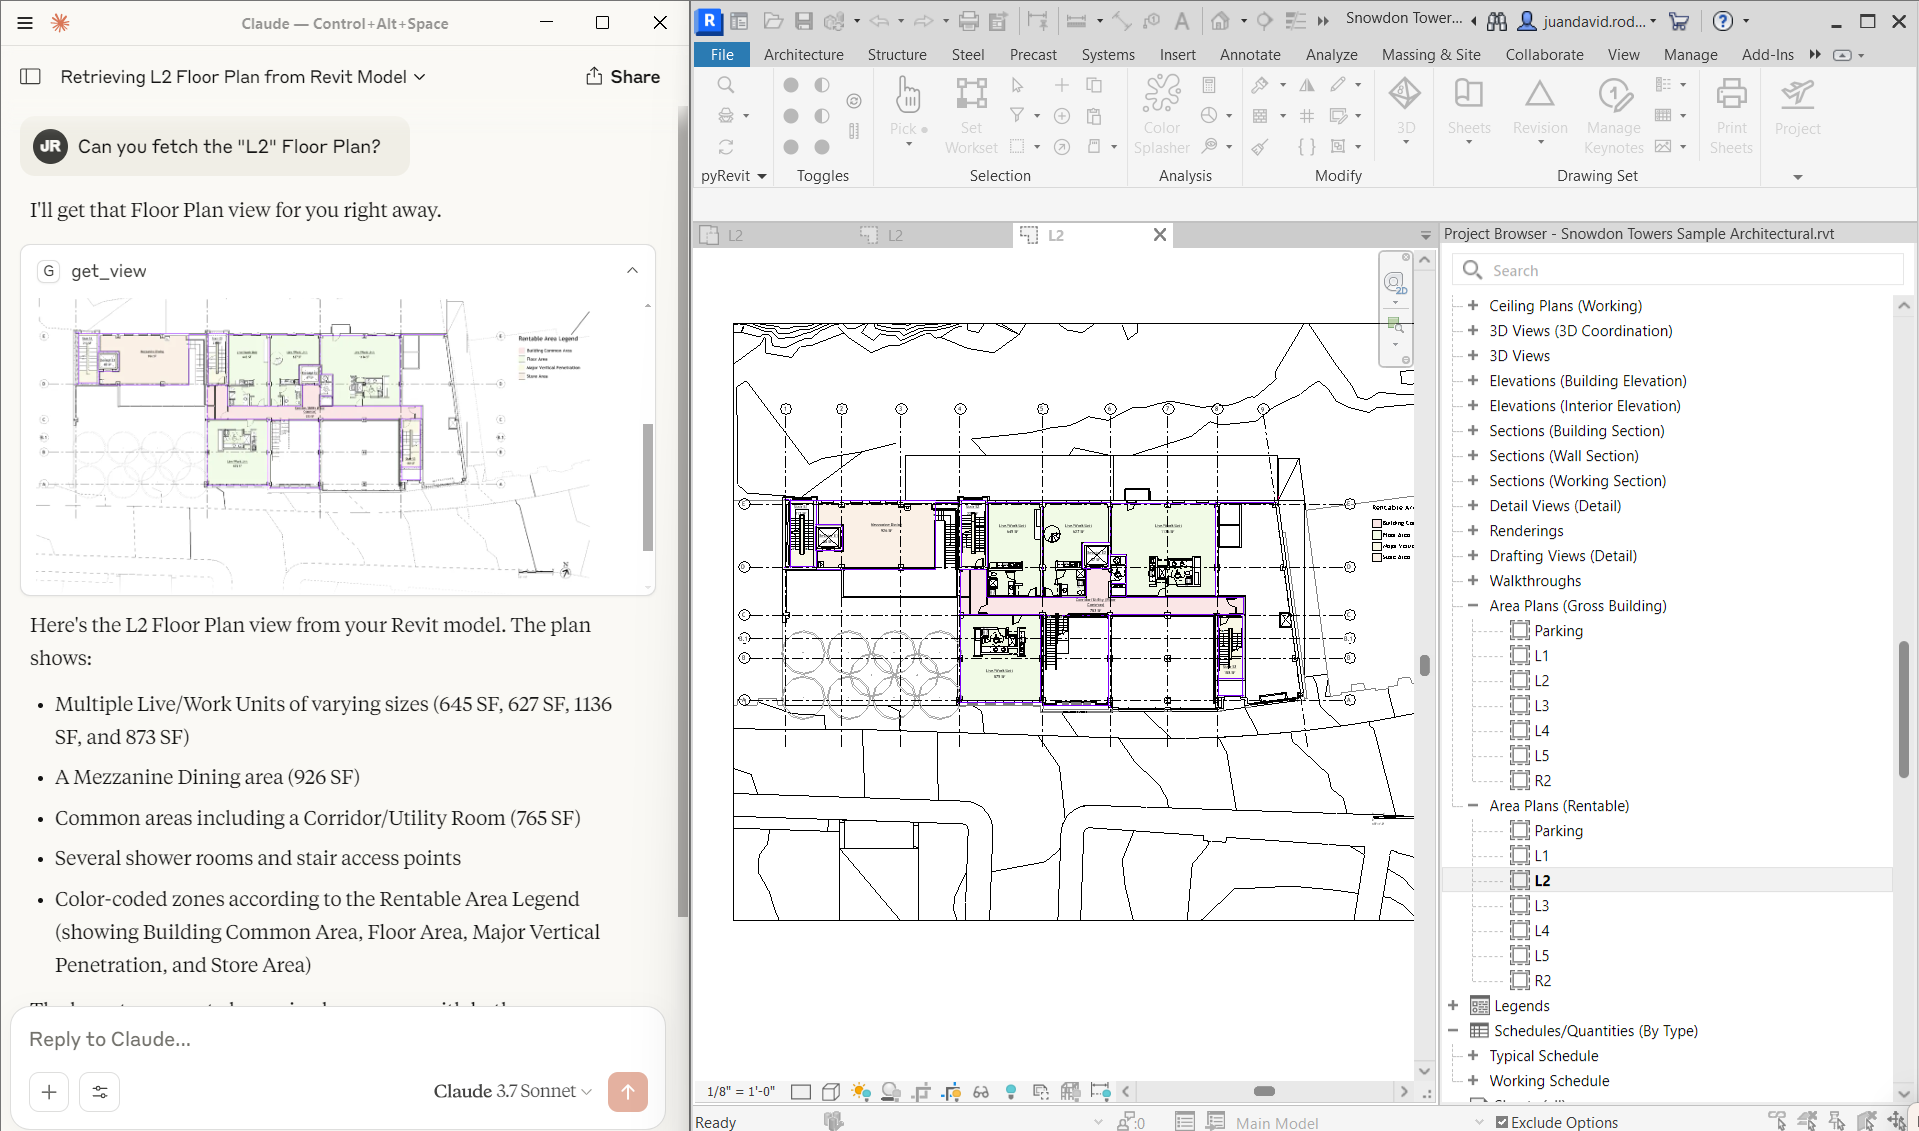
get_revit_view | ✅ Implemented | View & Image | Export a specific Revit view as an image |
list_revit_views | ✅ Implemented | View & Image | Get a list of all exportable views organized by type |
place_family | ✅ Implemented | Family & Placement | Place a family instance at specified location with custom properties |
list_families | ✅ Implemented | Family & Placement | Get a flat list of available family types (with filtering) |
list_family_categories | ✅ Implemented | Family & Placement | Get a list of all family categories in the model |
get_current_view_info | ✅ Implemented | View Information | Get detailed information about the currently active view |
get_current_view_elements | ✅ Implemented | View Information | Get all elements visible in the current view |
create_point_based_element | ✅ Implemented | Element Creation | Create point-based elements (doors, windows, furniture) |
color_splash | ✅ Implemented | Visualization | Color elements based on parameter values |
execute_revit_code | ✅ Implemented | Code Execution | Execute IronPython code directly in Revit context |
list_revit_installations | ✅ Implemented | Launch & Document | Discover all Revit versions installed on the system |
launch_revit | ✅ Implemented | Launch & Document | Launch Revit, optionally with a file, and poll for readiness |
open_document | ✅ Implemented | Launch & Document | Open a document in running Revit (supports detach and audit) |
close_document | ✅ Implemented | Launch & Document | Close the active document |
save_document | ✅ Implemented | Launch & Document | Save or Save As the active document |
sync_with_central | ✅ Implemented | Launch & Document | Synchronize a workshared document with central |
get_selected_elements | 🔄 Pending | Selection Management | Get information about currently selected elements |
create_line_based_element | 🔄 Pending | Element Creation | Create line-based elements (walls, beams, pipes) |
create_surface_based_element | 🔄 Pending | Element Creation | Create surface-based elements (floors, ceilings) |
delete_elements | 🔄 Pending | Element Management | Delete specified elements from the model |
modify_element | 🔄 Pending | Element Management | Modify element properties (instance parameters) |
reset_model | 🔄 Pending | Element Management | Reset model by deleting process model elements |
tag_walls | 🔄 Pending | Annotation | Tag all walls in the current view |
search_modules | 🔄 Pending | Integration | Search for available modules/addins |
use_module | 🔄 Pending | Integration | Execute functionality from external modules |
Getting Started
Installing uv:
Refer to ./README_UV.md
Installing the Extension on Revit
Activate pyRevit Routes
- In Revit, navigate to the pyRevit tab
- Open Settings
- Go to
Routes> activateRoutes ServerpyRevit will start listening on porthttp://localhost:48884/
Install from pyRevit:
- In Revit, navigate to the pyRevit tab
- Open Extensions
- Select the MCP Server for Revit Python Extension > Install extension
- Select location, default is
%APPDATA%\Roaming\pyRevit\Extensions - Enable and wait for pyRevit to reload. Restart Revit if necessary.
Manual Installation on a custom directory:
- Clone the repo in a custom location:
git clone https://github.com/mcp-servers-for-revit/mcp-server-for-revit-python - Add
.extensionto the root folder name - In Revit, navigate to the pyRevit tab
- Open Settings
- Under "Custom Extensions", add the path to the
.extensionfolder - Save settings and reload pyRevit (you might need to restart Revit entirely)
Testing Your Connection
Once installed, test that the Routes API is working:
-
Open your web browser and go to:
http://localhost:48884/revit_mcp/status/ -
If successful, you should see a response like:
{"status": "active",
 "health": "healthy",
 "revit_available": true,
 "document_title": "your_revit_filename",
 "api_name": "revit_mcp"}
The Routes Service will now load automatically whenever you start Revit. To disable it, simply remove the extension path from the pyRevit settings.
Using the MCP Client
Testing with the MCP Inspector
The MCP SDK includes a handy inspector tool for debugging:
mcp dev main.py
Then access http://127.0.0.1:6274 in your browser to test your MCP server interactively.
Transport Modes
The MCP server supports multiple transport modes for different use cases:
| Flag | Transport | Endpoints | Use Case |
|---|---|---|---|
| (none) | stdio | stdin/stdout | Claude Desktop / Claude Code default |
--sse | SSE only | /sse, /messages/ | Legacy clients |
--streamable-http | HTTP only | /mcp | Modern HTTP clients |
--combined | Both | All above | Maximum compatibility |
Running with combined transport (recommended for HTTP):
uv run --with "mcp[cli]" main.py --combined
This starts the server on http://127.0.0.1:8000 with both SSE and streamable-HTTP endpoints available.
Testing the endpoints:
# Test streamable-http
curl -X POST http://localhost:8000/mcp

# Test SSE
curl http://localhost:8000/sse
Connecting to Claude Desktop
The simplest way to install your MCP server in Claude Desktop:
mcp install main.py
Or for manual installation:
- Open Claude Desktop → Settings → Developer → Edit Config
- Add this to the
mcpServerssection:
{
  "mcpServers": {
    "Revit Connector": {
      "command": "uv",
      "args": [
        "run",
        "--with",
        "mcp[cli]",
        "mcp",
        "run",
        "/absolute/path/to/main.py"
      ]
    }
  }
}
For HTTP transport mode, configure Claude Desktop with:
{
  "mcpServers": {
    "Revit Connector": {
      "url": "http://localhost:8000/mcp"
    }
  }
}
Connecting to Claude Code
claude mcp add -s user "Revit-Connector" -- uv run --with "mcp[cli]" mcp run /absolute/path/to/main.py
Creating Your Own Tools
The modular architecture of this project makes adding functionalities relatively simple. The provided LLM.txt file also gives your language model the necessary context to get started right away.
The process involves three main parts:
Part 1: Create the Route Module in Revit
Create a new Python file within the revit-mcp-python.extension/revit_mcp/ directory (e.g., revit_mcp/your_module.py). This module will contain all the related functions you want to expose.
# In revit-mcp-python.extension/revit_mcp/your_module.py

# -*- coding: UTF-8 -*-
"""
Your Module for Revit MCP
Handles your specific functionality.
"""
from pyrevit import routes, revit, DB
import json
import logging

# Standard logger setup
logger = logging.getLogger(__name__)

def register_your_routes(api):
    """Register all your routes with the API."""

    # ---- Example 1: A GET request for reading data ----
    @api.route('/your_endpoint/', methods=["GET"])
    def get_project_title(doc):
        """Gets the project title from the Revit model."""
        try:
            value = doc.Title
            return routes.make_response(data={"status": "success", "data": value})
        except Exception as e:
            logger.error("Get project title failed: {}".format(str(e)))
            return routes.make_response(data={"error": str(e)}, status=500)

    # ---- Example 2: A POST request for modifying the model ----
    @api.route('/modify_model/', methods=["POST"])
    def modify_model(doc, request):
        """Handles POST requests for modifying the Revit model."""
        try:
            data = json.loads(request.data) if isinstance(request.data, str) else request.data

            # Use a transaction for all model modifications
            t = DB.Transaction(doc, "Modify Model via MCP")
            t.Start()

            try:
                element_id = data.get("element_id")
                new_value = data.get("new_value")
                element = doc.GetElement(DB.ElementId(int(element_id)))
                param = element.LookupParameter("Comments")
                param.Set(new_value)

                t.Commit()
                return routes.make_response(data={"status": "success", "result": "Element modified."})

            except Exception as tx_error:
                if t.HasStarted() and not t.HasEnded():
                    t.RollBack()
                raise tx_error

        except Exception as e:
            logger.error("Modify model failed: {}".format(str(e)))
            return routes.make_response(data={"error": str(e)}, status=500)

    logger.info("Your custom routes were registered successfully.")
Part 2: Create the MCP Tool Module
Create the corresponding tools for the MCP server in the tools/ directory (e.g., tools/your_tools.py). This module will use the revit_get and revit_post helpers from main.py.
# In tools/your_tools.py
# -*- coding: utf-8 -*-
"""Your tools for the MCP server."""

from mcp.server.fastmcp import Context
from .utils import format_response

def register_your_tools(mcp, revit_get, revit_post, revit_image=None):
    """Register your tools with the MCP server."""

    # ---- Tool for the GET request ----
    @mcp.tool()
    async def get_revit_project_title(ctx: Context) -> str:
        """
        Retrieves the title of the currently open Revit project.
        """
        response = await revit_get("/your_endpoint/", ctx)
        return format_response(response)

    # ---- Tool for the POST request ----
    @mcp.tool()
    async def modify_revit_element_comment(
        element_id: int,
        new_value: str,
        ctx: Context = None
    ) -> str:
        """
        Modifies the 'Comments' parameter of a specific element.

        Args:
            element_id: The ID of the element to modify.
            new_value: The new comment to apply to the element.
        """
        payload = {"element_id": element_id, "new_value": new_value}
        response = await revit_post("/modify_model/", payload, ctx)
        return format_response(response)
Part 3: Register Your New Modules
1. Register the Route Module
Open revit-mcp-python.extension/startup.py and add your new route registration function.
# In revit-mcp-python.extension/startup.py

# ... (other imports)
# Import the registration function from your new module
from revit_mcp.your_module import register_your_routes

def register_routes():
    """Register all MCP route modules"""
    api = routes.API('revit_mcp')
    try:
        # ... (existing route registrations)

        # Register your new routes (this registers all functions inside)
        register_your_routes(api)

        logger.info("All MCP routes registered successfully")
    except Exception as e:
        logger.error("Failed to register MCP routes: {}".format(str(e)))
        raise
2. Register the Tool Module
Open tools/__init__.py and add your new tool registration function.
# In tools/__init__.py

# ... (other tool imports)
# Import the registration function from your new tool module
from .your_tools import register_your_tools

def register_tools(mcp_server, revit_get_func, revit_post_func, revit_image_func):
    """Register all tools with the MCP server"""

    # ... (existing tool registrations)
    # Register your new tools (this registers all tools inside)
    register_your_tools(mcp_server, revit_get_func, revit_post_func, revit_image_func)

    return mcp_server
Roadmap
This is a work in progress and more of a demonstration than a fully-featured product. Future improvements could include:
- Creating a Client inside Revit
- Implementing compatibilities with other language Models
- Authentication and security enhancements
- More advanced Revit tools and capabilities
- Better error handling and debugging features
- Benchmarking with local models
- Documentation and examples for common use cases
- ...
Contributing
Contributions are welcome! Feel free to submit pull requests or open issues for any bugs or feature requests. Feel free to reach out to me if you have any questions, ideas