Comfy Cloud MCP
Server MCP resmi untuk Comfy Cloud - menghasilkan gambar, video, audio, dan 3D, menjalankan alur kerja ComfyUI, serta mencari model langsung dari Claude dan agen AI lainnya
Dokumentasi
Comfy MCP: Connect AI Agents to ComfyUI
Connect AI agents to ComfyUI over the Model Context Protocol. Generate images, video, audio, and 3D, and run real workflows on Comfy Cloud or your own machine.
Overview
Comfy MCP connects AI agents to ComfyUI over the Model Context Protocol. Once connected, you can generate images, video, audio and 3D, search models, nodes and templates, and run real ComfyUI workflows from a chat with your agent.
It comes with two connections: a Comfy Cloud connection and a local ComfyUI connection, with the local one fully open source.
[!TIP]
Stuck on anything below? The best way is to hand this page to your agent and ask for help.
Which connection do I want?
For new users, we recommend starting with the cloud connection — it is the simplest setup. If you use claude.ai, ChatGPT, or the Claude Desktop chat app, the cloud connection is also the more compatible choice.
If you already run ComfyUI locally or in your own deployed environment, or you work mostly in a coding agent like Claude Code, Cursor, or Codex, start with the local connection.
[!NOTE]
For Mac users, if you plan to run open-source models, we recommend the cloud connection. Today's open-weight models — the local versions of MiniMax H3, LTX-2.3, and similar — are large, and will not run at a workable speed on the Apple GPU.
Running both at once is normal, and most clients host two MCP servers happily. They sign in to the same Comfy account, but separately — one sign-in does not cover the other.
Comfy Cloud MCP Connection
The hosted connection, linking your agent to your Comfy Cloud account. Nothing to install, and workflows run on Comfy Cloud GPUs. To learn more about Comfy Cloud, see Comfy Cloud.
Set up the cloud connection
[!NOTE]
You need a Comfy Cloud account before connecting. Sign up if you do not have one yet; new users get 5 free runs to try it out. OAuth sign-in during setup uses your Comfy account.
Comfy Cloud MCP runs at:
https://cloud.comfy.org/mcp
Pick your client:
[tab] Claude Desktop
Claude Desktop adds Comfy Cloud as a custom connector through its UI, then runs the OAuth sign-in.
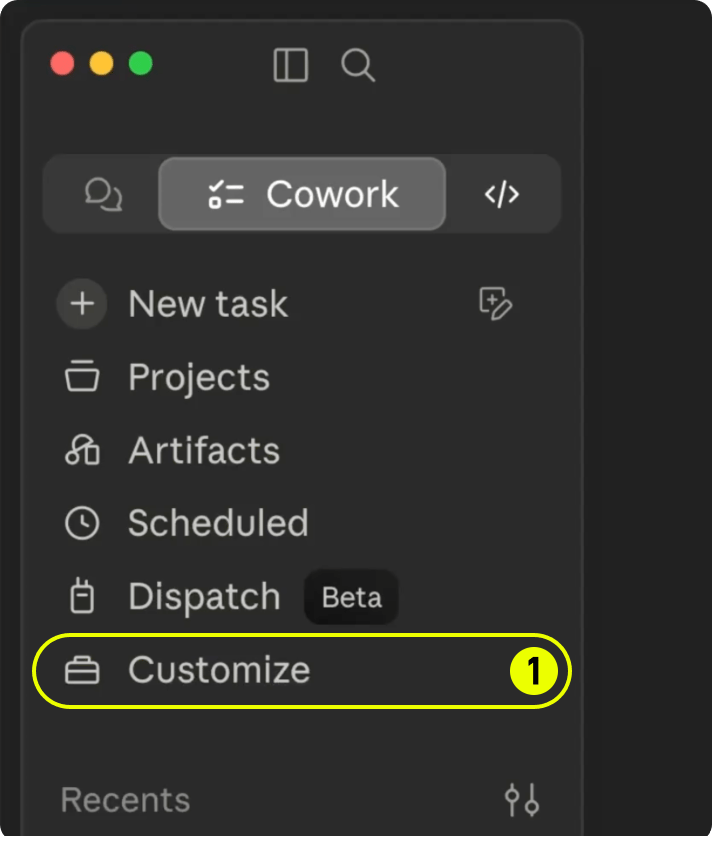
1. Open Customize
In the sidebar, click Customize (labeled 1).
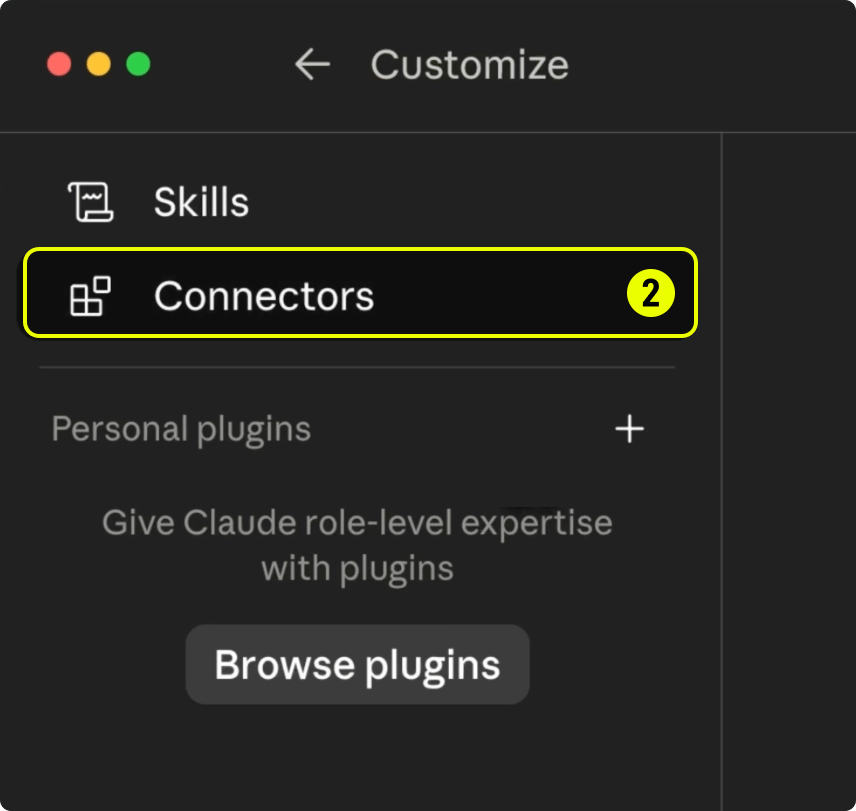
2. Open Connectors
Click Connectors (labeled 2).
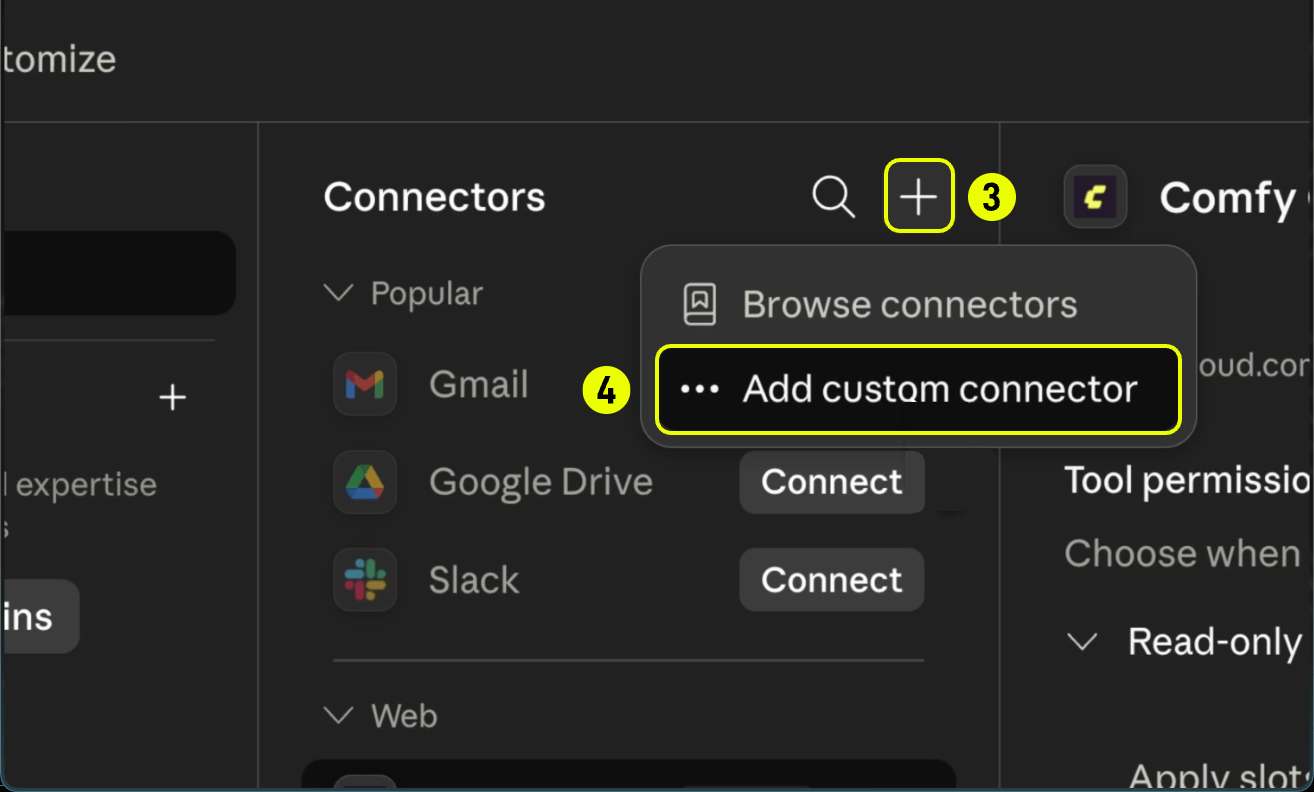
3. Add a custom connector
Click the + button (labeled 3) in the Connectors header.
Choose Add custom connector (labeled 4).
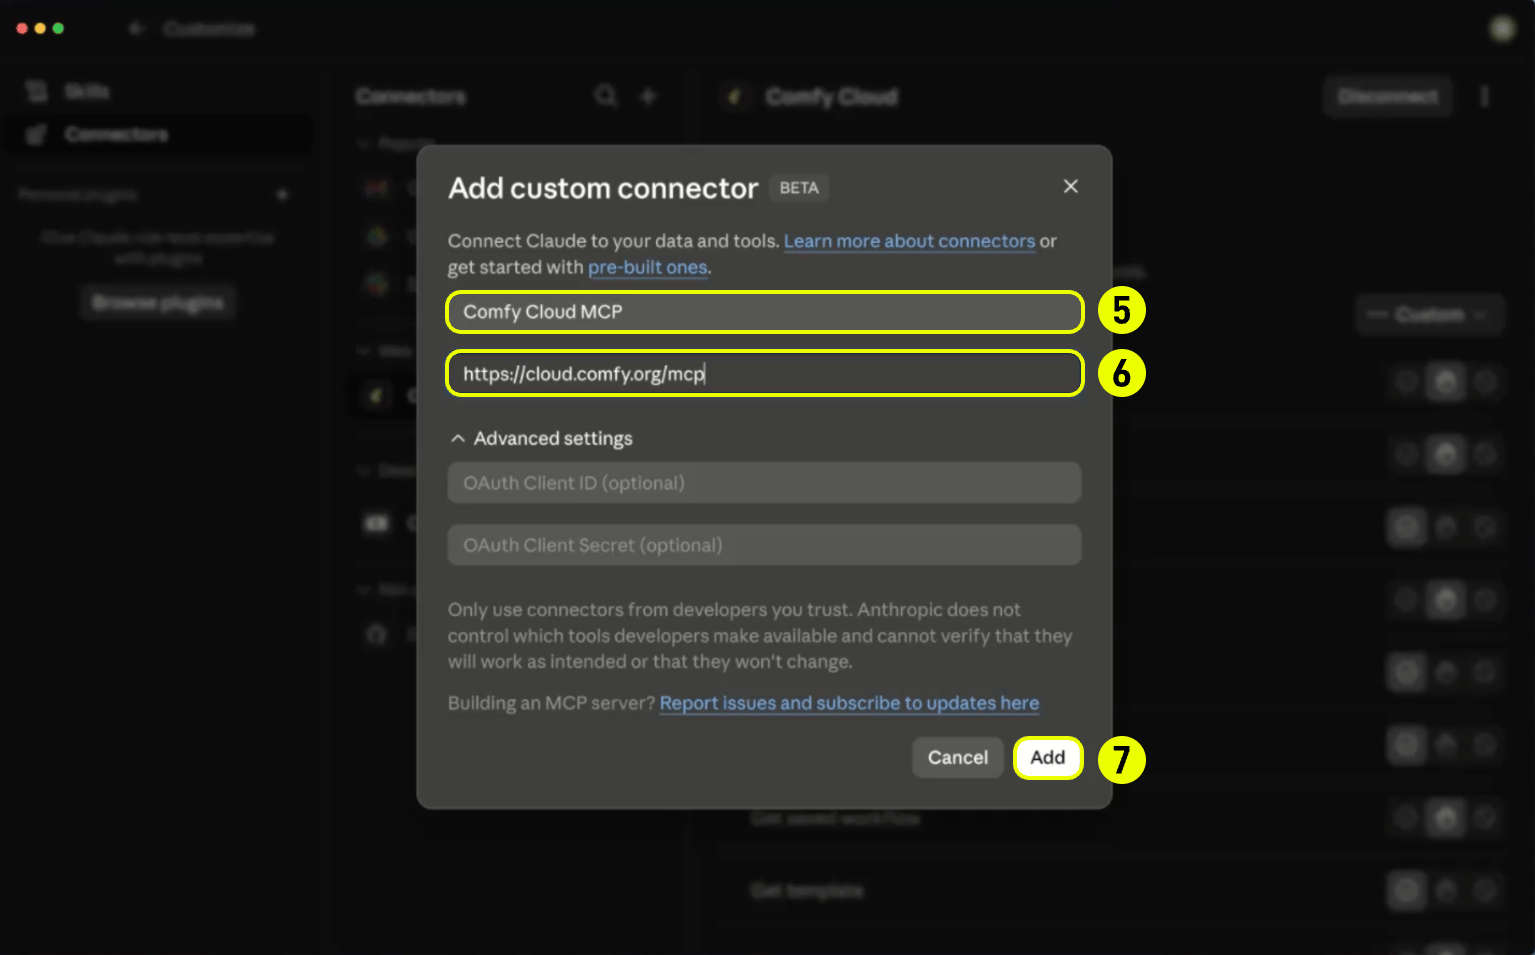
4. Enter server details
Enter a name such as Comfy Cloud MCP in the Name field (labeled 5).
Set the Remote MCP server URL to
https://cloud.comfy.org/mcp(labeled 6).Click Add (labeled 7).
5. Sign in
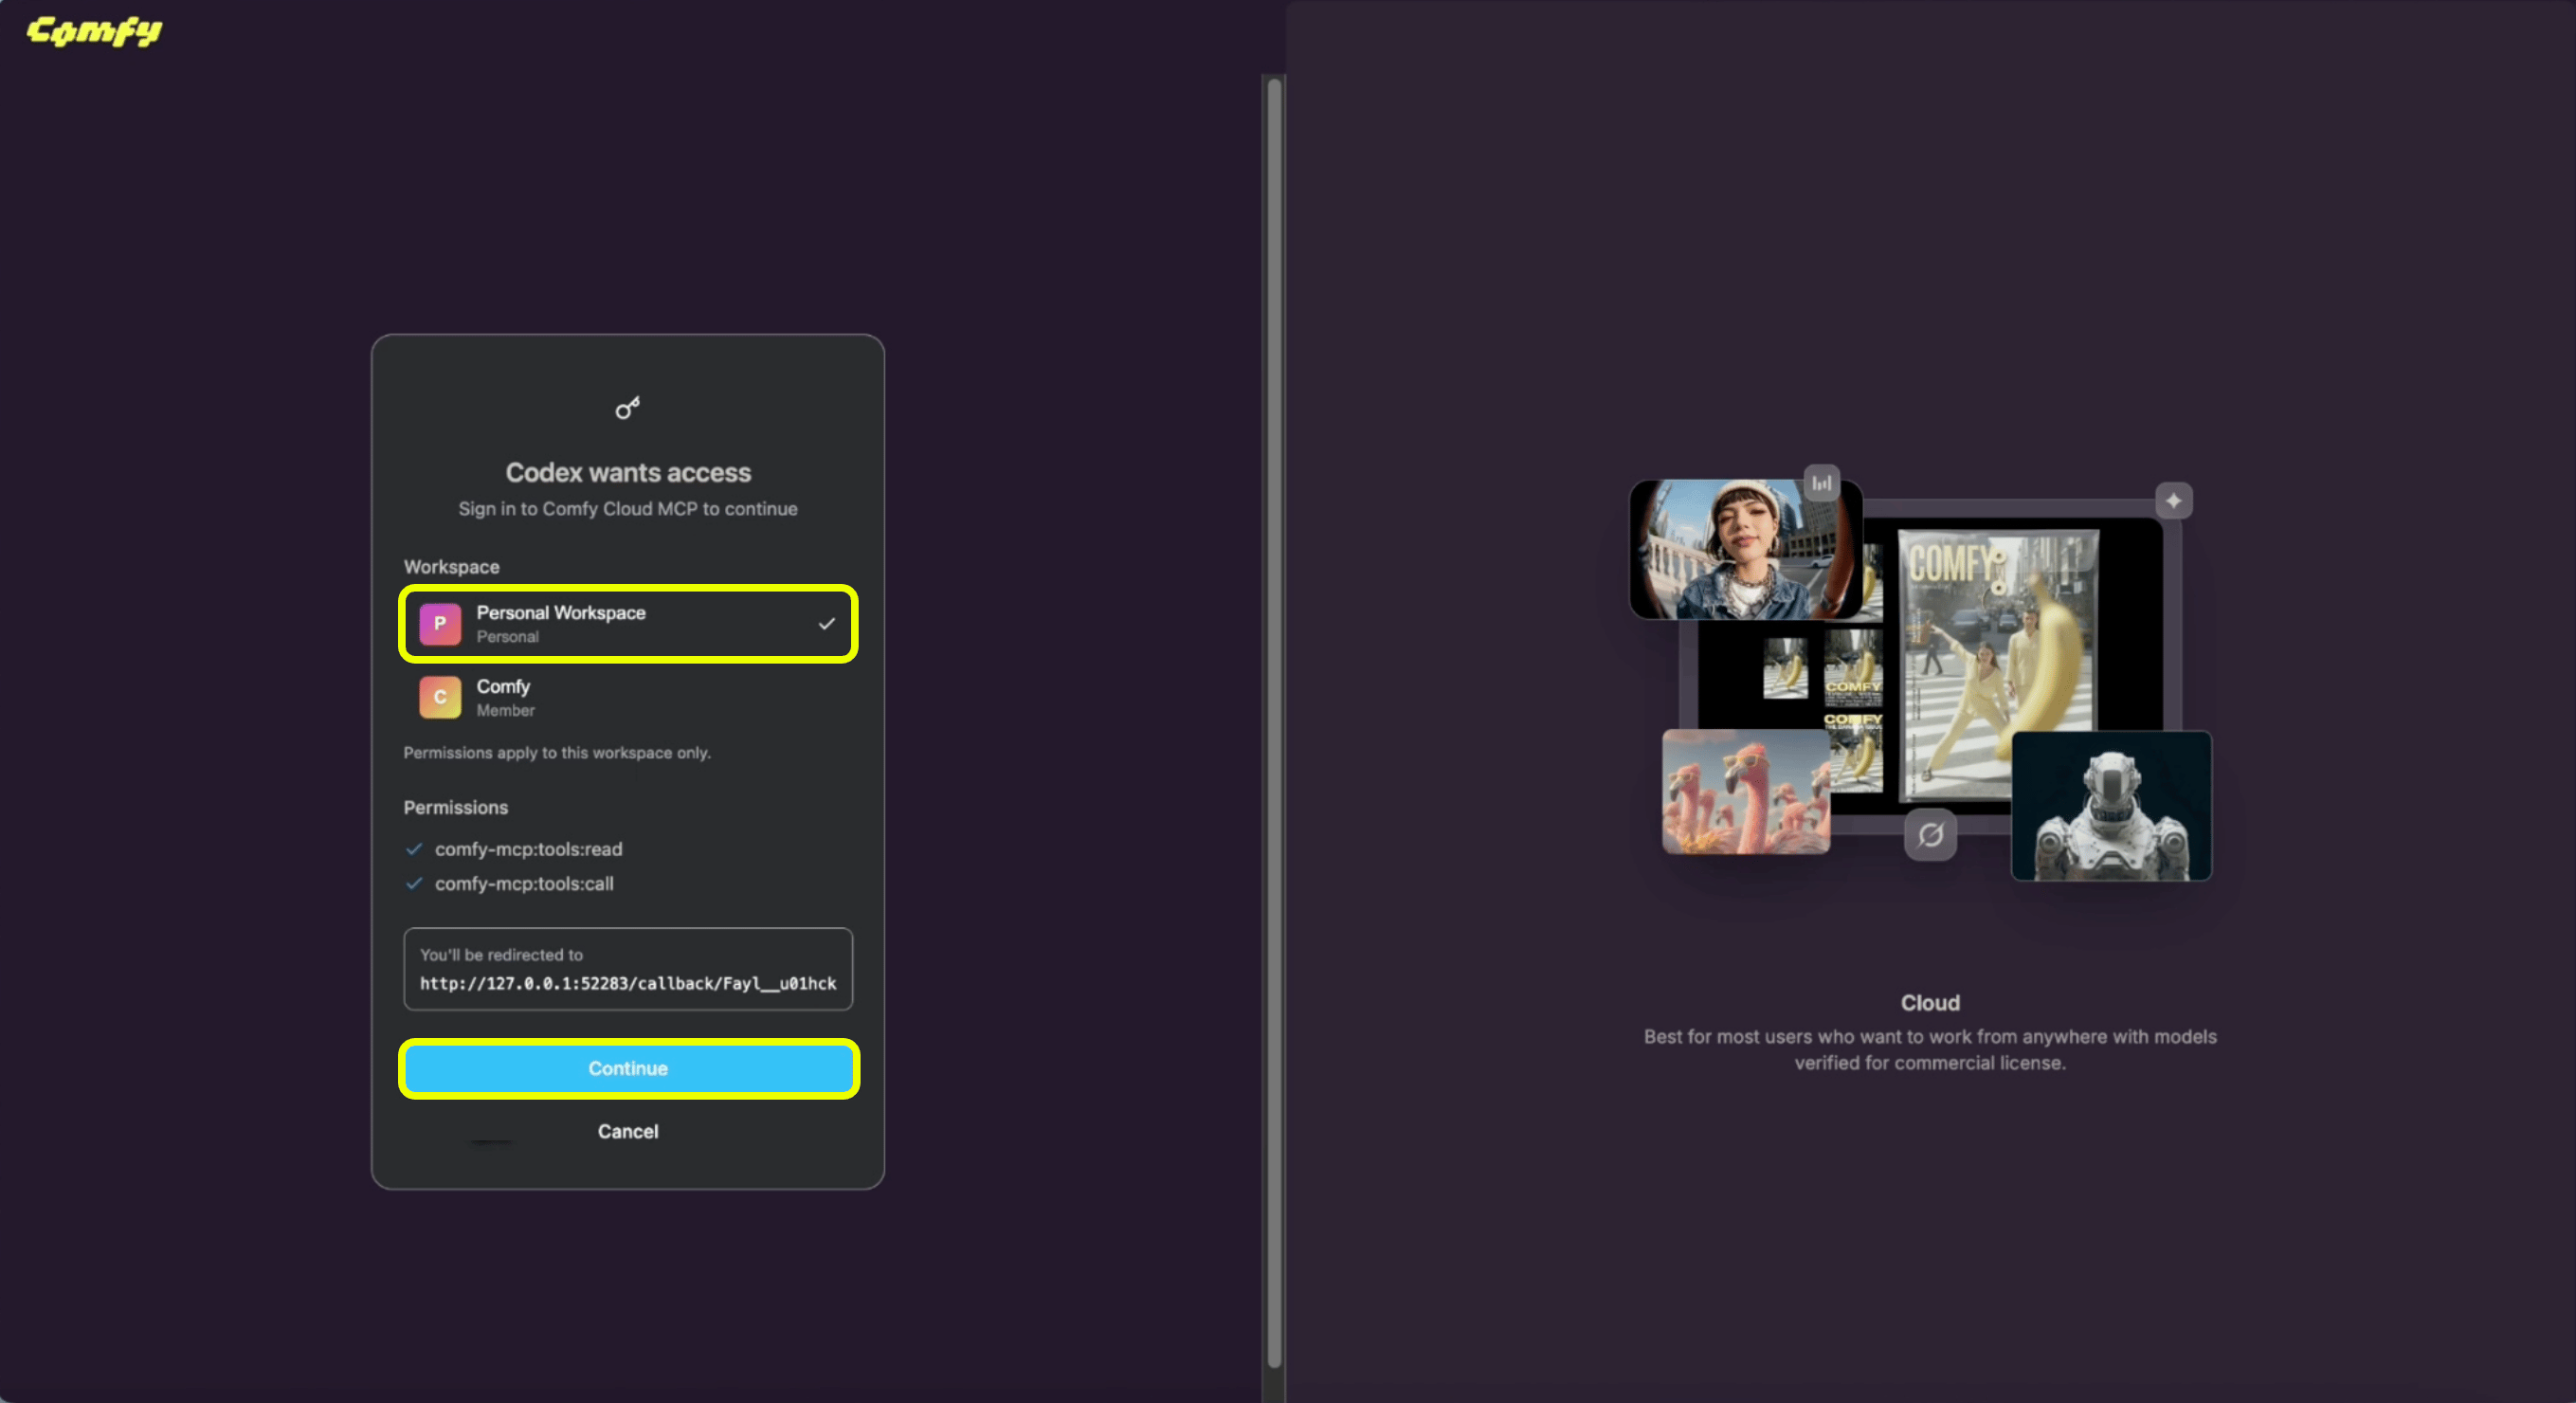
When the browser opens, choose your workspace (for example Personal Workspace).
Click Continue to authorize the connector. You are connected.
[tab] Claude Code
Install the comfy-cloud plugin. It adds the MCP connection and slash commands in one step. The plugin is published through the Comfy Skills repository, which hosts Claude Code plugins and community agent skills for Comfy.
1. Add the marketplace
Register the Comfy Skills marketplace (one-time):
/plugin marketplace add Comfy-Org/comfy-skills2. Install the plugin
/plugin install comfy-cloud@comfy-skills3. Sign in
Run
/mcp, select comfy-cloud → Authenticate. Your browser opens to sign in, and tokens refresh automatically.The plugin adds these slash commands:
Command What it does /comfy-cloud:generate-imageGenerate, edit, or modify an image /comfy-cloud:generate-videoGenerate, edit, or extend a video /comfy-cloud:generate-audioGenerate audio, music, or sound effects /comfy-cloud:generate-3dGenerate a 3D model from text or an image /comfy-cloud:remove-backgroundRemove the background from an image /comfy-cloud:upscale-imageUpscale an image to higher resolution /comfy-cloud:search-templatesFind pre-built workflow templates on comfy.org /comfy-cloud:search-modelsSearch for available models /comfy-cloud:search-nodesSearch for nodes and get wiring suggestions /comfy-cloud:helpSee what you can do with ComfyUI Cloud [accordion] Prefer just the connection, without the plugin?
Add the server directly:
claude mcp add --transport http comfy-cloud https://cloud.comfy.org/mcpThen run
/mcp, select comfy-cloud → Authenticate. Add-s userto make it available in all your projects.This path still exposes the same workflows as MCP prompts:
/mcp__comfy-cloud__generate-image,/mcp__comfy-cloud__search-models, and so on (the/mcp__<name>__prefix uses the name you passed toclaude mcp add). The plugin above is recommended because it wraps these as the friendlier/comfy-cloud:*commands.
[tab] Cursor
Cursor connects to remote MCP servers over HTTP. Cursor does not support MCP OAuth today. Add Comfy Cloud with a Comfy Cloud API key in your MCP config.
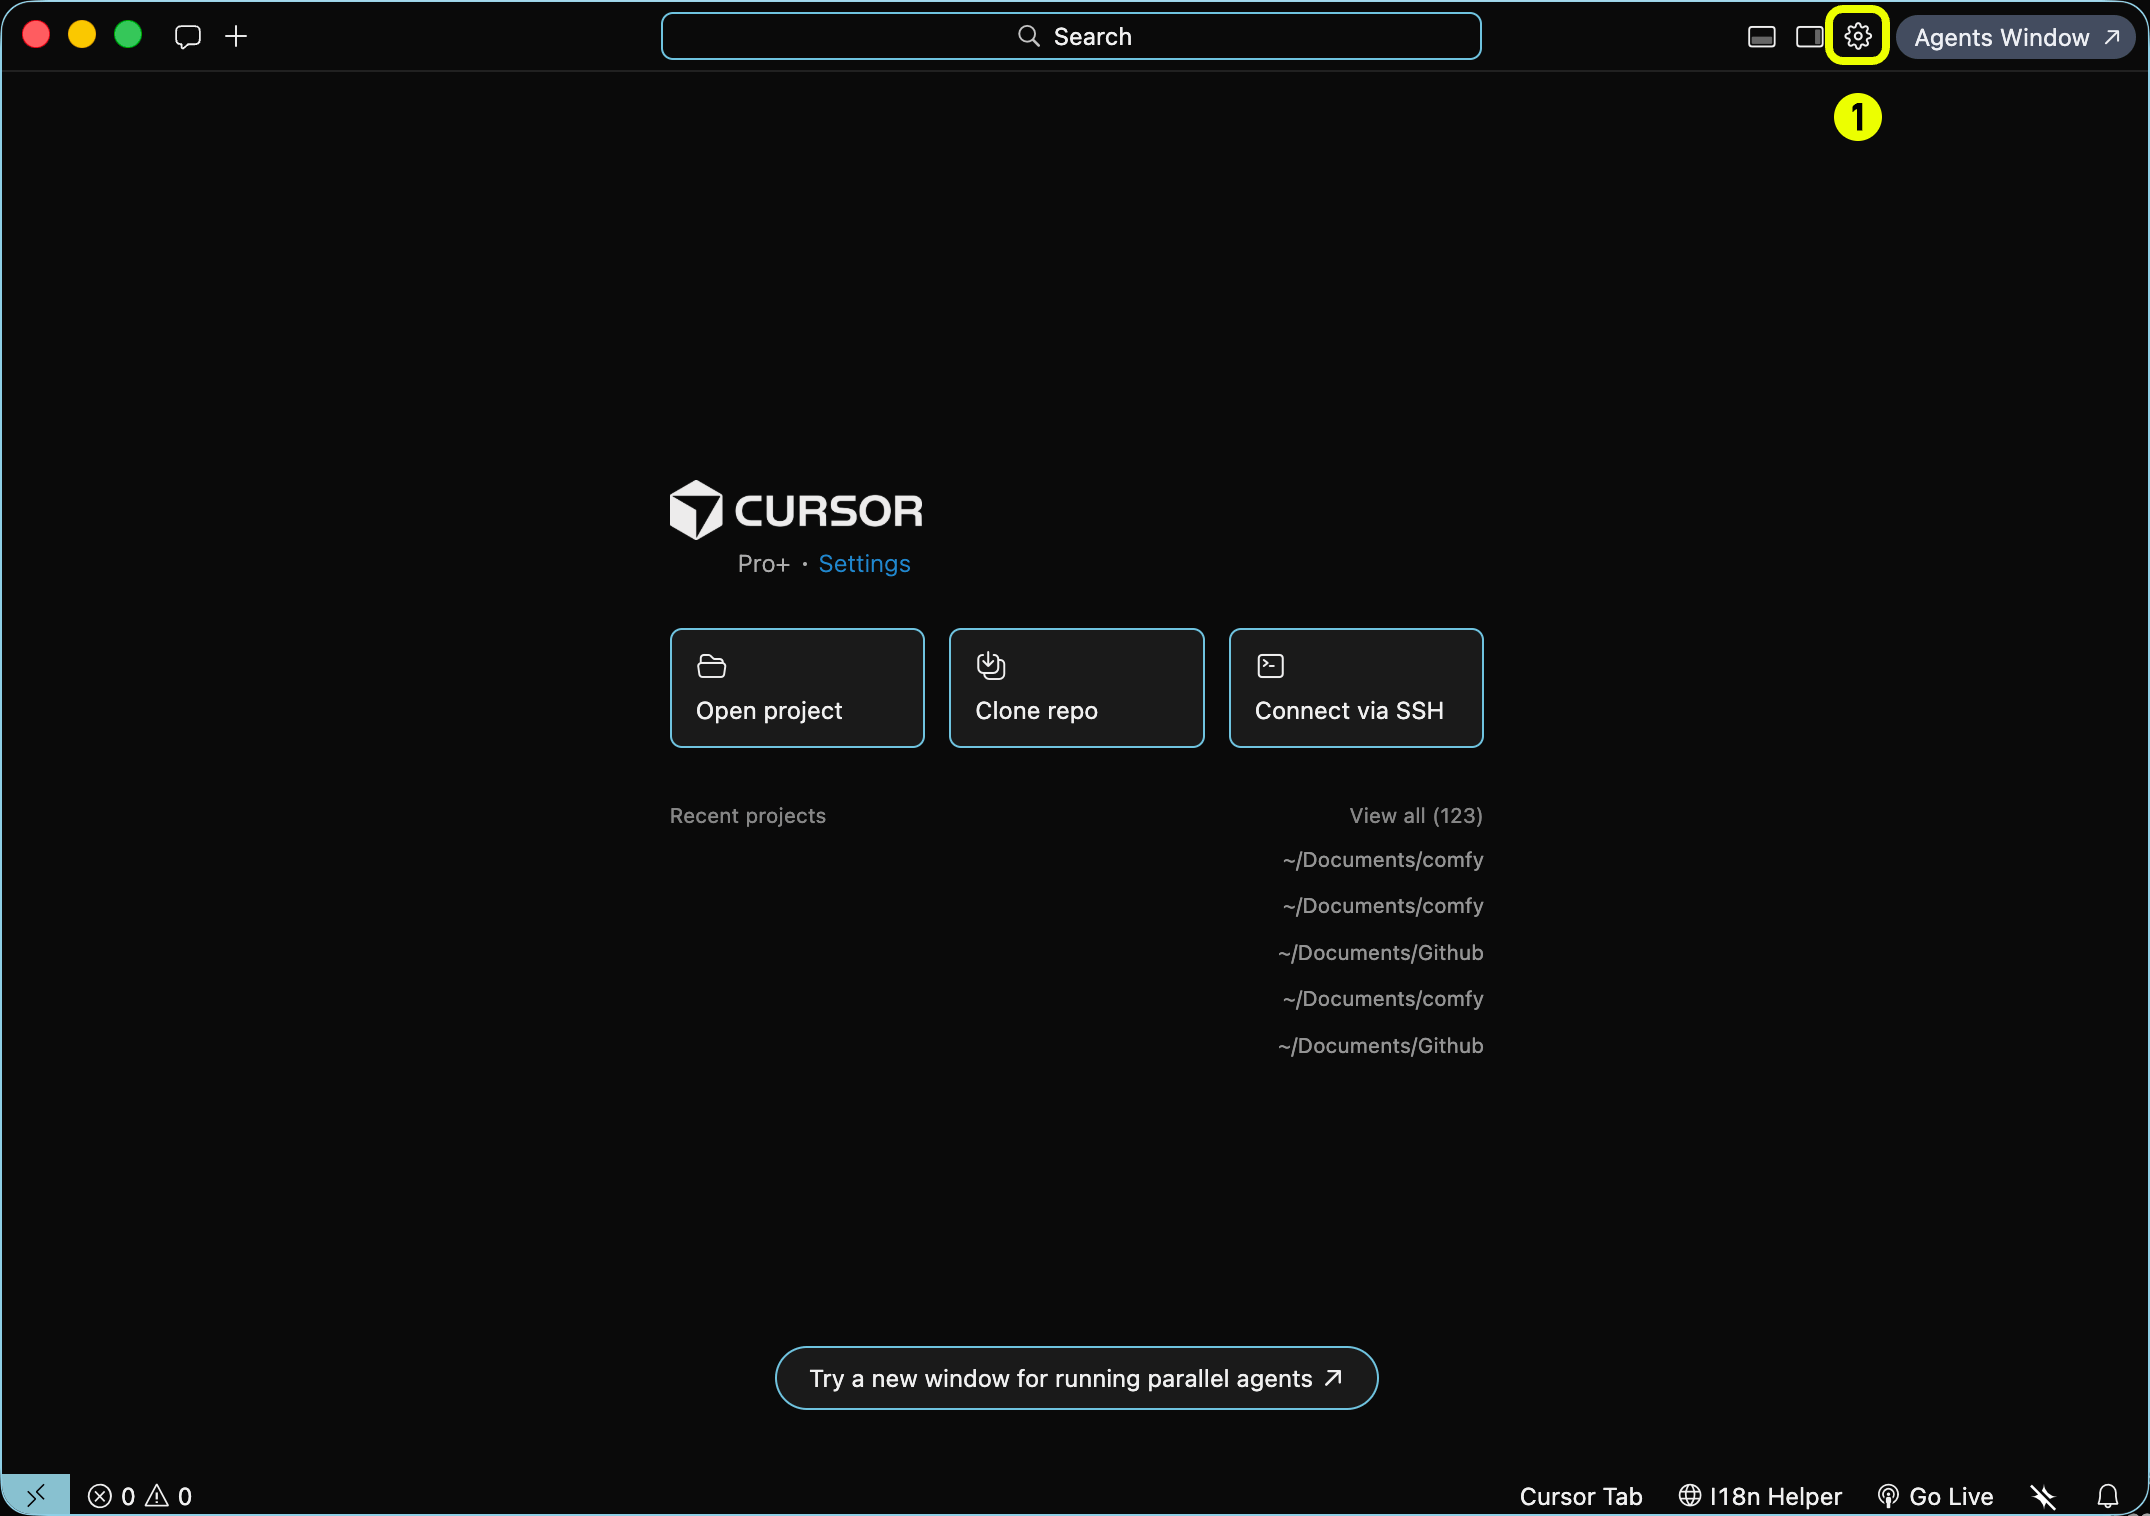
1. Open Cursor Settings
Click the Settings gear in the top-right corner (labeled 1).
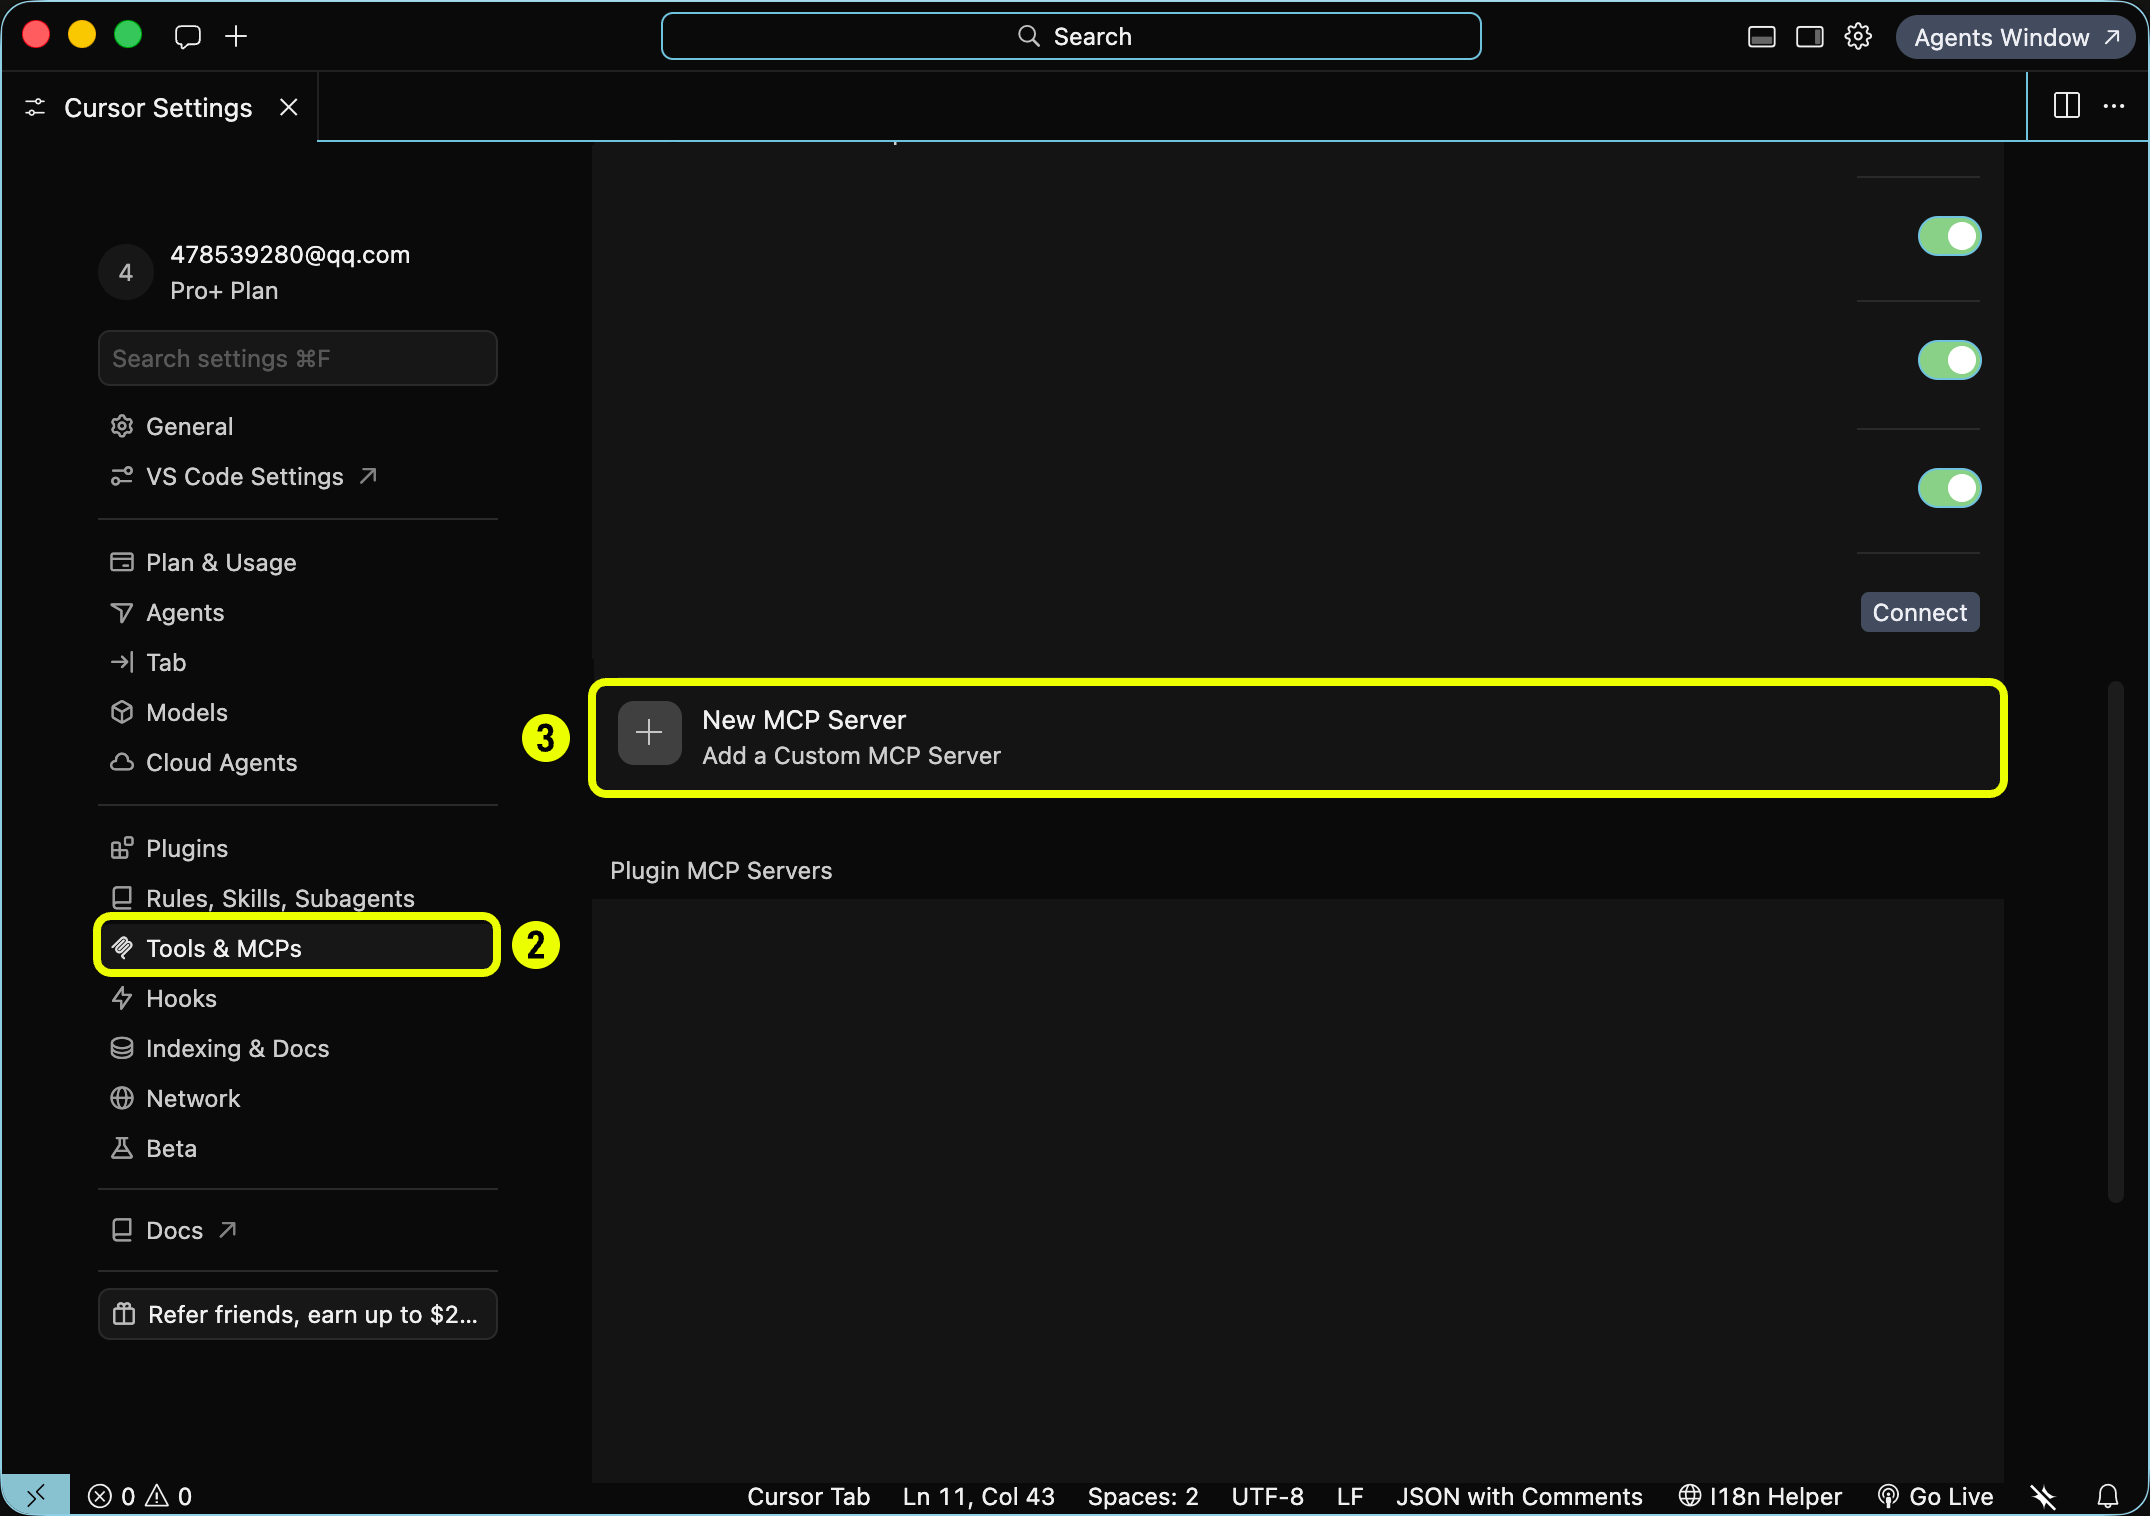
2. Open Tools & MCP
In the sidebar, click Tools & MCPs (labeled 2).
Click + New MCP Server (labeled 3) → Add a Custom MCP Server.
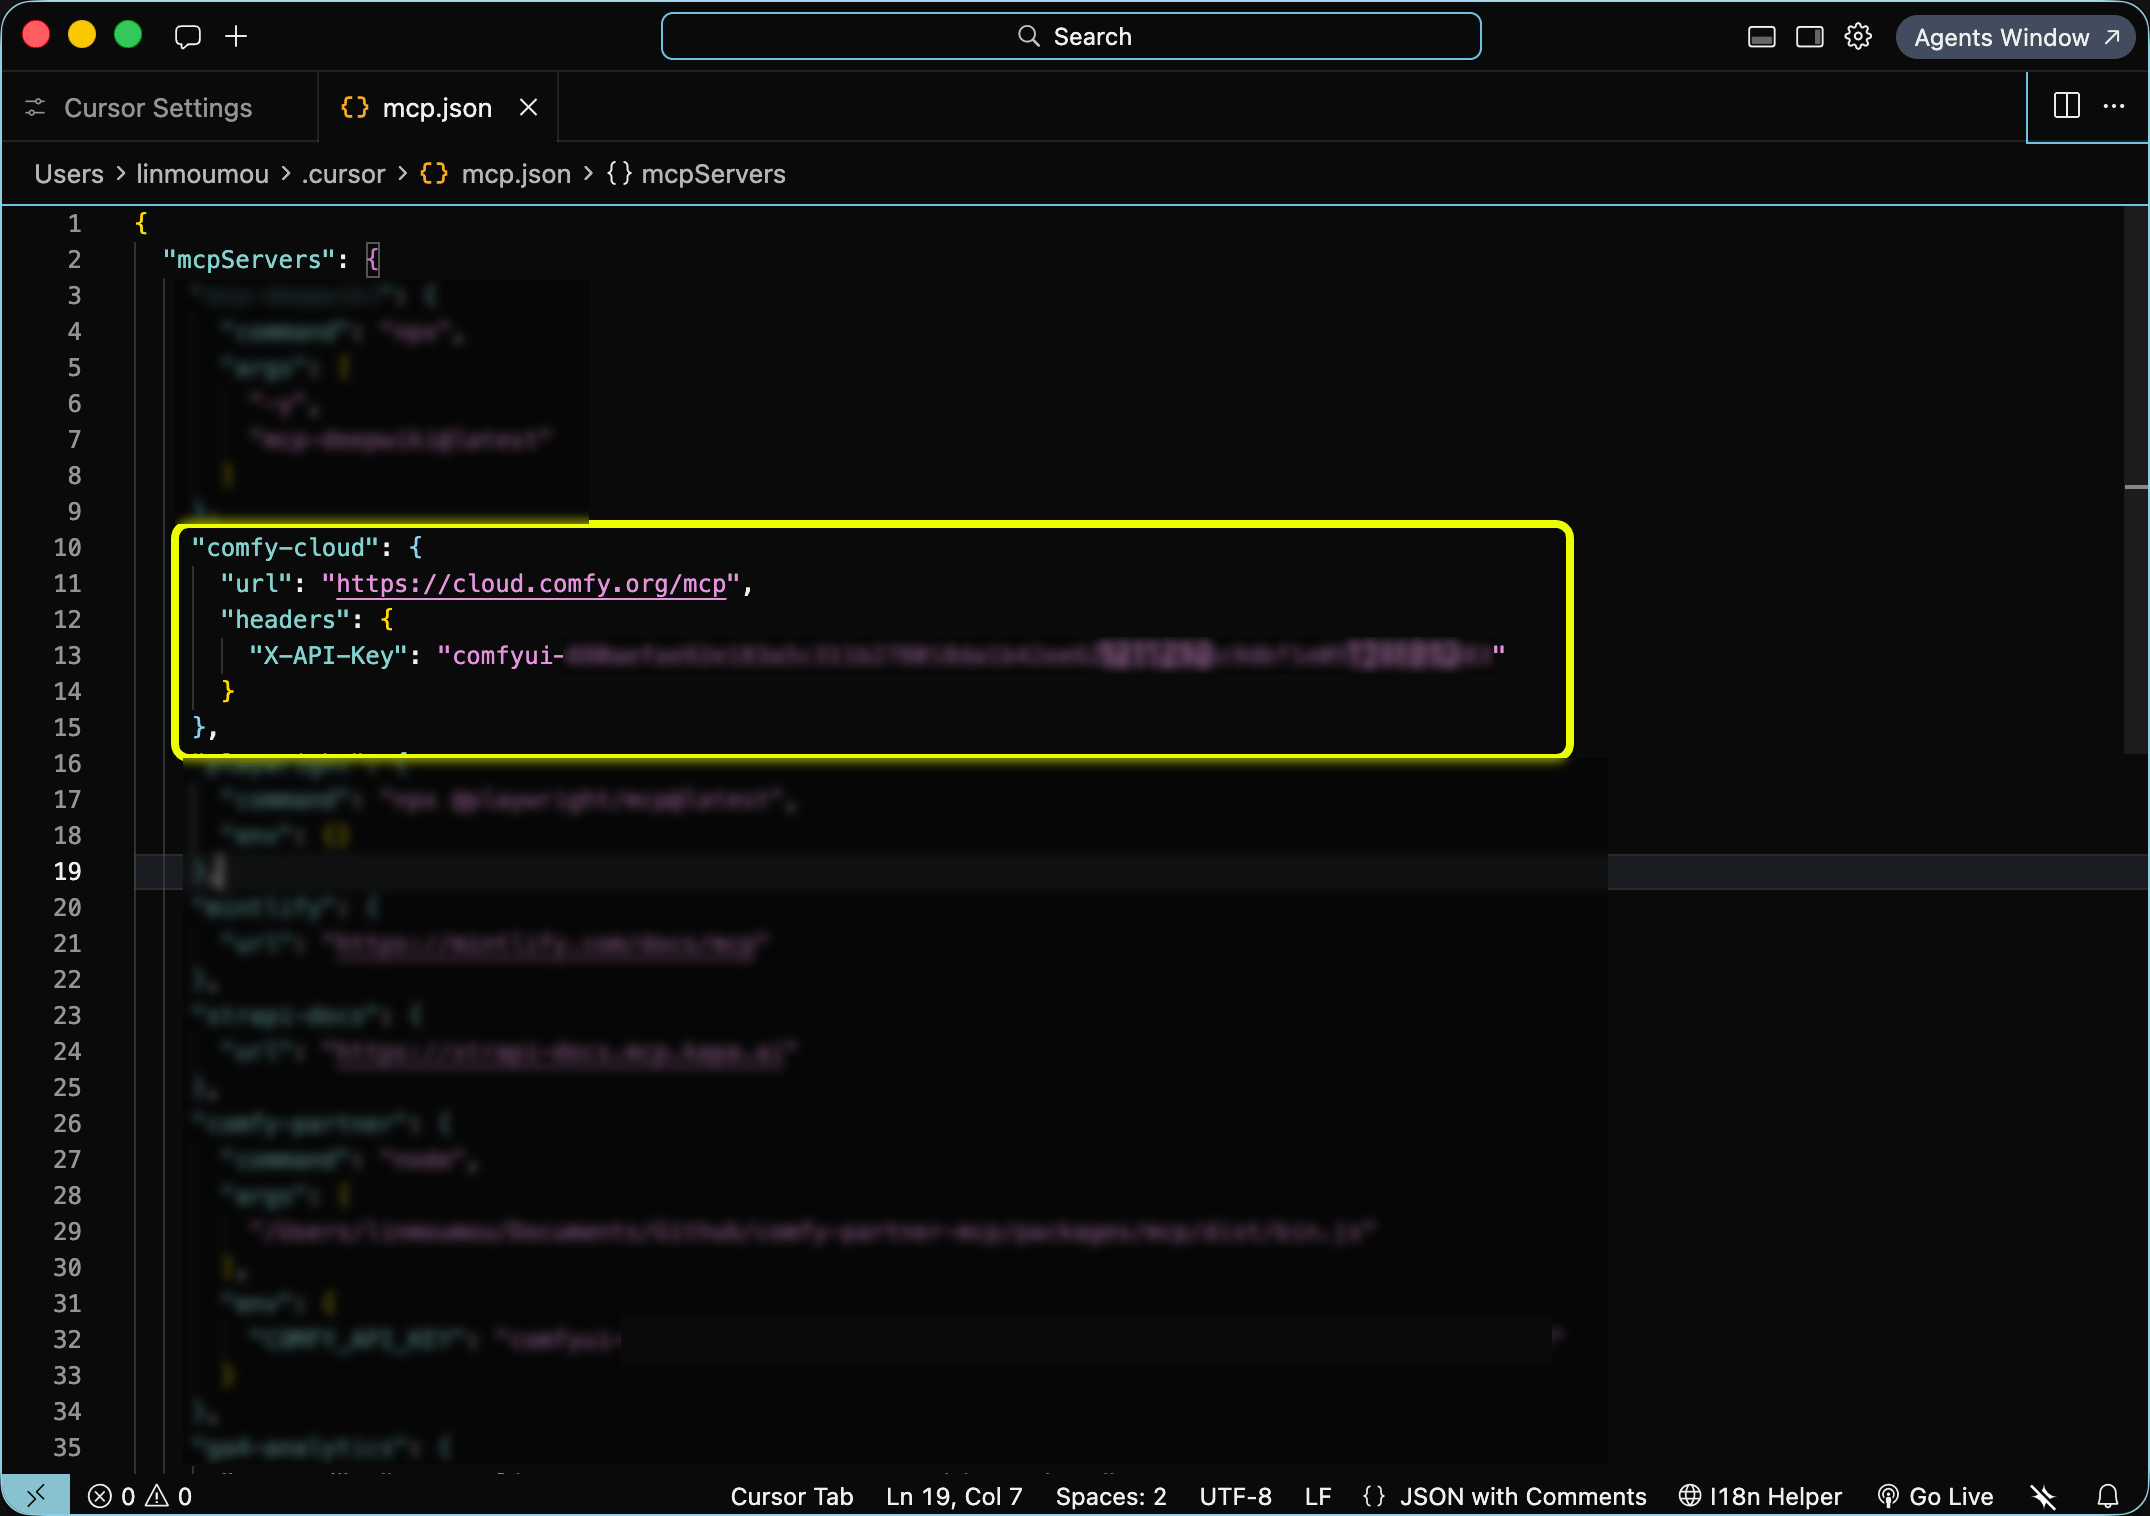
3. Add your API key
Edit
~/.cursor/mcp.json(global) or.cursor/mcp.json(project). Set the server URL and pass your Comfy Cloud API key in theX-API-Keyheader. Create a key at platform.comfy.org/profile/api-keys (starts withcomfyui-):{ "mcpServers": { "comfy-cloud": { "url": "https://cloud.comfy.org/mcp", "headers": { "X-API-Key": "${env:COMFY_API_KEY}" } } } }Set
COMFY_API_KEYin your shell or system environment. Prefer${env:COMFY_API_KEY}over hardcoding the key in a file you might commit to Git.
4. Start generating
Ask in plain language ("generate an image of a cat astronaut", "find a Wan 2.2 video template"). Cursor invokes the MCP tools on your behalf.
[tab] Codex
Codex connects to Comfy Cloud over Streamable HTTP. Add the server in Settings, then sign in with OAuth.
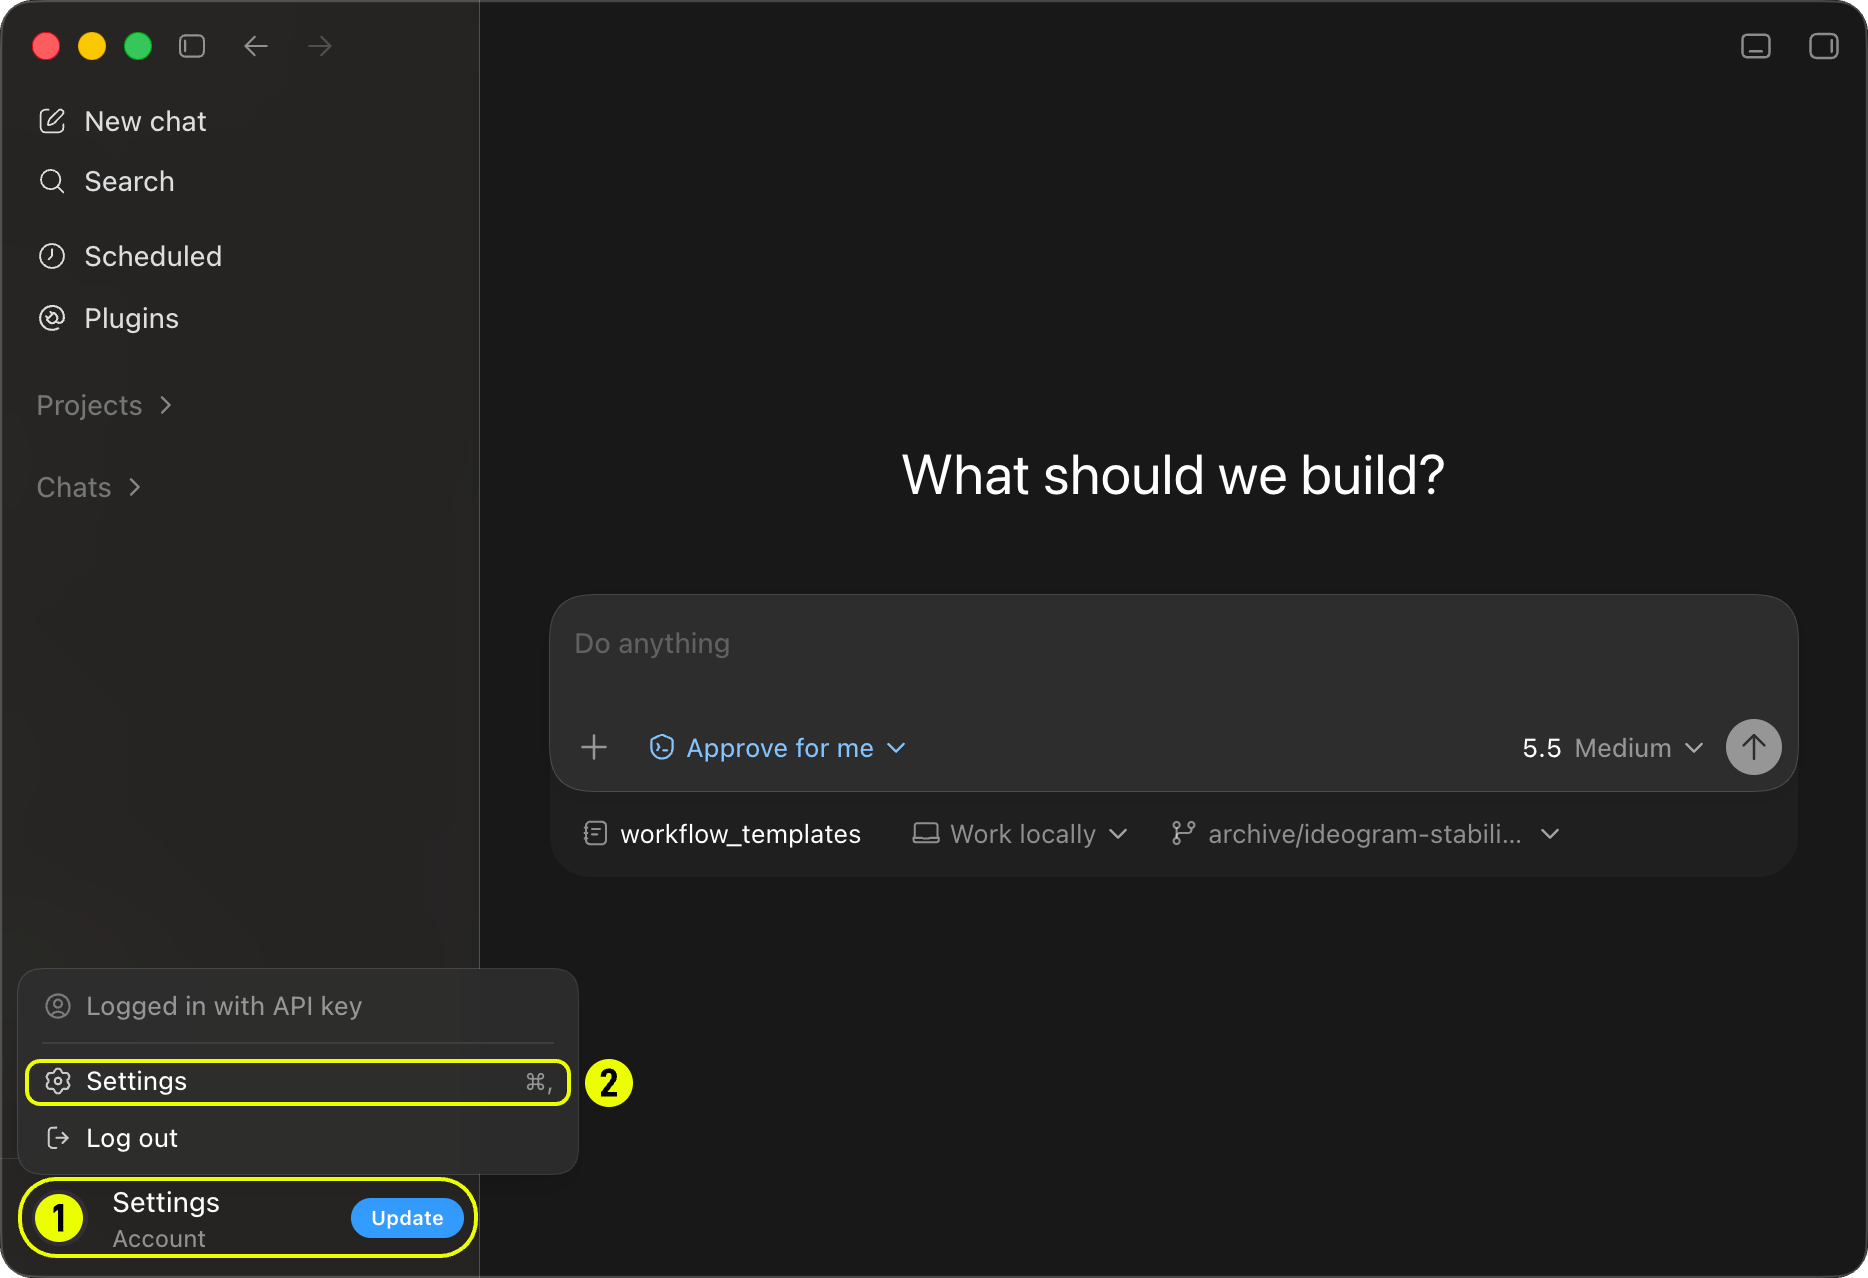
1. Open the settings panel
Click Settings (labeled 1) under Logged in with API key.
Click Settings (labeled 2) to open the full settings panel.
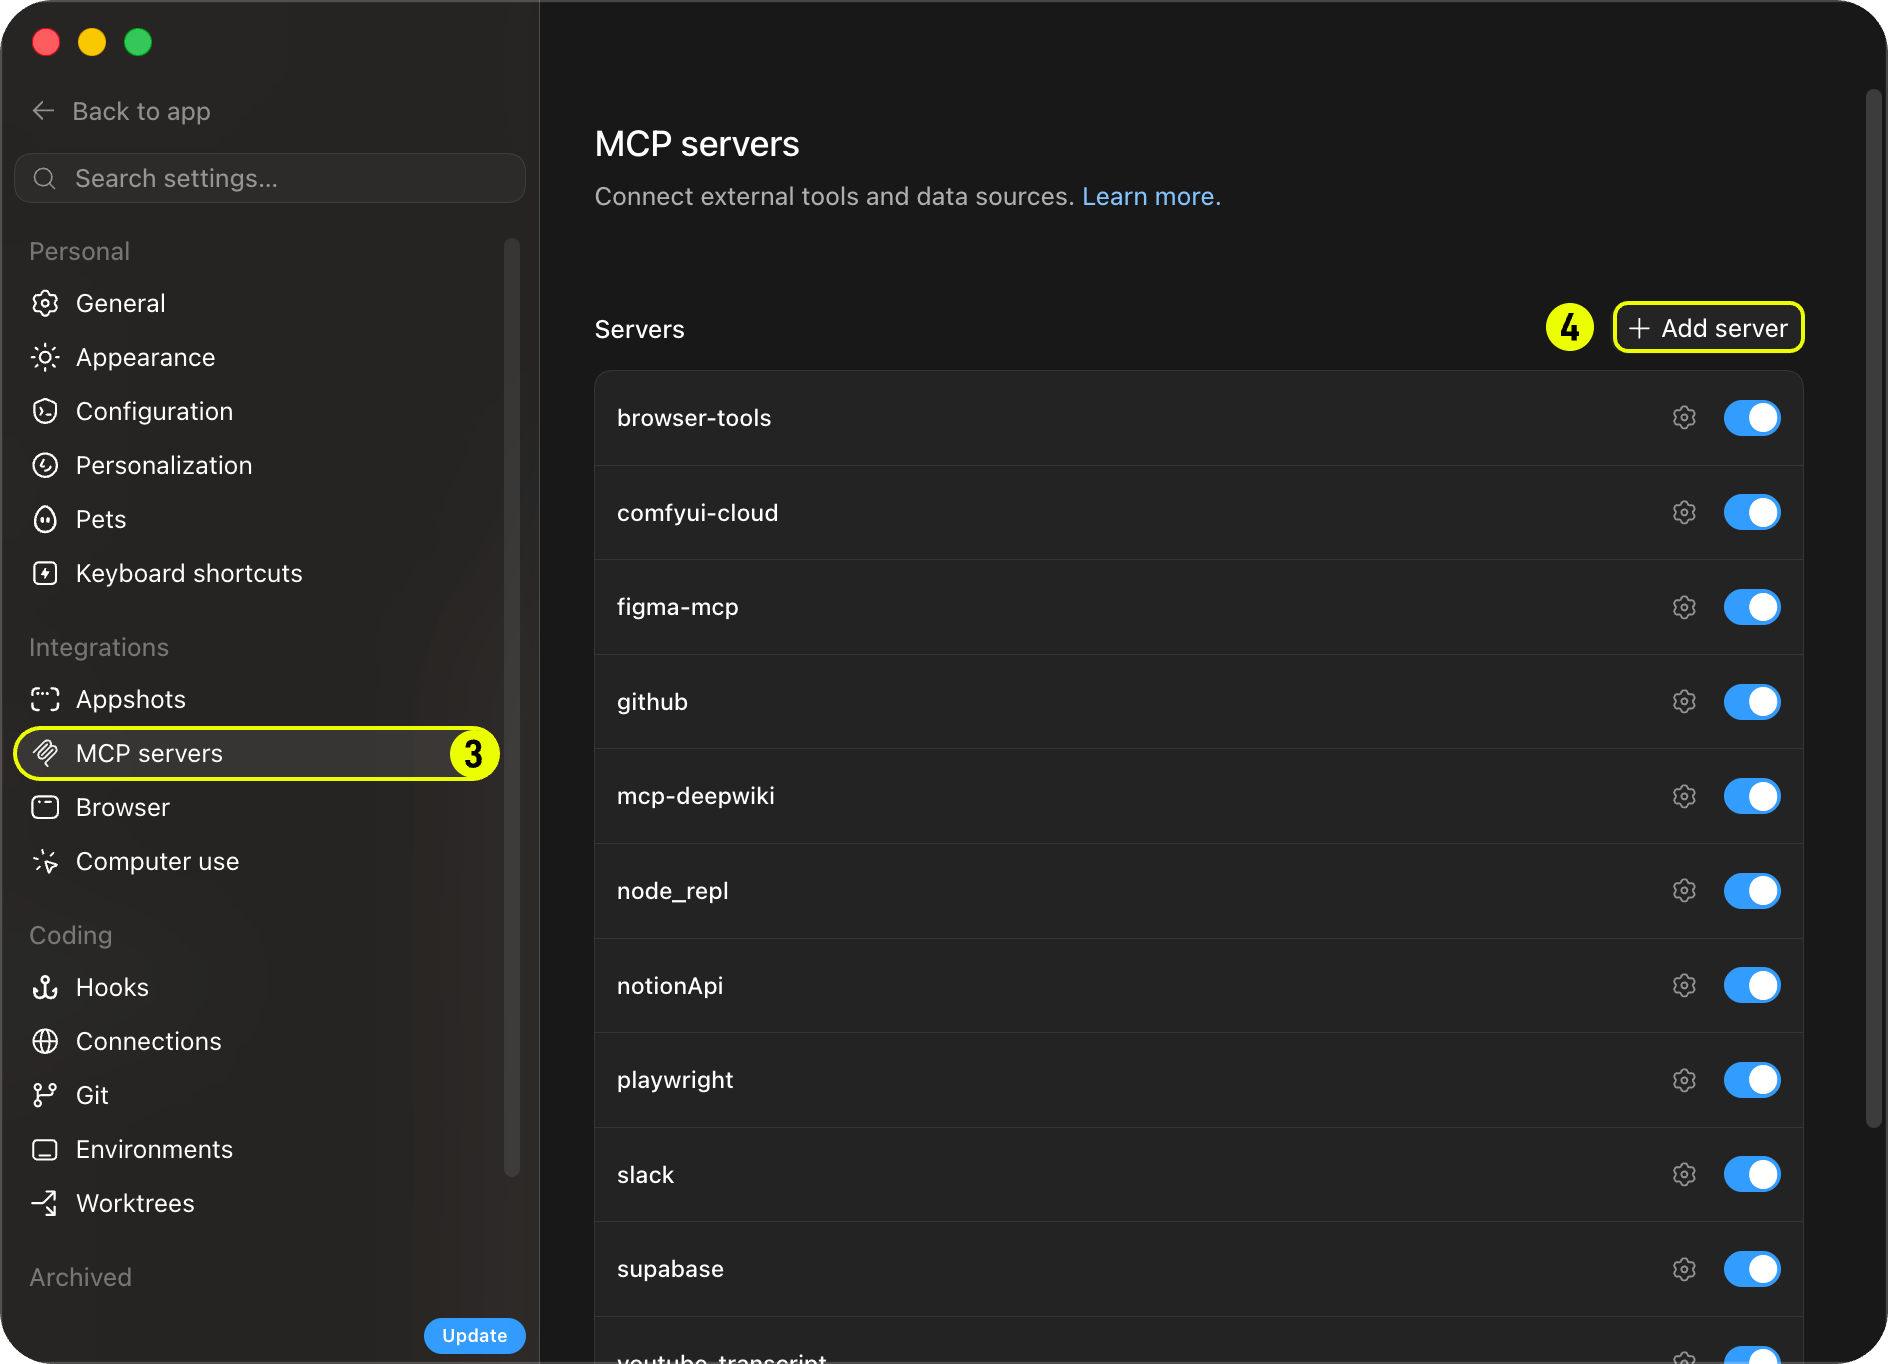
2. Open MCP server settings
Click MCP servers (labeled 3) in the settings list.
Click + Add server (labeled 4) to add a new MCP server.
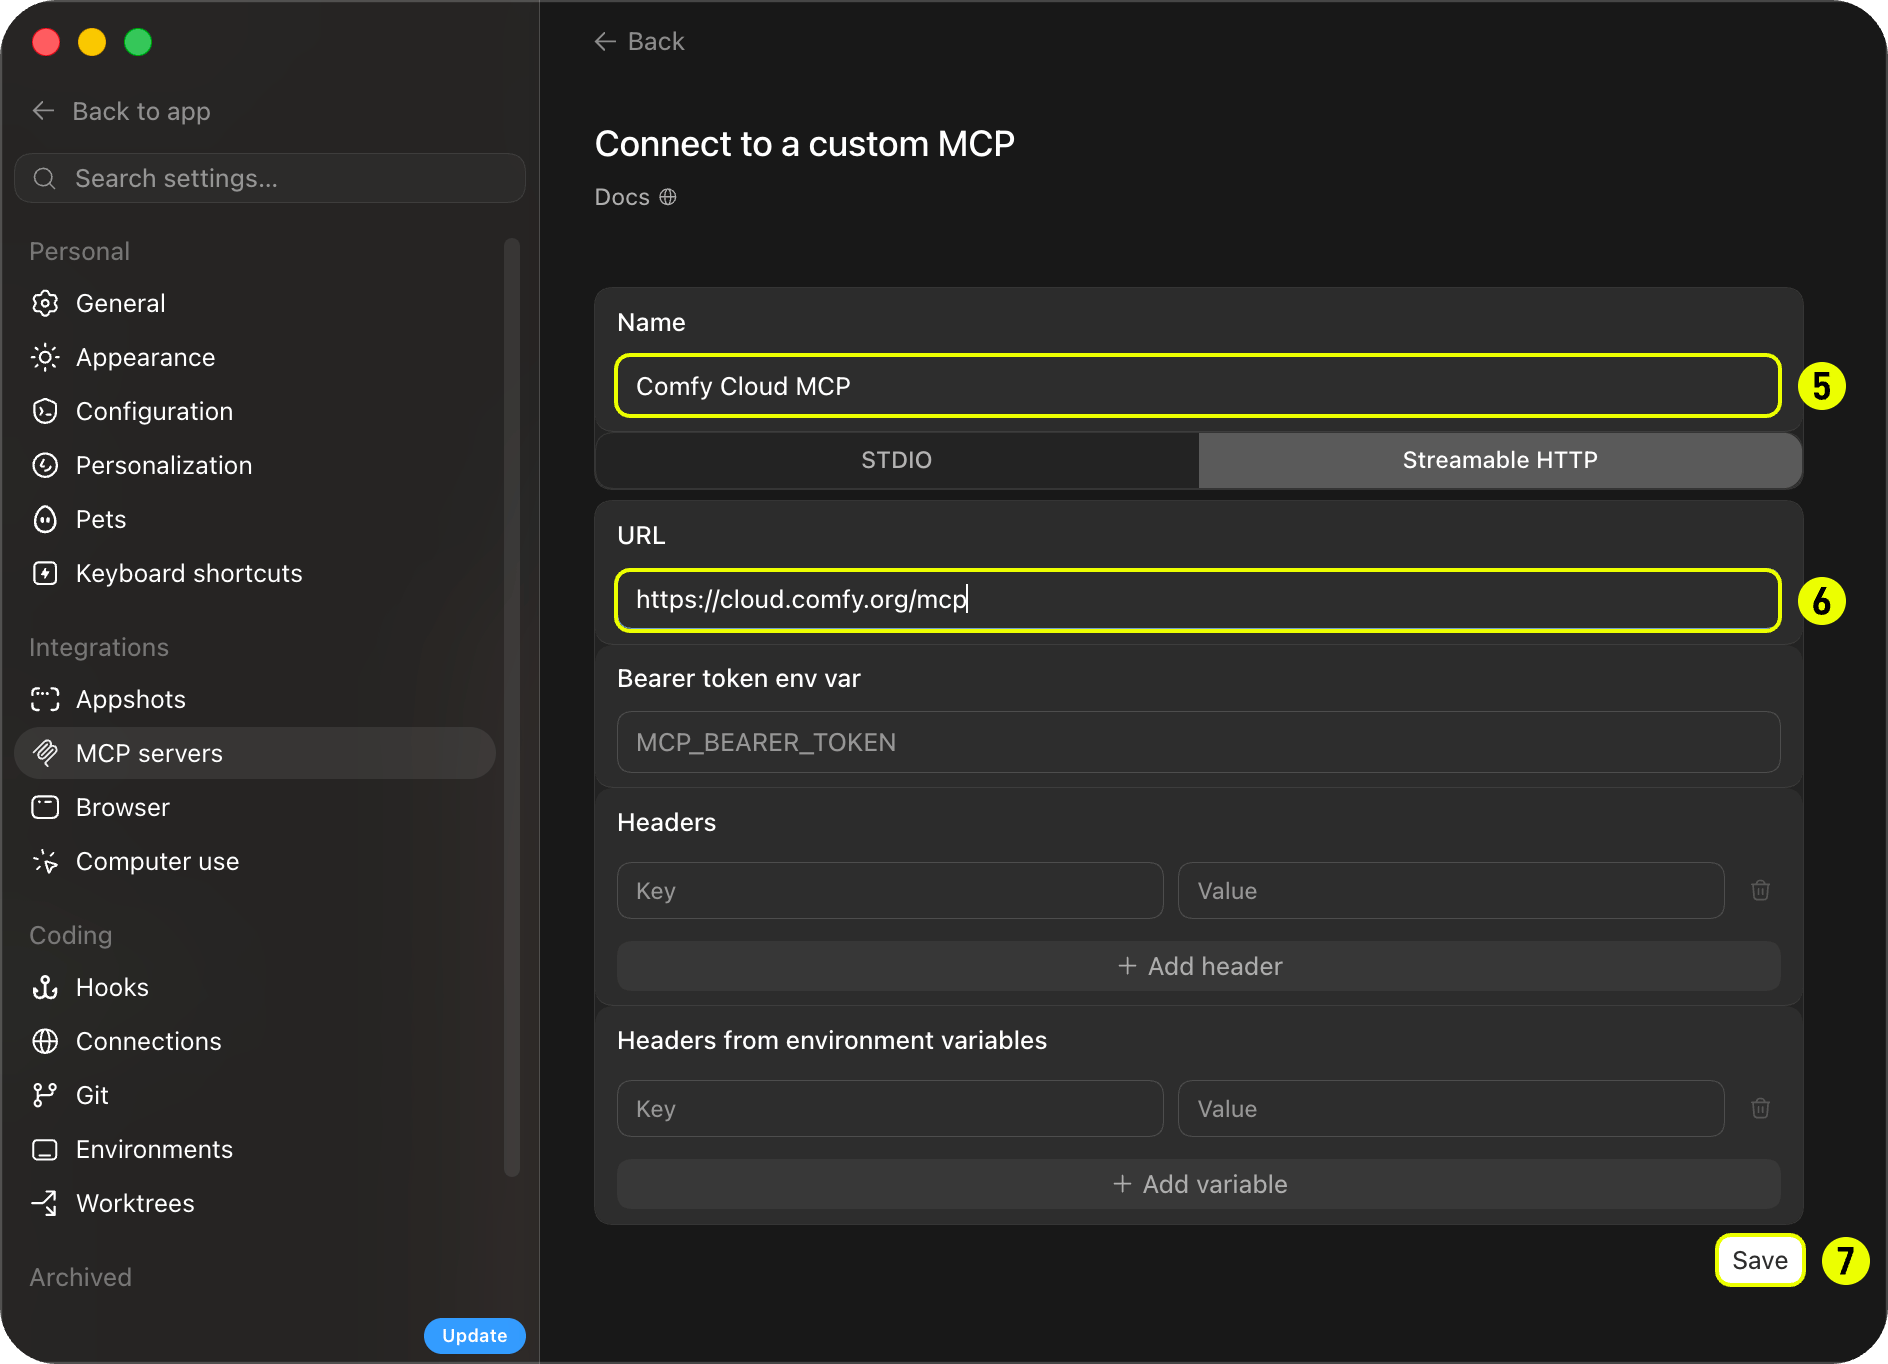
3. Connect to Comfy Cloud
Choose Streamable HTTP as the connection type.
Enter a name such as Comfy Cloud MCP in the Name field (labeled 5).
Enter the URL
https://cloud.comfy.org/mcpin the URL field (labeled 6).Click Save (labeled 7).
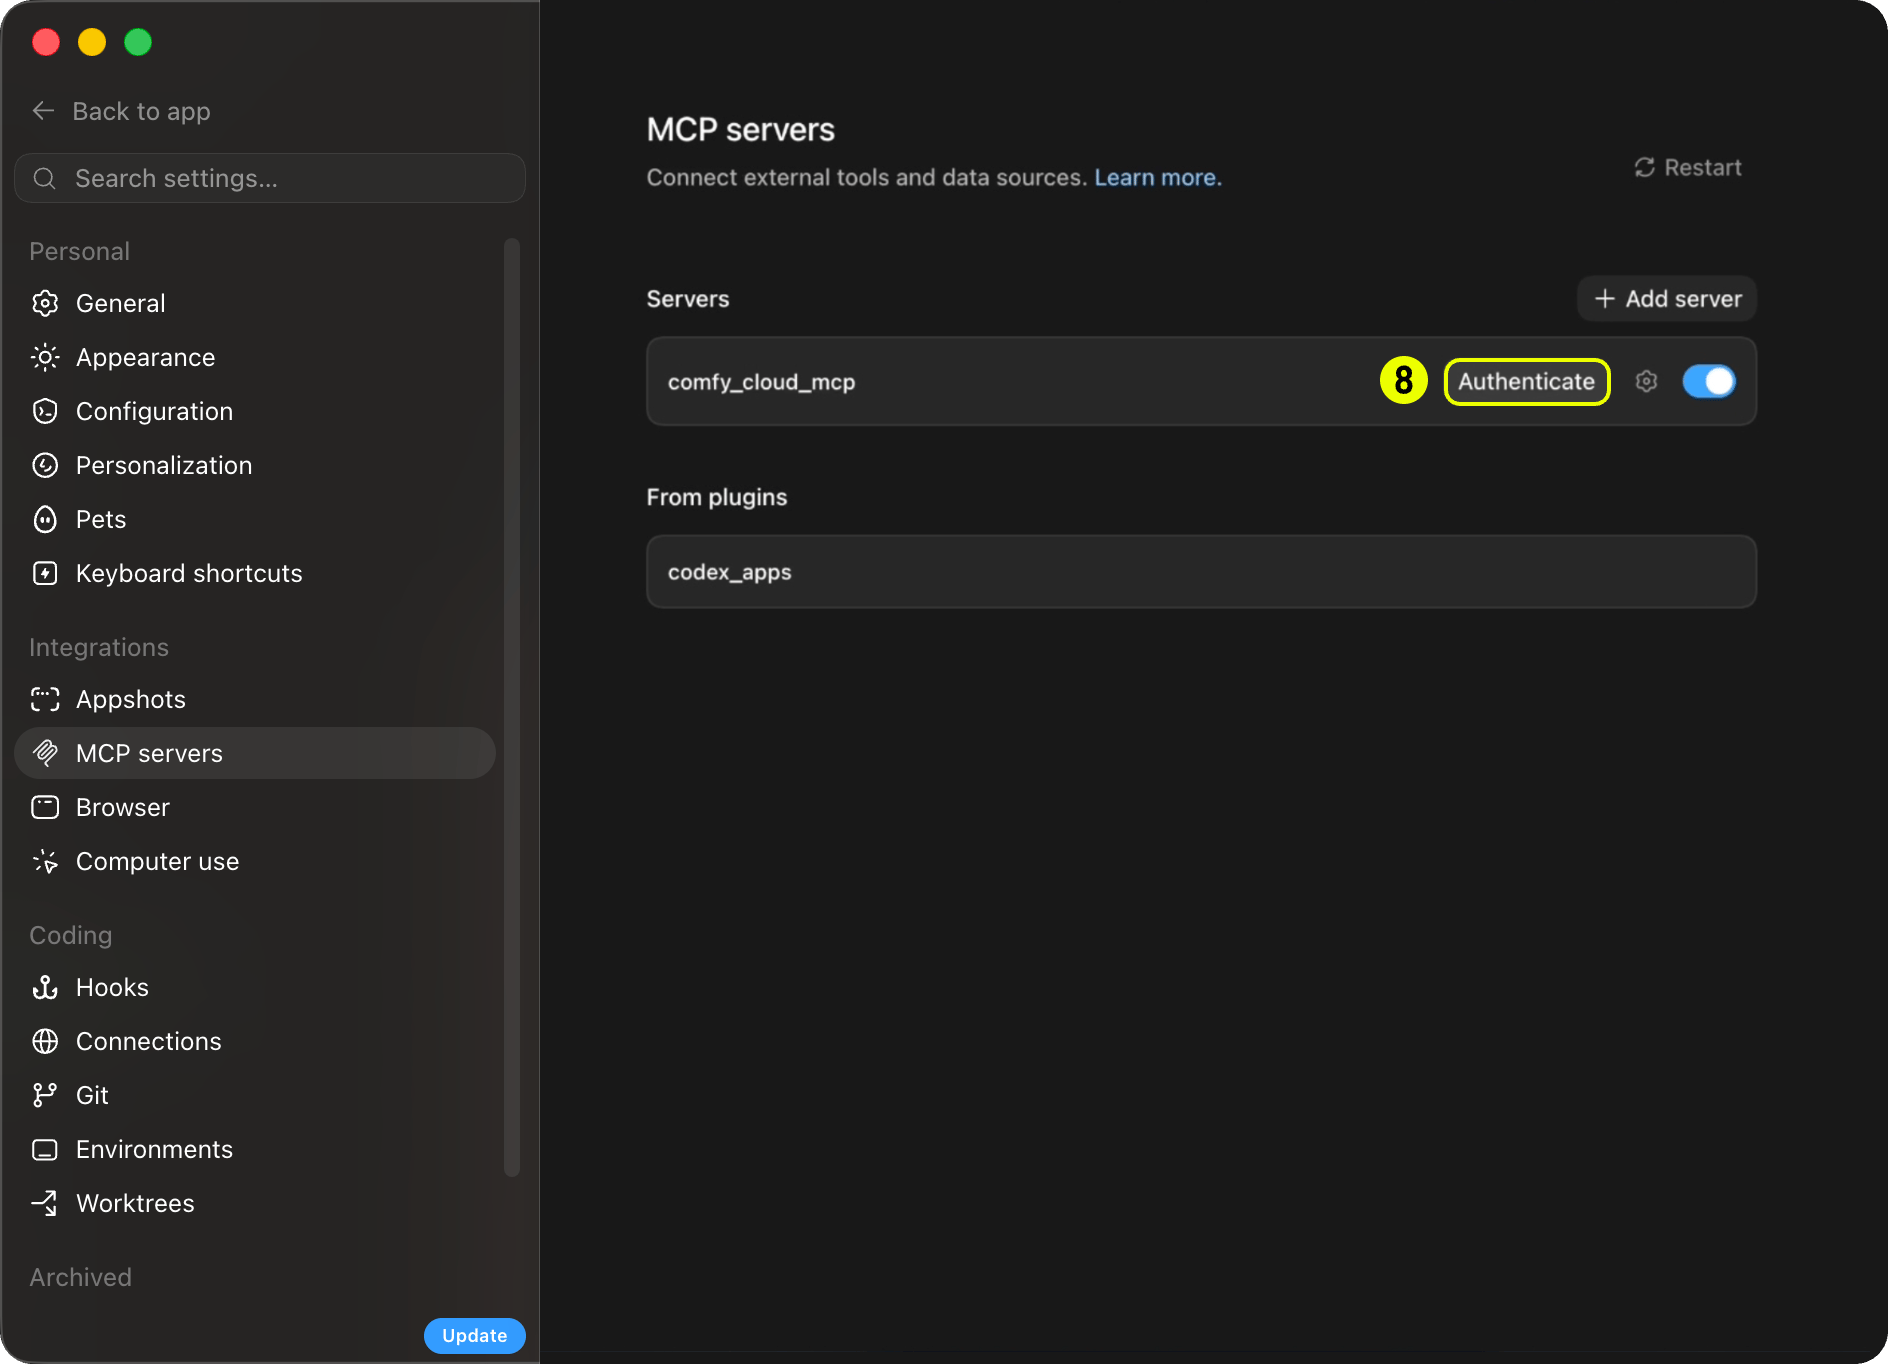
4. Authenticate
Click Authenticate (labeled 8) on the saved server entry.
In the browser popup, choose your workspace and click Continue to finish signing in. You are connected.
Ask in plain language ("generate an image of a cat astronaut", "find a Wan 2.2 video template"). Codex invokes the MCP tools on your behalf.
[accordion] Prefer the CLI instead?
Register and sign in from the terminal:
codex mcp add comfy-cloud --url https://cloud.comfy.org/mcp
codex mcp login comfy-cloud
This writes an entry to
~/.codex/config.toml(or.codex/config.tomlin a trusted project).[accordion] API key instead of OAuth (headless or CI)
When no browser is available, add the server with a header pulled from an environment variable. Create a key at platform.comfy.org/profile/api-keys (starts with
comfyui-), then add to~/.codex/config.toml:[mcp_servers.comfy-cloud] url = "https://cloud.comfy.org/mcp" env_http_headers = { "X-API-Key" = "COMFY_API_KEY" }Set
COMFY_API_KEYin your shell or system environment. Do not commit the key to version control.[accordion] Codex keeps asking you to sign in again (invalid_grant or refresh token reuse)
Symptom: Codex signs you out of Comfy Cloud and asks you to reauthenticate over and over, sometimes every few minutes. Codex warnings or logs may mention
invalid_grant, a refresh token that was already used or revoked, or a failed OAuth token refresh.Cause: This comes from how Codex stores and refreshes MCP OAuth credentials, not from Comfy Cloud. When several Codex processes (TUI sessions, the app server,
codex mcpcommands) share one OAuth server, one process can refresh with a token that another has already rotated. The authorization server treats that as token reuse and ends the session. Users of other OAuth MCP servers report the same behavior. These issues are open in the Codex repository, so you can check their current status:
- openai/codex#46028: long-lived clients reuse rotated refresh tokens
- openai/codex#48507: concurrent processes race refresh token rotation and the next startup hits
invalid_grant- openai/codex#41133: shutdown can lose a rotated refresh token
- openai/codex#17265: Codex does not refresh stored MCP OAuth tokens
Workaround 1: turn on Codex's refresh coordination flag. Codex has a feature flag,
mcp_oauth_refresh_coordination, that coordinates OAuth token refreshes between Codex processes. It is a Codex setting, not a Comfy one. Codex lists it as under development and off by default, and neither Codex nor Comfy supports it as an official fix. In openai/codex#46028, enabling it stopped the stale token reuse in the reporter's test. If your Codex version still has it off, add it to~/.codex/config.toml:[features] mcp_oauth_refresh_coordination = trueClose and restart every running Codex session so they all pick up the flag. If Codex already shows comfy-cloud as signed out, sign in once more (
codex mcp login comfy-cloud, or Authenticate in Settings). If a later Codex release turns this on by default or removes the flag, you can skip this step.Workaround 2: keep one Codex process refreshing each server. If the flag is not available or does not help, move the
[mcp_servers.comfy-cloud]entry out of the global~/.codex/config.tomland into a.codex/config.tomlin a trusted project, so only sessions in that project load and refresh it. Avoid running many Codex sessions against Comfy Cloud at the same time, and close Codex sessions before restarting your computer. This is the workaround reported in openai/codex#48507.Moving the entry does not stop Codex processes that already loaded the global config, and those keep refreshing the old server definition. After the move, close every running Codex session and stop the Codex app server, then start Codex only in the project that holds the entry.
If you do not need OAuth, the API key setup above does not use refresh tokens.
These steps reduce sign-outs but may not stop them completely. We are also working on changes on the Comfy Cloud side to reduce how often this happens.
[tab] OpenClaw
Install the Comfy Cloud skill from ClawHub. It connects OpenClaw to the hosted MCP server (
cloud.comfy.org/mcp). Cloud only: it does not drive a local ComfyUI install.1. Install the skill
openclaw skills install @comfy-org/comfySkill page: clawhub.ai/comfy-org/skills/comfy.
2. Connect with OAuth (recommended)
Register the MCP server and sign in with your Comfy account:
openclaw mcp set comfy '{"url":"https://cloud.comfy.org/mcp","transport":"streamable-http","auth":"oauth"}'
openclaw mcp login comfy
openclaw gateway restart
openclaw mcp loginprints an authorization URL. Open it, sign in, and finish the flow as the CLI directs (it may ask you to rerun with a--codevalue). Verify withopenclaw mcp status --verbose.[!NOTE]
When
auth: "oauth"is set, OpenClaw ignores staticheaderson that server entry. Do not combine OAuth with a hardcoded API key header.3. Start generating
Ask in plain language ("generate an image of a cat astronaut", "find a Wan 2.2 video template"). OpenClaw invokes the MCP tools on your behalf.
[accordion] API key instead of OAuth (headless or CI)
Create a key at platform.comfy.org/profile/api-keys (starts with
comfyui-), export it, then register the server:export COMFY_API_KEY="comfyui-..." openclaw mcp set comfy '{"url":"https://cloud.comfy.org/mcp","transport":"streamable-http","headers":{"Authorization":"Bearer ${COMFY_API_KEY}"}}' openclaw gateway restartPrefer
Authorization: Bearerover a customX-API-Keyheader for OpenClaw. Some OpenClaw builds drop custom headers on streamable-http transports; Bearer survives proxies more reliably. PutCOMFY_API_KEYin your shell profile or OpenClaw env. Do not commit the key.
[tab] Other clients
Any MCP client that supports remote HTTP transport can connect to Comfy Cloud. The server URL is always
https://cloud.comfy.org/mcp.1. Add the server URL
Add a remote MCP entry pointing at
https://cloud.comfy.org/mcp. Most clients use a JSON config with aurlfield:{ "mcpServers": { "comfy-cloud": { "url": "https://cloud.comfy.org/mcp" } } }Windsurf uses
serverUrlinstead ofurl. Amp uses the samemcpServersshape in Settings → MCP Servers or~/.config/amp/settings.json.2. Authenticate
If your client supports MCP OAuth, sign in through the browser when prompted. Otherwise, add an API key header (see below).
3. Restart and verify
Restart your client. You should see Comfy Cloud tools (
search_templates,submit_workflow,get_output, and others) registered under the comfy-cloud server.Headless / CI (API key): when OAuth is not available, create a key at platform.comfy.org/profile/api-keys and pass it as the
X-API-Keyheader:{ "mcpServers": { "comfy-cloud": { "url": "https://cloud.comfy.org/mcp", "headers": { "X-API-Key": "comfyui-…" } } } }For Claude Code from the terminal:
claude mcp add --transport http comfy-cloud https://cloud.comfy.org/mcp -H "X-API-Key: comfyui-…"Prefer
${env:COMFY_API_KEY}or your client's secret interpolation instead of hardcoding keys in config files you commit to Git.
What your agent can do
You do not call MCP tools yourself. Your agent picks the right tool based on what you ask for. Slash commands and prompts (below) are shortcuts that steer the agent toward common tasks, but plain language works too ("generate an image of a cat astronaut", "upscale this photo", "find a Wan 2.2 video template").
Typical flow:
- Discover what is available (
search_templates,search_models,search_nodes, orcqlfor graph-style questions). - Run a generation:
run_templatefor a matching pre-built template,submit_workflowfor a custom workflow (withupload_filewhen an input image is needed), orpartner_generatefor partner models like Flux, Grok, Gemini, OpenAI, Ideogram, and Seedance. - Wait and retrieve outputs (
wait_for_job, thenget_outputreturns a download command your agent runs in your shell).
The server prefers matching pre-built templates before building a workflow from scratch, which tends to produce better results faster.
Cloud MCP tools
These are the tools your agent has access to once connected. Names match what appears in MCP client logs and debugging output.
Discovery
| Tool | Description |
|---|---|
search_templates | Search pre-built workflow templates from comfy.org by text, tag, media type, or model |
get_template | Fetch a template's full workflow JSON for inspection or hand-editing |
get_template_schema | See which of a template's parameters can be overridden at run time |
search_models | Search the model catalog by text, type, base model, or source |
search_nodes | Search available nodes by text, category, or input/output types. Also surfaces subgraph blueprints (pre-wired node groups like Text to Image or Remove Background) |
get_node | Get the complete input spec for specific nodes, including full option lists |
cql | Run a CQL graph query for structural questions (for example, which nodes produce images, or paths between node types). Use search_nodes when you need full input specs for a specific node |
get_prompting_guide | Prompt style and recommended settings (steps, cfg, sampler, resolution) per model family |
Generation
| Tool | Description |
|---|---|
run_template | Run a pre-built template by name, with optional parameter overrides — the preferred path when a template matches |
submit_workflow | Submit a ComfyUI API-format workflow for execution on Comfy Cloud |
partner_generate | Generate with partner-API models (Flux/BFL, Grok, Gemini, OpenAI, Ideogram, Seedream/Seedance, and more) |
upload_file | Upload an input image or file for use in workflows (for example, with LoadImage) |
apply_slots | Apply parameter overrides to a workflow's interior values and return the modified workflow |
Jobs and batches
| Tool | Description |
|---|---|
get_job_status | Poll execution status of a submitted workflow |
wait_for_job | Wait until a job finishes instead of polling repeatedly |
get_output | Retrieve output images, videos, or audio from a completed workflow |
use_previous_output | Chain workflows by reusing output from one run as input to another |
cancel_job | Cancel a pending or running job |
get_queue | Check how many jobs are running and pending |
submit_batch, get_batch_status, get_batch_output, wait_for_batch | Submit many generations in one call and collect them together later — the batch ID stays valid across sessions |
Saved workflows
| Tool | Description |
|---|---|
list_saved_workflows | Browse your saved workflows from Comfy Cloud |
get_saved_workflow | Inspect a saved workflow's nodes, inputs, and customizable settings |
save_workflow | Save a workflow to your Comfy Cloud account |
update_workflow | Update an existing workflow in place as a new version (earlier versions stay recoverable) |
run_saved_workflow | Run a saved workflow by filename — the server converts it from editor format to executable format automatically |
Sharing workflows
| Tool | Description |
|---|---|
share_workflow | Publish a saved workflow and return a ?share=<id> URL anyone can open |
import_shared_workflow | Resolve a share URL or bare share ID into workflow JSON, optionally saving it to your account |
Hub URL share IDs: the trailing hyphen-delimited hex token in a comfy.org/workflows/<slug>-<hex> hub URL is the share ID. For example, comfy.org/workflows/topaz-starlight-upscale-1c77e82713b7 has share ID 1c77e82713b7. Pass that token to import_shared_workflow as share_id. The share_url parameter only accepts ?share=<id> query URLs like https://cloud.comfy.org/?share=..., not hub page URLs.
Apps and links
| Tool | Description |
|---|---|
create_app | Turn a saved workflow into an App Mode app — a simplified "run this workflow" view with chosen inputs and outputs |
get_app_mode_url | Get the stable link that opens a workflow as a runnable app |
get_workflow_canvas_url | Get a link that opens a workflow directly on the Comfy Cloud canvas, ready to view, edit, or run |
Account and session
| Tool | Description |
|---|---|
get_billing_status | Check your credit balance, subscription tier, and billing link |
get_server_info | Confirm which server the agent reached: environment, host, version, and auth state |
submit_feedback | Get the feedback survey link |
report_session_summary | Share an anonymized session summary with the Comfy team — only with your explicit consent; the agent must ask first, and no prompts, file paths, or personal information are included |
Prompts (Claude Desktop)
Claude Desktop does not support Claude Code slash commands. Instead, open the prompt picker for the same workflows:
| Prompt | Description |
|---|---|
generate-image | Generate an image from a text description |
generate-video | Generate a video from text or an image |
generate-audio | Generate audio, music, or sound effects |
generate-3d | Generate a 3D model from text or an image |
upscale-image | Upscale an image to higher resolution |
remove-background | Remove the background from an image |
search-templates | Find pre-built workflow templates |
search-models | Search for models (checkpoints, LoRAs, VAEs) |
search-nodes | Search nodes and get wiring suggestions |
help | See what you can do with ComfyUI Cloud |
You can also skip prompts and ask in plain language. The MCP tools work the same way.
Credits and spending
Discovery is free: search_templates, search_models, and search_nodes work with just a Comfy account. Running generations requires an active Comfy Cloud subscription. A credit or top-up balance alone does not grant access: you need an active subscription to run generations, even if you have unused credits.
Uploads and downloads
The MCP server runs in the cloud and the MCP itself doesn't write files to your machine. When a generation completes, your agent calls get_output, which returns:
- A temporary signed download URL (valid for a short window).
- A ready-to-run shell command (
curlon macOS and Linux,curl.exeon Windows).
Your agent should run that command in your shell. The command includes the destination path and filename.
[!WARNING]
Run the returned command verbatim. Do not re-encode or edit the signed URL. The signature lives in the query string and breaks if the URL is modified.
If your MCP client cannot run shell commands (some GUI-only setups), copy the command and run it yourself in a terminal.
Asset upload and download depend on the client's file access. If Claude Desktop or another agent client has trouble handling asset uploads or downloads, it may be related to the agent's access to your local file directories. For Claude users we recommend Claude Code (desktop app or terminal), which has more capabilities. Similarly, for other agent families, the coding agent is usually better than the web chat version.
Known limitations
Comfy Cloud MCP is an early release. These limitations are known and being worked on:
Workflows
- Assets generated via
submit_workflowmay not embed workflow metadata. They might not reopen the originating workflow when opened in ComfyUI. - Workflow building depends on agent accuracy. Complex multi-node workflows may need a retry or refinement.
File handling
- Outputs require a shell download step. See Uploads and downloads.
- Upload size limits may apply depending on your MCP client. Some clients impose their own limits on file uploads.
Authentication
- OAuth or API key. Claude Code and Claude Desktop use a one-time browser OAuth flow. Cursor requires a Comfy Cloud API key in your MCP config (no OAuth). Other headless clients can pass a Comfy Cloud API key via the
X-API-Keyheader instead. A device-code OAuth flow for clients that cannot open a browser is planned.
Local Comfy MCP Connection
The open-source connection: your client launches the server on your machine and it drives the ComfyUI installed there.
comfy-mcp is Comfy's first-party local MCP server — the official way to drive a local ComfyUI install from AI agents (Claude Code, Claude Desktop, Cursor, and other MCP clients).
Unlike the cloud and partner servers, it talks to the ComfyUI running on your own machine — so it can run your workflows and inspect the nodes, custom nodes, and models your install actually has.
[!TIP]
The fastest setup: hand it to your agent. Paste
https://docs.comfy.org/agent-tools/mcp#installationinto your AI client and ask it to set up the local connection for you.
Requirements
- Python 3.10+
- comfy-cli on your
PATH(pip install "comfy-cli>=1.14.0") — the engine every tool wraps - A ComfyUI workspace — create one with
comfy installif you don't have one (an existing checkout works viacomfy set-default <path>) - A running ComfyUI for execution tools. Start it with
comfy launch, or calllaunch_comfyui. The server does not launch ComfyUI implicitly.
Installation
From PyPI:
pip install comfy-mcp
This puts a comfy-mcp console script on your PATH — that command is the MCP server (it speaks MCP over stdio). Point your AI client at it below. (Hacking on the server itself? pip install -e . from a checkout of the repository instead.)
[!NOTE]
COMFY_BIN(optional). MCP clients launch the server with their own environment, which often does not include your shell'sPATH. Ifcomfylives in a virtualenv or a non-standard location, setCOMFY_BINto its absolute path (for example/path/to/venv/bin/comfy). Every client example below shows where it goes; drop it ifcomfyis already on the environment your client launches the server with.
Manual configuration
All clients speak the same MCP stdio contract: run the comfy-mcp command as a server. Pick your client:
[tab] Claude Desktop
Edit
claude_desktop_config.json(Settings → Developer → Edit Config; on macOS it lives at~/Library/Application Support/Claude/claude_desktop_config.json), add the server, then restart Claude Desktop:{ "mcpServers": { "comfy-mcp": { "command": "comfy-mcp", "env": { "COMFY_BIN": "/path/to/venv/bin/comfy" } } } }
[tab] Claude Code
One command registers the server:
claude mcp add comfy-mcp -e COMFY_BIN=/path/to/venv/bin/comfy -- comfy-mcpOr check it into a project with a
.mcp.jsonat the repo root:{ "mcpServers": { "comfy-mcp": { "command": "comfy-mcp", "env": { "COMFY_BIN": "/path/to/venv/bin/comfy" } } } }
[tab] Cursor
Add the server to
~/.cursor/mcp.json(global) or.cursor/mcp.json(per project):{ "mcpServers": { "comfy-mcp": { "command": "comfy-mcp", "env": { "COMFY_BIN": "/path/to/venv/bin/comfy" } } } }
Quickstart
Zero to a generated image:
1. Install the pieces
pip install "comfy-cli>=1.14.0"  # the engine
comfy install                    # create a ComfyUI workspace (skip if you have one)
pip install comfy-mcp            # this MCP server → the `comfy-mcp` command
2. Launch ComfyUI and leave it running
comfy launch
3. Add the server to your client
Use the snippet for your client above, then restart / reload it so the tools appear.
4. Ask your agent to run a workflow
For example:
"Confirm my local ComfyUI is running, then run the workflow at
~/workflows/txt2img.jsonand show me the image."
Under the hood the agent calls server_info to confirm ComfyUI is up, run_workflow to execute the workflow JSON, and fetch_outputs to collect the result.
Tools
Each tool maps onto a comfy-cli command, run with --where local. Highlights:
| Tool | Purpose |
|---|---|
server_info() | Is a local ComfyUI running, where, and which workspace. Call first. |
run_workflow(workflow_path, wait=True) | Run a workflow JSON; wait=False submits async and returns a prompt_id. |
job_status / wait_for_job / watch_job | Poll, wait on, or stream a submitted job. |
fetch_outputs(prompt_id, out_dir) | Copy a finished job's outputs into out_dir. |
launch_comfyui / stop_comfyui | Start or stop the local ComfyUI. |
search_templates / fetch_template | Find a built-in template and write its runnable workflow JSON. |
search_nodes / get_node / list_nodes | Inspect the node classes in your live local install (custom nodes included). |
search_models | List the model files on disk. |
validate_workflow | Pre-flight a workflow against the live object_info before a slow run. |
Node introspection and model search read your live install — custom nodes included — which is the local differentiator from the cloud connection. See the repository for the full tool list and reference.
Related resources
| Resource | What it's for |
|---|---|
| Comfy Skills | Claude Code plugin marketplace and community skill library. The comfy-cloud plugin used above is distributed here; browse or contribute additional skills for Comfy workflows. |
| Comfy Cloud on ClawHub | OpenClaw skill (openclaw skills install @comfy-org/comfy) for the hosted Comfy Cloud MCP server. |
| Comfy CLI | Command-line tool for local ComfyUI install/launch and for calling hosted partner nodes from scripts or CI (comfy generate, in beta). Complements MCP when you need terminal or automation workflows. |
| Share a workflow on Comfy Cloud | Share workflows from the Comfy Cloud UI (the MCP share_workflow tool does this from an agent session). |
Related: Comfy Agent
Want the agent experience inside ComfyUI, not an external MCP client?
[card] Comfy Agent
Built-in ComfyUI assistant for building, editing, and running workflows. Generally available on Cloud. Local (Comfy Desktop) coming soon.
Feedback
Try Comfy MCP and tell us what works and what doesn't:
- Feedback survey: report bugs, request features, or share general impressions.
- Discord: #comfy-mcp-and-cli on the Comfy Discord for questions and discussion.
FAQ
Getting started
[accordion] Which clients are supported?
Any MCP-compatible client.
The cloud connection needs remote HTTP support. Claude Code, Claude Desktop, Cursor, Codex and OpenClaw have first-class setup above; Windsurf, Amp and others use the same URL with OAuth or an API key.
The local connection needs a client that can launch a local stdio server as a subprocess. That rules out browser-based clients. claude.ai and ChatGPT accept remote connectors only.
[accordion] What's the server URL?
The cloud connection runs at
https://cloud.comfy.org/mcp.The local connection has no URL. Your client launches the
comfy-mcpcommand directly and talks to it over stdio.
[accordion] Can I use it with my local ComfyUI?
Yes. That is the Local Comfy MCP Connection. It drives the ComfyUI installed on your own machine, so your agent sees the models, LoRAs and custom nodes you actually have, and runs on your GPU.
[accordion] Can I connect both the cloud and local connections at once?
Yes, and we recommend it if you run ComfyUI locally. Most clients host two MCP servers happily, and your agent keeps them straight. Each connection runs its own workflows and returns its own results.
The two sign-ins are separate, though. Signing in on one does not sign you in on the other, even though it is the same Comfy account.
[accordion] How do I know if my machine can run the local connection?
Ask your agent. It reads your hardware before starting anything heavy.
On a Mac, use the cloud connection for generating: today's open-weight models are too large to run at a workable speed on the Apple GPU. On a PC with a dedicated graphics card, 24 GB or more of VRAM handles most things including video; 8–24 GB is fine for images but video will be slow or will not fit; under 8 GB, use cloud.
[accordion] Is it generally available?
Yes. The cloud connection is generally available, and the local connection is available for local ComfyUI installations. See Feedback to report issues or share suggestions.
Cost and access
[accordion] Does it cost anything?
Discovery is free on both connections: searching templates, models and nodes needs only a Comfy account.
On the cloud connection, running generations requires an active Comfy Cloud subscription; new users get 5 free runs. On the local connection, runs are free because they happen on your hardware, with one exception: partner models execute on partner infrastructure and spend credits.
[accordion] Do I need an API key?
Not for interactive clients that support OAuth, including Claude Code, Claude Desktop, Codex and OpenClaw.
Cursor requires a Comfy Cloud API key in your MCP config; there is no MCP OAuth there yet. Headless and CI setups with no browser need one too. See the Cursor and Other clients tabs under Set up the cloud connection.
Using it
[accordion] What can my agent do once connected?
You do not call MCP tools yourself — your agent picks them based on what you ask for. Typically it discovers what is available (
search_templates,search_models,search_nodes), runs a generation, then waits and retrieves the output. See What your agent can do.
[accordion] Where do my outputs go?
On the cloud connection, the server never writes to your machine:
get_outputreturns a temporary signed URL and a ready-to-run download command for your agent to execute in your shell. See Uploads and downloads.On the local connection, ComfyUI writes into your workspace's
output/directory, andfetch_outputs(prompt_id, out_dir)copies a finished job's files anywhere you name.
[accordion] I started on one connection and now I need the other. What do I do?
Nothing to undo — add the second connection alongside the first.
Going local → cloud (you need Cloud GPUs or partner models): ask your agent to sign you in, then add
https://cloud.comfy.org/mcpto your client.Going cloud → local (you want your own models and custom nodes): install ComfyUI and the local server, then point your client at it. Your agent can do most of this for you.
[accordion] How do I switch between the local and cloud connections?
Just ask your agent. With both connections added, say where you want a job to run — "run this one on Comfy Cloud", "do this locally" — and it uses the right connection. There is no mode to toggle and nothing to reconfigure between runs.
If a workflow turns out to be too heavy for your machine, your agent can tell you and offer to run it on Comfy Cloud instead. And if only one connection is set up, ask it to add the other — see Set up the cloud connection or the Local Comfy MCP Connection.
[accordion] How do I update Comfy MCP?
On the cloud connection, nothing to do — it is hosted, so you are always on the current version.
On the local connection, ask your agent to handle it. Afterwards, restart your client or start a new session: MCP servers load when a session starts, so a running one keeps serving the old version until you do.
Troubleshooting
[accordion] Do slash commands work in Claude Desktop?
No. Slash commands ship in the Claude Code plugin. Claude Desktop connects to the same MCP server — the tools work if you ask in plain language or use the prompt picker — but it does not support Claude Code plugins or slash commands.
[accordion] I typed /comfy or /cloud and nothing came up.
There is no
/comfyor/cloudcommand. Commands appear under one of two prefixes depending on how you connected:
- Plugin (recommended):
/comfy-cloud:generate-image,/comfy-cloud:generate-video, … — type/comfy-cloud:to see them all.- Direct connection (no plugin):
/mcp__comfy-cloud__generate-image, … — type/mcp__to see them.Either way you can just ask in plain language ("generate an image of …"). The MCP tools are model-invoked and do not require a slash command.
[accordion] The sign-in did not open a browser.
In Claude Code, run
/mcp, select comfy-cloud, and choose Authenticate. In Claude Desktop, reopen the connector from Customize → Connectors and trigger sign-in.
This documentation is built and hosted on Mintlify, a developer documentation platform.